
Users Manual - English
Page 4
... FAGGOTING/PATCHWORK 59 EYELET 61 DARNING 62 BASTING 65 LATERAL SEWING (STRAIGHT/ZIGZAG) 66 2. EMBROIDERING 87 EMBROIDERY 87 PREPARATION BEFORE SEWING 89 Fitting embroidery unit 89 Inserting memory card 90 Set fabric to embroidery frame 90 Fitting embroidery frame 91 HOW TO SELECT AND SEW PATTERN 92 In case of "Character" card 92 How...
... FAGGOTING/PATCHWORK 59 EYELET 61 DARNING 62 BASTING 65 LATERAL SEWING (STRAIGHT/ZIGZAG) 66 2. EMBROIDERING 87 EMBROIDERY 87 PREPARATION BEFORE SEWING 89 Fitting embroidery unit 89 Inserting memory card 90 Set fabric to embroidery frame 90 Fitting embroidery frame 91 HOW TO SELECT AND SEW PATTERN 92 In case of "Character" card 92 How...

Users Manual - English
Page 7
Needle set Parts code: (12 pcs) X80409-001 (24 pcs) X80417-001 (36 pcs) X80418-001 3- Scissors 4- Bobbins (4 pcs) 8- Embroidery thread set 75/11: 2 pcs 90/14: 2 pcs 14 Golden needle (for this machine. ** Each symbol is indicated on each presser foot. Chalk pen 3- Embroidery sheet (Small) Parts code: X57469-002 5- Screw driver 7- Spool cap (Small) 9- Walking foot Parts...
Needle set Parts code: (12 pcs) X80409-001 (24 pcs) X80417-001 (36 pcs) X80418-001 3- Scissors 4- Bobbins (4 pcs) 8- Embroidery thread set 75/11: 2 pcs 90/14: 2 pcs 14 Golden needle (for this machine. ** Each symbol is indicated on each presser foot. Chalk pen 3- Embroidery sheet (Small) Parts code: X57469-002 5- Screw driver 7- Spool cap (Small) 9- Walking foot Parts...

Users Manual - English
Page 21
Embroidery foot "Q" 1. Raise presser foot lever and loosen the screw to needle bar and fasten the screw while holding the foot at the lower position. 19 I " 2- Zipper foot "I 6 0 Driver 0 16 2. Attach zipper or embroidery foot to remove the shank. How to set zipper foot and embroidery foot 1 2 0 1-
Embroidery foot "Q" 1. Raise presser foot lever and loosen the screw to needle bar and fasten the screw while holding the foot at the lower position. 19 I " 2- Zipper foot "I 6 0 Driver 0 16 2. Attach zipper or embroidery foot to remove the shank. How to set zipper foot and embroidery foot 1 2 0 1-
Users Manual - English
Page 26
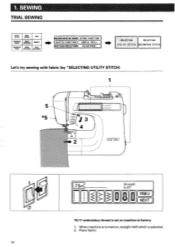
... SELECTING UTILITY STITCH DECORATIUE STITCH Let's try sewing with fabric (by "SELECTING UTILITY STITCH) 1 kk 0 24 3 IC 2 J i I rima I (Straight (Le ft) PREU ) F( NEXT 75/11 embroidery thread is selected. 2. When machine is turned on, straight (left) stitch is set on machine at factory. 1. 1. Place fabric.
... SELECTING UTILITY STITCH DECORATIUE STITCH Let's try sewing with fabric (by "SELECTING UTILITY STITCH) 1 kk 0 24 3 IC 2 J i I rima I (Straight (Le ft) PREU ) F( NEXT 75/11 embroidery thread is selected. 2. When machine is turned on, straight (left) stitch is set on machine at factory. 1. 1. Place fabric.

Users Manual - English
Page 83
One touch of the "UP" will move the stitch pattern up half of its finished height. CLEAR One touch of the "DOWN" will move the stitch pattern down half of its finished height. 81 STEP PATTERN UTILITY STITCH BASIC SEWING CARD CHARACTER BASIC SEWING OPERATION MEMORY DECORATIVE SEWING STITCH STITCH APPLICATION ADJUSTMENT PREPGRGTION BEFORE SEWING ( EXTRA FUNCTION ( SWITCH FUNCTION) USEFUL SKILL (PATTERN SELECTION ADJUSTMENT STEP LAYOUT ( EMBROIDERY MEMORY Let's make your own pattern by combining satin and one point stitches and using "UP" and "DOWN" .
One touch of the "UP" will move the stitch pattern up half of its finished height. CLEAR One touch of the "DOWN" will move the stitch pattern down half of its finished height. 81 STEP PATTERN UTILITY STITCH BASIC SEWING CARD CHARACTER BASIC SEWING OPERATION MEMORY DECORATIVE SEWING STITCH STITCH APPLICATION ADJUSTMENT PREPGRGTION BEFORE SEWING ( EXTRA FUNCTION ( SWITCH FUNCTION) USEFUL SKILL (PATTERN SELECTION ADJUSTMENT STEP LAYOUT ( EMBROIDERY MEMORY Let's make your own pattern by combining satin and one point stitches and using "UP" and "DOWN" .

Users Manual - English
Page 89
... not touch connector of presser foot "Q" on needle holder and attach the foot by using a screw driver. EMBROIDERING EMBROIDERY UTILITY STITCH BASIC SEWING CARO CHARACTER BASIC SEWING OPERATION MEMORY DECORATIVE SEWING STITCH STITCH APPLICATION ADJUSTMENT (PREPARATION BEFORE SUING) EXTRA... FUNCTION ( SWITCH FUNCTION)( USEFUL SKILL PATTERN SELECTION ( ADJUSTMENT ( STEP LAYOUT EMBROIDERY MEMORY O O 3Y ET ID a 4 Iiii NOTE FOR EMBROIDERY ATTACHMENT (1) Always turn off main power switch. 3. O 2. Turn off main power switch when set in...
... not touch connector of presser foot "Q" on needle holder and attach the foot by using a screw driver. EMBROIDERING EMBROIDERY UTILITY STITCH BASIC SEWING CARO CHARACTER BASIC SEWING OPERATION MEMORY DECORATIVE SEWING STITCH STITCH APPLICATION ADJUSTMENT (PREPARATION BEFORE SUING) EXTRA... FUNCTION ( SWITCH FUNCTION)( USEFUL SKILL PATTERN SELECTION ( ADJUSTMENT ( STEP LAYOUT EMBROIDERY MEMORY O O 3Y ET ID a 4 Iiii NOTE FOR EMBROIDERY ATTACHMENT (1) Always turn off main power switch. 3. O 2. Turn off main power switch when set in...

Users Manual - English
Page 90
( 3. Set lower thread (bobbin). Type of thread Designated embroidery thread #50 Silk thread #50-80 6. Place fabric in frame and fit frame into embroidery attachment. Select pattern. 88 Type of needle 75/11 mazmazneD CO A NE !C!I PREY L M H I J K L N LAYOUT 0 7. Insert memory card. ) START/ STOP 5. Set embroidery attachment to machine. 0 Connecting slot 4. Turn on main power switch. 8.
( 3. Set lower thread (bobbin). Type of thread Designated embroidery thread #50 Silk thread #50-80 6. Place fabric in frame and fit frame into embroidery attachment. Select pattern. 88 Type of needle 75/11 mazmazneD CO A NE !C!I PREY L M H I J K L N LAYOUT 0 7. Insert memory card. ) START/ STOP 5. Set embroidery attachment to machine. 0 Connecting slot 4. Turn on main power switch. 8.

Users Manual - English
Page 91
... Hold thread end lightly. Remove cover of embroidery unit connecting slot with the embroidery unit attached. * Use designated embroidery thread for embroidery. 89 9. Fitting embroidery unit 1. For good result * It is recommendable to prevent embroidery unit from machine while machine is not used.... O Spool cap • Felt PREPARATION BEFORE SEWING Always turn off the power before the procedure below . * When installing the embroidery unit, be detached from falling down by accident. Insert connector of presser foot "Q" as shown below . Raise presser foot, trim...
... Hold thread end lightly. Remove cover of embroidery unit connecting slot with the embroidery unit attached. * Use designated embroidery thread for embroidery. 89 9. Fitting embroidery unit 1. For good result * It is recommendable to prevent embroidery unit from machine while machine is not used.... O Spool cap • Felt PREPARATION BEFORE SEWING Always turn off the power before the procedure below . * When installing the embroidery unit, be detached from falling down by accident. Insert connector of presser foot "Q" as shown below . Raise presser foot, trim...

Users Manual - English
Page 92
Always turn offpower supply before pulling out card. Mark fabric using chalk or marking pen to embroidery frame 1. Avoid inserting card in wrong direction or by excessive force which may damage connector inside slot. Set fabric to position em- Turn off power supply. 0 0 2. broidery. 0 4 r`s 90 Turn off power before the procedure below. Inserting memory card 1. Insert memory card straight into card slot as it illustrated. * Arrow mark should face towards you.
Always turn offpower supply before pulling out card. Mark fabric using chalk or marking pen to embroidery frame 1. Avoid inserting card in wrong direction or by excessive force which may damage connector inside slot. Set fabric to position em- Turn off power supply. 0 0 2. broidery. 0 4 r`s 90 Turn off power before the procedure below. Inserting memory card 1. Insert memory card straight into card slot as it illustrated. * Arrow mark should face towards you.

Users Manual - English
Page 93
... it clicks. O Inner frame @ Outer frame O Fabric O Surface for embroidering • Standard line O Center of the hoop. O Tighten Fitting embroidery frame 4. O Space for embroidering • Adjusting screw O Loosen 5. Put pins of frame to be taunt of pattern 2. O Frame holder 91 Loosen... adjusting screw and place fabric onto outer frame. Remove embroidery sheet. Tighten adjusting screw and adjust fabric to holder slit and insert frame into outer frame. O Standard line • Inner frame ( 1....
... it clicks. O Inner frame @ Outer frame O Fabric O Surface for embroidering • Standard line O Center of the hoop. O Tighten Fitting embroidery frame 4. O Space for embroidering • Adjusting screw O Loosen 5. Put pins of frame to be taunt of pattern 2. O Frame holder 91 Loosen... adjusting screw and place fabric onto outer frame. Remove embroidery sheet. Tighten adjusting screw and adjust fabric to holder slit and insert frame into outer frame. O Standard line • Inner frame ( 1....

Users Manual - English
Page 99
... needle at high position. A- Forward without sewing according to change the needle position from the 5th drop of needle. Forward without sewing one drop of embroidery foot with mark on fahrir Before sewing ..; - -4 . C- Match hole of needle. D- Return to the previous screen. * If "FORWARD" or "BACK" is repeatedly touched, it will...
... needle at high position. A- Forward without sewing according to change the needle position from the 5th drop of needle. Forward without sewing one drop of embroidery foot with mark on fahrir Before sewing ..; - -4 . C- Match hole of needle. D- Return to the previous screen. * If "FORWARD" or "BACK" is repeatedly touched, it will...
Users Manual - English
Page 101
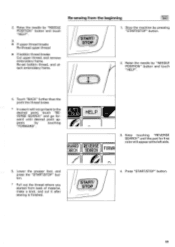
...NEEDLE PnSMnN" button and much "HELP". 3. • If upper thread breaks Re-thread upper thread • If bobbin thread breaks Cut upper thread, and remove embroidery frame. VERSE SEARCH" and go for first color will not go back to the desired point, touch "RE- Keep touching "REVERSE SEARCH" until desired point...and cut it will appear at the left side. 5. Raise the needle by "NEEDLE POSITION" button and touch "HELP". 4. Re-set bobbin thread, and attach embroidery frame. (START/ STOP 1. Touch "BACK" further than the point the thread broke. * In case it after sewing is finished.
...NEEDLE PnSMnN" button and much "HELP". 3. • If upper thread breaks Re-thread upper thread • If bobbin thread breaks Cut upper thread, and remove embroidery frame. VERSE SEARCH" and go for first color will not go back to the desired point, touch "RE- Keep touching "REVERSE SEARCH" until desired point...and cut it will appear at the left side. 5. Raise the needle by "NEEDLE POSITION" button and touch "HELP". 4. Re-set bobbin thread, and attach embroidery frame. (START/ STOP 1. Touch "BACK" further than the point the thread broke. * In case it after sewing is finished.

Users Manual - English
Page 102
... BASIC SEWING OPERATION MEMORY DECORATIVE SEWING STITCH STITCH APPLICATION ADJUSTMENT (PREPARATION BEFORE SEWING) EXTRA FUNCTION SWITCH FUNCTION)( USEFUL SKILL ot (PATTERN SELECTION)( ADJUSTMENT ( STEP LAYOUT ( EMBROIDERY MEMORY Memorizing combined pattern N Gi r l CHECk 1 1)) l'.1!XIT Ea os: CIrIJW(Cr,E102)2 ElIDECIE L AI -I RID ID CLEAR Let's memorize pattern "Girl". 1. MEMORY MEMORY (EXAMPLE) Memorizing...
... BASIC SEWING OPERATION MEMORY DECORATIVE SEWING STITCH STITCH APPLICATION ADJUSTMENT (PREPARATION BEFORE SEWING) EXTRA FUNCTION SWITCH FUNCTION)( USEFUL SKILL ot (PATTERN SELECTION)( ADJUSTMENT ( STEP LAYOUT ( EMBROIDERY MEMORY Memorizing combined pattern N Gi r l CHECk 1 1)) l'.1!XIT Ea os: CIrIJW(Cr,E102)2 ElIDECIE L AI -I RID ID CLEAR Let's memorize pattern "Girl". 1. MEMORY MEMORY (EXAMPLE) Memorizing...
Users Manual - English
Page 103
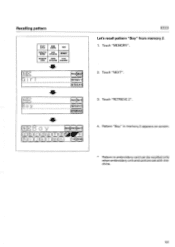
Touch "MEMORY". 2. Recalling pattern UTILITY STITCH BASIC SEWING CARD CHARACTER BASIC SEWING OPERATION MEMORY DECORATIVE SEWING STITCH STITCH APPLICATION ADJUSTMENT 4P N Gi r l PREU NEXT MEMORY1) RERIE0E1 RETRIEVE Let's recall pattern "Boy" from memory 2. 1. Pattern "Boy" in memory 2 appears on screen. * Pattern in embroidery card can be recalled only when embroidery unit and card are set with machine. 101 N B Qy PREU NEXT MEMORY2) 0ETPIEUE2 4 N Boy CHECk PREU NEXT ra-.)l (c)(d:(_)(T)0?;il LAI ECCIEDE :n. Touch "NEXT". El5111:1 3. Touch "RETRIEVE 2". 4.
Touch "MEMORY". 2. Recalling pattern UTILITY STITCH BASIC SEWING CARD CHARACTER BASIC SEWING OPERATION MEMORY DECORATIVE SEWING STITCH STITCH APPLICATION ADJUSTMENT 4P N Gi r l PREU NEXT MEMORY1) RERIE0E1 RETRIEVE Let's recall pattern "Boy" from memory 2. 1. Pattern "Boy" in memory 2 appears on screen. * Pattern in embroidery card can be recalled only when embroidery unit and card are set with machine. 101 N B Qy PREU NEXT MEMORY2) 0ETPIEUE2 4 N Boy CHECk PREU NEXT ra-.)l (c)(d:(_)(T)0?;il LAI ECCIEDE :n. Touch "NEXT". El5111:1 3. Touch "RETRIEVE 2". 4.

Users Manual - English
Page 106
...-80 30 30 Size of needle 11-14 9-11 14-16 Golden needle 9-14 14-16 * For sewing on the popular stretch variety of fabrics, embroidery and decorative stitch sewing, "Golden needle" should be used. 104
...-80 30 30 Size of needle 11-14 9-11 14-16 Golden needle 9-14 14-16 * For sewing on the popular stretch variety of fabrics, embroidery and decorative stitch sewing, "Golden needle" should be used. 104
Users Manual - English
Page 108
Remove side cutter. Disconnect foot control. When motor is attached in embroidery, move and power switch on. Side cutter cannot be combined. When side cutter is rocked. When memory that upper thread is cut . When machine finds ...
Remove side cutter. Disconnect foot control. When motor is attached in embroidery, move and power switch on. Side cutter cannot be combined. When side cutter is rocked. When memory that upper thread is cut . When machine finds ...

Users Manual - English
Page 109
... is pressed during embroidering or pause. 107 This pattern cannot be bigger than the frame in other embroidery card. This button does not work when needle is pressed in embroidery mode with needle position down to high position and touch key again. When Multiple color key is ...exceeding sewing area. When recalling pattern that cannot be changed halfway. This button does not work when embroidery attachment is not stored in machine or in memory page. When operated for the pattern outline to store patterns that is connected. When ...
... is pressed during embroidering or pause. 107 This pattern cannot be bigger than the frame in other embroidery card. This button does not work when needle is pressed in embroidery mode with needle position down to high position and touch key again. When Multiple color key is ...exceeding sewing area. When recalling pattern that cannot be changed halfway. This button does not work when embroidery attachment is not stored in machine or in memory page. When operated for the pattern outline to store patterns that is connected. When ...

Users Manual - English
Page 110
...pressing needle position button. Foot control does not work when embroidery attachment is not connected. Turn off main power and insert embroidery card. When "START/STOP" button is pressed when pattern storage is used with embroidery attachment. When foot controller is not completed. Raise needle to...change thread color and "START/STOP" button is not inserted. Embroidery card is pressed without memory card. Turn off main power and insert card. Raise presser foot and thread again. 108 When power switch and embroidery attachment are on with memory card. When "CARD" is ...
...pressing needle position button. Foot control does not work when embroidery attachment is not connected. Turn off main power and insert embroidery card. When "START/STOP" button is pressed when pattern storage is used with embroidery attachment. When foot controller is not completed. Raise needle to...change thread color and "START/STOP" button is not inserted. Embroidery card is pressed without memory card. Turn off main power and insert card. Raise presser foot and thread again. 108 When power switch and embroidery attachment are on with memory card. When "CARD" is ...

Users Manual - English
Page 113
... Power switch is in the off power, and unplug. • To start again, follow the instruction for thread breakages. Connect embroidery unit properly to proper needle. 3. In this case, mechanical sound which is different from sewing sound is set at its highest position... Error messages. 4. Accordingly, the machine does not start 5. "START/STOP" button is not fed properly. 2. See page "ERROR MESSAGE". 1. Embroidery unit does not work Probable cause Remedy 1. Machine is noisy, slow speed, thread trimming is not correctly inserted. 2. Correct needle is not correctly ...
... Power switch is in the off power, and unplug. • To start again, follow the instruction for thread breakages. Connect embroidery unit properly to proper needle. 3. In this case, mechanical sound which is different from sewing sound is set at its highest position... Error messages. 4. Accordingly, the machine does not start 5. "START/STOP" button is not fed properly. 2. See page "ERROR MESSAGE". 1. Embroidery unit does not work Probable cause Remedy 1. Machine is noisy, slow speed, thread trimming is not correctly inserted. 2. Correct needle is not correctly ...


