

Users Manual - English
Page 3
...Open the upper cover to place the spool of thread on the spool pin. 6 Bobbin winder Use the bobbin winder when winding the bobbin. 7 Operation panel Select a stitch from those that appear in the operation panel. (page Cover E) 8 Sewing speed controller Use the sewing speed controller to adjust the sewing speed. 9 Knee lifter mounting slot Plug the knee lifter into the knee lifter mounting slot. 0 Operation buttons Use the operation buttons to start the sewing machine and automatically cut them. B Thread cutter Pass the threads through the thread cutter to thread the needle. D Thread tension...
...Open the upper cover to place the spool of thread on the spool pin. 6 Bobbin winder Use the bobbin winder when winding the bobbin. 7 Operation panel Select a stitch from those that appear in the operation panel. (page Cover E) 8 Sewing speed controller Use the sewing speed controller to adjust the sewing speed. 9 Knee lifter mounting slot Plug the knee lifter into the knee lifter mounting slot. 0 Operation buttons Use the operation buttons to start the sewing machine and automatically cut them. B Thread cutter Pass the threads through the thread cutter to thread the needle. D Thread tension...
Users Manual - English
Page 4
... sewing machine is installed onto the presser foot holder. 5 6 8 7 1 Presser foot dial Use the presser foot dial to adjust the amount of the foot controller cable into the power supply jack. 8 Feed dog position switch Use the feed dog position switch to lower the feed dogs. Memo ● Refer to Cover B, D or E pages while you to raise and lower the needle to sew one stitch. 4 Air vent The air vent allows the air surrounding the motor to be exchanged. Attach the appropriate presser foot for sewing straight seams. 5 Bobbin cover/shuttle Remove the bobbin cover...
... sewing machine is installed onto the presser foot holder. 5 6 8 7 1 Presser foot dial Use the presser foot dial to adjust the amount of the foot controller cable into the power supply jack. 8 Feed dog position switch Use the feed dog position switch to lower the feed dogs. Memo ● Refer to Cover B, D or E pages while you to raise and lower the needle to sew one stitch. 4 Air vent The air vent allows the air surrounding the motor to be exchanged. Attach the appropriate presser foot for sewing straight seams. 5 Bobbin cover/shuttle Remove the bobbin cover...
Users Manual - English
Page 5
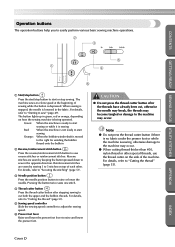
..."Securing the stitching" (page 51). 3 Needle position button Press the needle position button to raise and lower the presser foot. CONTENTS GETTING READY SEWING BASICS UTILITY STITCHES Operation buttons The operation buttons help you to easily perform various basic sewing machine operations. 2 3 5 1 4 6 1 Start/stop button Press the start/stop button to start sewing Orange: When the bobbin winder shaft is moved to the right for winding the bobbin thread onto the bobbin 2 Reverse/reinforcement stitch button Press the reverse/reinforcement stitch button to sew reverse stitches or...
..."Securing the stitching" (page 51). 3 Needle position button Press the needle position button to raise and lower the presser foot. CONTENTS GETTING READY SEWING BASICS UTILITY STITCHES Operation buttons The operation buttons help you to easily perform various basic sewing machine operations. 2 3 5 1 4 6 1 Start/stop button Press the start/stop button to start sewing Orange: When the bobbin winder shaft is moved to the right for winding the bobbin thread onto the bobbin 2 Reverse/reinforcement stitch button Press the reverse/reinforcement stitch button to sew reverse stitches or...
Users Manual - English
Page 6
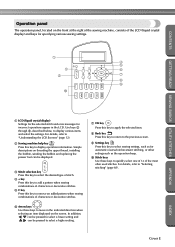
Simple descriptions on threading the upper thread, installing the bobbin, winding the bobbin and replacing the presser foot can be displayed. 3 Stitch selection key Press this key to select the desired type of stitch. 4 + key Press this key to add a pattern when sewing combinations of characters or decorative stitches. 5 C key Press this key to remove an added pattern when sewing combinations of characters or decorative stitches. 6 Arrow keys Use these keys to...
Simple descriptions on threading the upper thread, installing the bobbin, winding the bobbin and replacing the presser foot can be displayed. 3 Stitch selection key Press this key to select the desired type of stitch. 4 + key Press this key to add a pattern when sewing combinations of characters or decorative stitches. 5 C key Press this key to remove an added pattern when sewing combinations of characters or decorative stitches. 6 Arrow keys Use these keys to...
Users Manual - English
Page 8
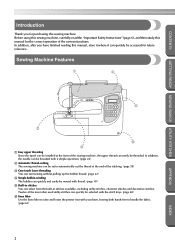
... addition, the needle can be threaded with a simple operation. (page 24) 2 Automatic thread-cutting The sewing machine can be set to automatically cut the thread at the front of the sewing machine, the upper thread can quickly be threaded. Sewing Machine Features 1 4 5 2 6 3 1 Easy upper threading Since the spool can be installed at the end of the stitching. (page 58) 3 One-touch lower threading You can start sewing without pulling up the bobbin thread. (page 22) 4 Simple bobbin-winding The bobbin can select...
... addition, the needle can be threaded with a simple operation. (page 24) 2 Automatic thread-cutting The sewing machine can be set to automatically cut the thread at the front of the sewing machine, the upper thread can quickly be threaded. Sewing Machine Features 1 4 5 2 6 3 1 Easy upper threading Since the spool can be installed at the end of the stitching. (page 58) 3 One-touch lower threading You can start sewing without pulling up the bobbin thread. (page 22) 4 Simple bobbin-winding The bobbin can select...
Users Manual - English
Page 9
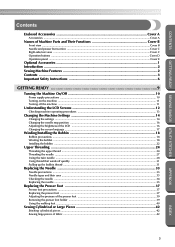
... thread ...24 Threading the needle ...27 Using the twin needle ...28 Using thread that winds off quickly ...31 Pulling up the bobbin thread ...31 Replacing the Needle ...33 Needle precautions ...33 Needle types and their uses ...33 Checking the needle ...34 Replacing the needle ...35 Replacing the Presser Foot 37 Presser foot precautions ...37 Replacing the presser foot ...37 Adjusting the pressure of the presser foot ...39 Removing the presser foot holder ...39 Using the walking foot ...40 Sewing Cylindrical or Large Pieces 42 Stitching cylindrical pieces ...42 Sewing large pieces of fabric...
... thread ...24 Threading the needle ...27 Using the twin needle ...28 Using thread that winds off quickly ...31 Pulling up the bobbin thread ...31 Replacing the Needle ...33 Needle precautions ...33 Needle types and their uses ...33 Checking the needle ...34 Replacing the needle ...35 Replacing the Presser Foot 37 Presser foot precautions ...37 Replacing the presser foot ...37 Adjusting the pressure of the presser foot ...39 Removing the presser foot holder ...39 Using the walking foot ...40 Sewing Cylindrical or Large Pieces 42 Stitching cylindrical pieces ...42 Sewing large pieces of fabric...
Users Manual - English
Page 10
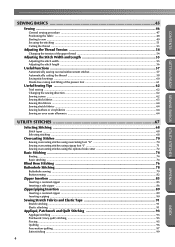
...54 Changing the tension of theupper thread ...54 Adjusting the Stitch Width and Length 55 Adjusting the stitch width ...55 Adjusting the stitch length ...56 Useful Functions ...57 Automatically sewing reverse/reinforcement stitches 57 Automatically cutting the thread ...58 Saving stitch settings ...60 Hands-free raising and lifting of the presser foot 61 Useful Sewing Tips ...62 Trial sewing ...62 Changing the sewing direction ...62 Sewing curves ...62 Sewing thick fabrics ...63 Sewing thin fabrics ...64 Sewing stretch fabrics ...64 Sewing leathers or vinyl fabrics ...64 Sewing an even seam...
...54 Changing the tension of theupper thread ...54 Adjusting the Stitch Width and Length 55 Adjusting the stitch width ...55 Adjusting the stitch length ...56 Useful Functions ...57 Automatically sewing reverse/reinforcement stitches 57 Automatically cutting the thread ...58 Saving stitch settings ...60 Hands-free raising and lifting of the presser foot 61 Useful Sewing Tips ...62 Trial sewing ...62 Changing the sewing direction ...62 Sewing curves ...62 Sewing thick fabrics ...63 Sewing thin fabrics ...64 Sewing stretch fabrics ...64 Sewing leathers or vinyl fabrics ...64 Sewing an even seam...

Users Manual - English
Page 12
The machine should never be used as threading needle, changing needle, threading bobbin, or changing presser foot, and the like. 15. Return the machine to the symbol "{" position which represents off, then remove plug from the electrical outlet when removing covers, lubricating, or when making any air openings blocked. Never operate the machine with this machine if it has a damaged cord or plug, if it has been dropped or damaged, or dropped into any object...
The machine should never be used as threading needle, changing needle, threading bobbin, or changing presser foot, and the like. 15. Return the machine to the symbol "{" position which represents off, then remove plug from the electrical outlet when removing covers, lubricating, or when making any air openings blocked. Never operate the machine with this machine if it has a damaged cord or plug, if it has been dropped or damaged, or dropped into any object...

Users Manual - English
Page 14
... replacing or installing any other moving parts. 2. PLEASE READ BEFORE USING THIS MACHINE For safe operation 1. Remember to turn off the power switch and unplug the cord when: • Operation is completed • Replacing or removing the needle or any assemblies, the presser feet, needle, or other hot objects. 2. Do not drop or hit the machine. 4. up lever, needle, or other parts • A power failure occurs during use extension cords. For additional product information and updates...
... replacing or installing any other moving parts. 2. PLEASE READ BEFORE USING THIS MACHINE For safe operation 1. Remember to turn off the power switch and unplug the cord when: • Operation is completed • Replacing or removing the needle or any assemblies, the presser feet, needle, or other hot objects. 2. Do not drop or hit the machine. 4. up lever, needle, or other parts • A power failure occurs during use extension cords. For additional product information and updates...
Users Manual - English
Page 26
... the needle may break. APPENDIX 1 1 Thread guide plate 1 1 Slit in bobbin winder seat (with built-in cutter) X The thread is cut to the right and pass it counterclockwise between the discs. 1 1 GETTING READY SEWING BASICS UTILITY STITCHES While holding the spool with your right hand, 8 pull the thread with your left hand, and then pass the thread behind the thread guide cover to the front. 1 1 Thread guide for bobbin winding While using...
... the needle may break. APPENDIX 1 1 Thread guide plate 1 1 Slit in bobbin winder seat (with built-in cutter) X The thread is cut to the right and pass it counterclockwise between the discs. 1 1 GETTING READY SEWING BASICS UTILITY STITCHES While holding the spool with your right hand, 8 pull the thread with your left hand, and then pass the thread behind the thread guide cover to the front. 1 1 Thread guide for bobbin winding While using...
Users Manual - English
Page 28
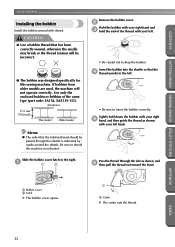
... bobbin was designed specifically for this sewing machine. Actual size 11.5 mm (7/16 inch) This model Older model Remove the bobbin cover. 2 Hold the bobbin with your left . • Be sure to thread the machine as shown, and 6 then pull the thread out toward the front. Slide the bobbin cover latch to drop the bobbin. Lightly hold the end of the same type (part code: SA156, XA5539-151). GETTING READY SEWING BASICS UTILITY STITCHES GETTING...
... bobbin was designed specifically for this sewing machine. Actual size 11.5 mm (7/16 inch) This model Older model Remove the bobbin cover. 2 Hold the bobbin with your left . • Be sure to thread the machine as shown, and 6 then pull the thread out toward the front. Slide the bobbin cover latch to drop the bobbin. Lightly hold the end of the same type (part code: SA156, XA5539-151). GETTING READY SEWING BASICS UTILITY STITCHES GETTING...

Users Manual - English
Page 61
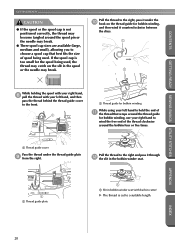
... they will always be specified each time the utility stitch is selected, the standard settings (highlighted) appear. Turn on the sewing machine. 1 X The LCD comes on the range of utility stitches can be adjusted with the sewing speed controller. Normally, when a stitch is erased. If the needle hits the presser foot, the needle may bend or break. For details, refer to "Selecting stitching" (page 68). • Immediately after...
... they will always be specified each time the utility stitch is selected, the standard settings (highlighted) appear. Turn on the sewing machine. 1 X The LCD comes on the range of utility stitches can be adjusted with the sewing speed controller. Normally, when a stitch is erased. If the needle hits the presser foot, the needle may bend or break. For details, refer to "Selecting stitching" (page 68). • Immediately after...
Users Manual - English
Page 86
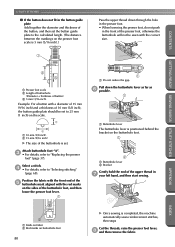
... marks on buttonhole foot 80 X Once sewing is positioned behind the bracket on the buttonhole foot. 1 2 1 Buttonhole lever 2 Bracket Gently hold the end of the upper thread in the button guide plate Add together the diameter and thickness of the buttonhole foot, and then lower the presser foot lever. 1 1 1 Do not reduce the gap. UTILITY STITCHES ■ If the button does not fit in 7 your left hand, and then start sewing. Attach buttonhole foot "A". 3 • For...
... marks on buttonhole foot 80 X Once sewing is positioned behind the bracket on the buttonhole foot. 1 2 1 Buttonhole lever 2 Bracket Gently hold the end of the upper thread in the button guide plate Add together the diameter and thickness of the buttonhole foot, and then lower the presser foot lever. 1 1 1 Do not reduce the gap. UTILITY STITCHES ■ If the button does not fit in 7 your left hand, and then start sewing. Attach buttonhole foot "A". 3 • For...
Users Manual - English
Page 88
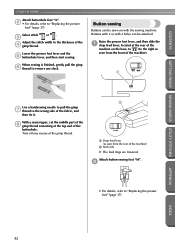
... Lower the presser foot lever and the 5 buttonhole lever, and then start sewing. Raise the presser foot lever, and then slide the 1 drop feed lever, located at the top end of the fabric, and then tie it. UTILITY STITCHES CONTENTS Attach buttonhole foot "A". 2 • For details, refer to remove any excess of the gimp thread. 2 1 Drop feed lever (as seen from the rear of the 4 gimp thread. Buttons with 2 or with the sewing machine. Select stitch 46 or 47 . 3 Adjust...
... Lower the presser foot lever and the 5 buttonhole lever, and then start sewing. Raise the presser foot lever, and then slide the 1 drop feed lever, located at the top end of the fabric, and then tie it. UTILITY STITCHES CONTENTS Attach buttonhole foot "A". 2 • For details, refer to remove any excess of the gimp thread. 2 1 Drop feed lever (as seen from the rear of the 4 gimp thread. Buttons with 2 or with the sewing machine. Select stitch 46 or 47 . 3 Adjust...
Users Manual - English
Page 89
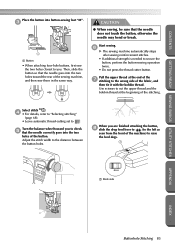
... drop feed lever to (to the left as seen from the front of the machine) to raise the feed dogs. 1 1 Back side APPENDIX INDEX Buttonhole Stitching 83 CAUTION ● When sewing, be sure that the needle correctly goes into the two holes toward you to check 5 that the needle does not touch the button, otherwise the needle may bend or break. Use scissors to cut the upper thread...
... drop feed lever to (to the left as seen from the front of the machine) to raise the feed dogs. 1 1 Back side APPENDIX INDEX Buttonhole Stitching 83 CAUTION ● When sewing, be sure that the needle correctly goes into the two holes toward you to check 5 that the needle does not touch the button, otherwise the needle may bend or break. Use scissors to cut the upper thread...
Users Manual - English
Page 134
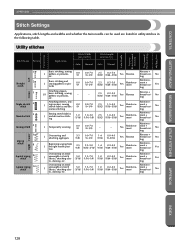
...position Reinforce- 3.5 (1/8) 2.5-5.0 1.4 0.3-4.0 (3/32-3/16) (1/16) (1/64-3/16) Yes Reinforcement ment + thread-cut - ting APPENDIX INDEX 128 Twin Needle Reverse/ Reinforcement Stitching Programmed Thread-Cutting Walking Foot Presser Foot Utility stitches Stitch Name Pattern Application Stitch Width [mm (inch.)] Stitch Length [mm (inch.)] Auto Manual Auto Manual Left 1 2 Straight stitch 3 Center Triple stretch 4 stitch 5 Stretch stitch 6 Basting stitch 7 Zigzag stitch 8 Right Center 2-point zigzag 9 stitch 3-point zigzag 10 stitch Basic stitching, sewing J gathers...
...position Reinforce- 3.5 (1/8) 2.5-5.0 1.4 0.3-4.0 (3/32-3/16) (1/16) (1/64-3/16) Yes Reinforcement ment + thread-cut - ting APPENDIX INDEX 128 Twin Needle Reverse/ Reinforcement Stitching Programmed Thread-Cutting Walking Foot Presser Foot Utility stitches Stitch Name Pattern Application Stitch Width [mm (inch.)] Stitch Length [mm (inch.)] Auto Manual Auto Manual Left 1 2 Straight stitch 3 Center Triple stretch 4 stitch 5 Stretch stitch 6 Basting stitch 7 Zigzag stitch 8 Right Center 2-point zigzag 9 stitch 3-point zigzag 10 stitch Basic stitching, sewing J gathers...
Users Manual - English
Page 143
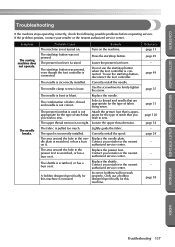
... to sew. The fabric is incorrectly installed. The spool is pulled too much. Correctly install the spool. Replace the needle plate. A bobbin designed specifically for the type of fabric, thread and needle is connected. Probable Cause Remedy The machine is raised. The presser foot lever is not turned on. Do not use the start/stop button. The upper thread tension is loose. Contact your retailer or the nearest authorized service center. page 18 APPENDIX INDEX Troubleshooting 137 If the problem...
... to sew. The fabric is incorrectly installed. The spool is pulled too much. Correctly install the spool. Replace the needle plate. A bobbin designed specifically for the type of fabric, thread and needle is connected. Probable Cause Remedy The machine is raised. The presser foot lever is not turned on. Do not use the start/stop button. The upper thread tension is loose. Contact your retailer or the nearest authorized service center. page 18 APPENDIX INDEX Troubleshooting 137 If the problem...
Users Manual - English
Page 144
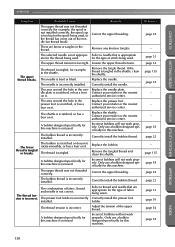
... shuttle. A bobbin designed specifically for this machine is too big for this machine is scratched, or has a burr on it . The bobbin thread is incorrectly installed. The presser foot holder is incorrectly installed. The needle is incorrect. Replace the needle plate. The upper thread was not threaded correctly (for example, the spool is not installed correctly, the spool cap is not used . Correctly install the presser foot holder. Adjust the tension of fabric, thread and needle is appropriate ate for the type of the needle bar thread hook). Remove...
... shuttle. A bobbin designed specifically for this machine is too big for this machine is scratched, or has a burr on it . The bobbin thread is incorrectly installed. The presser foot holder is incorrectly installed. The needle is incorrect. Replace the needle plate. The upper thread was not threaded correctly (for example, the spool is not installed correctly, the spool cap is not used . Correctly install the presser foot holder. Adjust the tension of fabric, thread and needle is appropriate ate for the type of the needle bar thread hook). Remove...

Users Manual - English
Page 150
... 57 automatic reverse stitching 57 automatic thread-cutting 58 B back key Cover E balance wheel Cover C, 48 bar tack 100 baseline 75 basic stitching 74 blind hem stitch 76 bobbin Cover A, 22 bobbin cover Cover C, 22 bobbin thread 22 pulling up 31 bobbin winder Cover B, 19 bobbin winder seat 20 bobbin winder shaft spring 19 bobbin-winding 18 button sewing 82 buttonhole foot 80 buttonhole lever Cover C, 80, 101, 103 buttonhole stitching 78 C C key Cover E changing sewing direction 62 changing the needle 35 checking patterns 116 cleaning 135 cleaning brush Cover A, 136...
... 57 automatic reverse stitching 57 automatic thread-cutting 58 B back key Cover E balance wheel Cover C, 48 bar tack 100 baseline 75 basic stitching 74 blind hem stitch 76 bobbin Cover A, 22 bobbin cover Cover C, 22 bobbin thread 22 pulling up 31 bobbin winder Cover B, 19 bobbin winder seat 20 bobbin winder shaft spring 19 bobbin-winding 18 button sewing 82 buttonhole foot 80 buttonhole lever Cover C, 80, 101, 103 buttonhole stitching 78 C C key Cover E changing sewing direction 62 changing the needle 35 checking patterns 116 cleaning 135 cleaning brush Cover A, 136...
Users Manual - English
Page 151
... threader lever Cover B, 27 non stick foot Cover A, 64 O OK key Cover E openings 100 operating procedures 13 operation beep 142 operation buttons Cover B, Cover D operation manual Cover A operation panel Cover B, Cover E optional accessories 1 original patterns 123 overcasting stitches 70 P patchwork stitching 95 pattern size 117 patterns 113 piecing 95 pocket corners 100 positioning fabric 48 presser foot Cover C, 37 presser foot dial Cover C, 39 presser foot holder Cover C, 39 presser foot lever Cover D presser foot pressure 39 programmed thread-cutting 58 Q quick...
... threader lever Cover B, 27 non stick foot Cover A, 64 O OK key Cover E openings 100 operating procedures 13 operation beep 142 operation buttons Cover B, Cover D operation manual Cover A operation panel Cover B, Cover E optional accessories 1 original patterns 123 overcasting stitches 70 P patchwork stitching 95 pattern size 117 patterns 113 piecing 95 pocket corners 100 positioning fabric 48 presser foot Cover C, 37 presser foot dial Cover C, 39 presser foot holder Cover C, 39 presser foot lever Cover D presser foot pressure 39 programmed thread-cutting 58 Q quick...


