
Users Manual - English
Page 2
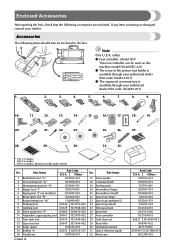
...net 27 Foot controller 28 Grid sheet set Cover A Part Code U.S.A. Part Name 1 Buttonhole foot "A" 2 Overcasting foot "G" 3 Monogramming foot "N" 4 Zipper foot "I" 5 Zigzag foot "J" (on this machine model NX-400/PC-420. ● The screw of the presser foot holder is available through your retailer. ...XE1139-001 XC4546-151,XC4589-051 XC2360-152 Enclosed Accessories After opening the box, check that the following items should also be used on machine) 6 Blind stitch foot "R" 7 Button fitting foot "M" 8 Walking foot 9 Quilting foot 10 Stitch guide foot "P" 11 Adjustable ...
...net 27 Foot controller 28 Grid sheet set Cover A Part Code U.S.A. Part Name 1 Buttonhole foot "A" 2 Overcasting foot "G" 3 Monogramming foot "N" 4 Zipper foot "I" 5 Zigzag foot "J" (on this machine model NX-400/PC-420. ● The screw of the presser foot holder is available through your retailer. ...XE1139-001 XC4546-151,XC4589-051 XC2360-152 Enclosed Accessories After opening the box, check that the following items should also be used on machine) 6 Blind stitch foot "R" 7 Button fitting foot "M" 8 Walking foot 9 Quilting foot 10 Stitch guide foot "P" 11 Adjustable ...
Users Manual - English
Page 4
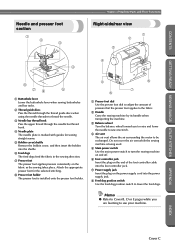
APPENDIX INDEX Cover C CONTENTS GETTING READY SEWING BASICS UTILITY STITCHES Names of Machine Parts and Their Functions Needle and presser foot section 1 2 3 Right-side/rear view 1 2 3 4 4 8 76 5 1 Buttonhole lever Lower the buttonhole lever when sewing buttonholes and bar tacks. 2 Thread guide discs Pass the thread through ...vent allows the air surrounding the motor to use your machine. Do not cover the air vent while the sewing machine is being used. 5 Main power switch Use the main power switch to turn the sewing machine on and off. 6 Foot controller jack Insert the plug...
APPENDIX INDEX Cover C CONTENTS GETTING READY SEWING BASICS UTILITY STITCHES Names of Machine Parts and Their Functions Needle and presser foot section 1 2 3 Right-side/rear view 1 2 3 4 4 8 76 5 1 Buttonhole lever Lower the buttonhole lever when sewing buttonholes and bar tacks. 2 Thread guide discs Pass the thread through ...vent allows the air surrounding the motor to use your machine. Do not cover the air vent while the sewing machine is being used. 5 Main power switch Use the main power switch to turn the sewing machine on and off. 6 Foot controller jack Insert the plug...
Users Manual - English
Page 10
... ...68 Selecting stitching ...68 Overcasting Stitches ...70 Sewing overcasting stitches using overcasting foot "G 70 Sewing overcasting stitches using zigzag foot "J 71 Sewing overcasting stitches using the optional side cutter 72 Basic Stitching ...74 Basting ...74 Basic stitching ...74 Blind Hem Stitching ...76 Buttonhole Stitching ...78 Buttonhole sewing ...79 Button sewing ...82 Zipper Insertion ...85 Inserting a centered zipper...
... ...68 Selecting stitching ...68 Overcasting Stitches ...70 Sewing overcasting stitches using overcasting foot "G 70 Sewing overcasting stitches using zigzag foot "J 71 Sewing overcasting stitches using the optional side cutter 72 Basic Stitching ...74 Basting ...74 Basic stitching ...74 Blind Hem Stitching ...76 Buttonhole Stitching ...78 Buttonhole sewing ...79 Button sewing ...82 Zipper Insertion ...85 Inserting a centered zipper...

Users Manual - English
Page 44
... so that the 6 presser foot pin snaps into the notch in the presser foot holder. Check that should be used appears in the holder. Buttonhole foot "A" Overcasting foot "G" Zigzag foot "J" Button fitting foot "M" Monogramming foot "N" Blind stitch foot "R" Side cutter "S" ● For details on...starting to be read. 1 Note ● When a stitch is installed, turn off the sewing machine, attach the correct presser foot, and then select the desired stitch again. GETTING READY SEWING BASICS UTILITY STITCHES GETTING READY CONTENTS Press the black button at the back of the 4 ...
... so that the 6 presser foot pin snaps into the notch in the presser foot holder. Check that should be used appears in the holder. Buttonhole foot "A" Overcasting foot "G" Zigzag foot "J" Button fitting foot "M" Monogramming foot "N" Blind stitch foot "R" Side cutter "S" ● For details on...starting to be read. 1 Note ● When a stitch is installed, turn off the sewing machine, attach the correct presser foot, and then select the desired stitch again. GETTING READY SEWING BASICS UTILITY STITCHES GETTING READY CONTENTS Press the black button at the back of the 4 ...

Users Manual - English
Page 64
.../reinforcement stitch button) once. X The LCD comes on the sewing machine. 1 1 Reverse/reinforcement stitch button X After reverse/reinforcement stitches are automatically sewn. 1 Automatically cutting the thread The sewing machine can be sewn if the start/stop button is convenient if...is not necessary if a stitch such as those for sewing buttonholes and bar tacks is selected where reinforcement stitches are sewn, the sewing machine stops. Press 3 (settings key) in the operation panel. X The screen for sewing buttonholes or bar tacks is selected. (arrow keys) until APPENDIX...
.../reinforcement stitch button) once. X The LCD comes on the sewing machine. 1 1 Reverse/reinforcement stitch button X After reverse/reinforcement stitches are automatically sewn. 1 Automatically cutting the thread The sewing machine can be sewn if the start/stop button is convenient if...is not necessary if a stitch such as those for sewing buttonholes and bar tacks is selected where reinforcement stitches are sewn, the sewing machine stops. Press 3 (settings key) in the operation panel. X The screen for sewing buttonholes or bar tacks is selected. (arrow keys) until APPENDIX...

Users Manual - English
Page 65
... not be sewn and the thread will not automatically be cut here. This step is selected where reinforcement stitches are sewn, the sewing machine stops and cuts the thread. X The initial stitch screen appears again, and appears in the lower-left corner of the screen. &#...8226; When the sewing machine is turned off, the programmed thread-cutting setting is cut if the start /stop button is pressed at the end of the stitching, press 9 (reverse/reinforcement stitch button) once. The thread is cancelled. X The machine is now set for sewing buttonholes and bar tacks is...
... not be sewn and the thread will not automatically be cut here. This step is selected where reinforcement stitches are sewn, the sewing machine stops and cuts the thread. X The initial stitch screen appears again, and appears in the lower-left corner of the screen. &#...8226; When the sewing machine is turned off, the programmed thread-cutting setting is cut if the start /stop button is pressed at the end of the stitching, press 9 (reverse/reinforcement stitch button) once. The thread is cancelled. X The machine is now set for sewing buttonholes and bar tacks is...
Users Manual - English
Page 73
Selecting Stitching 68 Overcasting Stitches 70 Basic Stitching ...74 Blind Hem Stitching 76 Buttonhole Stitching 78 Zipper Insertion ...85 Zipper/piping Insertion 89 Sewing Stretch Fabrics and Elastic Tape 91 Appliqué, Patchwork and Quilt Stitching 93 Reinforcement Stitching 100 Eyelet Stitching ...104 Decorative Stitching 105 Sewing the Various Built-In Decorative Patterns 113 Designing a Pattern 123 APPENDIX INDEX CONTENTS GETTING READY SEWING BASICS UTILITY STITCHES 3 UTILITY STITCHES The various stitches and their applications are described in this chapter.
Selecting Stitching 68 Overcasting Stitches 70 Basic Stitching ...74 Blind Hem Stitching 76 Buttonhole Stitching 78 Zipper Insertion ...85 Zipper/piping Insertion 89 Sewing Stretch Fabrics and Elastic Tape 91 Appliqué, Patchwork and Quilt Stitching 93 Reinforcement Stitching 100 Eyelet Stitching ...104 Decorative Stitching 105 Sewing the Various Built-In Decorative Patterns 113 Designing a Pattern 123 APPENDIX INDEX CONTENTS GETTING READY SEWING BASICS UTILITY STITCHES 3 UTILITY STITCHES The various stitches and their applications are described in this chapter.

Users Manual - English
Page 74
... refer to "Replacing the presser foot" (page 37). The presser feet are stored in the accessory compartment. • For details on the sewing machine. 4 X The straight stitch (left needle position) is selected. Press 5 (stitch selection key) in the LCD. X The screen containing the...shown in the operation panel. When the sewing machine is turned on the types of stitches available, refer to "Stitch Settings" (page 128). ■ Utility stitches There are 67 utility stitches, including straight stitches, overcasting stitches and buttonhole stitches. ■ Decorative stitches There are ...
... refer to "Replacing the presser foot" (page 37). The presser feet are stored in the accessory compartment. • For details on the sewing machine. 4 X The straight stitch (left needle position) is selected. Press 5 (stitch selection key) in the LCD. X The screen containing the...shown in the operation panel. When the sewing machine is turned on the types of stitches available, refer to "Stitch Settings" (page 128). ■ Utility stitches There are 67 utility stitches, including straight stitches, overcasting stitches and buttonhole stitches. ■ Decorative stitches There are ...
Users Manual - English
Page 84
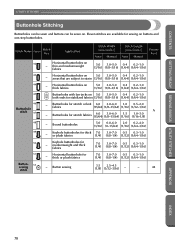
... for thick or plush fabrics 7.0 3.0-7.0 0.5 0.3-1.0 (1/4) (1/8-1/4) (1/32) (1/64-1/16) Button- 55 sewing stitch - Bound buttonholes 5.0 0.0-6.0 2.0 0.2-4.0 (3/16) (0-15/64) (1/16) (1/64-3/16) 49 - Button sewing 3.5 2.5-4.5 (1/8) (3/32-3/16) - - Horizontal buttonholes on thick fabrics 5.0 3.0-5.0 0.4 0.2-1.0 (3/16) (1/8-3/16) (1/64) (1/64-1/16) 45 Buttonholes with bar tacks on 5.0 3.0-5.0 0.4 0.2-1.0 both ends for - Keyhole buttonholes for thick 7.0 or plush fabrics (1/4) 3.0-7.0 0.5 0.3-1.0 (1/8-1/4) (1/32) (1/64-1/16) 50 Keyhole...
... for thick or plush fabrics 7.0 3.0-7.0 0.5 0.3-1.0 (1/4) (1/8-1/4) (1/32) (1/64-1/16) Button- 55 sewing stitch - Bound buttonholes 5.0 0.0-6.0 2.0 0.2-4.0 (3/16) (0-15/64) (1/16) (1/64-3/16) 49 - Button sewing 3.5 2.5-4.5 (1/8) (3/32-3/16) - - Horizontal buttonholes on thick fabrics 5.0 3.0-5.0 0.4 0.2-1.0 (3/16) (1/8-3/16) (1/64) (1/64-1/16) 45 Buttonholes with bar tacks on 5.0 3.0-5.0 0.4 0.2-1.0 both ends for - Keyhole buttonholes for thick 7.0 or plush fabrics (1/4) 3.0-7.0 0.5 0.3-1.0 (1/8-1/4) (1/32) (1/64-1/16) 50 Keyhole...
Users Manual - English
Page 85
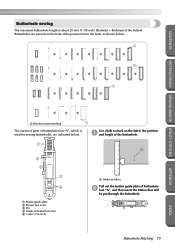
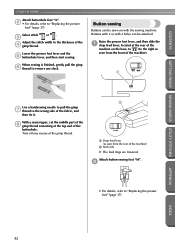
... to the back, as shown below. 1 1 1 GETTING READY SEWING BASICS UTILITY STITCHES APPENDIX 1 Reinforcement stitching 1 The names of parts of buttonhole foot "A", which is about 28 mm (1-1/8 inch) (diameter + thickness of buttonhole 2 foot "A", and then insert the button that will be put through the buttonhole. Buttonholes are sewn from the front of the presser foot...
... to the back, as shown below. 1 1 1 GETTING READY SEWING BASICS UTILITY STITCHES APPENDIX 1 Reinforcement stitching 1 The names of parts of buttonhole foot "A", which is about 28 mm (1-1/8 inch) (diameter + thickness of buttonhole 2 foot "A", and then insert the button that will be put through the buttonhole. Buttonholes are sewn from the front of the presser foot...
Users Manual - English
Page 86
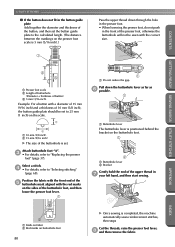
... distance between the markings on the presser foot scale is 5 mm (3/16 inch).) Pass the upper thread down the buttonhole lever as far as 6 possible. 1 1 Buttonhole lever The buttonhole lever is completed, the machine automatically sews reinforcement stitches, then stops Cut the threads, raise the presser foot lever, 8 and then remove the fabric. UTILITY STITCHES...
... distance between the markings on the presser foot scale is 5 mm (3/16 inch).) Pass the upper thread down the buttonhole lever as far as 6 possible. 1 1 Buttonhole lever The buttonhole lever is completed, the machine automatically sews reinforcement stitches, then stops Cut the threads, raise the presser foot lever, 8 and then remove the fabric. UTILITY STITCHES...
Users Manual - English
Page 87
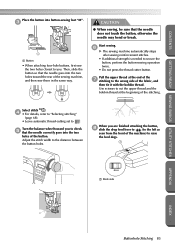
Memo ● Before sewing buttonholes, check the stitch length and width by sewing a trial buttonhole on a scrap piece of fabric. ■ Sewing buttonholes on stretch fabrics When sewing buttonholes on stretch fabrics, use the seam ripper to cut open the buttonhole. 1 • For details, refer to ... Adjust the stitch width. - + GETTING READY SEWING BASICS UTILITY STITCHES 1 1 Seam ripper For keyhole buttonholes, use the eyelet punch to cut towards the pin a and open the buttonhole. ■ Changing the density of the buttonhole, and then use a gimp thread. APPENDIX INDEX...
Memo ● Before sewing buttonholes, check the stitch length and width by sewing a trial buttonhole on a scrap piece of fabric. ■ Sewing buttonholes on stretch fabrics When sewing buttonholes on stretch fabrics, use the seam ripper to cut open the buttonhole. 1 • For details, refer to ... Adjust the stitch width. - + GETTING READY SEWING BASICS UTILITY STITCHES 1 1 Seam ripper For keyhole buttonholes, use the eyelet punch to cut towards the pin a and open the buttonhole. ■ Changing the density of the buttonhole, and then use a gimp thread. APPENDIX INDEX...
Users Manual - English
Page 88
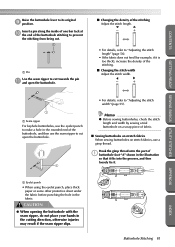
... 82 Trim off any slack. Select stitch 46 or 47 . 3 Adjust the stitch width to the wrong side of the buttonhole. Buttons with 2 or with the sewing machine. With a seam ripper, cut the middle part of the 8 gimp thread remaining at the rear of the... handsewing needle to pull the gimp 7 thread to the thickness of the machine) 2 Back side X The feed dogs are lowered. Attach button-sewing foot "M". 2 • For details, refer to "Replacing the presser foot" (page 37). UTILITY STITCHES CONTENTS Attach buttonhole foot "A". 2 • For details, refer to "Replacing the presser ...
... 82 Trim off any slack. Select stitch 46 or 47 . 3 Adjust the stitch width to the wrong side of the buttonhole. Buttons with 2 or with the sewing machine. With a seam ripper, cut the middle part of the 8 gimp thread remaining at the rear of the... handsewing needle to pull the gimp 7 thread to the thickness of the machine) 2 Back side X The feed dogs are lowered. Attach button-sewing foot "M". 2 • For details, refer to "Replacing the presser foot" (page 37). UTILITY STITCHES CONTENTS Attach buttonhole foot "A". 2 • For details, refer to "Replacing the presser ...
Users Manual - English
Page 89
... front of the button. CAUTION ● When sewing, be sure that the needle correctly goes into the two holes of the machine) to raise the feed dogs. 1 1 Back side APPENDIX INDEX Buttonhole Stitching 83 Turn the balance wheel toward the rear of the sewing machine, and then sew them in the same way. When you to...
... front of the button. CAUTION ● When sewing, be sure that the needle correctly goes into the two holes of the machine) to raise the feed dogs. 1 1 Back side APPENDIX INDEX Buttonhole Stitching 83 Turn the balance wheel toward the rear of the sewing machine, and then sew them in the same way. When you to...
Users Manual - English
Page 106
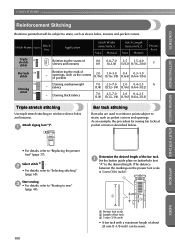
... J Bar tack 54 stitch - Darning mediumweight fabrics - INDEX APPENDIX • For details, refer to "Selecting stitching" (page 68). As an example, the procedure for sewing bar tacks at pocket corners is 5 mm (3/16 inch).) 1 2 3 1 Presser foot scale 2 Length of bar tack 3 5 mm (3/16 inch) • A... bar tack with a maximum length of the bar tack. 1 Set the button guide plate on buttonhole foot "A" to strain, such as sleeve holes, inseams and pocket corners. Stitch Name Pattern Stitch Key Application Stitch Width [mm (inch.)] Auto Manual Stitch...
... J Bar tack 54 stitch - Darning mediumweight fabrics - INDEX APPENDIX • For details, refer to "Selecting stitching" (page 68). As an example, the procedure for sewing bar tacks at pocket corners is 5 mm (3/16 inch).) 1 2 3 1 Presser foot scale 2 Length of bar tack 3 5 mm (3/16 inch) • A... bar tack with a maximum length of the bar tack. 1 Set the button guide plate on buttonhole foot "A" to strain, such as sleeve holes, inseams and pocket corners. Stitch Name Pattern Stitch Key Application Stitch Width [mm (inch.)] Auto Manual Stitch...
Users Manual - English
Page 107
...in 6 your left hand, and then start sewing. 1 1 2 mm (1/16 inch) Pass the upper thread down the buttonhole lever as far as 5 possible. 1 Memo ● If the fabric does not feed, for example, because it is completed, the machine automatically sews reinforcement stitches, then stops Cut the threads,...foot lever so that the needle drops 2 mm (1/16 inch) in the front of the pocket opening. Raise the buttonhole lever to "Adjusting the stitch length" (page 56). X Once sewing is too thick, increase the stitch length. Select stitch 54 . 3 • For details, refer to "Replacing ...
...in 6 your left hand, and then start sewing. 1 1 2 mm (1/16 inch) Pass the upper thread down the buttonhole lever as far as 5 possible. 1 Memo ● If the fabric does not feed, for example, because it is completed, the machine automatically sews reinforcement stitches, then stops Cut the threads,...foot lever so that the needle drops 2 mm (1/16 inch) in the front of the pocket opening. Raise the buttonhole lever to "Adjusting the stitch length" (page 56). X Once sewing is too thick, increase the stitch length. Select stitch 54 . 3 • For details, refer to "Replacing ...
Users Manual - English
Page 108
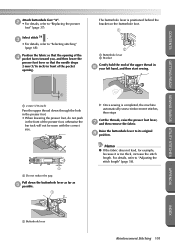
...can be sewn. Darning is sewn as shown below. 1 CONTENTS GETTING READY SEWING BASICS UTILITY STITCHES 1 Reinforcement stitching 1 Determine the desired length of the darning. 1 Set the button guide plate on buttonhole foot "A" to the desired length. (The distance between the markings on ... 5 mm (3/16 inch) 4 7 mm (1/4 inch) • A bar tack with the correct size. 1 1 Do not reduce the gap. 102 APPENDIX INDEX Attach buttonhole foot "A". 2 • For details, refer to "Selecting stitching" (page 68). Select stitch 52 3 or 53 . • For details, refer to "Replacing the ...
...can be sewn. Darning is sewn as shown below. 1 CONTENTS GETTING READY SEWING BASICS UTILITY STITCHES 1 Reinforcement stitching 1 Determine the desired length of the darning. 1 Set the button guide plate on buttonhole foot "A" to the desired length. (The distance between the markings on ... 5 mm (3/16 inch) 4 7 mm (1/4 inch) • A bar tack with the correct size. 1 1 Do not reduce the gap. 102 APPENDIX INDEX Attach buttonhole foot "A". 2 • For details, refer to "Selecting stitching" (page 68). Select stitch 52 3 or 53 . • For details, refer to "Replacing the ...
Users Manual - English
Page 109
..., the machine automatically sews reinforcement stitches, then stops Cut the threads, raise the presser foot lever, 7 and then remove the fabric. Reinforcement Stitching 103 APPENDIX INDEX For details, refer to its original 8 position. X Once sewing is too thick, increase the stitch length. CONTENTS GETTING READY SEWING BASICS UTILITY STITCHES Pull down the buttonhole lever as...
..., the machine automatically sews reinforcement stitches, then stops Cut the threads, raise the presser foot lever, 7 and then remove the fabric. Reinforcement Stitching 103 APPENDIX INDEX For details, refer to its original 8 position. X Once sewing is too thick, increase the stitch length. CONTENTS GETTING READY SEWING BASICS UTILITY STITCHES Pull down the buttonhole lever as...

Users Manual - English
Page 137
...Stitch Length [mm (inch.)] Auto Manual Auto Manual 42 43 44 45 46 Buttonhole stitch 47 48 49 50 51 52 Darning stitch 53 54 Bar tack stitch Button-sewing 55 stitch 56 Eyelet stitch 57 Piecing straight stitch 58 Straight stitch that have backings... (1/16) (1/32-3/16) (1/16) (1/16-3/16) No Reinforcement ment + thread-cut - No ting N Sewing eyelets, for quilt- ing) Zigzag stitch 60 (for quilting) Appliqué stitch 61 (for quilting) A Horizontal buttonholes on thin and mediumweight fabrics 5.0 3.0-5.0 0.4 0.2-1.0 (3/16) (1/8-3/16) (1/64) (1/64-1/16) No Automatic ...
...Stitch Length [mm (inch.)] Auto Manual Auto Manual 42 43 44 45 46 Buttonhole stitch 47 48 49 50 51 52 Darning stitch 53 54 Bar tack stitch Button-sewing 55 stitch 56 Eyelet stitch 57 Piecing straight stitch 58 Straight stitch that have backings... (1/16) (1/32-3/16) (1/16) (1/16-3/16) No Reinforcement ment + thread-cut - No ting N Sewing eyelets, for quilt- ing) Zigzag stitch 60 (for quilting) Appliqué stitch 61 (for quilting) A Horizontal buttonholes on thin and mediumweight fabrics 5.0 3.0-5.0 0.4 0.2-1.0 (3/16) (1/8-3/16) (1/64) (1/64-1/16) No Automatic ...
Users Manual - English
Page 147
...setting for adjusting the stitch width using the sewing speed controller is set up because the thread is tangled. CONTENTS GETTING READY SEWING BASICS UTILITY STITCHES Error messages If the start/stop button is pressed before the sewing machine is correctly set to the right. Follow the... instructions that cannot be changed with the twin needle is raised. The reverse/reinforcement stitch button, needle position button or thread cutter button was pressed while the buttonhole lever is selected. Error...
...setting for adjusting the stitch width using the sewing speed controller is set up because the thread is tangled. CONTENTS GETTING READY SEWING BASICS UTILITY STITCHES Error messages If the start/stop button is pressed before the sewing machine is correctly set to the right. Follow the... instructions that cannot be changed with the twin needle is raised. The reverse/reinforcement stitch button, needle position button or thread cutter button was pressed while the buttonhole lever is selected. Error...


