

Accessory Catalog
Page 5
...at the left side of the center guide. 3. It can also be placed. 2. Place each edge of two pieces of fabric or trim along the seam allowance on the presser foot. 2. Edge stitching: 1. Pin tucks: 1. Place the fold at lower edge of zipper. Brother General Sewing Accessories 07 Blind Stitch ... zipper and baste along the guide on this presser foot. Edge Joining Foot Brother General Sewing Accessories 08 Edge Joining Foot This foot is Project Book (See pages 37 and 39 for both sides of the zipper opening. 5. Fold the fabric up tab. 8. Baste the seam closed and press. 3. Cut...
...at the left side of the center guide. 3. It can also be placed. 2. Place each edge of two pieces of fabric or trim along the seam allowance on the presser foot. 2. Edge stitching: 1. Pin tucks: 1. Place the fold at lower edge of zipper. Brother General Sewing Accessories 07 Blind Stitch ... zipper and baste along the guide on this presser foot. Edge Joining Foot Brother General Sewing Accessories 08 Edge Joining Foot This foot is Project Book (See pages 37 and 39 for both sides of the zipper opening. 5. Fold the fabric up tab. 8. Baste the seam closed and press. 3. Cut...

Accessory Catalog
Page 6
...narrow hem on sheer and very lightweight fabrics. 1. Lower the presser foot so that the foot guide is rolling around the curled part of the fabric. 4. Position the edge of the fabric. Hold...Place the fabric with fabrics such as leather, vinyl and other novelty fabrics. Sews overcast seams to the end of the fabric behind the needle and lower the presser foot. 7. ...to sew to protect edges from fraying. 1. Brother General Sewing Accessories 09 Narrow Hemmer Foot Non Stick Foot Overlock Foot Picot Foot Brother General Sewing Accessories 10 SA126 ABCDEFJKMN SA127 GHILOP...
...narrow hem on sheer and very lightweight fabrics. 1. Lower the presser foot so that the foot guide is rolling around the curled part of the fabric. 4. Position the edge of the fabric. Hold...Place the fabric with fabrics such as leather, vinyl and other novelty fabrics. Sews overcast seams to the end of the fabric behind the needle and lower the presser foot. 7. ...to sew to protect edges from fraying. 1. Brother General Sewing Accessories 09 Narrow Hemmer Foot Non Stick Foot Overlock Foot Picot Foot Brother General Sewing Accessories 10 SA126 ABCDEFJKMN SA127 GHILOP...

Accessory Catalog
Page 7
..., 1/2 inch, or 5/8 inch (approx. 6.5, 13, or 16 mm) seam. Place the cut edge like a serger or overlock. It can be used for straight stitching especially on selected machines. Helpful for stitching heavy fabrics together. 1. Brother General Sewing Accessories 11 Seam Guide Side Cutter Stitch Guide Foot Seam Guide Guides fabric edge with the Straight Stitch Needle Plate to...
..., 1/2 inch, or 5/8 inch (approx. 6.5, 13, or 16 mm) seam. Place the cut edge like a serger or overlock. It can be used for straight stitching especially on selected machines. Helpful for stitching heavy fabrics together. 1. Brother General Sewing Accessories 11 Seam Guide Side Cutter Stitch Guide Foot Seam Guide Guides fabric edge with the Straight Stitch Needle Plate to...

Accessory Catalog
Page 11
Brother Embellishment Feet 19 Braiding Foot Clear-view Foot Baby Blanket, Pillow & Bib created by June Mellinger Braiding Foot Attaches up the center guide mark on the presser foot over the desired seams or pattern markings. 3. Tighten the screw and pull the braid behind the presser foot. 4. Attach the... presser foot onto the machine. 5. Stitch braid in place. SA141 All Brother home-use sewing machines Clear-...
Brother Embellishment Feet 19 Braiding Foot Clear-view Foot Baby Blanket, Pillow & Bib created by June Mellinger Braiding Foot Attaches up the center guide mark on the presser foot over the desired seams or pattern markings. 3. Tighten the screw and pull the braid behind the presser foot. 4. Attach the... presser foot onto the machine. 5. Stitch braid in place. SA141 All Brother home-use sewing machines Clear-...

Accessory Catalog
Page 12
...various settings to see which one works on your fabric. 3. Ideal for ULT series, PC-6500, PC-8200 and PC-8500 sewing machines. For gathering: 1. Slide the fabric not to be gathered into the ... right side up the center of the foot with a single zigzag stitch. Ideal for details.) Brother Embellishment Feet Open Toe Foot 22 Pearls and Sequins Foot Metal type SA146 IP Open Toe Foot ...rounded cords up the center guide mark (red) of the foot. 3. Adding decorative stitches over seams or patterns: Line up to 4 mm in groove of the presser foot to the seam or pattern line and ...
...various settings to see which one works on your fabric. 3. Ideal for ULT series, PC-6500, PC-8200 and PC-8500 sewing machines. For gathering: 1. Slide the fabric not to be gathered into the ... right side up the center of the foot with a single zigzag stitch. Ideal for details.) Brother Embellishment Feet Open Toe Foot 22 Pearls and Sequins Foot Metal type SA146 IP Open Toe Foot ...rounded cords up the center guide mark (red) of the foot. 3. Adding decorative stitches over seams or patterns: Line up to 4 mm in groove of the presser foot to the seam or pattern line and ...

Accessory Catalog
Page 14
...Foot with 1/4" or 1/8'' seam allowance. The front of the foot narrows to the 1/4"measurement for quilt and patchwork piecing with Guide Quilting Guide Brother Quilting Feet 26 SA125 All Brother home-use sewing machines SA185 All Brother home-use sewing machines SA132 All Brother home-use sewing machines ... up edges of fabrics to the fabric guide of stitching. Brother Quilting Feet 25 Quality quilting Brother offers you innovative accessories to make quilting easier, helping you form perfect 1/4'" seams and turn corners. Stitch, keeping the guide in the first row of the presser ...
...Foot with 1/4" or 1/8'' seam allowance. The front of the foot narrows to the 1/4"measurement for quilt and patchwork piecing with Guide Quilting Guide Brother Quilting Feet 26 SA125 All Brother home-use sewing machines SA185 All Brother home-use sewing machines SA132 All Brother home-use sewing machines ... up edges of fabrics to the fabric guide of stitching. Brother Quilting Feet 25 Quality quilting Brother offers you innovative accessories to make quilting easier, helping you form perfect 1/4'" seams and turn corners. Stitch, keeping the guide in the first row of the presser ...
Accessory Catalog
Page 35
... (3 feet included) Gathering Foot This foot can be used for lightly gathering fabrics. Spring Action Guides Gathering Foot Brother Sewing Machine Attachments for PQ Series 68 Spring Action Guides There is guide on any material. Topstitching: Fold the seam allowance to sew edge stitching or topstitching right where you want. Their workspaces are designed to...
... (3 feet included) Gathering Foot This foot can be used for lightly gathering fabrics. Spring Action Guides Gathering Foot Brother Sewing Machine Attachments for PQ Series 68 Spring Action Guides There is guide on any material. Topstitching: Fold the seam allowance to sew edge stitching or topstitching right where you want. Their workspaces are designed to...

Accessory Catalog
Page 40
... a tweezers. Fold fabric and set through the holder). 4. Sew. Insert the tab on the bias tape attachment into the guide. 4. The stitches are always smooth. 1. SA226CV www.brother.com Set the bias tape though the holder (cut the end of the presser foot, and sew. Set up your machine ... the hem positioning plate A/B to 1/2 inch) bias tapes as holding the fabric lightly with the LC1 presser foot included in the machine. 2. Open the seams. 4. Set up your Cover Stitch). 1. Align the fabric joint and the groove of fabric pointed so that it to top stitch with 3 or 6 mm...
... a tweezers. Fold fabric and set through the holder). 4. Sew. Insert the tab on the bias tape attachment into the guide. 4. The stitches are always smooth. 1. SA226CV www.brother.com Set the bias tape though the holder (cut the end of the presser foot, and sew. Set up your machine ... the hem positioning plate A/B to 1/2 inch) bias tapes as holding the fabric lightly with the LC1 presser foot included in the machine. 2. Open the seams. 4. Set up your Cover Stitch). 1. Align the fabric joint and the groove of fabric pointed so that it to top stitch with 3 or 6 mm...
Users Manual - English
Page 34
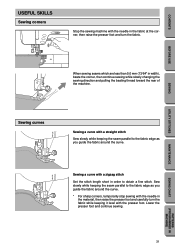
... mm (13/64" in the material, then raise the presser foot and carefully turn the fabric. Sew slowly while keeping the seam parallel to the fabric edge as you guide the fabric around the curve. * For sharp corners, temporarily stop sewing with a zigzag stitch Set the stitch length short in ...order to the fabric edge as you guide the fabric around the curve. 5 6 Sewing a curve with the needle in width), baste the corner, then continue sewing while slowly changing the sewing...
... mm (13/64" in the material, then raise the presser foot and carefully turn the fabric. Sew slowly while keeping the seam parallel to the fabric edge as you guide the fabric around the curve. * For sharp corners, temporarily stop sewing with a zigzag stitch Set the stitch length short in ...order to the fabric edge as you guide the fabric around the curve. 5 6 Sewing a curve with the needle in width), baste the corner, then continue sewing while slowly changing the sewing...
Users Manual - English
Page 35
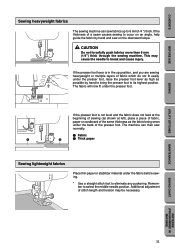
... to its highest position. CAUTION Do not forcefully push fabrics more than 6 mm (1/4'') thick through the sewing machine. Additional adjustment of a seam causes sewing to occur on an angle, help guide the fabric by hand to bring the presser foot to break and cause injury. CONTENTS BEFORE USE SEWING Sewing heavyweight fabrics...
... to its highest position. CAUTION Do not forcefully push fabrics more than 6 mm (1/4'') thick through the sewing machine. Additional adjustment of a seam causes sewing to occur on an angle, help guide the fabric by hand to bring the presser foot to break and cause injury. CONTENTS BEFORE USE SEWING Sewing heavyweight fabrics...

Users Manual - English
Page 39
Sew slowly, keeping the seams parallel with the fabric edge as you guide the fabric around the curve. 6 36 SEWING CHART PATTERNS (PROGRAMMED IN MACHINE) CONTENTS ZIGZAG STITCHES J 3 4 3: Zigzag stitch 4: Elastic zigzag stitch Overcasting (using a zigzag stitch) Sew ...
Sew slowly, keeping the seams parallel with the fabric edge as you guide the fabric around the curve. 6 36 SEWING CHART PATTERNS (PROGRAMMED IN MACHINE) CONTENTS ZIGZAG STITCHES J 3 4 3: Zigzag stitch 4: Elastic zigzag stitch Overcasting (using a zigzag stitch) Sew ...
Users Manual - English
Page 42
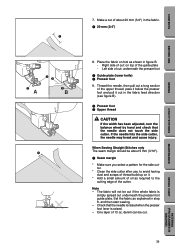
Left side of the cutter. denim can be cut : underneath the presser foot 1 Guide plate (lower knife) 2 Presser foot 9. Make a cut of about 5 mm (3/16''). 1 Seam margin * Make sure you select a pattern for the side cutter. * Clean the side cutter after use, to the cutting edge of cut . Thread the needle... thread, pass it below the presser foot and pull it . * Add a small amount of oil as required to avoid having dust and scraps of the guide plate - The fabric will not be about 20 mm (3/4'') in the fabric feed direction (see figure B). 2 Presser foot 3 Upper thread CAUTION If the ...
Left side of the cutter. denim can be cut : underneath the presser foot 1 Guide plate (lower knife) 2 Presser foot 9. Make a cut of about 5 mm (3/16''). 1 Seam margin * Make sure you select a pattern for the side cutter. * Clean the side cutter after use, to the cutting edge of cut . Thread the needle... thread, pass it below the presser foot and pull it . * Add a small amount of oil as required to avoid having dust and scraps of the guide plate - The fabric will not be about 20 mm (3/4'') in the fabric feed direction (see figure B). 2 Presser foot 3 Upper thread CAUTION If the ...
Users Manual - English
Page 43
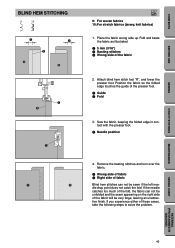
...very large, leaving an unattractive finish. Remove the basting stitches and turn over the fabric. 1 Wrong side of fabric 2 Right side of the presser foot. 1 Guide 2 Fold 3. MAINTENANCE SEWING CHART PATTERNS (PROGRAMMED IN MACHINE) 40 Fold and baste the fabric as illustrated. 1 5 mm (3/16'') 2 Basting stitches 3 Wrong side... of the fabric will be unfolded and the seam appearing on the right side of the fabric 2. If the needle catches too much of the fold, the fabric can not be sewn if the...
...very large, leaving an unattractive finish. Remove the basting stitches and turn over the fabric. 1 Wrong side of fabric 2 Right side of the presser foot. 1 Guide 2 Fold 3. MAINTENANCE SEWING CHART PATTERNS (PROGRAMMED IN MACHINE) 40 Fold and baste the fabric as illustrated. 1 5 mm (3/16'') 2 Basting stitches 3 Wrong side... of the fabric will be unfolded and the seam appearing on the right side of the fabric 2. If the needle catches too much of the fold, the fabric can not be sewn if the...

