
Accessory Catalog
Page 7
...curve, sew so that the fabric edge becomes a right angle against the seam guide. 3. SA108 GHILOP Straight Stitch Foot and Straight Stitch Needle Plate Use the Straight Stitch Foot with the thumbscrew of the foot guide plate. 4. The side extension ruler on stitch settings. 1. Available in the seam line of fabrics. Sew. Make a cut edge like a serger or overlock. Place the cut right section on selected machines. Installing the Straight Stitch Needle Plate automatically sets the needle position to the center straight stitching position on the top of the seam guide. 2. Helpful for...
...curve, sew so that the fabric edge becomes a right angle against the seam guide. 3. SA108 GHILOP Straight Stitch Foot and Straight Stitch Needle Plate Use the Straight Stitch Foot with the thumbscrew of the foot guide plate. 4. The side extension ruler on stitch settings. 1. Available in the seam line of fabrics. Sew. Make a cut edge like a serger or overlock. Place the cut right section on selected machines. Installing the Straight Stitch Needle Plate automatically sets the needle position to the center straight stitching position on the top of the seam guide. 2. Helpful for...

Accessory Catalog
Page 11
... seams or pattern markings are desired. Perfect for quilting appliqué! 1. Place cord under the presser foot, and select zigzag stitch with brother sewing machines of the braid. 3. SA110 ABCDEFJKMN SA148 GHILOP Cording Foot (5-hole) Used for embellishing 1 to fit the width of 7 mm feed width. 1. Insert cords or threads into each hole on the presser foot. 2. It can be used with maximum stitch width. Insert cords or threads into each hole on the presser foot. 2. Attach the presser foot and pull cords under the presser foot...
... seams or pattern markings are desired. Perfect for quilting appliqué! 1. Place cord under the presser foot, and select zigzag stitch with brother sewing machines of the braid. 3. SA110 ABCDEFJKMN SA148 GHILOP Cording Foot (5-hole) Used for embellishing 1 to fit the width of 7 mm feed width. 1. Insert cords or threads into each hole on the presser foot. 2. It can be used with maximum stitch width. Insert cords or threads into each hole on the presser foot. 2. Attach the presser foot and pull cords under the presser foot...

Accessory Catalog
Page 13
... this presser foot. 1. Use a stiff card to slide the fabric from left into gathers or tucks. Sew slowly for details.) Brother Embellishment Feet Pin Tuck Foot 24 Ruffler Foot Pin Tuck Foot This presser foot has 7 grooves and produces perfect pin tucks and corded pin tucks using a twin needle on the lower portion of stitching and use that to get started. For seven grooves: SA179 ABCDEJ For five grooves: SA162 IP This presser foot does not include the bobbin cover...
... this presser foot. 1. Use a stiff card to slide the fabric from left into gathers or tucks. Sew slowly for details.) Brother Embellishment Feet Pin Tuck Foot 24 Ruffler Foot Pin Tuck Foot This presser foot has 7 grooves and produces perfect pin tucks and corded pin tucks using a twin needle on the lower portion of stitching and use that to get started. For seven grooves: SA179 ABCDEJ For five grooves: SA162 IP This presser foot does not include the bobbin cover...

Accessory Catalog
Page 15
... starting to sew, press the needle position button twice to pull the bobbin thread to straight stitch. 3. Quilting Foot For darning, quilting, or free-motion. Sew. Use for ULT series, PC-6500, PC-8200 and PC-8500 sewing machines. Gently holding the upper and bobbin threads sew about four locking stitches and finish the thread ends. Lower the feed dogs. 2. Place the fabric beneath the presser foot. 4. Fabrics that both hands are created. 1. Set the machine to the quilt top. 7. Walking Foot SA140 ABCDEFJKMN SA166 L SA107 GHO SA169 I Open...
... starting to sew, press the needle position button twice to pull the bobbin thread to straight stitch. 3. Quilting Foot For darning, quilting, or free-motion. Sew. Use for ULT series, PC-6500, PC-8200 and PC-8500 sewing machines. Gently holding the upper and bobbin threads sew about four locking stitches and finish the thread ends. Lower the feed dogs. 2. Place the fabric beneath the presser foot. 4. Fabrics that both hands are created. 1. Set the machine to the quilt top. 7. Walking Foot SA140 ABCDEFJKMN SA166 L SA107 GHO SA169 I Open...

Accessory Catalog
Page 17
... stitch quality when stitching over differing fabric thicknesses. - Includes three new free-motion presser feet: Free-motion quilting foot "C" for more features to the actual machine: - Customizable USB Mouse* Pointer Functions. - Add even more control with the entire library of making beautiful borders. SAVR4500D Duetta™ 4500D/Innov-is4000D Nightie Innov-is Project Book (See page 18 for easier viewing of items. - New Border Frame and 28 Unique Embroidery Patterns...
... stitch quality when stitching over differing fabric thicknesses. - Includes three new free-motion presser feet: Free-motion quilting foot "C" for more features to the actual machine: - Customizable USB Mouse* Pointer Functions. - Add even more control with the entire library of making beautiful borders. SAVR4500D Duetta™ 4500D/Innov-is4000D Nightie Innov-is Project Book (See page 18 for easier viewing of items. - New Border Frame and 28 Unique Embroidery Patterns...

Accessory Catalog
Page 33
... on creating. Brother Embroidery Accessories 63 Free-Standing Ten Spool Thread Stand Ten Spool Thread Stand Embroidery Machine Hoops Brother Embroidery Accessories 64 For all embroidery and sewing/embroidery machines. The spool pins can be removed to accommodate a variety of thread on to your machine to 10 spools of spool sizes. Spend less time changing threads, and more on our website for your spool thread tails by placing them in use. Allows easy access to the machine as well as a thread locking system which keeps...
... on creating. Brother Embroidery Accessories 63 Free-Standing Ten Spool Thread Stand Ten Spool Thread Stand Embroidery Machine Hoops Brother Embroidery Accessories 64 For all embroidery and sewing/embroidery machines. The spool pins can be removed to accommodate a variety of thread on to your machine to 10 spools of spool sizes. Spend less time changing threads, and more on our website for your spool thread tails by placing them in use. Allows easy access to the machine as well as a thread locking system which keeps...

Accessory Catalog
Page 34
Brother Embroidery Accessories PacesetterTM Polyester Threads 65 Brother Country Yarn Embroidery Threads Metallic Threads For the best embroidery results, use these embroidery threads especially designed for Brother sewing and embroidering machines. 61 Color Thread Set with Wooden Rack ETKSP999 PacesetterTM Polyester Threads (61 Color Thread Set with Wooden Rack) Our high sheen 100% polyester mini king embroidery thread (1100 yds) is ideal for our embroidery only machines, PE750D and PE700II. Make sure you just the right color for...
Brother Embroidery Accessories PacesetterTM Polyester Threads 65 Brother Country Yarn Embroidery Threads Metallic Threads For the best embroidery results, use these embroidery threads especially designed for Brother sewing and embroidering machines. 61 Color Thread Set with Wooden Rack ETKSP999 PacesetterTM Polyester Threads (61 Color Thread Set with Wooden Rack) Our high sheen 100% polyester mini king embroidery thread (1100 yds) is ideal for our embroidery only machines, PE750D and PE700II. Make sure you just the right color for...

Accessory Catalog
Page 40
...) wide cover stitch. 1. Sew as folding them. Attach the hem positioning plate A/B to the hemming attachment, and attach it is easily set it into the front cover slot. 3. Insert the tab on the bias tape attachment into the guide. 4. Align the fabric joint and the groove of fabric pointed so that it to your machine for a cover stitch, with 3 or 6 mm wide cover stitch. 3. Set T1/T2 presser foot. 2. Open the seams. 4. Sew. Brother Cover Stitch Feet 77 Bias Tape Binding Set Hemming Set Bias...
...) wide cover stitch. 1. Sew as folding them. Attach the hem positioning plate A/B to the hemming attachment, and attach it is easily set it into the front cover slot. 3. Insert the tab on the bias tape attachment into the guide. 4. Align the fabric joint and the groove of fabric pointed so that it to your machine for a cover stitch, with 3 or 6 mm wide cover stitch. 3. Set T1/T2 presser foot. 2. Open the seams. 4. Sew. Brother Cover Stitch Feet 77 Bias Tape Binding Set Hemming Set Bias...

Users Manual - English
Page 4
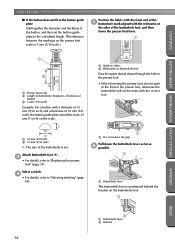
f Feed dogs The feed dogs feed the fabric in the sewing direction. Attach the appropriate presser foot for sewing straight seams. e Bobbin cover/Shuttle Remove the bobbin cover, and then insert the bobbin into the shuttle. h Presser foot holder The presser foot is installed onto the presser foot holder. 5 8 7 6 a Presser foot dial Use the presser foot dial to adjust the amount of the foot controller cable into the power supply jack. b Handle Carry the sewing machine by its handle when transporting the machine. APPENDIX INDEX Cover C f Foot controller jack Insert the plug on...
f Feed dogs The feed dogs feed the fabric in the sewing direction. Attach the appropriate presser foot for sewing straight seams. e Bobbin cover/Shuttle Remove the bobbin cover, and then insert the bobbin into the shuttle. h Presser foot holder The presser foot is installed onto the presser foot holder. 5 8 7 6 a Presser foot dial Use the presser foot dial to adjust the amount of the foot controller cable into the power supply jack. b Handle Carry the sewing machine by its handle when transporting the machine. APPENDIX INDEX Cover C f Foot controller jack Insert the plug on...
Users Manual - English
Page 5
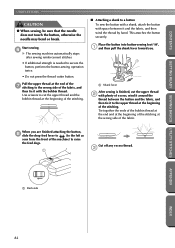
... thread cutter button if there is no fabric under the presser foot or while the machine is moved to the right for winding the bobbin thread onto the bobbin b Reverse/reinforcement stitch button Press the reverse/reinforcement stitch button to adjust the sewing speed. CONTENTS GETTING READY SEWING BASICS UTILITY STITCHES Operation buttons The operation buttons help you to easily perform various basic sewing machine operations. 2 3 5 1 4 6 a Start/stop button Press the start/stop sewing. The machine sews at a slow speed at the beginning of sewing while the button is lowered...
... thread cutter button if there is no fabric under the presser foot or while the machine is moved to the right for winding the bobbin thread onto the bobbin b Reverse/reinforcement stitch button Press the reverse/reinforcement stitch button to adjust the sewing speed. CONTENTS GETTING READY SEWING BASICS UTILITY STITCHES Operation buttons The operation buttons help you to easily perform various basic sewing machine operations. 2 3 5 1 4 6 a Start/stop button Press the start/stop sewing. The machine sews at a slow speed at the beginning of sewing while the button is lowered...
Users Manual - English
Page 9
...24 Threading the needle ...27 Using the twin needle ...28 Using thread that winds off quickly ...31 Pulling up the bobbin thread...31 Replacing the Needle ...33 Needle precautions ...33 Needle types and their uses...34 Checking the needle ...35 Replacing the needle...35 Replacing the Presser Foot 37 Presser foot precautions ...37 Replacing the presser foot ...37 Adjusting the pressure of the presser foot ...39 Removing the presser foot holder ...39 Using the walking foot ...40 Sewing Cylindrical or Large Pieces 42 Stitching cylindrical pieces...42 Sewing large pieces of fabric ...42 SEWING...
...24 Threading the needle ...27 Using the twin needle ...28 Using thread that winds off quickly ...31 Pulling up the bobbin thread...31 Replacing the Needle ...33 Needle precautions ...33 Needle types and their uses...34 Checking the needle ...35 Replacing the needle...35 Replacing the Presser Foot 37 Presser foot precautions ...37 Replacing the presser foot ...37 Adjusting the pressure of the presser foot ...39 Removing the presser foot holder ...39 Using the walking foot ...40 Sewing Cylindrical or Large Pieces 42 Stitching cylindrical pieces...42 Sewing large pieces of fabric ...42 SEWING...
Users Manual - English
Page 10
......53 Changing the tension of the upper thread...54 Adjusting the Stitch Width and Length 55 Adjusting the stitch width ...55 Adjusting the stitch length ...56 Useful Functions...57 Automatically sewing reverse/reinforcement stitches 57 Automatically cutting the thread ...58 Saving stitch settings ...60 Hands-free raising and lifting of the presser foot 61 Useful Sewing Tips ...62 Trial sewing ...62 Changing the sewing direction ...62 Sewing curves ...62 Sewing thick fabrics ...63 Sewing thin fabrics...63 Sewing stretch fabrics...63 Sewing leathers or vinyl fabrics ...64 Sewing an even seam...
......53 Changing the tension of the upper thread...54 Adjusting the Stitch Width and Length 55 Adjusting the stitch width ...55 Adjusting the stitch length ...56 Useful Functions...57 Automatically sewing reverse/reinforcement stitches 57 Automatically cutting the thread ...58 Saving stitch settings ...60 Hands-free raising and lifting of the presser foot 61 Useful Sewing Tips ...62 Trial sewing ...62 Changing the sewing direction ...62 Sewing curves ...62 Sewing thick fabrics ...63 Sewing thin fabrics...63 Sewing stretch fabrics...63 Sewing leathers or vinyl fabrics ...64 Sewing an even seam...
Users Manual - English
Page 61
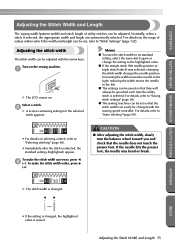
... presser foot, the needle may bend or break. a X The LCD comes on the sewing machine. z The settings can be adjusted with the sewing speed controller. Memo z To reset the stitch width to its standard setting, select the same stitch again or change the setting to "Selecting stitching" (page 66). • Immediately after the stitch is selected. z If the straight stitch (left . For details on selecting a stitch, refer to the highlighted value. Select a stitch. To make...
... presser foot, the needle may bend or break. a X The LCD comes on the sewing machine. z The settings can be adjusted with the sewing speed controller. Memo z To reset the stitch width to its standard setting, select the same stitch again or change the setting to "Selecting stitching" (page 66). • Immediately after the stitch is selected. z If the straight stitch (left . For details on selecting a stitch, refer to the highlighted value. Select a stitch. To make...
Users Manual - English
Page 84
... the buttonhole foot, and then lower the presser foot lever. 1 CONTENTS GETTING READY SEWING BASICS UTILITY STITCHES 1 2 3 a Presser foot scale b Length of buttonhole (Diameter + thickness of button) c 5 mm (3/16 inch) Example: For a button with a diameter of 15 mm (9/16 inch) and a thickness of 10 mm (3/8 inch), the button guide plate should be set . Attach buttonhole foot "A". A 2 a Mark on fabric b Red marks on buttonhole foot Pass the upper thread down the buttonhole lever as far as f possible. 1 a Buttonhole lever The buttonhole lever is set...
... the buttonhole foot, and then lower the presser foot lever. 1 CONTENTS GETTING READY SEWING BASICS UTILITY STITCHES 1 2 3 a Presser foot scale b Length of buttonhole (Diameter + thickness of button) c 5 mm (3/16 inch) Example: For a button with a diameter of 15 mm (9/16 inch) and a thickness of 10 mm (3/8 inch), the button guide plate should be set . Attach buttonhole foot "A". A 2 a Mark on fabric b Red marks on buttonhole foot Pass the upper thread down the buttonhole lever as far as f possible. 1 a Buttonhole lever The buttonhole lever is set...
Users Manual - English
Page 88
... wind the thread by hand. Place the button into button-sewing foot "M", a and then pull the shank lever toward you are finished attaching the button, h slide the drop feed lever to (to raise the feed dogs. 1 Cut off any excess thread. When you . 1 a Shank lever After sewing is needed to the wrong side of the fabric. Tie together the ends of the bobbin thread at the end and at the beginning of the stitching...
... wind the thread by hand. Place the button into button-sewing foot "M", a and then pull the shank lever toward you are finished attaching the button, h slide the drop feed lever to (to raise the feed dogs. 1 Cut off any excess thread. When you . 1 a Shank lever After sewing is needed to the wrong side of the fabric. Tie together the ends of the bobbin thread at the end and at the beginning of the stitching...
Users Manual - English
Page 148
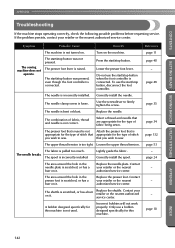
... problems before requesting service. Press the start /stop button was not pressed. The needle is scratched, or has a burr on the machine. The needle clamp screw is not correct. Replace the needle. The combination of fabric being sewn. The upper thread tension is incorrectly installed. Loosen the upper thread tension. The spool is too tight. Lightly guide the fabric. Replace the needle plate. Contact your retailer or the nearest authorized service center. Replace the presser foot. A bobbin designed specifically for the type of fabric, thread and needle...
... problems before requesting service. Press the start /stop button was not pressed. The needle is scratched, or has a burr on the machine. The needle clamp screw is not correct. Replace the needle. The combination of fabric being sewn. The upper thread tension is incorrectly installed. Loosen the upper thread tension. The spool is too tight. Lightly guide the fabric. Replace the needle plate. Contact your retailer or the nearest authorized service center. Replace the presser foot. A bobbin designed specifically for the type of fabric, thread and needle...

Users Manual - English
Page 149
... type of the needle bar thread hook). The thread is tangled, for example, in the shuttle, clean the shuttle. A bobbin designed specifically for this machine is not used. Incorrect bobbins will not work properly. Correctly install the needle. Contact your retailer or the nearest authorized service center. A bobbin designed specifically for this machine is not used , or the thread has come out of thread being used . page 140 page 18 APPENDIX INDEX Troubleshooting 143 Loosen the upper thread tension. Remove the tangle thread. The needle...
... type of the needle bar thread hook). The thread is tangled, for example, in the shuttle, clean the shuttle. A bobbin designed specifically for this machine is not used. Incorrect bobbins will not work properly. Correctly install the needle. Contact your retailer or the nearest authorized service center. A bobbin designed specifically for this machine is not used , or the thread has come out of thread being used . page 140 page 18 APPENDIX INDEX Troubleshooting 143 Loosen the upper thread tension. Remove the tangle thread. The needle...
Users Manual - English
Page 151
.... Correct the upper threading. A bobbin designed specifically for example, in the shuttle, clean the shuttle. Only use a bobbin designed specifically for example, in the shuttle. cannot be used . Press the needle position button to the left. page 27 page 35 The presser foot that appropriate for the type of the presser foot is either the LCD. page 132 The stitch is incorrect. The thread tension is not sewn correctly. Remove the tangle thread. Slide the drop feed lever to raise...
.... Correct the upper threading. A bobbin designed specifically for example, in the shuttle, clean the shuttle. Only use a bobbin designed specifically for example, in the shuttle. cannot be used . Press the needle position button to the left. page 27 page 35 The presser foot that appropriate for the type of the presser foot is either the LCD. page 132 The stitch is incorrect. The thread tension is not sewn correctly. Remove the tangle thread. Slide the drop feed lever to raise...
Users Manual - English
Page 156
...47 bar tack 100 baseline 73 basic stitching 73 basting 72 blind hem stitch 74 , bobbin Cover A 22 , bobbin cover Cover C 23 bobbin thread 22 pulling up 31 , bobbin winder Cover B 19 bobbin winder seat 20 bobbin winder shaft spring 19 , bobbin-winding 2 18 brightness 16 built-in stitches 2 , button sewing 77 81 buttonhole foot 80 buttonhole lever Cover C, 78, 101, 103 buttonhole stitching 76 C C key Cover E changing machine settings 14 changing sewing direction 62 changing the needle 35 changing the settings 14 checking patterns 118 cleaning 140 , cleaning brush Cover...
...47 bar tack 100 baseline 73 basic stitching 73 basting 72 blind hem stitch 74 , bobbin Cover A 22 , bobbin cover Cover C 23 bobbin thread 22 pulling up 31 , bobbin winder Cover B 19 bobbin winder seat 20 bobbin winder shaft spring 19 , bobbin-winding 2 18 brightness 16 built-in stitches 2 , button sewing 77 81 buttonhole foot 80 buttonhole lever Cover C, 78, 101, 103 buttonhole stitching 76 C C key Cover E changing machine settings 14 changing sewing direction 62 changing the needle 35 changing the settings 14 checking patterns 118 cleaning 140 , cleaning brush Cover...
Users Manual - English
Page 157
... GETTING READY SEWING BASICS UTILITY STITCHES L language 17 LCD Cover E 12, 16, 147 , brightness 16 147 leather/vinyl fabrics 64 , lower threading 2 22 M , main power switch Cover C 11 maintenance 140 mirror image 122 N needle 33 , needle bar thread hook Cover C 26 needle clamp screw 36 , needle plate Cover C 64 needle plate cover 140 , needle position 55 73 needle position button Cover D needle set Cover A needle stop position 16 , needle threader lever Cover B 27 , non stick foot Cover A 64 O OK key Cover E open toe foot Cover A openings 100 operating procedures 13...
... GETTING READY SEWING BASICS UTILITY STITCHES L language 17 LCD Cover E 12, 16, 147 , brightness 16 147 leather/vinyl fabrics 64 , lower threading 2 22 M , main power switch Cover C 11 maintenance 140 mirror image 122 N needle 33 , needle bar thread hook Cover C 26 needle clamp screw 36 , needle plate Cover C 64 needle plate cover 140 , needle position 55 73 needle position button Cover D needle set Cover A needle stop position 16 , needle threader lever Cover B 27 , non stick foot Cover A 64 O OK key Cover E open toe foot Cover A openings 100 operating procedures 13...


