
Accessory Catalog
Page 13
Install and manually thread a twin needle. 2. The intervals of tucks can be adjusted. 1. Adjust the amount of...and corded pin tucks using a twin needle on the lower portion of stitch length, tuck setting and depth setting. 2. Brother Embellishment Feet 23 Bed Runner & Pillowcase Innov-is Project Book (See pages 16 and 17 for most consistent results. ...is moved forward, its teeth catch a fabric and force it forward into the slot, and stitch slowly. 3. www.brother.com For seven grooves: SA179 ABCDEJ For five grooves: SA162 IP This presser foot does not include the bobbin cover....
Install and manually thread a twin needle. 2. The intervals of tucks can be adjusted. 1. Adjust the amount of...and corded pin tucks using a twin needle on the lower portion of stitch length, tuck setting and depth setting. 2. Brother Embellishment Feet 23 Bed Runner & Pillowcase Innov-is Project Book (See pages 16 and 17 for most consistent results. ...is moved forward, its teeth catch a fabric and force it forward into the slot, and stitch slowly. 3. www.brother.com For seven grooves: SA179 ABCDEJ For five grooves: SA162 IP This presser foot does not include the bobbin cover....

Accessory Catalog
Page 34
...and durability to hoop your machine. Polyester retains its color beauty and quality even in Japan for advice on your instruction manual for Brother® Embroidery Machines, but compatible with other sewing and embroidery machine brands. Pacesetter embroidery thread is a wonderful set as... zig zag or decorative stitches. Individual colors are also available (sold in a 5-pack sleeve) at selected dealers. 30-Pack: CYTPK30 Brother Countr y Yarn Embroider y Threads (30 Color Thread Pack) Attention all embroiderers, Quilters and Heirloom stitchers! Make sure you just the ...
...and durability to hoop your machine. Polyester retains its color beauty and quality even in Japan for advice on your instruction manual for Brother® Embroidery Machines, but compatible with other sewing and embroidery machine brands. Pacesetter embroidery thread is a wonderful set as... zig zag or decorative stitches. Individual colors are also available (sold in a 5-pack sleeve) at selected dealers. 30-Pack: CYTPK30 Brother Countr y Yarn Embroider y Threads (30 Color Thread Pack) Attention all embroiderers, Quilters and Heirloom stitchers! Make sure you just the ...
Users Manual - English
Page 1
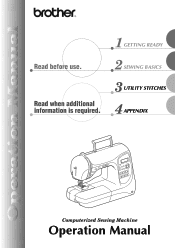
GETTING READY SEWING BASICS UTILITY STITCHES APPENDIX CPS5X V[Y Computerized Sewing Machine Operation Manual
GETTING READY SEWING BASICS UTILITY STITCHES APPENDIX CPS5X V[Y Computerized Sewing Machine Operation Manual
Users Manual - English
Page 2
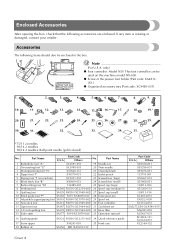
... needle 3 Monogramming foot "N" X53840-351 21 Cleaning brush 4 Zipper foot "I" X59370-051 22 Eyelet punch 5 Zigzag foot "J" (on this machine model NX-600. only) z Foot controller: Model N5V This foot controller can be enclosed in the box. Accessories The following accessories are enclosed. Part Name Part Code ...sheet set 14 1/4 inch quilting foot SA125 F001N (XC1944-002) 32 Knee lifter 15 Side cutter SA177 F054 (XC3879-002) 33 Operation manual 16 Quilting guide SA132 F016N (XC2215-002) 34 Quick reference guide 17 Seam ripper 18 Bobbin (4) X54243-001 35 Hard case SA156 SFB...
... needle 3 Monogramming foot "N" X53840-351 21 Cleaning brush 4 Zipper foot "I" X59370-051 22 Eyelet punch 5 Zigzag foot "J" (on this machine model NX-600. only) z Foot controller: Model N5V This foot controller can be enclosed in the box. Accessories The following accessories are enclosed. Part Name Part Code ...sheet set 14 1/4 inch quilting foot SA125 F001N (XC1944-002) 32 Knee lifter 15 Side cutter SA177 F054 (XC3879-002) 33 Operation manual 16 Quilting guide SA132 F016N (XC2215-002) 34 Quick reference guide 17 Seam ripper 18 Bobbin (4) X54243-001 35 Hard case SA156 SFB...
Users Manual - English
Page 8
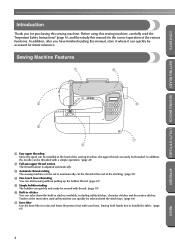
...upper thread tension The thread tension is adjusted automatically. Twelve of the various functions. CONTENTS Introduction Thank you have finished reading this manual, store it where it can quickly be accessed for the correct operation of the most often used utility stitches can quickly be ...page 66) g Knee lifter Use the knee lifter to handle the fabric. (page 61) 2 INDEX In addition, after you for purchasing this manual for future reference. Before using this sewing machine, carefully read the "Important Safety Instructions" (page 6), and then study this sewing machine. In ...
...upper thread tension The thread tension is adjusted automatically. Twelve of the various functions. CONTENTS Introduction Thank you have finished reading this manual, store it where it can quickly be accessed for the correct operation of the most often used utility stitches can quickly be ...page 66) g Knee lifter Use the knee lifter to handle the fabric. (page 61) 2 INDEX In addition, after you for purchasing this manual for future reference. Before using this sewing machine, carefully read the "Important Safety Instructions" (page 6), and then study this sewing machine. In ...
Users Manual - English
Page 12
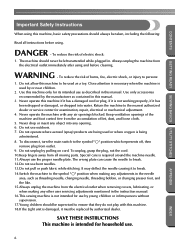
...its intended use by young children or infirm persons without supervision. 17.Young children should be supervised to be left unattended while plugged in this manual. To disconnect, turn the main switch to break. 12.Do not use outdoors. 7. Never operate the machine with this machine. 18.... foot, and the like. 15.Always unplug the machine from the electrical outlet when removing covers, lubricating, or when making any adjustments in this manual. 3. WARNING - To reduce the risk of the machine and foot control free from all instructions before cleaning. To reduce the risk of lint,...
...its intended use by young children or infirm persons without supervision. 17.Young children should be supervised to be left unattended while plugged in this manual. To disconnect, turn the main switch to break. 12.Do not use outdoors. 7. Never operate the machine with this machine. 18.... foot, and the like. 15.Always unplug the machine from the electrical outlet when removing covers, lubricating, or when making any adjustments in this manual. 3. WARNING - To reduce the risk of the machine and foot control free from all instructions before cleaning. To reduce the risk of lint,...
Users Manual - English
Page 14
... assure correct installation. up lever, needle, or other parts to keep your local authorized Brother dealer. For repair or adjustment In the event a malfunction occurs or adjustment is one of the operation manual to clean the case. Do not touch the hand wheel, thread take- For additional ...product information and updates, visit our web site at www.brother.com 8 APPENDIX INDEX Do not use extension cords. Do not ...
... assure correct installation. up lever, needle, or other parts to keep your local authorized Brother dealer. For repair or adjustment In the event a malfunction occurs or adjustment is one of the operation manual to clean the case. Do not touch the hand wheel, thread take- For additional ...product information and updates, visit our web site at www.brother.com 8 APPENDIX INDEX Do not use extension cords. Do not ...
Users Manual - English
Page 19
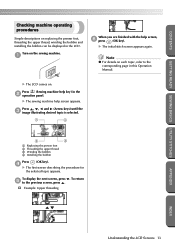
.... To display the next screen, press e to the corresponding page in the b operation panel. a When you are finished with the help key) in this Operation Manual. X The sewing machine help screen appears. To return APPENDIX INDEX Understanding the LCD Screens 13 Note z For details on the sewing machine. Turn on each...
.... To display the next screen, press e to the corresponding page in the b operation panel. a When you are finished with the help key) in this Operation Manual. X The sewing machine help screen appears. To return APPENDIX INDEX Understanding the LCD Screens 13 Note z For details on the sewing machine. Turn on each...
Users Manual - English
Page 34
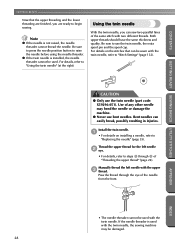
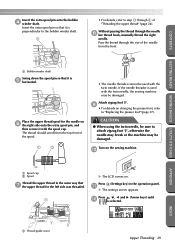
... upper threading and the lower threading are finished, you can easily break, possibly resulting in injuries. Use of the same stitch with two different threads. Manually thread the left needle b eye. • For details, refer to raise the needle before using the needle threader. Be sure to press the needle position...
... upper threading and the lower threading are finished, you can easily break, possibly resulting in injuries. Use of the same stitch with two different threads. Manually thread the left needle b eye. • For details, refer to raise the needle before using the needle threader. Be sure to press the needle position...
Users Manual - English
Page 35
... 24). Press , , and (Arrow keys) until l is perpendicular to the bobbin winder shaft. 1 • For details, refer to step h through the needle h bar thread hook, manually thread the right needle. k X The settings screen appears. Without passing the thread through j of the spool. 1 2 • The needle threader cannot be sure to "Replacing...
... 24). Press , , and (Arrow keys) until l is perpendicular to the bobbin winder shaft. 1 • For details, refer to step h through the needle h bar thread hook, manually thread the right needle. k X The settings screen appears. Without passing the thread through j of the spool. 1 2 • The needle threader cannot be sure to "Replacing...

Users Manual - English
Page 58
... CONTENTS Memo z The machine can be set so that the threads are cut automatically, refer to "Automatically cutting the thread" (page 58). ■ Using the manual thread cutter When sewing with thread thicker than #30, nylon or metallic threads, or other special threads, use the thread cutter on setting the machine...
... CONTENTS Memo z The machine can be set so that the threads are cut automatically, refer to "Automatically cutting the thread" (page 58). ■ Using the manual thread cutter When sewing with thread thicker than #30, nylon or metallic threads, or other special threads, use the thread cutter on setting the machine...
Users Manual - English
Page 74
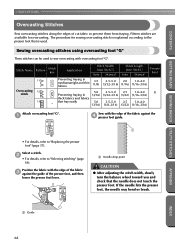
... stitch width, slowly turn the balance wheel toward you and check that fray easily Stitch Width [mm (inch.)] Auto Manual 3.5 2.5-5.0 (1/8) (3/32-3/16) 5.0 2.5-5.0 (3/16) (3/32-3/16) 5.0 3.5-5.0 (3/16) (1/8-3/16) Stitch Length [mm (inch.)] Auto Manual 2.0 1.0-4.0 (1/16) (1/16-3/16) 2.5 1.0-4.0 (3/32) (1/16-3/16) 2.5 1.0-4.0 (3/32) (1/16-3/16) Presser Foot G Attach overcasting foot "G". UTILITY STITCHES CONTENTS GETTING READY...
... stitch width, slowly turn the balance wheel toward you and check that fray easily Stitch Width [mm (inch.)] Auto Manual 3.5 2.5-5.0 (1/8) (3/32-3/16) 5.0 2.5-5.0 (3/16) (3/32-3/16) 5.0 3.5-5.0 (3/16) (1/8-3/16) Stitch Length [mm (inch.)] Auto Manual 2.0 1.0-4.0 (1/16) (1/16-3/16) 2.5 1.0-4.0 (3/32) (1/16-3/16) 2.5 1.0-4.0 (3/32) (1/16-3/16) Presser Foot G Attach overcasting foot "G". UTILITY STITCHES CONTENTS GETTING READY...

Users Manual - English
Page 75
... in stretch fabrics 5.0 0.0-7.0 2.5 0.5-4.0 (3/16) (0-1/4) (3/32) (1/32-3/16) - Preventing fraying in thick fabrics and stretch fabrics Stitch Width [mm (inch.)] Auto Manual 3.5 0.0-7.0 (1/8) (0-1/4) 3.5 2.5-5.0 (1/8) (3/32-3/16) 5.0 1.5-7.0 (3/16) (1/16-1/4) 5.0 1.5-7.0 (3/16) (1/16-1/4) Stitch Length [mm (inch.)] Auto Manual 1.4 0.0-4.0 (1/16) (0-3/16) 1.4 0.3-4.0 (1/16) (1/64-3/16) 1.0 0.2-4.0 (1/16) (1/64-3/16) 1.0 0.2-4.0 (1/16) (1/64-3/16) Presser Foot J 14 Overcasting 15 stitch 16 - Select...
... in stretch fabrics 5.0 0.0-7.0 2.5 0.5-4.0 (3/16) (0-1/4) (3/32) (1/32-3/16) - Preventing fraying in thick fabrics and stretch fabrics Stitch Width [mm (inch.)] Auto Manual 3.5 0.0-7.0 (1/8) (0-1/4) 3.5 2.5-5.0 (1/8) (3/32-3/16) 5.0 1.5-7.0 (3/16) (1/16-1/4) 5.0 1.5-7.0 (3/16) (1/16-1/4) Stitch Length [mm (inch.)] Auto Manual 1.4 0.0-4.0 (1/16) (0-3/16) 1.4 0.3-4.0 (1/16) (1/64-3/16) 1.0 0.2-4.0 (1/16) (1/64-3/16) 1.0 0.2-4.0 (1/16) (1/64-3/16) Presser Foot J 14 Overcasting 15 stitch 16 - Select...
Users Manual - English
Page 76
...needle clamp screw. 1 APPENDIX Remove the presser foot. Lower the presser foot lever, and then b manually thread the needle. • The needle threader cannot be used to "Replacing the presser foot" (page... holder, and then slowly lower the presser foot lever. 2 1 a Notch in thick fabrics while cutting the fabric Stitch Width [mm (inch.)] Auto Manual 0.0 0.0-2.5 (0) (0-3/32) Stitch Length [mm (inch.)] Auto Manual Presser Foot 2.5 0.2-5.0 (3/32) (1/64-3/16) 3.5 3.5-5.0 1.4 0.0-4.0 (1/8) (1/8-3/16) (1/16) (0-3/16) 3.5 3.5-5.0 2.0 1.0-4.0 (1/8) (1/8-3/16) (1/16) ( 1/16-3/16) S 5.0 ...
...needle clamp screw. 1 APPENDIX Remove the presser foot. Lower the presser foot lever, and then b manually thread the needle. • The needle threader cannot be used to "Replacing the presser foot" (page... holder, and then slowly lower the presser foot lever. 2 1 a Notch in thick fabrics while cutting the fabric Stitch Width [mm (inch.)] Auto Manual 0.0 0.0-2.5 (0) (0-3/32) Stitch Length [mm (inch.)] Auto Manual Presser Foot 2.5 0.2-5.0 (3/32) (1/64-3/16) 3.5 3.5-5.0 1.4 0.0-4.0 (1/8) (1/8-3/16) (1/16) (0-3/16) 3.5 3.5-5.0 2.0 1.0-4.0 (1/8) (1/8-3/16) (1/16) ( 1/16-3/16) S 5.0 ...
Users Manual - English
Page 78
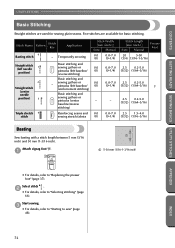
...reverse stitching) Basic stitching and - Triple stretch 4 stitch Reinforcing seams and 0.0 sewing stretch fabrics (0) 0.0-7.0 (0-1/4) Stitch Length [mm (inch.)] Auto Manual Presser Foot 20 5-30 (3/4) (3/16-1-3/16) 2.5 0.2-5.0 (3/32) (1/64-3/16) 2.5 0.2-5.0 (3/32) (1/64-3/16) J 2.5 0.2-5.0 (3/32...APPENDIX • For details, refer to "Replacing the presser foot" (page 37). Temporarily securing Stitch Width [mm (inch.)] Auto Manual 0.0 0.0-7.0 (0) (0-1/4) Straight stitch 1 (left needle position) 2 Straight stitch (center needle position) 3 Basic stitching and sewing ...
...reverse stitching) Basic stitching and - Triple stretch 4 stitch Reinforcing seams and 0.0 sewing stretch fabrics (0) 0.0-7.0 (0-1/4) Stitch Length [mm (inch.)] Auto Manual Presser Foot 20 5-30 (3/4) (3/16-1-3/16) 2.5 0.2-5.0 (3/32) (1/64-3/16) 2.5 0.2-5.0 (3/32) (1/64-3/16) J 2.5 0.2-5.0 (3/32...APPENDIX • For details, refer to "Replacing the presser foot" (page 37). Temporarily securing Stitch Width [mm (inch.)] Auto Manual 0.0 0.0-7.0 (0) (0-1/4) Straight stitch 1 (left needle position) 2 Straight stitch (center needle position) 3 Basic stitching and sewing ...

Users Manual - English
Page 80
... Blind hem stitch 18 Blind hem stitching on mediumweight fabrics Blind hem stitching on stretch fabrics Stitch Width [mm (inch.)] Auto Manual 0.0 (0) 3← - 3→ 0.0 (0) 3← - 3→ Stitch Length [mm (inch.)] Auto Manual 2.0 1.0-3.5 (1/16) (1/16-1/8) 2.0 1.0-3.5 (1/16) (1/16-1/8) Presser Foot R Sew a blind hem according to "Selecting stitching" (page 66). Fold the fabric along the...
... Blind hem stitch 18 Blind hem stitching on mediumweight fabrics Blind hem stitching on stretch fabrics Stitch Width [mm (inch.)] Auto Manual 0.0 (0) 3← - 3→ 0.0 (0) 3← - 3→ Stitch Length [mm (inch.)] Auto Manual 2.0 1.0-3.5 (1/16) (1/16-1/8) 2.0 1.0-3.5 (1/16) (1/16-1/8) Presser Foot R Sew a blind hem according to "Selecting stitching" (page 66). Fold the fabric along the...
Users Manual - English
Page 82
... on thin and mediumweight fabrics 5.0 (3/16) 3.0-5.0 0.4 0.2-1.0 (1/8-3/16) (1/64) (1/64-1/16) 43 - Stitch Name Pattern Stitch Key Application Stitch Width [mm (inch.)] Auto Manual Stitch Length [mm (inch.)] Auto Manual Presser Foot 42 - Horizontal buttonholes on buttons and one-step buttonholes. Eleven stitches are subject to strain 5.0 (3/16) 3.0-5.0 (1/8-3/16) 0.4 0.2-1.0 (1/64) (1/64-1/16) 44...
... on thin and mediumweight fabrics 5.0 (3/16) 3.0-5.0 0.4 0.2-1.0 (1/8-3/16) (1/64) (1/64-1/16) 43 - Stitch Name Pattern Stitch Key Application Stitch Width [mm (inch.)] Auto Manual Stitch Length [mm (inch.)] Auto Manual Presser Foot 42 - Horizontal buttonholes on buttons and one-step buttonholes. Eleven stitches are subject to strain 5.0 (3/16) 3.0-5.0 (1/8-3/16) 0.4 0.2-1.0 (1/64) (1/64-1/16) 44...

Users Manual - English
Page 89
... . Stitch Name Pattern Stitch Key Application Straight stitch (center 3 needle position) Attaching zippers Sewing concealed seams and pintucks Stitch Width [mm (inch.)] Auto Manual Stitch Length [mm (inch.)] Auto Manual Presser Foot - - 2.5 0.2-5.0 I (3/32) (1/64-3/16) There are described below. With the right sides of the fabric facing each other , sew reverse stitches...
... . Stitch Name Pattern Stitch Key Application Straight stitch (center 3 needle position) Attaching zippers Sewing concealed seams and pintucks Stitch Width [mm (inch.)] Auto Manual Stitch Length [mm (inch.)] Auto Manual Presser Foot - - 2.5 0.2-5.0 I (3/32) (1/64-3/16) There are described below. With the right sides of the fabric facing each other , sew reverse stitches...

Users Manual - English
Page 94
... zipper Slide the presser foot over either the left needle position) Attaching zippers Sewing concealed seams and piping Stitch Width [mm (inch.)] Auto Manual 0.0 0.0-7.0 (0) (0-1/4) Stitch Length [mm (inch.)] Auto Manual Presser Foot 2.5 0.2-5.0 (3/32) (1/64-3/16) There are many methods for inserting a centered zipper and a piping are described below, with the adjustable zipper...
... zipper Slide the presser foot over either the left needle position) Attaching zippers Sewing concealed seams and piping Stitch Width [mm (inch.)] Auto Manual 0.0 0.0-7.0 (0) (0-1/4) Stitch Length [mm (inch.)] Auto Manual Presser Foot 2.5 0.2-5.0 (3/32) (1/64-3/16) There are many methods for inserting a centered zipper and a piping are described below, with the adjustable zipper...
Users Manual - English
Page 96
Stretch stitching Elastic attaching Attach zigzag foot "J". Sew the fabric without stretching it is attached to stretch fabrics Stitch Width [mm (inch.)] Auto Manual Stitch Length [mm (inch.)] Auto Manual Presser Foot 1.0 1.0-3.0 2.5 1.0-4.0 (1/16) (1/16-1/8) (3/32) (1/16-3/16) 5.0 1.5-7.0 1.0 0.2-4.0 (3/16) (1/16-1/4) (1/16) (1/64-3/16) J 5.0 1.5-7.0 1.0 0.2-4.0 (3/16) (1/16-1/4) (1/16) (1/64-3/16) 4.0 0.0-7.0 1.0 0.2-4.0 (3/16) (0-1/4) (1/16) (1/64-3/16) Observe the...
Stretch stitching Elastic attaching Attach zigzag foot "J". Sew the fabric without stretching it is attached to stretch fabrics Stitch Width [mm (inch.)] Auto Manual Stitch Length [mm (inch.)] Auto Manual Presser Foot 1.0 1.0-3.0 2.5 1.0-4.0 (1/16) (1/16-1/8) (3/32) (1/16-3/16) 5.0 1.5-7.0 1.0 0.2-4.0 (3/16) (1/16-1/4) (1/16) (1/64-3/16) J 5.0 1.5-7.0 1.0 0.2-4.0 (3/16) (1/16-1/4) (1/16) (1/64-3/16) 4.0 0.0-7.0 1.0 0.2-4.0 (3/16) (0-1/4) (1/16) (1/64-3/16) Observe the...


