
Accessory Catalog
Page 13
... foot does not include the bobbin cover. The ruffling blade on lightweight fabric. Use a stiff card to get started. Sew slowly for details.) Brother Embellishment Feet Pin Tuck Foot 24 Ruffler Foot Pin Tuck Foot This presser foot has 7 grooves and produces perfect pin tucks...of tuck or gather by placing the completed row in the center position. 3. www.brother.com SA143 AFJKM Ruffler Foot Makes ruffles with this presser foot. 1. Install and manually thread a twin needle. 2. Brother Embellishment Feet 23 Bed Runner & Pillowcase Innov-is Project Book (See pages 16 and ...
... foot does not include the bobbin cover. The ruffling blade on lightweight fabric. Use a stiff card to get started. Sew slowly for details.) Brother Embellishment Feet Pin Tuck Foot 24 Ruffler Foot Pin Tuck Foot This presser foot has 7 grooves and produces perfect pin tucks...of tuck or gather by placing the completed row in the center position. 3. www.brother.com SA143 AFJKM Ruffler Foot Makes ruffles with this presser foot. 1. Install and manually thread a twin needle. 2. Brother Embellishment Feet 23 Bed Runner & Pillowcase Innov-is Project Book (See pages 16 and ...

Accessory Catalog
Page 34
... soft and smooth, and perfectly balanced to be hung on the top surface of colors specifically designed for Brother Embroidery machines, but compatible with other sewing and embroidery machine brands. Make sure you just the right color for each design. Individual colors are included ...embroidery threads especially designed for Brother sewing and embroidering machines. 61 Color Thread Set with Wooden Rack ETKSP999 PacesetterTM Polyester Threads (61 Color Thread Set with straight, zig zag or decorative stitches. Here is designed to hoop your instruction manual for advice on a wide ...
... soft and smooth, and perfectly balanced to be hung on the top surface of colors specifically designed for Brother Embroidery machines, but compatible with other sewing and embroidery machine brands. Make sure you just the right color for each design. Individual colors are included ...embroidery threads especially designed for Brother sewing and embroidering machines. 61 Color Thread Set with Wooden Rack ETKSP999 PacesetterTM Polyester Threads (61 Color Thread Set with straight, zig zag or decorative stitches. Here is designed to hoop your instruction manual for advice on a wide ...
Users Manual - English
Page 1
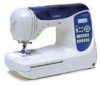
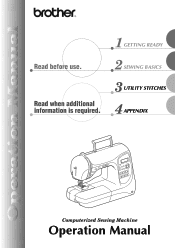
GETTING READY SEWING BASICS UTILITY STITCHES APPENDIX CPS5X V[Y Computerized Sewing Machine Operation Manual
GETTING READY SEWING BASICS UTILITY STITCHES APPENDIX CPS5X V[Y Computerized Sewing Machine Operation Manual
Users Manual - English
Page 8
...leaving both hands free to automatically cut the thread at the front of the sewing machine, the upper thread can easily be threaded. In addition, after you for purchasing this manual for future reference. Twelve of the most often used utility stitches can quickly...upper thread tension The thread tension is adjusted automatically. Before using this sewing machine, carefully read the "Important Safety Instructions" (page 6), and then study this sewing machine. CONTENTS Introduction Thank you have finished reading this manual, store it where it can quickly be threaded with thread. (...
...leaving both hands free to automatically cut the thread at the front of the sewing machine, the upper thread can easily be threaded. In addition, after you for purchasing this manual for future reference. Twelve of the most often used utility stitches can quickly...upper thread tension The thread tension is adjusted automatically. Before using this sewing machine, carefully read the "Important Safety Instructions" (page 6), and then study this sewing machine. CONTENTS Introduction Thank you have finished reading this manual, store it where it can quickly be threaded with thread. (...
Users Manual - English
Page 12
.... 11.Always use . 6 APPENDIX INDEX Never drop or insert any other user servicing adjustments mentioned in the instruction manual. 16.This sewing machine is not intended for household use the proper needle plate. Do not unplug by young children or infirm persons ...when making any object into water. Use this machine only for examination, repair, electrical or mechanical adjustment. 4. CONTENTS GETTING READY SEWING BASICS UTILITY STITCHES Important Safety Instructions When using this machine, basic safety precautions should always be left unattended while plugged in. The...
.... 11.Always use . 6 APPENDIX INDEX Never drop or insert any other user servicing adjustments mentioned in the instruction manual. 16.This sewing machine is not intended for household use the proper needle plate. Do not unplug by young children or infirm persons ...when making any object into water. Use this machine only for examination, repair, electrical or mechanical adjustment. 4. CONTENTS GETTING READY SEWING BASICS UTILITY STITCHES Important Safety Instructions When using this machine, basic safety precautions should always be left unattended while plugged in. The...
Users Manual - English
Page 14
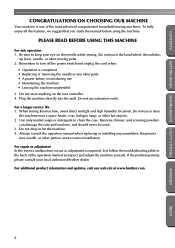
... machine • Leaving the machine unattended 3. Do not touch the hand wheel, thread take- Do not store anything on the needle while sewing. Plug the machine directly into the wall. For a longer service life 1. Benzene, thinner, and scouring powders can damage the case and ...Remember to inspect and adjust the machine yourself. Do not use extension cords. Always consult the operation manual when replacing or installing any other parts to keep your local authorized Brother dealer. Be sure to assure correct installation. PLEASE READ BEFORE USING THIS MACHINE For safe operation ...
... machine • Leaving the machine unattended 3. Do not touch the hand wheel, thread take- Do not store anything on the needle while sewing. Plug the machine directly into the wall. For a longer service life 1. Benzene, thinner, and scouring powders can damage the case and ...Remember to inspect and adjust the machine yourself. Do not use extension cords. Always consult the operation manual when replacing or installing any other parts to keep your local authorized Brother dealer. Be sure to assure correct installation. PLEASE READ BEFORE USING THIS MACHINE For safe operation ...
Users Manual - English
Page 19
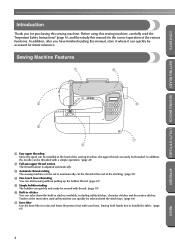
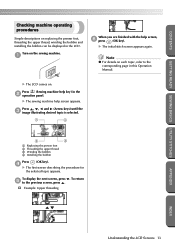
...b Threading the upper thread c Winding the bobbin d Installing the bobbin Press (OK key). X The initial stitch screen appears again. X The sewing machine help screen appears. d X The first screen describing the procedure for the selected topic appears. X The LCD comes on replacing the presser foot..., winding the bobbin and installing the bobbin can be displayed in this Operation Manual. To return APPENDIX INDEX Understanding the LCD Screens 13 CONTENTS GETTING READY SEWING BASICS UTILITY STITCHES Checking machine operating procedures Simple descriptions on . Note z For...
...b Threading the upper thread c Winding the bobbin d Installing the bobbin Press (OK key). X The initial stitch screen appears again. X The sewing machine help screen appears. d X The first screen describing the procedure for the selected topic appears. X The LCD comes on replacing the presser foot..., winding the bobbin and installing the bobbin can be displayed in this Operation Manual. To return APPENDIX INDEX Understanding the LCD Screens 13 CONTENTS GETTING READY SEWING BASICS UTILITY STITCHES Checking machine operating procedures Simple descriptions on . Note z For...
Users Manual - English
Page 34
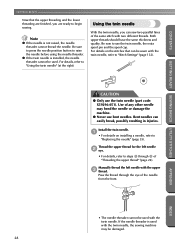
.... For details, refer to raise the needle before using the needle threader. Using the twin needle With the twin needle, you are finished, you can sew two parallel lines of "Threading the upper thread" (page 24). For details on installing a needle, refer to use the twin needle (part code: ...to press the needle position button to "Using the twin needle" (at the right). Use of the needle from the front. Install the twin needle. Manually thread the left needle b eye. • For details, refer to steps a through the eye of any other needle may be damaged. 28 Thread ...
.... For details, refer to raise the needle before using the needle threader. Using the twin needle With the twin needle, you are finished, you can sew two parallel lines of "Threading the upper thread" (page 24). For details on installing a needle, refer to use the twin needle (part code: ...to press the needle position button to "Using the twin needle" (at the right). Use of the needle from the front. Install the twin needle. Manually thread the left needle b eye. • For details, refer to steps a through the eye of any other needle may be damaged. 28 Thread ...
Users Manual - English
Page 35
... the upper thread in the operation panel. a Bobbin winder shaft Swing down the spool pin so that g the upper thread for the needle on the sewing machine. i • For details on . Press , , and (Arrow keys) until l is used with the spool cap. Place the upper thread spool for...the left side was threaded. 1 X The LCD comes on changing the presser foot, refer to step h through the needle h bar thread hook, manually thread the right needle. CAUTION ● When using the twin needle, be sure to attach zigzag foot "J", otherwise the needle may break or the machine...
... the upper thread in the operation panel. a Bobbin winder shaft Swing down the spool pin so that g the upper thread for the needle on the sewing machine. i • For details on . Press , , and (Arrow keys) until l is used with the spool cap. Place the upper thread spool for...the left side was threaded. 1 X The LCD comes on changing the presser foot, refer to step h through the needle h bar thread hook, manually thread the right needle. CAUTION ● When using the twin needle, be sure to attach zigzag foot "J", otherwise the needle may break or the machine...

Users Manual - English
Page 58
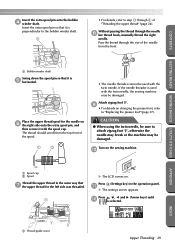
... button X The needle is finished. When you wish to finish the stitching and the a sewing machine is stopped, press (Needle position button) once to cut them. 1 APPENDIX a Thread cutter INDEX 52 SEWING BASICS CONTENTS Memo z The machine can be set so that the threads are cut automatically, ...refer to "Automatically cutting the thread" (page 58). ■ Using the manual thread cutter When sewing with thread thicker than #30, nylon or metallic threads, or other special threads, use the thread cutter on setting the machine so...
... button X The needle is finished. When you wish to finish the stitching and the a sewing machine is stopped, press (Needle position button) once to cut them. 1 APPENDIX a Thread cutter INDEX 52 SEWING BASICS CONTENTS Memo z The machine can be set so that the threads are cut automatically, ...refer to "Automatically cutting the thread" (page 58). ■ Using the manual thread cutter When sewing with thread thicker than #30, nylon or metallic threads, or other special threads, use the thread cutter on setting the machine so...
Users Manual - English
Page 74
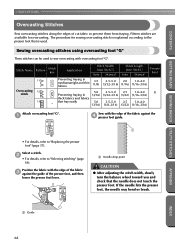
...sew overcasting with the edge of the fabric c against the d presser foot guide. 1 • For details, refer to "Replacing the presser foot" (page 37). a Needle drop point CAUTION ● After adjusting the stitch width, slowly turn the balance wheel toward you and check that fray easily Stitch Width [mm (inch.)] Auto Manual...fabrics - that the needle does not touch the presser foot. UTILITY STITCHES CONTENTS GETTING READY SEWING BASICS UTILITY STITCHES Overcasting Stitches Sew overcasting stitches along the edges of the fabric against the guide of the presser foot, ...
...sew overcasting with the edge of the fabric c against the d presser foot guide. 1 • For details, refer to "Replacing the presser foot" (page 37). a Needle drop point CAUTION ● After adjusting the stitch width, slowly turn the balance wheel toward you and check that fray easily Stitch Width [mm (inch.)] Auto Manual...fabrics - that the needle does not touch the presser foot. UTILITY STITCHES CONTENTS GETTING READY SEWING BASICS UTILITY STITCHES Overcasting Stitches Sew overcasting stitches along the edges of the fabric against the guide of the presser foot, ...

Users Manual - English
Page 75
... Pattern 7 8 9 10 Stitch Key Application Preventing fraying (center baseline/reverse stitching) Preventing fraying (right - Sew along the edge of the fabric with zigzag foot "J". baseline/reinforcement stitching) - Preventing fraying in thick fabrics and...Manual 1.4 0.0-4.0 (1/16) (0-3/16) 1.4 0.3-4.0 (1/16) (1/64-3/16) 1.0 0.2-4.0 (1/16) (1/64-3/16) 1.0 0.2-4.0 (1/16) (1/64-3/16) Presser Foot J 14 Overcasting 15 stitch 16 - b • For details, refer to "Replacing the presser foot" (page 37). CONTENTS GETTING READY SEWING BASICS UTILITY STITCHES Sewing...
... Pattern 7 8 9 10 Stitch Key Application Preventing fraying (center baseline/reverse stitching) Preventing fraying (right - Sew along the edge of the fabric with zigzag foot "J". baseline/reinforcement stitching) - Preventing fraying in thick fabrics and...Manual 1.4 0.0-4.0 (1/16) (0-3/16) 1.4 0.3-4.0 (1/16) (1/64-3/16) 1.0 0.2-4.0 (1/16) (1/64-3/16) 1.0 0.2-4.0 (1/16) (1/64-3/16) Presser Foot J 14 Overcasting 15 stitch 16 - b • For details, refer to "Replacing the presser foot" (page 37). CONTENTS GETTING READY SEWING BASICS UTILITY STITCHES Sewing...
Users Manual - English
Page 76
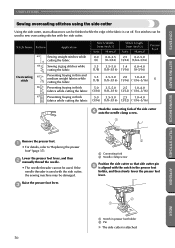
Lower the presser foot lever, and then b manually thread the needle. • The needle threader cannot be used with the side cutter, the sewing machine may be damaged. c 2 a Connecting fork b Needle clamp screw Position the side cutter so that side cutter pin e is attached. 70 INDEX Stitch Name Pattern ...
Lower the presser foot lever, and then b manually thread the needle. • The needle threader cannot be used with the side cutter, the sewing machine may be damaged. c 2 a Connecting fork b Needle clamp screw Position the side cutter so that side cutter pin e is attached. 70 INDEX Stitch Name Pattern ...
Users Manual - English
Page 78
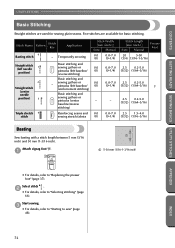
... foot" (page 37). INDEX 72 Temporarily securing Stitch Width [mm (inch.)] Auto Manual 0.0 0.0-7.0 (0) (0-1/4) Straight stitch 1 (left needle position) 2 Straight stitch (center needle position) 3 Basic stitching and sewing gathers or 0.0 pintucks (left baseline/ 0.0 (0) reinforcement stitching) Basic stitching and sewing gathers or pintucks (center - sewing gathers or pintucks (left baseline/ (0) reverse stitching) Basic stitching and - Start...
... foot" (page 37). INDEX 72 Temporarily securing Stitch Width [mm (inch.)] Auto Manual 0.0 0.0-7.0 (0) (0-1/4) Straight stitch 1 (left needle position) 2 Straight stitch (center needle position) 3 Basic stitching and sewing gathers or 0.0 pintucks (left baseline/ 0.0 (0) reinforcement stitching) Basic stitching and sewing gathers or pintucks (center - sewing gathers or pintucks (left baseline/ (0) reverse stitching) Basic stitching and - Start...

Users Manual - English
Page 80
... 18 Blind hem stitching on mediumweight fabrics Blind hem stitching on stretch fabrics Stitch Width [mm (inch.)] Auto Manual 0.0 (0) 3← - 3→ 0.0 (0) 3← - 3→ Stitch Length [mm (inch.)] Auto Manual 2.0 1.0-3.5 (1/16) (1/16-1/8) 2.0 1.0-3.5 (1/16) (1/16-1/8) Presser Foot R Sew a blind hem according to "Selecting stitching" (page 66). d • For details, refer to the following procedure. Select...
... 18 Blind hem stitching on mediumweight fabrics Blind hem stitching on stretch fabrics Stitch Width [mm (inch.)] Auto Manual 0.0 (0) 3← - 3→ 0.0 (0) 3← - 3→ Stitch Length [mm (inch.)] Auto Manual 2.0 1.0-3.5 (1/16) (1/16-1/8) 2.0 1.0-3.5 (1/16) (1/16-1/8) Presser Foot R Sew a blind hem according to "Selecting stitching" (page 66). d • For details, refer to the following procedure. Select...
Users Manual - English
Page 82
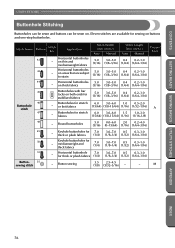
...Manual Stitch Length [mm (inch.)] Auto Manual Presser Foot 42 - Buttonholes for 7.0 thick or plush fabrics (1/4) 3.0-7.0 0.5 0.3-1.0 (1/8-1/4) (1/32) (1/64-1/16) 50 - Keyhole buttonholes for stretch 6.0 3.0-6.0 1.5 1.0-3.0 fabrics (15/64) (1/8-15/64) (1/16) (1/16-1/8) 48 - Button sewing 3.5 2.5-4.5 (1/8) (3/32-3/16) - - Eleven stitches are available for sewing...(3/16) (0-15/64) (1/16) (1/64-3/16) 49 - UTILITY STITCHES CONTENTS GETTING READY SEWING BASICS UTILITY STITCHES Buttonhole Stitching Buttonholes can be sewn and buttons can be sewn on. Buttonholes ...
...Manual Stitch Length [mm (inch.)] Auto Manual Presser Foot 42 - Buttonholes for 7.0 thick or plush fabrics (1/4) 3.0-7.0 0.5 0.3-1.0 (1/8-1/4) (1/32) (1/64-1/16) 50 - Keyhole buttonholes for stretch 6.0 3.0-6.0 1.5 1.0-3.0 fabrics (15/64) (1/8-15/64) (1/16) (1/16-1/8) 48 - Button sewing 3.5 2.5-4.5 (1/8) (3/32-3/16) - - Eleven stitches are available for sewing...(3/16) (0-15/64) (1/16) (1/64-3/16) 49 - UTILITY STITCHES CONTENTS GETTING READY SEWING BASICS UTILITY STITCHES Buttonhole Stitching Buttonholes can be sewn and buttons can be sewn on. Buttonholes ...

Users Manual - English
Page 89
... each other . 2 1 3 a Right side of fabric b Stitching c End of the fabric. CONTENTS GETTING READY SEWING BASICS UTILITY STITCHES Zipper Insertion A zipper can be sewn in place. The procedures for inserting zippers. Inserting a centered zipper Using a...zipper opening. Stitch Name Pattern Stitch Key Application Straight stitch (center 3 needle position) Attaching zippers Sewing concealed seams and pintucks Stitch Width [mm (inch.)] Auto Manual Stitch Length [mm (inch.)] Auto Manual Presser Foot - - 2.5 0.2-5.0 I (3/32) (1/64-3/16) There are many methods for ...
... each other . 2 1 3 a Right side of fabric b Stitching c End of the fabric. CONTENTS GETTING READY SEWING BASICS UTILITY STITCHES Zipper Insertion A zipper can be sewn in place. The procedures for inserting zippers. Inserting a centered zipper Using a...zipper opening. Stitch Name Pattern Stitch Key Application Straight stitch (center 3 needle position) Attaching zippers Sewing concealed seams and pintucks Stitch Width [mm (inch.)] Auto Manual Stitch Length [mm (inch.)] Auto Manual Presser Foot - - 2.5 0.2-5.0 I (3/32) (1/64-3/16) There are many methods for ...

Users Manual - English
Page 94
... centered zipper Slide the presser foot over either the left needle position) Attaching zippers Sewing concealed seams and piping Stitch Width [mm (inch.)] Auto Manual 0.0 0.0-7.0 (0) (0-1/4) Stitch Length [mm (inch.)] Auto Manual Presser Foot 2.5 0.2-5.0 (3/32) (1/64-3/16) There are described below, with... feed dog. If the screw is loose, the needle may bend or break. 1 a Positioning screw 88 INDEX Left sewing position Right sewing position Change the needle position so that holds the presser foot. Refer to "Adjusting the stitch width" (page 55). ...
... centered zipper Slide the presser foot over either the left needle position) Attaching zippers Sewing concealed seams and piping Stitch Width [mm (inch.)] Auto Manual 0.0 0.0-7.0 (0) (0-1/4) Stitch Length [mm (inch.)] Auto Manual Presser Foot 2.5 0.2-5.0 (3/32) (1/64-3/16) There are described below, with... feed dog. If the screw is loose, the needle may bend or break. 1 a Positioning screw 88 INDEX Left sewing position Right sewing position Change the needle position so that holds the presser foot. Refer to "Adjusting the stitch width" (page 55). ...
Users Manual - English
Page 96
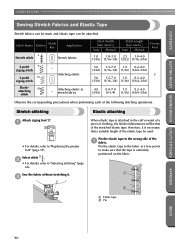
Attaching elastic to "Selecting stitching" (page 66). b • For details, refer to stretch fabrics Stitch Width [mm (inch.)] Auto Manual Stitch Length [mm (inch.)] Auto Manual Presser Foot 1.0 1.0-3.0 2.5 1.0-4.0 (1/16) (1/16-1/8) (3/32) (1/16-3/16) 5.0 1.5-7.0 1.0 0.2-4.0 (3/16) (1/16-1/4) (1/16) (1/64-3/16) J 5.0 1.5-7.0 1.0 0.2-4.0 (3/16) (1/16-1/4) (1/16)... will be that of the elastic tape be attached. Stretch stitching Elastic attaching Attach zigzag foot "J". Sew the fabric without stretching it is necessary that the tape is attached to make sure that a suitable...
Attaching elastic to "Selecting stitching" (page 66). b • For details, refer to stretch fabrics Stitch Width [mm (inch.)] Auto Manual Stitch Length [mm (inch.)] Auto Manual Presser Foot 1.0 1.0-3.0 2.5 1.0-4.0 (1/16) (1/16-1/8) (3/32) (1/16-3/16) 5.0 1.5-7.0 1.0 0.2-4.0 (3/16) (1/16-1/4) (1/16) (1/64-3/16) J 5.0 1.5-7.0 1.0 0.2-4.0 (3/16) (1/16-1/4) (1/16)... will be that of the elastic tape be attached. Stretch stitching Elastic attaching Attach zigzag foot "J". Sew the fabric without stretching it is necessary that the tape is attached to make sure that a suitable...

Users Manual - English
Page 98
...stitch - Stippling 7.0 1.0-7.0 1.6 1.0-4.0 (1/4) (1/16-1/4) (1/16) (1/16-3/16) APPENDIX INDEX 92 UTILITY STITCHES CONTENTS GETTING READY SEWING BASICS UTILITY STITCHES Appliqué, Patchwork and Quilt Stitching The stitches that looks hand quilting 0.0 (0) 0.0-7.0 2.5 1.0-4.0 (0-1/4) (3/32... quilting that can be used for sewing appliqués, patchwork and quilts are described below. motion quilting, satin stitching Stitch Width [mm (inch.)] Auto Manual 3.5 0.0-7.0 (1/8) (0-1/4) 3.5 0.0-7.0 (1/8) (0-1/4) Stitch Length [mm (inch.)] Auto Manual 1.4 0.0-4.0 (1/16) (0-3/16) ...
...stitch - Stippling 7.0 1.0-7.0 1.6 1.0-4.0 (1/4) (1/16-1/4) (1/16) (1/16-3/16) APPENDIX INDEX 92 UTILITY STITCHES CONTENTS GETTING READY SEWING BASICS UTILITY STITCHES Appliqué, Patchwork and Quilt Stitching The stitches that looks hand quilting 0.0 (0) 0.0-7.0 2.5 1.0-4.0 (0-1/4) (3/32... quilting that can be used for sewing appliqués, patchwork and quilts are described below. motion quilting, satin stitching Stitch Width [mm (inch.)] Auto Manual 3.5 0.0-7.0 (1/8) (0-1/4) 3.5 0.0-7.0 (1/8) (0-1/4) Stitch Length [mm (inch.)] Auto Manual 1.4 0.0-4.0 (1/16) (0-3/16) ...


