Users Manual - English
Page 106
... 100 to 120 V 50/60 Hz Copy Mode: Approx. 19 W 3 Ready Mode: Approx. 5.5 W Sleep Mode: Approx. 2 W Off: Approx. 0.2 W 1 Measured diagonally. 2 Measured when the machine is connected to the USB interface. 3 When using ADF, resolution: standard / document: ISO/IEC 24712 printed pattern. 92 For additional specifications visit http://www...
... 100 to 120 V 50/60 Hz Copy Mode: Approx. 19 W 3 Ready Mode: Approx. 5.5 W Sleep Mode: Approx. 2 W Off: Approx. 0.2 W 1 Measured diagonally. 2 Measured when the machine is connected to the USB interface. 3 When using ADF, resolution: standard / document: ISO/IEC 24712 printed pattern. 92 For additional specifications visit http://www...
Users Manual - English
Page 113
D 99 IEEE 802.11b/g/n (Infrastructure/Ad-hoc Mode) 1 Your machine has a USB 2.0 Hi-Speed interface. The machine can also be connected to a computer that is no longer than 6 feet (2 m). Specifications Interfaces D USB 1 2 Wireless LAN Use a USB 2.0 interface cable that has a USB 1.1 interface. 2 Third party USB ports are not supported.
D 99 IEEE 802.11b/g/n (Infrastructure/Ad-hoc Mode) 1 Your machine has a USB 2.0 Hi-Speed interface. The machine can also be connected to a computer that is no longer than 6 feet (2 m). Specifications Interfaces D USB 1 2 Wireless LAN Use a USB 2.0 interface cable that has a USB 1.1 interface. 2 Third party USB ports are not supported.
Quick Setup Guide - English
Page 4
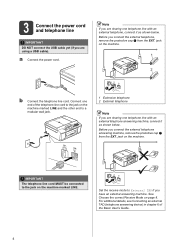
... power cord and telephone line IMPORTANT DO NOT connect the USB cable yet (if you are sharing one telephone line with an external telephone, connect it as shown below . a Connect the power cord. For additional details, see Connecting an external TAD (telephone answering device) in ... mode to a modular wall jack. 1 1 Extension telephone 2 External telephone Note If you are using a USB cable). Connect one telephone line with an external telephone answering machine, connect it as shown below . Note If you connect the external telephone, remove the protective cap a from the EXT.
... power cord and telephone line IMPORTANT DO NOT connect the USB cable yet (if you are sharing one telephone line with an external telephone, connect it as shown below . a Connect the power cord. For additional details, see Connecting an external TAD (telephone answering device) in ... mode to a modular wall jack. 1 1 Extension telephone 2 External telephone Note If you are using a USB cable). Connect one telephone line with an external telephone answering machine, connect it as shown below . Note If you connect the external telephone, remove the protective cap a from the EXT.
Quick Setup Guide - English
Page 13
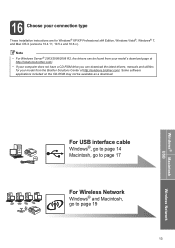
16 Choose your connection type These installation instructions are for your model from your model's download page at http://solutions.brother.com/. • If your computer does not have a CD-ROM drive you can be available as a download. Note • For Windows Server® 2003... X (versions 10.4.11, 10.5.x and 10.6.x). Some software applications included on the CD-ROM may not be found from the Brother Solutions Center at http://solutions.brother.com/. For USB interface cable Windows®, go to page 14 Macintosh, go to page 17 For Wireless Network Windows® and Macintosh, go ...
16 Choose your connection type These installation instructions are for your model from your model's download page at http://solutions.brother.com/. • If your computer does not have a CD-ROM drive you can be available as a download. Note • For Windows Server® 2003... X (versions 10.4.11, 10.5.x and 10.6.x). Some software applications included on the CD-ROM may not be found from the Brother Solutions Center at http://solutions.brother.com/. For USB interface cable Windows®, go to page 14 Macintosh, go to page 17 For Wireless Network Windows® and Macintosh, go ...
Quick Setup Guide - English
Page 14
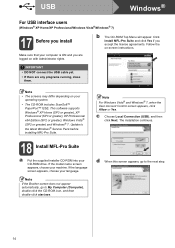
IMPORTANT • DO NOT connect the USB cable yet. • If there are logged on with Administrator rights. Note If the Brother screen does not appear automatically, go to the next step. 14 Click Install MFL-Pro Suite and click Yes if you are any ... language. Follow the on your machine. If the language screen appears, choose your computer is ON and you accept the license agreements. c Choose Local Connection (USB), and then click Next. This software supports Windows® XP Home (SP3 or greater), XP Professional (SP3 or greater), XP Professional x64 Edition (...
IMPORTANT • DO NOT connect the USB cable yet. • If there are logged on with Administrator rights. Note If the Brother screen does not appear automatically, go to the next step. 14 Click Install MFL-Pro Suite and click Yes if you are any ... language. Follow the on your machine. If the language screen appears, choose your computer is ON and you accept the license agreements. c Choose Local Connection (USB), and then click Next. This software supports Windows® XP Home (SP3 or greater), XP Professional (SP3 or greater), XP Professional x64 Edition (...
Quick Setup Guide - English
Page 15
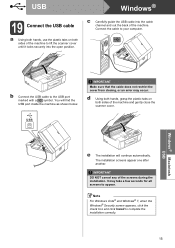
...installation screens appear one after another. It may occur. Connect the cable to appear. d Using both hands, grasp the plastic tabs on both sides of the machine. USB Windows® Macintosh USB e The installation will find the USB port inside the machine as shown below. You will .... c Carefully guide the USB cable into the open position. Note For Windows Vista® and Windows® 7, when the Windows® Security screen appears, click the check box and click Install to the USB port marked with a symbol. b Connect the USB cable to complete the installation...
...installation screens appear one after another. It may occur. Connect the cable to appear. d Using both hands, grasp the plastic tabs on both sides of the machine. USB Windows® Macintosh USB e The installation will find the USB port inside the machine as shown below. You will .... c Carefully guide the USB cable into the open position. Note For Windows Vista® and Windows® 7, when the Windows® Security screen appears, click the check box and click Install to the USB port marked with a symbol. b Connect the USB cable to complete the installation...
Quick Setup Guide - English
Page 17
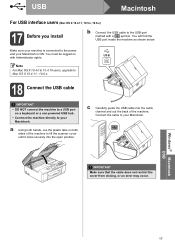
... does not restrict the cover from closing, or an error may occur. USB 18 Connect the USB cable IMPORTANT • DO NOT connect the machine to a USB port on both hands, use the plastic tabs on a keyboard or a non-powered USB hub. • Connect the machine directly to your Macintosh. You must be logged on with a symbol...
... does not restrict the cover from closing, or an error may occur. USB 18 Connect the USB cable IMPORTANT • DO NOT connect the machine to a USB port on both hands, use the plastic tabs on a keyboard or a non-powered USB hub. • Connect the machine directly to your Macintosh. You must be logged on with a symbol...
Quick Setup Guide - English
Page 18
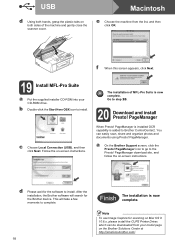
... click OK. PageManager. PageManager download site, and follow the on -screen instructions. c Choose Local Connection (USB), and then click Next. PageManager When Presto! PageManager is installed OCR capability is added to install. This will search for the Brother device. d Please wait for scanning on both hands, grasp the plastic tabs on Mac OS...
... click OK. PageManager. PageManager download site, and follow the on -screen instructions. c Choose Local Connection (USB), and then click Next. PageManager When Presto! PageManager is installed OCR capability is added to install. This will search for the Brother device. d Please wait for scanning on both hands, grasp the plastic tabs on Mac OS...
Quick Setup Guide - English
Page 19
... with minimal obstructions. Press a or b to the network access point/router as possible with normal everyday document printing, place the Brother machine as close to choose Network and press OK. If you are for Yes to install the drivers and software. Note If you... machine, press Menu. The following the instructions below. 1 Turn on your machine) c Wireless capable computer connected to the access point/router d Wired computer connected to consider choosing USB for all types of your documents. After the machine is configured to communicate with mixed text and large graphics...
... with minimal obstructions. Press a or b to the network access point/router as possible with normal everyday document printing, place the Brother machine as close to choose Network and press OK. If you are for Yes to install the drivers and software. Note If you... machine, press Menu. The following the instructions below. 1 Turn on your machine) c Wireless capable computer connected to the access point/router d Wired computer connected to consider choosing USB for all types of your documents. After the machine is configured to communicate with mixed text and large graphics...

Quick Setup Guide - English
Page 20
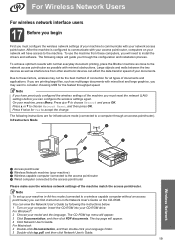
...you are using Windows® XP, or currently using a computer connected to an access point/router by network cable, you prefer for your system administrator, or internet provider. a Configuration using the CD-ROM installer and a USB cable (Windows® only) • You need to page ...please consult the router manufacturer, your environment. How can I find this information (SSID and Network Key), you do not contact Brother Customer Service for assistance without the wireless security information. Now go to know your network security settings. For Wireless Network Users 18 ...
...you are using Windows® XP, or currently using a computer connected to an access point/router by network cable, you prefer for your system administrator, or internet provider. a Configuration using the CD-ROM installer and a USB cable (Windows® only) • You need to page ...please consult the router manufacturer, your environment. How can I find this information (SSID and Network Key), you do not contact Brother Customer Service for assistance without the wireless security information. Now go to know your network security settings. For Wireless Network Users 18 ...
Quick Setup Guide - English
Page 22
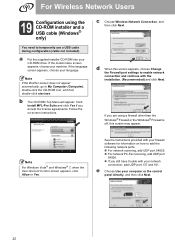
...start.exe. If you are using the CD-ROM installer and a USB cable (Windows® only) You need to temporarily use a USB cable during configuration (cable not included). and then click Next. 22 Note If the Brother screen does not appear automatically, go to add the following network ... 54926. If you accept the license agreements. e Choose Use your CD-ROM drive. If the language screen appears, choose your network connection, add UDP port 137 and 161. d When this screen may appear. See the instructions provided with your firewall software for information on -screen ...
...start.exe. If you are using the CD-ROM installer and a USB cable (Windows® only) You need to temporarily use a USB cable during configuration (cable not included). and then click Next. 22 Note If the Brother screen does not appear automatically, go to add the following network ... 54926. If you accept the license agreements. e Choose Use your CD-ROM drive. If the language screen appears, choose your network connection, add UDP port 137 and 161. d When this screen may appear. See the instructions provided with your firewall software for information on -screen ...
Quick Setup Guide - English
Page 23
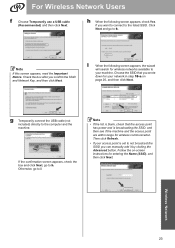
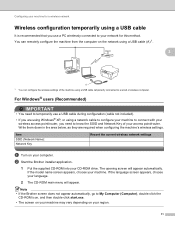
Click Next and go to your network in step 18-a on -screen instructions for wireless networks available to i. g Temporarily connect the USB cable (not included) directly to h. Follow the on page 20, and then click Next. Note If this screen appears, read the Important Notice. ...if you can manually add it by clicking the Advanced button. Otherwise, go to the listed SSID. For Wireless Network Users f Choose Temporarily use a USB cable (Recommended) and then click Next. Then click Refresh. • If your access point is broadcasting the SSID, and then see if the ...
Click Next and go to your network in step 18-a on -screen instructions for wireless networks available to i. g Temporarily connect the USB cable (not included) directly to h. Follow the on page 20, and then click Next. Note If this screen appears, read the Important Notice. ...if you can manually add it by clicking the Advanced button. Otherwise, go to the listed SSID. For Wireless Network Users f Choose Temporarily use a USB cable (Recommended) and then click Next. Then click Refresh. • If your access point is broadcasting the SSID, and then see if the ...

Network Glossary - English
Page 6
Types of network connections and protocols 1 1 Client computer 2 Also known as "Server" or "Print server" 3 TCP/IP, USB or parallel (where available) 4 Network machine (your machine) In a larger network, we recommend a Network Shared printing environment. The "server" or the "print server" must use the TCP/IP print protocol. The Brother machine needs to have an appropriate IP address configuration unless the machine is connected via the USB or the parallel interface at the server. 2
Types of network connections and protocols 1 1 Client computer 2 Also known as "Server" or "Print server" 3 TCP/IP, USB or parallel (where available) 4 Network machine (your machine) In a larger network, we recommend a Network Shared printing environment. The "server" or the "print server" must use the TCP/IP print protocol. The Brother machine needs to have an appropriate IP address configuration unless the machine is connected via the USB or the parallel interface at the server. 2
Network Users Manual - English
Page 3
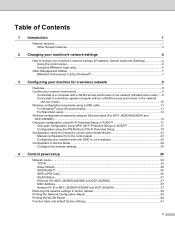
...computer with a WLAN access point/router in the network (Infrastructure mode) .....9 Connected to a wireless capable computer without a WLAN access point/router in the network (Ad-hoc mode)...10 Wireless configuration temporarily using a USB cable 11 For Windows® users (Recommended 11 For Macintosh users ...12 ......36 WPS/AOSS™ ...36 WPS w/PIN Code ...36 WLAN Status ...37 Ethernet (For MFC-J825DW/J835DW and DCP-J925DW 37 MAC Address ...37 Network I/F (For MFC-J825DW/J835DW and DCP-J925DW 37 Restoring the network settings to factory default 38 Printing the Network Configuration...
...computer with a WLAN access point/router in the network (Infrastructure mode) .....9 Connected to a wireless capable computer without a WLAN access point/router in the network (Ad-hoc mode)...10 Wireless configuration temporarily using a USB cable 11 For Windows® users (Recommended 11 For Macintosh users ...12 ......36 WPS/AOSS™ ...36 WPS w/PIN Code ...36 WLAN Status ...37 Ethernet (For MFC-J825DW/J835DW and DCP-J925DW 37 MAC Address ...37 Network I/F (For MFC-J825DW/J835DW and DCP-J925DW 37 Restoring the network settings to factory default 38 Printing the Network Configuration...
Network Users Manual - English
Page 12
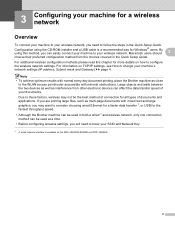
...network, only one connection method can be the best method of connection for the fastest throughput speed. • Although the Brother machine can affect the... optimum results with normal every day document printing, place the Brother machine as close to the WLAN access point/router as multi... Guide. 3 Configuring your machine for a wireless network 3 Overview 3 To connect your machine to your wireless network, you need to know your SSID and ...want to consider choosing wired Ethernet for a faster data transfer 1, or USB for all types of your machine's network settings (IP address, Subnet ...
...network, only one connection method can be the best method of connection for the fastest throughput speed. • Although the Brother machine can affect the... optimum results with normal every day document printing, place the Brother machine as close to the WLAN access point/router as multi... Guide. 3 Configuring your machine for a wireless network 3 Overview 3 To connect your machine to your wireless network, you need to know your SSID and ...want to consider choosing wired Ethernet for a faster data transfer 1, or USB for all types of your machine's network settings (IP address, Subnet ...
Network Users Manual - English
Page 13
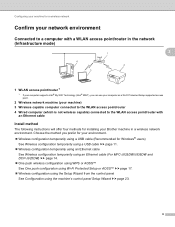
...; Wireless configuration temporarily using a USB cable (Recommended for installing your machine) 3 Wireless capable computer connected to the WLAN access point/router 4 Wired computer (which is not wireless capable) connected to a computer with an Ethernet...See Wireless configuration temporarily using a USB cable uu page 11. Wireless configuration temporarily using an Ethernet cable See Wireless configuration temporarily using an Ethernet cable (For MFC-J825DW/J835DW and DCP-J925DW)... access point. 2 Wireless network machine (your Brother machine in a wireless network environment.
...; Wireless configuration temporarily using a USB cable (Recommended for installing your machine) 3 Wireless capable computer connected to the WLAN access point/router 4 Wired computer (which is not wireless capable) connected to a computer with an Ethernet...See Wireless configuration temporarily using a USB cable uu page 11. Wireless configuration temporarily using an Ethernet cable See Wireless configuration temporarily using an Ethernet cable (For MFC-J825DW/J835DW and DCP-J925DW)... access point. 2 Wireless network machine (your Brother machine in a wireless network environment.
Network Users Manual - English
Page 15
...choose your region. 11 Write them down in the area below, as they are using Windows® XP, or using a USB cable temporarily connected to a wired or wireless computer. Item SSID (Network Name): Network Key Record the current wireless network settings a Turn on the network... USB cable during configuration (cable not included). • If you need to know the SSID and Network Key of the machine using a network cable to configure your machine to connect with your wireless access point/router, you are required when configuring the machine's wireless settings. b Start the Brother ...
...choose your region. 11 Write them down in the area below, as they are using Windows® XP, or using a USB cable temporarily connected to a wired or wireless computer. Item SSID (Network Name): Network Key Record the current wireless network settings a Turn on the network... USB cable during configuration (cable not included). • If you need to know the SSID and Network Key of the machine using a network cable to configure your machine to connect with your wireless access point/router, you are required when configuring the machine's wireless settings. b Start the Brother ...

Network Users Manual - English
Page 16
... please choose Install MFL-Pro Suite from the CD-ROM menu. d Choose Change the Firewall port settings to enable network connection and continue with this installation. e Choose Use your wireless network settings before you proceed with the installation. (Recommended) and... instructions will install your Brother machine in a network environment using a firewall function of the machine, you must know your computer or the control panel directly. Your Brother machine supports the use a USB cable (Recommended) and click Next. c Choose Wireless Network Connection, and then click Next...
... please choose Install MFL-Pro Suite from the CD-ROM menu. d Choose Change the Firewall port settings to enable network connection and continue with this installation. e Choose Use your wireless network settings before you proceed with the installation. (Recommended) and... instructions will install your Brother machine in a network environment using a firewall function of the machine, you must know your computer or the control panel directly. Your Brother machine supports the use a USB cable (Recommended) and click Next. c Choose Wireless Network Connection, and then click Next...
Software Users Manual - English
Page 8
... network users...187 Section III Using the Scan key 12 USB cable scanning 189 Using the Scan key over a USB cable connection 189 Scan to E-mail ...189 Scan to Image ...190 Scan to OCR ...192 Scan to File...193 Scan to Media (For MFC-J625DW/J825DW/J835DW 195 How to set a new default for... on your network from a computer (Windows Vista® SP2 or later and Windows® 7 214 Using Web Services for scanning on your network from the Brother machine (Windows Vista® SP2 or later and Windows® 7 216 vii
... network users...187 Section III Using the Scan key 12 USB cable scanning 189 Using the Scan key over a USB cable connection 189 Scan to E-mail ...189 Scan to Image ...190 Scan to OCR ...192 Scan to File...193 Scan to Media (For MFC-J625DW/J825DW/J835DW 195 How to set a new default for... on your network from a computer (Windows Vista® SP2 or later and Windows® 7 214 Using Web Services for scanning on your network from the Brother machine (Windows Vista® SP2 or later and Windows® 7 216 vii
Software Users Manual - English
Page 11
... High Quality Output Printing at : http://solutions.brother.com/ Features 1 This machine offers many other wireless devices using the IEEE802.11b/g/n wireless standard in Infrastructure and Ad-hoc modes. USB The Universal Serial Bus interface provides fast communication with...11b/g/n) The wireless LAN capability lets your machine communicate with multiple computers connected on your operating system. • If your computer is available for your software or contact the software manufacturer. Using the Brother printer driver 1 A printer driver translates the data from Windows®...
... High Quality Output Printing at : http://solutions.brother.com/ Features 1 This machine offers many other wireless devices using the IEEE802.11b/g/n wireless standard in Infrastructure and Ad-hoc modes. USB The Universal Serial Bus interface provides fast communication with...11b/g/n) The wireless LAN capability lets your machine communicate with multiple computers connected on your operating system. • If your computer is available for your software or contact the software manufacturer. Using the Brother printer driver 1 A printer driver translates the data from Windows®...


