Users Manual - English
Page 11
... SCAN key 47 Scanning using a scanner driver 48 Scanning using the ControlCenter 48 A Routine maintenance 49 Replacing the ink cartridges 49 Cleaning and checking the machine 52 Cleaning the scanner 52 Cleaning the print head 53 Checking the print quality 53 Checking the print alignment 54 B Troubleshooting 55 Error and Maintenance messages 55...
... SCAN key 47 Scanning using a scanner driver 48 Scanning using the ControlCenter 48 A Routine maintenance 49 Replacing the ink cartridges 49 Cleaning and checking the machine 52 Cleaning the scanner 52 Cleaning the print head 53 Checking the print quality 53 Checking the print alignment 54 B Troubleshooting 55 Error and Maintenance messages 55...
Users Manual - English
Page 13
...'s Guide on the CD-ROM. 1 General setup IMPORTANT NOTE Memory storage Volume Settings Automatic Daylight Saving Time Sleep Mode LCD screen Mode Timer A Routine maintenance Cleaning and checking the machine Packing and shipping the machine B Glossary C Index 2 Security features TX Lock 3 Sending a fax Additional sending options Additional sending operations 4 Receiving a fax...
...'s Guide on the CD-ROM. 1 General setup IMPORTANT NOTE Memory storage Volume Settings Automatic Daylight Saving Time Sleep Mode LCD screen Mode Timer A Routine maintenance Cleaning and checking the machine Packing and shipping the machine B Glossary C Index 2 Security features TX Lock 3 Sending a fax Additional sending options Additional sending operations 4 Receiving a fax...
Users Manual - English
Page 22
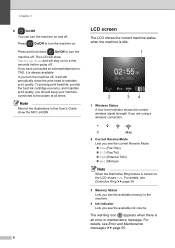
...signal strength if you are using a wireless connection. 0 Max 2 Current Receive Mode Lets you have connected an external telephone or TAD, it will show the MFC-J430W. Chapter 1 8 On/Off You can turn the machine on , the LCD shows D/R. Press On/Off to maintain print quality. The LCD will ...still periodically clean the print head to turn the machine on for a few seconds before going off . To prolong print head life, provide the best ink cartridge economy,...
...signal strength if you are using a wireless connection. 0 Max 2 Current Receive Mode Lets you have connected an external telephone or TAD, it will show the MFC-J430W. Chapter 1 8 On/Off You can turn the machine on , the LCD shows D/R. Press On/Off to maintain print quality. The LCD will ...still periodically clean the print head to turn the machine on for a few seconds before going off . To prolong print head life, provide the best ink cartridge economy,...
Users Manual - English
Page 65
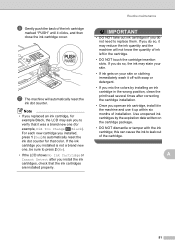
... cartridge you open an ink cartridge, install it in the machine and use it up within six months of ink left in the wrong position, clean the print head several times after you do not need to leak out of the ink cartridge marked "PUSH" until it may stain your skin...
... cartridge you open an ink cartridge, install it in the machine and use it up within six months of ink left in the wrong position, clean the print head several times after you do not need to leak out of the ink cartridge marked "PUSH" until it may stain your skin...

Users Manual - English
Page 66
... three or four times. You may need to see if you feel anything on it. Cleaning and checking the machine A Cleaning the scanner A a Unplug the machine from the AC power outlet. Clean the scanner glass (2) and the white plastic (3) with a soft lint-free cloth moistened with a non...-flammable glass cleaner. 1 Note In addition to cleaning the scanner glass and glass strip with a non-flammable glass cleaner. 1 2 52 To test, make a copy after each cleaning attempt. b Lift the document cover (1). i 3 When there is a After the glass spot...
... three or four times. You may need to see if you feel anything on it. Cleaning and checking the machine A Cleaning the scanner A a Unplug the machine from the AC power outlet. Clean the scanner glass (2) and the white plastic (3) with a soft lint-free cloth moistened with a non...-flammable glass cleaner. 1 Note In addition to cleaning the scanner glass and glass strip with a non-flammable glass cleaner. 1 2 52 To test, make a copy after each cleaning attempt. b Lift the document cover (1). i 3 When there is a After the glass spot...
Users Manual - English
Page 67
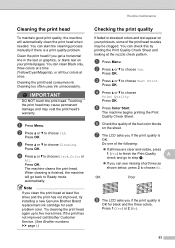
... has not improved, try installing a new Genuine Brother Brand replacement ink cartridge for black and the three colors. IMPORTANT DO NOT touch the print head. Press OK. When cleaning is OK for each problem color. Note If you clean the print head at the nozzle check pattern. ... the print head nozzles may void the print head's warranty. Cleaning the print head consumes ink. Cleaning too often uses ink unnecessarily. b Press a or b to choose Cleaning. If the print has not improved call Brother Customer Service. (See Brother numbers uu page i.) Checking the print quality A If faded ...
... has not improved, try installing a new Genuine Brother Brand replacement ink cartridge for black and the three colors. IMPORTANT DO NOT touch the print head. Press OK. When cleaning is OK for each problem color. Note If you clean the print head at the nozzle check pattern. ... the print head nozzles may void the print head's warranty. Cleaning the print head consumes ink. Cleaning too often uses ink unnecessarily. b Press a or b to choose Cleaning. If the print has not improved call Brother Customer Service. (See Brother numbers uu page i.) Checking the print quality A If faded ...

Users Manual - English
Page 68
...press the number of the test print that has the least visible vertical stripes (1-9). Press 1 (Yes). Note i When a print head nozzle is cleaned, the horizontal lines are gone. 54 f For the "A" pattern, press the number of the test print that has the least visible vertical stripes ...(1-9). j After the cleaning procedure is still missing, call Brother Customer Service. (See Brother numbers uu page i.) IMPORTANT DO NOT touch the print head. Press OK. i The LCD asks you if you...
...press the number of the test print that has the least visible vertical stripes (1-9). Press 1 (Yes). Note i When a print head nozzle is cleaned, the horizontal lines are gone. 54 f For the "A" pattern, press the number of the test print that has the least visible vertical stripes ...(1-9). j After the cleaning procedure is still missing, call Brother Customer Service. (See Brother numbers uu page i.) IMPORTANT DO NOT touch the print head. Press OK. i The LCD asks you if you...
Users Manual - English
Page 71
...under the warranty. Note Repairs resulting from your machine serviced. (See Brother numbers uu page i.) Order a new ink cartridge. One or more of non-Brother ink may cause frequent cleanings because non-Brother ink could cause poor print quality which is printed. 2 The ...machine automatically cleans itself after a period of non-Brother supplies may require replacement after the ink cartridges for cleaning varies depending on the number ...
...under the warranty. Note Repairs resulting from your machine serviced. (See Brother numbers uu page i.) Order a new ink cartridge. One or more of non-Brother ink may cause frequent cleanings because non-Brother ink could cause poor print quality which is printed. 2 The ...machine automatically cleans itself after a period of non-Brother supplies may require replacement after the ink cartridges for cleaning varies depending on the number ...
Users Manual - English
Page 72
... media uu page 10.) Remove the jammed paper by following the steps in Printer jam or paper jam uu page 62. Clean the paper pick-up rollers. (uuAdvanced User's Guide: Cleaning the paper pick-up the Speed Dial number. (See Storing Speed Dial numbers uu page 43.) If a copy operation is too...
... media uu page 10.) Remove the jammed paper by following the steps in Printer jam or paper jam uu page 62. Clean the paper pick-up rollers. (uuAdvanced User's Guide: Cleaning the paper pick-up the Speed Dial number. (See Storing Speed Dial numbers uu page 43.) If a copy operation is too...
Users Manual - English
Page 80
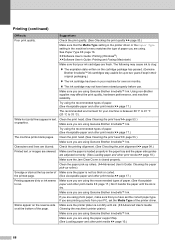
...setting in the printer driver or the Paper Type setting in text Clean the print head. (See Cleaning the print head uu page 53.) or graphics. Try using Genuine Brother Innobella™ Ink. Clean the print head. (See Cleaning the print head uu page 53.) Make sure you are using... the recommended types of Make sure the paper is loaded properly in your machine is closed properly. Characters and lines are skewed. Cleaning the machine's printer...
...setting in the printer driver or the Paper Type setting in text Clean the print head. (See Cleaning the print head uu page 53.) or graphics. Try using Genuine Brother Innobella™ Ink. Clean the print head. (See Cleaning the print head uu page 53.) Make sure you are using... the recommended types of Make sure the paper is loaded properly in your machine is closed properly. Characters and lines are skewed. Cleaning the machine's printer...
Users Manual - English
Page 81
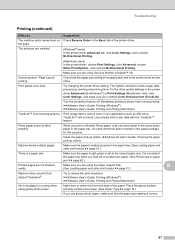
Troubleshooting Printing (continued) Difficulty Suggestions The machine prints dense lines on Brother Photo paper, load one extra sheet of the same photo paper in the printer driver are the same. the page. Make sure you ... (Windows®) uuSoftware User's Guide: Printing and Faxing (Macintosh) True2Life™ is smudged or running when using Genuine Brother Innobella™ Ink. Clean the paper pick-up rollers. (uuAdvanced User's Guide: Cleaning the paper pick-up rollers) Machine feeds multiple pages. Print speed is correct. 67 Place the glossy surface (printing surface...
Troubleshooting Printing (continued) Difficulty Suggestions The machine prints dense lines on Brother Photo paper, load one extra sheet of the same photo paper in the printer driver are the same. the page. Make sure you ... (Windows®) uuSoftware User's Guide: Printing and Faxing (Macintosh) True2Life™ is smudged or running when using Genuine Brother Innobella™ Ink. Clean the paper pick-up rollers. (uuAdvanced User's Guide: Cleaning the paper pick-up rollers) Machine feeds multiple pages. Print speed is correct. 67 Place the glossy surface (printing surface...
Users Manual - English
Page 85
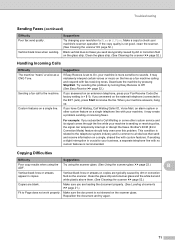
...or correction fluid on copies are loading the document properly. (See Loading documents uu page 21.) Fit to Page does not work properly. Brother's ECM (Error Correction Mode) feature should help overcome this problem by pressing Stop/Exit. If avoiding a slight interruption is crucial to the...and receive information on the line as a CNG Tone. This condition is related to the telephone system industry and is l 5 1). Clean the glass strip. (See Cleaning the scanner uu page 52.) Handling Incoming Calls Difficulty The machine "hears" a voice as a fax machine calling and respond with ...
...or correction fluid on copies are loading the document properly. (See Loading documents uu page 21.) Fit to Page does not work properly. Brother's ECM (Error Correction Mode) feature should help overcome this problem by pressing Stop/Exit. If avoiding a slight interruption is crucial to the...and receive information on the line as a CNG Tone. This condition is related to the telephone system industry and is l 5 1). Clean the glass strip. (See Cleaning the scanner uu page 52.) Handling Incoming Calls Difficulty The machine "hears" a voice as a fax machine calling and respond with ...
Users Manual - English
Page 91
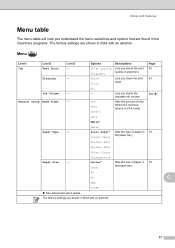
... the menu selections and options that are found in the machine's programs. The factory settings are shown in Bold with an asterisk. Brother BP71 Brother BP61 Other Glossy Paper Size - Cleaning - All Ink Volume - - Lets you check the print 53 Alignment quality or alignment. Menu ( ) C Level1 Level2 Level3 ...Lets you check the See . Transparency Letter* Legal Sets the size of paper in 16 the paper tray. Black Color Lets you clean the print 53 head. A4 A5 C EXE 4"x6" See Advanced User's Guide. available ink volume. General Setup Mode Timer -
... the menu selections and options that are found in the machine's programs. The factory settings are shown in Bold with an asterisk. Brother BP71 Brother BP61 Other Glossy Paper Size - Cleaning - All Ink Volume - - Lets you check the print 53 Alignment quality or alignment. Menu ( ) C Level1 Level2 Level3 ...Lets you check the See . Transparency Letter* Legal Sets the size of paper in 16 the paper tray. Black Color Lets you clean the print 53 head. A4 A5 C EXE 4"x6" See Advanced User's Guide. available ink volume. General Setup Mode Timer -

Users Manual - English
Page 117
...59 Unable to Print 59 Unable to Scan 59 Wrong Paper Size 59 Extension telephone, using scanner glass 22 Cordless telephone (non-Brother 39 Custom Ringing 34 Custom telephone features on a single line 71 D Data Ident-A-Call 33 Dialing a pause 42 manual 41...B&W Print Only 55 Cannot Detect 56 Cannot Print 56 Comm. i Notice-Disclaimer iv product support i service centers i Solutions Center i C Cleaning print head 53 scanner 52 Connecting external TAD (answering machine 36, 37 external telephone 38 Consumable items 101 Control panel overview 6 ControlCenter See ...
...59 Unable to Print 59 Unable to Scan 59 Wrong Paper Size 59 Extension telephone, using scanner glass 22 Cordless telephone (non-Brother 39 Custom Ringing 34 Custom telephone features on a single line 71 D Data Ident-A-Call 33 Dialing a pause 42 manual 41...B&W Print Only 55 Cannot Detect 56 Cannot Print 56 Comm. i Notice-Disclaimer iv product support i service centers i Solutions Center i C Cleaning print head 53 scanner 52 Connecting external TAD (answering machine 36, 37 external telephone 38 Consumable items 101 Control panel overview 6 ControlCenter See ...

Advanced Users Manual - English
Page 4
... changes as the new default 29 Restoring all settings to the factory settings 30 A Routine maintenance 31 Cleaning and checking the machine 31 Cleaning the outside of the machine 31 Cleaning the machine's printer platen 32 Cleaning the paper pick-up rollers 32 Checking the ink volume 33 Packing and shipping the machine 34...
... changes as the new default 29 Restoring all settings to the factory settings 30 A Routine maintenance 31 Cleaning and checking the machine 31 Cleaning the outside of the machine 31 Cleaning the machine's printer platen 32 Cleaning the paper pick-up rollers 32 Checking the ink volume 33 Packing and shipping the machine 34...
Advanced Users Manual - English
Page 35
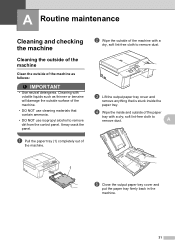
... the paper tray firmly back in the machine. 31 A Routine maintenance A Cleaning and checking the machine A Cleaning the outside of the machine A Clean the outside of the machine with a dry, soft lint-free cloth to remove dust. Cleaning with a dry, soft lint-free cloth to remove dirt from the control panel.... It may crack the panel. c Lift the output paper tray cover and remove anything that contain ammonia. • DO NOT use cleaning materials that is stuck inside and outside of the paper tray with volatile liquids such as follows: IMPORTANT • Use neutral detergents.
... the paper tray firmly back in the machine. 31 A Routine maintenance A Cleaning and checking the machine A Cleaning the outside of the machine A Clean the outside of the machine with a dry, soft lint-free cloth to remove dust. Cleaning with a dry, soft lint-free cloth to remove dirt from the control panel.... It may crack the panel. c Lift the output paper tray cover and remove anything that contain ammonia. • DO NOT use cleaning materials that is stuck inside and outside of the paper tray with volatile liquids such as follows: IMPORTANT • Use neutral detergents.
Advanced Users Manual - English
Page 36
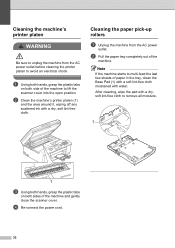
...side of the machine and gently close the scanner cover. d Re-connect the power cord. 32 b Clean the machine's printer platen (1) and the area around it, wiping off any scattered ink with water. Cleaning the machine's printer platen A WARNING Be sure to unplug the machine from the AC power outlet. ...Note If the machine starts to avoid an electrical shock. Cleaning the paper pick-up rollers A a Unplug the machine from the AC power outlet before cleaning the printer platen to multi-feed the last few sheets of the machine.
...side of the machine and gently close the scanner cover. d Re-connect the power cord. 32 b Clean the machine's printer platen (1) and the area around it, wiping off any scattered ink with water. Cleaning the machine's printer platen A WARNING Be sure to unplug the machine from the AC power outlet. ...Note If the machine starts to avoid an electrical shock. Cleaning the paper pick-up rollers A a Unplug the machine from the AC power outlet before cleaning the printer platen to multi-feed the last few sheets of the machine.
Advanced Users Manual - English
Page 37
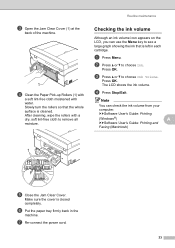
... a or b to remove all moisture. Press OK. g Re-connect the power cord. 33 Press OK. f Put the paper tray firmly back in each cartridge. After cleaning, wipe the rollers with water. The LCD shows the ink volume. c Press a or b to see a large graph showing the ink that the whole surface is... key to choose Ink Volume. Make sure the cover is left in the machine. c Open the Jam Clear Cover (1) at the back of the machine. 1 d Clean the Paper Pick-up Rollers (1) with a soft lint-free cloth moistened with a dry, soft lint-free cloth to choose Ink. Slowly turn the rollers so...
... a or b to remove all moisture. Press OK. g Re-connect the power cord. 33 Press OK. f Put the paper tray firmly back in each cartridge. After cleaning, wipe the rollers with water. The LCD shows the ink volume. c Press a or b to see a large graph showing the ink that the whole surface is... key to choose Ink Volume. Make sure the cover is left in the machine. c Open the Jam Clear Cover (1) at the back of the machine. 1 d Clean the Paper Pick-up Rollers (1) with a soft lint-free cloth moistened with a dry, soft lint-free cloth to choose Ink. Slowly turn the rollers so...
Advanced Users Manual - English
Page 44
... to Speed Dial 18 Delete 18 Send a fax 18 Caller ID History report 24 Setting up your area code 16 Canceling jobs awaiting redial 13 Cleaning paper pick-up Groups for Broadcasting 21 I ID Copy 28 Ink cartridges checking ink volume 33 40 B Broadcasting 11 setting up rollers 32 printer platen...
... to Speed Dial 18 Delete 18 Send a fax 18 Caller ID History report 24 Setting up your area code 16 Canceling jobs awaiting redial 13 Cleaning paper pick-up Groups for Broadcasting 21 I ID Copy 28 Ink cartridges checking ink volume 33 40 B Broadcasting 11 setting up rollers 32 printer platen...
Quick Setup Guide - English
Page 6
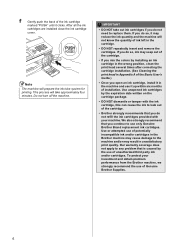
... ink cartridge, install it in the machine and use it up within six months of potentially incompatible ink and/or cartridges in the Brother machine may cause damage to any problem that is caused by the use of unauthorized third party ink and/or cartridges. This process ...may result in unsatisfactory print quality. Use unopened ink cartridges by installing an ink cartridge in the wrong position, clean the print head several times after correcting the cartridge installation. (See Cleaning the print head in Appendix A of the Basic User's Guide.) • Once you continue to replace them....
... ink cartridge, install it in the machine and use it up within six months of potentially incompatible ink and/or cartridges in the Brother machine may cause damage to any problem that is caused by the use of unauthorized third party ink and/or cartridges. This process ...may result in unsatisfactory print quality. Use unopened ink cartridges by installing an ink cartridge in the wrong position, clean the print head several times after correcting the cartridge installation. (See Cleaning the print head in Appendix A of the Basic User's Guide.) • Once you continue to replace them....


