
Advanced Users Manual - English
Page 23
... labeled L2. jack on one line at both the wall jack and at least three telephone line cords, the one that came with your machine and two for your machine is explained in the following ...to put the machine on Line 2, which is on other end into L1 of the first telephone line cord for your machine must have an RJ11 wall outlet installed and slave or jump one RJ14 jack to ...LINE jack on Line 1, plug the machine into the L1 or L1/L2 jack of the telephone line cord for your machine is the easiest: Buy a triplex adapter. Plug the other wall outlets as always. ...
... labeled L2. jack on one line at both the wall jack and at least three telephone line cords, the one that came with your machine and two for your machine is explained in the following ...to put the machine on Line 2, which is on other end into L1 of the first telephone line cord for your machine must have an RJ11 wall outlet installed and slave or jump one RJ14 jack to ...LINE jack on Line 1, plug the machine into the L1 or L1/L2 jack of the telephone line cord for your machine is the easiest: Buy a triplex adapter. Plug the other wall outlets as always. ...
Advanced Users Manual - English
Page 46
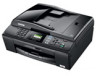
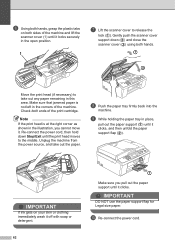
... from the AC power outlet before cleaning the printer platen to avoid electrical shock. Make sure the cover is closed properly. f Re-connect the power cord. 40 e Put the paper tray firmly back in the open the Jam Clear Cover (1) at the back of the machine. b Clean the machine's printer platen...
... from the AC power outlet before cleaning the printer platen to avoid electrical shock. Make sure the cover is closed properly. f Re-connect the power cord. 40 e Put the paper tray firmly back in the open the Jam Clear Cover (1) at the back of the machine. b Clean the machine's printer platen...
Advanced Users Manual - English
Page 50
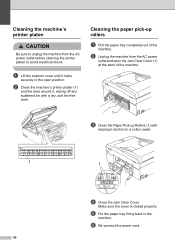
... the green protective part, DO NOT remove the ink cartridges before shipping. d Lift the machine from the telephone wall jack and take the telephone line cord out of the paper tray (2). 2 1 2 • If you are not able to your machine and may void your warranty. 1 e Unplug the machine from the front...
... the green protective part, DO NOT remove the ink cartridges before shipping. d Lift the machine from the telephone wall jack and take the telephone line cord out of the paper tray (2). 2 1 2 • If you are not able to your machine and may void your warranty. 1 e Unplug the machine from the front...
Quick Setup Guide - English
Page 1
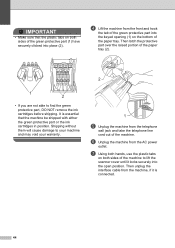
...from the LCD. This interface is no more than 6 feet (2 meters) long (cable not included). Quick Setup Guide Start Here MFC-J265W MFC-J270W MFC-J410W MFC-J415W Before you what to do to prevent possible personal injury. however, the maximum data transfer rate will be connected to a computer that...CD-ROM Documentation CD-ROM Basic User's Guide Safety and Legal booklet Accessory Order Form Product Registration Sheet (USA only) Telephone Line Cord WARNING Plastic bags are used in case for the correct setup and installation. Your machine has a USB interface that is also ...
...from the LCD. This interface is no more than 6 feet (2 meters) long (cable not included). Quick Setup Guide Start Here MFC-J265W MFC-J270W MFC-J410W MFC-J415W Before you what to do to prevent possible personal injury. however, the maximum data transfer rate will be connected to a computer that...CD-ROM Documentation CD-ROM Basic User's Guide Safety and Legal booklet Accessory Order Form Product Registration Sheet (USA only) Telephone Line Cord WARNING Plastic bags are used in case for the correct setup and installation. Your machine has a USB interface that is also ...

Quick Setup Guide - English
Page 4
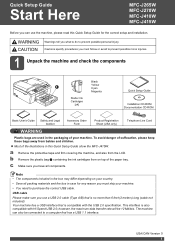
...you are using a USB cable). jack on page 8. See Choose the correct Receive Mode on the machine. 1 2 b Connect the telephone line cord. Before you connect the external telephone, remove the protective cap a from the EXT. Note If you are sharing one telephone line with an external ... details, see Connecting an external TAD (telephone answering device) in chapter 6 in the Basic User's Guide. a Connect the power cord. 3 Connect the power cord and telephone line IMPORTANT DO NOT connect the USB cable yet (if you are sharing one telephone line with an external telephone, connect...
...you are using a USB cable). jack on page 8. See Choose the correct Receive Mode on the machine. 1 2 b Connect the telephone line cord. Before you connect the external telephone, remove the protective cap a from the EXT. Note If you are sharing one telephone line with an external ... details, see Connecting an external TAD (telephone answering device) in chapter 6 in the Basic User's Guide. a Connect the power cord. 3 Connect the power cord and telephone line IMPORTANT DO NOT connect the USB cable yet (if you are sharing one telephone line with an external telephone, connect...
Network Users Manual - English
Page 97
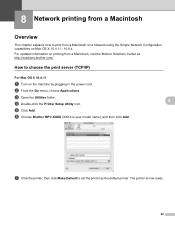
...Macintosh on a Network using the Simple Network Configuration capabilities on the machine by plugging in the power cord. d Double-click the Printer Setup Utility Icon. c Open the Utilities folder. f Choose Brother MFC-XXXX (XXXX is now ready. 90 The printer is your model name), and then click Add....- 10.6.x. e Click Add. 8 Network printing from a Macintosh 8 Overview 8 This chapter explains how to print from a Macintosh, visit the Brother Solutions Center at: http://solutions.brother.com/ How to set the printer as the default printer. b From the Go menu, choose Applications.
...Macintosh on a Network using the Simple Network Configuration capabilities on the machine by plugging in the power cord. d Double-click the Printer Setup Utility Icon. c Open the Utilities folder. f Choose Brother MFC-XXXX (XXXX is now ready. 90 The printer is your model name), and then click Add....- 10.6.x. e Click Add. 8 Network printing from a Macintosh 8 Overview 8 This chapter explains how to print from a Macintosh, visit the Brother Solutions Center at: http://solutions.brother.com/ How to set the printer as the default printer. b From the Go menu, choose Applications.
Network Users Manual - English
Page 98
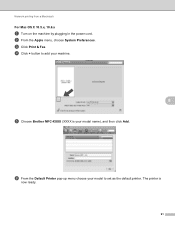
f From the Default Printer pop-up menu choose your model to add your model name), and then click Add. c Click Print & Fax. The printer is your machine. 8 e Choose Brother MFC-XXXX (XXXX is now ready. 91 d Click + button to set as the default printer. Network printing from a Macintosh For Mac OS X 10.5.x, 10.6.x 8 a Turn on the machine by plugging in the power cord. b From the Apple menu, choose System Preferences.
f From the Default Printer pop-up menu choose your model to add your model name), and then click Add. c Click Print & Fax. The printer is your machine. 8 e Choose Brother MFC-XXXX (XXXX is now ready. 91 d Click + button to set as the default printer. Network printing from a Macintosh For Mac OS X 10.5.x, 10.6.x 8 a Turn on the machine by plugging in the power cord. b From the Apple menu, choose System Preferences.
Network Users Manual - English
Page 101
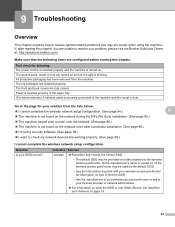
... channels on page 19. 94 First check the following items are unable to resolve your problem, please visit the Brother Solutions Center at: http://solutions.brother.com/ Make sure that the following : The power cord is connected properly and the machine is blinking. The ink cartridges are fully closed. The front and back...
... channels on page 19. 94 First check the following items are unable to resolve your problem, please visit the Brother Solutions Center at: http://solutions.brother.com/ Make sure that the following : The power cord is connected properly and the machine is blinking. The ink cartridges are fully closed. The front and back...

Users Manual - English
Page 4
Plain Paper (Letter size / 500 sheets) Matte Inkjet Paper (Letter size / 25 sheets) Plain Inkjet Paper (Letter size / 100 sheets) Telephone Line Cord Basic User's Guide Item LC61BK (Prints approx. 450 pages) 1 LC61C (Prints approx. 325 pages) 1 LC61M (Prints approx. 325 pages) 1 LC61Y (.../pageyield ii In USA: In Canada: 1-877-552-MALL (1-877-552-6255) 1-800-947-1445 (fax) http://www.brothermall.com/ 1-877-BROTHER http://www.brother.ca/ Description Ink Cartridge Standard Ink Cartridge (blue) Ink Cartridge (red) Ink Cartridge Premium Plus Glossy Photo Paper (Letter size / 20 sheets) (4"...
Plain Paper (Letter size / 500 sheets) Matte Inkjet Paper (Letter size / 25 sheets) Plain Inkjet Paper (Letter size / 100 sheets) Telephone Line Cord Basic User's Guide Item LC61BK (Prints approx. 450 pages) 1 LC61C (Prints approx. 325 pages) 1 LC61M (Prints approx. 325 pages) 1 LC61Y (.../pageyield ii In USA: In Canada: 1-877-552-MALL (1-877-552-6255) 1-800-947-1445 (fax) http://www.brothermall.com/ 1-877-BROTHER http://www.brother.ca/ Description Ink Cartridge Standard Ink Cartridge (blue) Ink Cartridge (red) Ink Cartridge Premium Plus Glossy Photo Paper (Letter size / 20 sheets) (4"...

Users Manual - English
Page 48
jack of your machine. jack. (Make sure this cord is plugged into the EXT. If your TAD is connected to control the telephone ...jack (unless you connect the external TAD, remove the protective cap (2) from the EXT. a Plug the telephone line cord from the external TAD into the jack labeled LINE. b Remove the protective cap (1) from the jack labeled EXT, and then... plug the telephone line cord from the telephone wall jack into the EXT. Your machine cannot work properly if you plug the TAD into the...
jack of your machine. jack. (Make sure this cord is plugged into the EXT. If your TAD is connected to control the telephone ...jack (unless you connect the external TAD, remove the protective cap (2) from the EXT. a Plug the telephone line cord from the external TAD into the jack labeled LINE. b Remove the protective cap (1) from the jack labeled EXT, and then... plug the telephone line cord from the telephone wall jack into the EXT. Your machine cannot work properly if you plug the TAD into the...

Users Manual - English
Page 49
... services and external devices External and extension telephones 6 Connecting an external or extension telephone 6 You can connect a separate telephone to Manual. Connect the telephone line cord to the last line on the system. If you set the Receive Mode to your OGM with sending or receiving faxes should be answered by...
... services and external devices External and extension telephones 6 Connecting an external or extension telephone 6 You can connect a separate telephone to Manual. Connect the telephone line cord to the last line on the system. If you set the Receive Mode to your OGM with sending or receiving faxes should be answered by...

Users Manual - English
Page 59
... or writing to the memory card (the PHOTO CAPTURE key is being read one memory card at a time. 9 45 IMPORTANT DO NOT unplug the power cord or remove the memory card from a memory card PHOTO CAPTURE light is on, the memory card is properly inserted. PHOTO CAPTURE light is...
... or writing to the memory card (the PHOTO CAPTURE key is being read one memory card at a time. 9 45 IMPORTANT DO NOT unplug the power cord or remove the memory card from a memory card PHOTO CAPTURE light is on, the memory card is properly inserted. PHOTO CAPTURE light is...
Users Manual - English
Page 76
Note If the print head is not left in this area. Re-connect the power cord, then hold down ( ) and close the scanner cover ( ) using both ends of the print cartridge. IMPORTANT If ink gets on both sides of the machine ...and lift the scanner cover (1) until it clicks, and then unfold the paper support flap ( ). j Re-connect the power cord. 62 i While holding the paper tray in place, pull out the paper support ( ) until it locks securely in the illustration, you pull out the paper...
Note If the print head is not left in this area. Re-connect the power cord, then hold down ( ) and close the scanner cover ( ) using both ends of the print cartridge. IMPORTANT If ink gets on both sides of the machine ...and lift the scanner cover (1) until it clicks, and then unfold the paper support flap ( ). j Re-connect the power cord. 62 i While holding the paper tray in place, pull out the paper support ( ) until it locks securely in the illustration, you pull out the paper...
Users Manual - English
Page 80
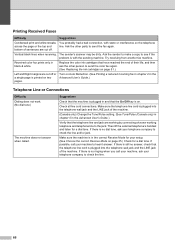
...telephone's handset and listen for a dial tone. Ask the sender to make a copy to check the line. 66 Make sure the telephone line cord is on. Ask the other person to send the color fax again. (See Replacing the ink cartridges on page 51.) Left and Right margins ...Canada only) Change the Tone/Pulse setting. (See Tone/Pulse (Canada only) in chapter 5 in the Advanced User's Guide.) Verify that the telephone line cord is no ringing when you call your telephone company to the jack. Printing Received Faxes Difficulty Suggestions Condensed print and white streaks across the page...
...telephone's handset and listen for a dial tone. Ask the sender to make a copy to check the line. 66 Make sure the telephone line cord is on. Ask the other person to send the color fax again. (See Replacing the ink cartridges on page 51.) Left and Right margins ...Canada only) Change the Tone/Pulse setting. (See Tone/Pulse (Canada only) in chapter 5 in the Advanced User's Guide.) Verify that the telephone line cord is no ringing when you call your telephone company to the jack. Printing Received Faxes Difficulty Suggestions Condensed print and white streaks across the page...

Users Manual - English
Page 81
... shares a line with your Brother machine to receive faxes. If you must answer every incoming call and activate the machine to automatically answer all line cord connections. Check all incoming faxes, you were not able to receive the fax, then another device or subscriber service may be interfering with other telephones ...
... shares a line with your Brother machine to receive faxes. If you must answer every incoming call and activate the machine to automatically answer all line cord connections. Check all incoming faxes, you were not able to receive the fax, then another device or subscriber service may be interfering with other telephones ...

Users Manual - English
Page 82
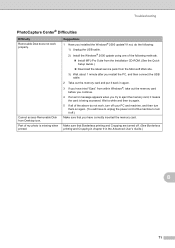
...your answering machine to answer within 2 or 3 rings. 4 Record the outgoing message on page 33.) 1 Plug the telephone line cord directly from the wall telephone jack to your Brother machine's LINE jack. 2 Remove the protective cap from your machine may be out of the machine. If you are having problems... Report, your answering machine into the telephone wall jack and the LINE jack of memory. jack, and then plug the telephone line cord from your Brother machine's EXT. Easy Receive is probably temporary noise or static on page 20.) 68 If you often get "RESULT:NG" on page...
...your answering machine to answer within 2 or 3 rings. 4 Record the outgoing message on page 33.) 1 Plug the telephone line cord directly from the wall telephone jack to your Brother machine's LINE jack. 2 Remove the protective cap from your machine may be out of the machine. If you are having problems... Report, your answering machine into the telephone wall jack and the LINE jack of memory. jack, and then plug the telephone line cord from your Brother machine's EXT. Easy Receive is probably temporary noise or static on page 20.) 68 If you often get "RESULT:NG" on page...
Users Manual - English
Page 85
... Difficulty Removable Disk does not work , turn off your PC and machine, and then turn them on again. (You will have to unplug the power cord of the machine to eject the memory card, it means the card is missing when printed.
... Difficulty Removable Disk does not work , turn off your PC and machine, and then turn them on again. (You will have to unplug the power cord of the machine to eject the memory card, it means the card is missing when printed.


