Users Manual - English
Page 15
... of the machine 152 Cleaning the scanner 153 Cleaning the laser scanner windows 154 Cleaning the corona wires 158 Cleaning the drum unit 161 Replacing the consumable items 169 Replacing a toner cartridge 172 Replacing the drum unit 177 Replacing the belt unit 183 Replacing the waste toner box 188 Packing and shipping the machine 194 Repacking the...
... of the machine 152 Cleaning the scanner 153 Cleaning the laser scanner windows 154 Cleaning the corona wires 158 Cleaning the drum unit 161 Replacing the consumable items 169 Replacing a toner cartridge 172 Replacing the drum unit 177 Replacing the belt unit 183 Replacing the waste toner box 188 Packing and shipping the machine 194 Repacking the...
Users Manual - English
Page 132
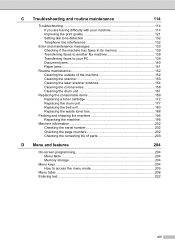
...and the power switch is turned on. „ Check that the toner cartridges and drum unit are available only when the machine is sending or receiving a fax, the signal can...the Start button, Control Panel, Hardware and Sound, and then Printers. Right-click Brother MFC-9840CDW Printer. Right-click Brother MFC-9840CDW Printer. Make sure that the correct printer driver has been installed and chosen. &#... caused by dirt or correction fluid on the glass strip, or one of the corona wires for printing is recommended. Handling incoming calls (continued) Difficulties Custom features on page 158...
...and the power switch is turned on. „ Check that the toner cartridges and drum unit are available only when the machine is sending or receiving a fax, the signal can...the Start button, Control Panel, Hardware and Sound, and then Printers. Right-click Brother MFC-9840CDW Printer. Right-click Brother MFC-9840CDW Printer. Make sure that the correct printer driver has been installed and chosen. &#... caused by dirt or correction fluid on the glass strip, or one of the corona wires for printing is recommended. Handling incoming calls (continued) Difficulties Custom features on page 158...
Users Manual - English
Page 138
... the corona wires on page 158.) If the print quality has not improved, put in a new drum unit. (See Replacing the drum unit on page 177.) „ Clean all four corona wires (one for each corona wire's green tab is at 1-877-BROTHER (1-877-276-8437) (in USA) or 1-877-BROTHER (in a new drum unit. (See Replacing the drum unit on page 172.) „ The drum unit may...
... the corona wires on page 158.) If the print quality has not improved, put in a new drum unit. (See Replacing the drum unit on page 177.) „ Clean all four corona wires (one for each corona wire's green tab is at 1-877-BROTHER (1-877-276-8437) (in USA) or 1-877-BROTHER (in a new drum unit. (See Replacing the drum unit on page 172.) „ The drum unit may...
Users Manual - English
Page 139
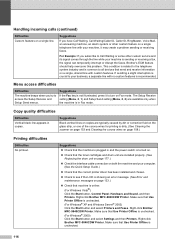
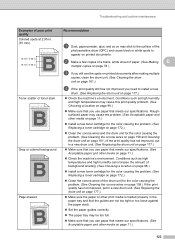
.... (See Replacing a toner cartridge on page 172.) „ Clean the corona wires of paper. (See Making multiple copies on page 78.) C c If you need to install a new drum. (See Replacing the drum unit on page 177.) „ Check the machine's environment. abcdefghijklmnopqrstuvwxyz. abcdefghijklmnopqrstuvwxyz. ...„ Clean the corona wires and the drum unit for the color causing the problem. (See Cleaning the corona wires on page 158 and Cleaning the drum unit on page 161.) If the print quality has not improved, put in a new drum unit. (See Replacing the drum unit on page 177.) ...
.... (See Replacing a toner cartridge on page 172.) „ Clean the corona wires of paper. (See Making multiple copies on page 78.) C c If you need to install a new drum. (See Replacing the drum unit on page 177.) „ Check the machine's environment. abcdefghijklmnopqrstuvwxyz. abcdefghijklmnopqrstuvwxyz. ...„ Clean the corona wires and the drum unit for the color causing the problem. (See Cleaning the corona wires on page 158 and Cleaning the drum unit on page 161.) If the print quality has not improved, put in a new drum unit. (See Replacing the drum unit on page 177.) ...

Users Manual - English
Page 140
..., put in the Software User's Guide on page 177.) „ The drum unit may be damaged. Put in a new drum unit. (See Replacing the drum unit on page 177.) „ Put in a new belt unit. (See Replacing the belt unit on page 183.) „ Clean the corona wires of your monitor. „ Make sure that you choose the proper media...
..., put in the Software User's Guide on page 177.) „ The drum unit may be damaged. Put in a new drum unit. (See Replacing the drum unit on page 177.) „ Put in a new belt unit. (See Replacing the belt unit on page 183.) „ Clean the corona wires of your monitor. „ Make sure that you choose the proper media...
Users Manual - English
Page 151
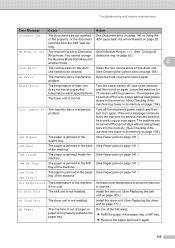
...The paper is jammed in the MP (See Paper jams on . Install the belt unit. (See Replacing the belt unit on page 177.) No Paper The machine is not installed. C Drum Error The corona wires on the drum unit needs to be turned off the machine's power switch and then turn it on page... days without losing faxes stored in the memory. (See Checking if the machine has faxes in the paper tray. Clean the four corona wires on the drum unit. (See Cleaning the corona wires on again. Turn the power switch off Ring mode. The machine can be turned off for up to Off. (See Turning off...
...The paper is jammed in the MP (See Paper jams on . Install the belt unit. (See Replacing the belt unit on page 177.) No Paper The machine is not installed. C Drum Error The corona wires on the drum unit needs to be turned off the machine's power switch and then turn it on page... days without losing faxes stored in the memory. (See Checking if the machine has faxes in the paper tray. Clean the four corona wires on the drum unit. (See Cleaning the corona wires on again. Turn the power switch off Ring mode. The machine can be turned off for up to Off. (See Turning off...

Users Manual - English
Page 174
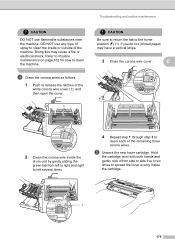
Cleaning the corona wires C If you have print quality problems, clean the corona wires as follows: a Turn off the machine's power switch. c Hold the green handle of the drum unit. Lift the drum unit up and then pull it out until it out of the drum unit. d Hold the handle of the toner cartridge and pull it stops. b Press the front cover release button and then open the front cover. Unplug the telephone line cord first, disconnect all the toner cartridges. 158 Repeat this for all cables, and then unplug the power cord from the AC power outlet.
Cleaning the corona wires C If you have print quality problems, clean the corona wires as follows: a Turn off the machine's power switch. c Hold the green handle of the drum unit. Lift the drum unit up and then pull it out until it out of the drum unit. d Hold the handle of the toner cartridge and pull it stops. b Press the front cover release button and then open the front cover. Unplug the telephone line cord first, disconnect all the toner cartridges. 158 Repeat this for all cables, and then unplug the power cord from the AC power outlet.

Users Manual - English
Page 176
...each of the toner cartridge and slide the toner cartridge into the drum unit. Yellow 4 K - Repeat this for all the toner cartridges. Black h Repeat e to g to the home position (b) (1). f Clean the corona wire inside the drum unit by gently sliding the green tab from left to right and right... to the same color label on the drum unit, and make sure that you do not, printed pages may have a vertical stripe. 1 2...
...each of the toner cartridge and slide the toner cartridge into the drum unit. Yellow 4 K - Repeat this for all the toner cartridges. Black h Repeat e to g to the home position (b) (1). f Clean the corona wire inside the drum unit by gently sliding the green tab from left to right and right... to the same color label on the drum unit, and make sure that you do not, printed pages may have a vertical stripe. 1 2...
Users Manual - English
Page 188
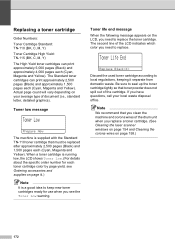
Actual page count will vary depending on page 158.) 172 Note We recommend that you clean the machine and corona wires of the cartridge. When a toner cartridge is running low, the LCD shows Toner Low. (For details about the specific order number for use when you...supplied with the Standard TN-110 toner cartridge that toner powder does not spill out of the drum unit when you replace a toner cartridge. (See Cleaning the laser scanner windows on page 154 and Cleaning the corona wires on your local waste disposal office. Be sure to local regulations, keeping it separate from domestic...
Actual page count will vary depending on page 158.) 172 Note We recommend that you clean the machine and corona wires of the cartridge. When a toner cartridge is running low, the LCD shows Toner Low. (For details about the specific order number for use when you...supplied with the Standard TN-110 toner cartridge that toner powder does not spill out of the drum unit when you replace a toner cartridge. (See Cleaning the laser scanner windows on page 154 and Cleaning the corona wires on your local waste disposal office. Be sure to local regulations, keeping it separate from domestic...
Users Manual - English
Page 191
... follows. 1 Push to release the latches of the remaining three corona wires. Doing this may have a vertical stripe. 3 Close the corona wire cover. e Unpack the new toner cartridge. C 1 2 1 2 2 Clean the corona wire inside the drum unit by gently sliding the green tab from side to side five or six times to clean the...gently rock it from left to right and right to left several times. 4 Repeat step 1 through step 3 to clean each of the white corona wire cover (1), and then open the cover. 1 CAUTION Be sure to return the tab to the home position (b) (1). If you do not, ...
... follows. 1 Push to release the latches of the remaining three corona wires. Doing this may have a vertical stripe. 3 Close the corona wire cover. e Unpack the new toner cartridge. C 1 2 1 2 2 Clean the corona wire inside the drum unit by gently sliding the green tab from side to side five or six times to clean the...gently rock it from left to right and right to left several times. 4 Repeat step 1 through step 3 to clean each of the white corona wire cover (1), and then open the cover. 1 CAUTION Be sure to return the tab to the home position (b) (1). If you do not, ...
Users Manual - English
Page 258
... 7, 83 temporary settings 79 tray selection 7, 85 using ADF 20, 81, 83 using scanner glass 21, 80, 81 Cordless telephone (non-Brother 57 Cover page 38 custom comments 38 for all faxes 39 for Macintosh®) See Software User's Guide on the CD-ROM. Copy brightness ...enter copy mode 78 keys 7, 79 multiple 78 N in memory 42 jobs awaiting redial 42 print jobs 8 remote fax options 68 Cleaning corona wire 158 drum unit 161 laser scanner window 154 scanner 153 Connecting external TAD (answering machine) .......53 external telephone 57 two-line external TAD or telephone ..........
... 7, 83 temporary settings 79 tray selection 7, 85 using ADF 20, 81, 83 using scanner glass 21, 80, 81 Cordless telephone (non-Brother 57 Cover page 38 custom comments 38 for all faxes 39 for Macintosh®) See Software User's Guide on the CD-ROM. Copy brightness ...enter copy mode 78 keys 7, 79 multiple 78 N in memory 42 jobs awaiting redial 42 print jobs 8 remote fax options 68 Cleaning corona wire 158 drum unit 161 laser scanner window 154 scanner 153 Connecting external TAD (answering machine) .......53 external telephone 57 two-line external TAD or telephone ..........


