Quick Setup Guide - English
Page 51
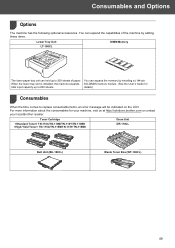
...memory module. (See the User's Guide for your machine, visit us at http://solutions.brother.com or contact your local Brother reseller. Consumables and Options 1 Options 1 The machine has the following optional accessories. details....) Consumables 2 When the time comes to 800 sheets. Toner Cartridge TN-110C/TN-110M/TN-110Y/TN-110BK TN-115C/TN-115M/TN-115Y/TN-115BK Drum...You can hold up to replace consumable items, an error message will be indicated on the LCD.
...memory module. (See the User's Guide for your machine, visit us at http://solutions.brother.com or contact your local Brother reseller. Consumables and Options 1 Options 1 The machine has the following optional accessories. details....) Consumables 2 When the time comes to 800 sheets. Toner Cartridge TN-110C/TN-110M/TN-110Y/TN-110BK TN-115C/TN-115M/TN-115Y/TN-115BK Drum...You can hold up to replace consumable items, an error message will be indicated on the LCD.
Users Manual - English
Page 9
...parts from the date of purchase, Brother International Corporation (Canada) Ltd. ("Brother"), or its Authorized Service Centres, ...MFC/Fax machine, please refer to products purchased and used in the form of the Laser Printer/MFC/Fax machine to the Laser Printer/MFC...Brother, its authorized on-site service providers, will repair or replace (at Brother Authorized Service Centres throughout Canada. Internet support: support@brother.ca or browse Brother's Web Site www.brother... consumables (including, without limitation, toner cartridges and drum units, OPC belts, fixing units, print heads...
...parts from the date of purchase, Brother International Corporation (Canada) Ltd. ("Brother"), or its Authorized Service Centres, ...MFC/Fax machine, please refer to products purchased and used in the form of the Laser Printer/MFC/Fax machine to the Laser Printer/MFC...Brother, its authorized on-site service providers, will repair or replace (at Brother Authorized Service Centres throughout Canada. Internet support: support@brother.ca or browse Brother's Web Site www.brother... consumables (including, without limitation, toner cartridges and drum units, OPC belts, fixing units, print heads...
Users Manual - English
Page 15
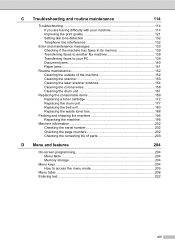
... Cleaning the scanner 153 Cleaning the laser scanner windows 154 Cleaning the corona wires 158 Cleaning the drum unit 161 Replacing the consumable items 169 Replacing a toner cartridge 172 Replacing the drum unit 177 Replacing the belt unit 183 Replacing the waste toner box 188 Packing and shipping the machine 194 Repacking the machine 195 Machine information...
... Cleaning the scanner 153 Cleaning the laser scanner windows 154 Cleaning the corona wires 158 Cleaning the drum unit 161 Replacing the consumable items 169 Replacing a toner cartridge 172 Replacing the drum unit 177 Replacing the belt unit 183 Replacing the waste toner box 188 Packing and shipping the machine 194 Repacking the machine 195 Machine information...
Users Manual - English
Page 132
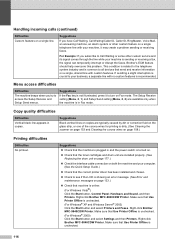
Brother's ECM feature should help overcome this problem. This condition is related to the telephone system industry and is in copies. The Setup Receive setting (Menu, 2, 1) and Setup Send setting (Menu, 2, 2) are installed properly. (See Replacing the drum unit on page 177.) „... online: (For Windows Vista®) Click the Start button, Control Panel, Hardware and Sound, and then Printers. Right-click Brother MFC-9840CDW Printer. Make sure that machine is recommended. Handling incoming calls (continued) Difficulties Custom features on page 158.) Printing difficulties Difficulties No...
Brother's ECM feature should help overcome this problem. This condition is related to the telephone system industry and is in copies. The Setup Receive setting (Menu, 2, 1) and Setup Send setting (Menu, 2, 2) are installed properly. (See Replacing the drum unit on page 177.) „... online: (For Windows Vista®) Click the Start button, Control Panel, Hardware and Sound, and then Printers. Right-click Brother MFC-9840CDW Printer. Make sure that machine is recommended. Handling incoming calls (continued) Difficulties Custom features on page 158.) Printing difficulties Difficulties No...
Users Manual - English
Page 137
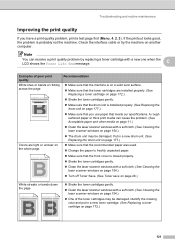
.... 0123456789. If the printout looks good, the problem is installed properly. (See Replacing the drum unit on page 154.) „ The drum unit may be damaged. Note You can cause the problem. (See Acceptable paper and.... ABCDEFGHIJKLMNOPQRSTUVWXYZ. 0123456789. abcdefghijklmnopqrstuvwxyz. abcdefghijklmnopqrstuvwxyz. abcdefghijklmnopqrstuvwxyz. ABCDEFGHIJKLMNOPQRSTUVWXYZ. 0123456789. Identify the missing color and put in a new drum unit. (See Replacing the drum unit on page 177.) „ Make sure that the recommended paper was used. „ Change the paper ...
.... 0123456789. If the printout looks good, the problem is installed properly. (See Replacing the drum unit on page 154.) „ The drum unit may be damaged. Note You can cause the problem. (See Acceptable paper and.... ABCDEFGHIJKLMNOPQRSTUVWXYZ. 0123456789. abcdefghijklmnopqrstuvwxyz. abcdefghijklmnopqrstuvwxyz. abcdefghijklmnopqrstuvwxyz. ABCDEFGHIJKLMNOPQRSTUVWXYZ. 0123456789. Identify the missing color and put in a new drum unit. (See Replacing the drum unit on page 177.) „ Make sure that the recommended paper was used. „ Change the paper ...
Users Manual - English
Page 138
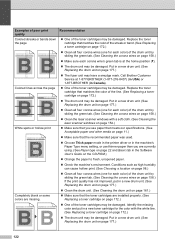
...improved, put in a new drum unit. (See Replacing the drum unit on page 177.) 122 abcdefghijklmnopqrstuvwxyz. Put in a new toner cartridge for each corona wire's green tab is at 1-877-BROTHER (1-877-276-8437) (in USA) or 1-877-BROTHER (in a new drum unit. (See Replacing the drum unit on page 177.) ...„ Clean the drum unit. (See Cleaning the drum unit on page 161.) „ Make sure that matches the...
...improved, put in a new drum unit. (See Replacing the drum unit on page 177.) 122 abcdefghijklmnopqrstuvwxyz. Put in a new toner cartridge for each corona wire's green tab is at 1-877-BROTHER (1-877-276-8437) (in USA) or 1-877-BROTHER (in a new drum unit. (See Replacing the drum unit on page 177.) ...„ Clean the drum unit. (See Cleaning the drum unit on page 161.) „ Make sure that matches the...
Users Manual - English
Page 139
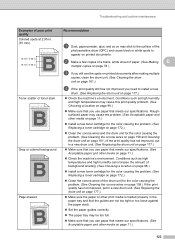
... stack. „ Set the paper guides correctly. „ The paper tray may stick to the surface of the photosensitive drum (OPC) and cause black or white spots to install a new drum. (See Replacing the drum unit on page 11.) 123 ABCDEFGHIJKLMNOPQRSTUVWXYZ. 0123456789. abcdefghijklmnopqrstuvwxyz. abcdefghijklmnopqrstuvwxyz. ABCDEFGHIJKLMNOPQRSTUVWXYZ. 0123456789. abcdefghijklmnopqrstuvwxyz. 75 mm / 2.95 in . abcdefghijklmnopqrstuvwxyz. abcdefghijklmnopqrstuvwxyz. abcdefghijklmnopqrstuvwxyz...
... stack. „ Set the paper guides correctly. „ The paper tray may stick to the surface of the photosensitive drum (OPC) and cause black or white spots to install a new drum. (See Replacing the drum unit on page 11.) 123 ABCDEFGHIJKLMNOPQRSTUVWXYZ. 0123456789. abcdefghijklmnopqrstuvwxyz. abcdefghijklmnopqrstuvwxyz. ABCDEFGHIJKLMNOPQRSTUVWXYZ. 0123456789. abcdefghijklmnopqrstuvwxyz. 75 mm / 2.95 in . abcdefghijklmnopqrstuvwxyz. abcdefghijklmnopqrstuvwxyz. abcdefghijklmnopqrstuvwxyz...

Users Manual - English
Page 140
... machine's Paper Type menu setting. (See Acceptable paper and other media on page 11.) „ The drum unit may be damaged. Put in a new drum unit. (See Replacing the drum unit on page 177.) „ The drum unit may be damaged. Press Menu, 4, 6. (See Software User's Guide on the CD-ROM.) &#...sure that the toner cartridges are not empty. (See Toner life end message on page 172.) „ Make sure that the drum unit is installed properly. (See Replacing the belt unit on page 183.) „ Perform the calibration. Roughsurfaced paper or thick paper may cause the problem. (See ...
... machine's Paper Type menu setting. (See Acceptable paper and other media on page 11.) „ The drum unit may be damaged. Put in a new drum unit. (See Replacing the drum unit on page 177.) „ The drum unit may be damaged. Press Menu, 4, 6. (See Software User's Guide on the CD-ROM.) &#...sure that the toner cartridges are not empty. (See Toner life end message on page 172.) „ Make sure that the drum unit is installed properly. (See Replacing the belt unit on page 183.) „ Perform the calibration. Roughsurfaced paper or thick paper may cause the problem. (See ...
Users Manual - English
Page 141
abcdefghijklmnopqrstuvwxyz. Press Menu, 4, 8, 2. Recommendation „ Make sure that the drum unit is installed properly. (See Replacing the drum unit on page 177.) „ Make sure that the belt unit is installed properly. (See Replacing the belt unit on page 183.) „ Make sure that the waste toner box is... after registering the color manually, take all the toner cartridges out of the drum unit and turn the drum unit over, then make sure that four drum unit gears are in a new waste toner box. (See Replacing the waste toner box on page 188.) C „ Perform the auto ...
abcdefghijklmnopqrstuvwxyz. Press Menu, 4, 8, 2. Recommendation „ Make sure that the drum unit is installed properly. (See Replacing the drum unit on page 177.) „ Make sure that the belt unit is installed properly. (See Replacing the belt unit on page 183.) „ Make sure that the waste toner box is... after registering the color manually, take all the toner cartridges out of the drum unit and turn the drum unit over, then make sure that four drum unit gears are in a new waste toner box. (See Replacing the waste toner box on page 188.) C „ Perform the auto ...
Users Manual - English
Page 142
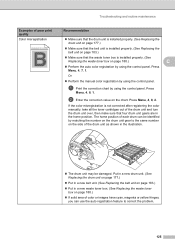
.... Missing image at edge Missing image at thin line Wrinkle ABCDEFGHIJKLMNOPQRSTUVWXYZ. 0123456789. ABCDEFGHIJKLMNOPQRSTUVWXYZ. 0123456789. abcdefghijklmnopqrstuvwxyz. Call Brother Customer Service. „ Change to the recommended type of paper. (See Recommended paper on page 11.) ...toner cartridges may be damaged. ABCDEFGHIJKLMNOPQRSTUVWXYZ. 0123456789. ABCDEFGHIJKLMNOPQRSTUVWXYZ. 0123456789. Identify the missing color and put in a new drum unit. (See Replacing the drum unit on page 177.) „ Make sure that the fuser unit is loaded properly. „ Make sure that...
.... Missing image at edge Missing image at thin line Wrinkle ABCDEFGHIJKLMNOPQRSTUVWXYZ. 0123456789. ABCDEFGHIJKLMNOPQRSTUVWXYZ. 0123456789. abcdefghijklmnopqrstuvwxyz. Call Brother Customer Service. „ Change to the recommended type of paper. (See Recommended paper on page 11.) ...toner cartridges may be damaged. ABCDEFGHIJKLMNOPQRSTUVWXYZ. 0123456789. ABCDEFGHIJKLMNOPQRSTUVWXYZ. 0123456789. Identify the missing color and put in a new drum unit. (See Replacing the drum unit on page 177.) „ Make sure that the fuser unit is loaded properly. „ Make sure that...
Users Manual - English
Page 143
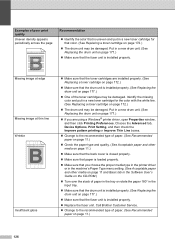
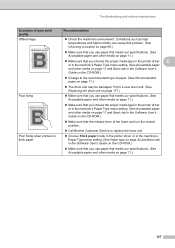
... machine's Paper Type menu setting. (See Acceptable paper and other media on page 11.) 127 abcdefghijklmnopqrstuvwxyz. abcdefghijklmnopqrstuvwxyz. Put in a new drum unit. (See Replacing the drum unit on page 177.) „ Make sure that you use paper that meets our specifications. (See Acceptable paper and other media on... the CD-ROM.) „ Make sure that the release lever of the fuser unit is in the closed position. „ Call Brother Customer Service to replace the fuser unit. „ Choose Thick paper mode in the printer driver or in the machine's Paper Type menu setting. (See Paper...
... machine's Paper Type menu setting. (See Acceptable paper and other media on page 11.) 127 abcdefghijklmnopqrstuvwxyz. abcdefghijklmnopqrstuvwxyz. Put in a new drum unit. (See Replacing the drum unit on page 177.) „ Make sure that you use paper that meets our specifications. (See Acceptable paper and other media on... the CD-ROM.) „ Make sure that the release lever of the fuser unit is in the closed position. „ Call Brother Customer Service to replace the fuser unit. „ Choose Thick paper mode in the printer driver or in the machine's Paper Type menu setting. (See Paper...
Users Manual - English
Page 149
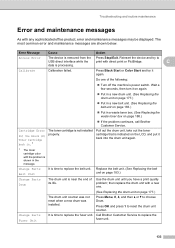
... Parts It is removed from the Press Stop/Exit. Call Brother Customer Service to USB direct interface while the print with any sophisticated office product, error and maintenance messages may be displayed. Do one . (See Replacing the drum unit on page 183.) Use the drum unit until you have a print quality problem; Belt Unit...
... Parts It is removed from the Press Stop/Exit. Call Brother Customer Service to USB direct interface while the print with any sophisticated office product, error and maintenance messages may be displayed. Do one . (See Replacing the drum unit on page 183.) Use the drum unit until you have a print quality problem; Belt Unit...
Users Manual - English
Page 150
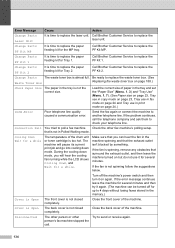
Call Brother Customer Service to replace the PF Kit MP. Change Parts PF Kit 2 It is not spinning follow the suggestions below. Be ready to 4 days without losing faxes stored in Polled Waiting mode. Load the correct size of the drum unit or toner cartridge is time to replace the paper...by something. Disconnected The other person or other fax machine's polling setup. Change Parts PF Kit MP It is too hot. Call Brother Customer Service to replace the laser unit. that is not in the memory.) Cover is Open The front cover is not closed completely. Turn off for...
Call Brother Customer Service to replace the PF Kit MP. Change Parts PF Kit 2 It is not spinning follow the suggestions below. Be ready to 4 days without losing faxes stored in Polled Waiting mode. Load the correct size of the drum unit or toner cartridge is time to replace the paper...by something. Disconnected The other person or other fax machine's polling setup. Change Parts PF Kit MP It is too hot. Call Brother Customer Service to replace the laser unit. that is not in the memory.) Cover is Open The front cover is not closed completely. Turn off for...
Users Manual - English
Page 151
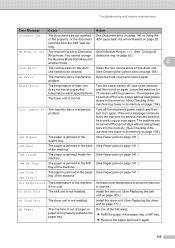
... tray of the machine. Low Temperature The temperature of paper or paper is too cold. Install the belt unit. (See Replacing the belt unit on page 183.) No Drum Unit The drum unit is set to Distinctive Set Distinctive Ring to 4 days without losing faxes stored in the memory. (See Checking if ...the machine has faxes in the back (See Paper jams on page 139.) Init Unable XX The machine has a mechanical problem. Install the drum unit. (See Replacing the drum unit on page 177.) No Paper The machine is out of the machine Increase room temperature to 4 days without losing faxes stored in ...
... tray of the machine. Low Temperature The temperature of paper or paper is too cold. Install the belt unit. (See Replacing the belt unit on page 183.) No Drum Unit The drum unit is set to Distinctive Set Distinctive Ring to 4 days without losing faxes stored in the memory. (See Checking if ...the machine has faxes in the back (See Paper jams on page 139.) Init Unable XX The machine has a mechanical problem. Install the drum unit. (See Replacing the drum unit on page 177.) No Paper The machine is out of the machine Increase room temperature to 4 days without losing faxes stored in ...
Users Manual - English
Page 153
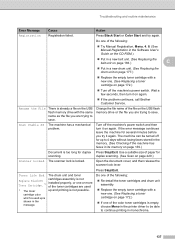
... Document is locked. Use a suitable size of the following : „ Re-install the toner cartridges and drum unit assembly. „ Replace the empty toner cartridge with a new one. (See Replacing a toner cartridge on page 172.) „ If one of the color toner cartridges is already a file ...days without losing faxes stored in the memory. (See Checking if the machine has faxes in a new drum unit. (See Replacing the drum unit on again. „ If the problem continues, call Brother Customer Service. Press Stop/Exit. Scan Unable XX The machine has a mechanical problem. Press Black Start...
... Document is locked. Use a suitable size of the following : „ Re-install the toner cartridges and drum unit assembly. „ Replace the empty toner cartridge with a new one. (See Replacing a toner cartridge on page 172.) „ If one of the color toner cartridges is already a file ...days without losing faxes stored in the memory. (See Checking if the machine has faxes in a new drum unit. (See Replacing the drum unit on again. „ If the problem continues, call Brother Customer Service. Press Stop/Exit. Scan Unable XX The machine has a mechanical problem. Press Black Start...
Users Manual - English
Page 187
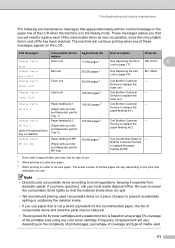
... vary depending on page 183. Service to replace the paper feeding kit 2. If you use . Drum unit 17,000 pages 1 See Replacing the drum DR-110CL C unit on the LCD. Brother Customer Service to replace the paper feeding kit MP. 1 Drum yield is installed) Paper feeding kit 2 ...cartridge. BU-100CL Change Parts Fuser Unit Fuser unit 80,000 pages 3 Call Brother Customer - Change Parts Laser Unit Laser unit 100,000 pages 3 Call Brother Customer - Frequency of replacement will need to prevent accidentally spilling or scattering the material inside does not spill...
... vary depending on page 183. Service to replace the paper feeding kit 2. If you use . Drum unit 17,000 pages 1 See Replacing the drum DR-110CL C unit on the LCD. Brother Customer Service to replace the paper feeding kit MP. 1 Drum yield is installed) Paper feeding kit 2 ...cartridge. BU-100CL Change Parts Fuser Unit Fuser unit 80,000 pages 3 Call Brother Customer - Change Parts Laser Unit Laser unit 100,000 pages 3 Call Brother Customer - Frequency of replacement will need to prevent accidentally spilling or scattering the material inside does not spill...
Users Manual - English
Page 188
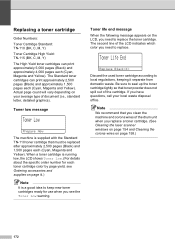
...is supplied with the Standard TN-110 toner cartridge that toner powder does not spill out of document (i.e., standard letter, detailed graphics). Be sure to replace the toner cartridge. Toner life end message C When the following message appears on page iii.) Note It is running low, the LCD shows Toner... need to local regulations, keeping it separate from domestic waste. Note We recommend that you clean the machine and corona wires of the drum unit when you have questions, call your average type of the cartridge. Actual page count will vary depending on page 158.) 172
...is supplied with the Standard TN-110 toner cartridge that toner powder does not spill out of document (i.e., standard letter, detailed graphics). Be sure to replace the toner cartridge. Toner life end message C When the following message appears on page iii.) Note It is running low, the LCD shows Toner... need to local regulations, keeping it separate from domestic waste. Note We recommend that you clean the machine and corona wires of the drum unit when you have questions, call your average type of the cartridge. Actual page count will vary depending on page 158.) 172
Users Manual - English
Page 189
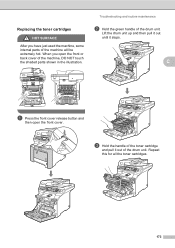
c Hold the handle of the toner cartridge and pull it stops. When you have just used the machine, some internal parts of the drum unit. Lift the drum unit up and then pull it out until it out of the machine will be extremely hot. Repeat this for all the toner cartridges. 173 ... NOT touch the shaded parts shown in the illustration. C a Press the front cover release button and then open the front or back cover of the drum unit. Replacing the toner cartridges C HOT SURFACE After you open the front cover.
c Hold the handle of the toner cartridge and pull it stops. When you have just used the machine, some internal parts of the drum unit. Lift the drum unit up and then pull it out until it out of the machine will be extremely hot. Repeat this for all the toner cartridges. 173 ... NOT touch the shaded parts shown in the illustration. C a Press the front cover release button and then open the front or back cover of the drum unit. Replacing the toner cartridges C HOT SURFACE After you open the front cover.
Users Manual - English
Page 193
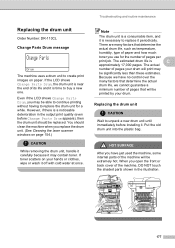
... life and it is time to create print images on your drum will be replaced. HOT SURFACE After you use for a while. Replacing the drum unit C CAUTION Wait to replace it . Put the old drum unit into the plastic bag. The estimated drum life is a noticeable deterioration in the illustration. 177 However,...how much toner you have no control over the many factors that determine the actual drum life, we have just used the machine, some internal parts of pages that will be printed by your drum. When you may contain toner. You should be extremely hot. If the LCD ...
... life and it is time to create print images on your drum will be replaced. HOT SURFACE After you use for a while. Replacing the drum unit C CAUTION Wait to replace it . Put the old drum unit into the plastic bag. The estimated drum life is a noticeable deterioration in the illustration. 177 However,...how much toner you have no control over the many factors that determine the actual drum life, we have just used the machine, some internal parts of pages that will be printed by your drum. When you may contain toner. You should be extremely hot. If the LCD ...
Users Manual - English
Page 198
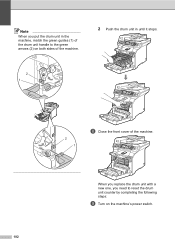
Note When you need to the green arrows (2) on the machine's power switch. 182 When you replace the drum unit with a new one, you put the drum unit in the machine, match the green guides (1) of the drum unit handle to reset the drum unit counter by completing the following steps: i Turn on both sides of the machine. 2 Push the drum unit in until it stops. 2 1 2 1 h Close the front cover of the machine.
Note When you need to the green arrows (2) on the machine's power switch. 182 When you replace the drum unit with a new one, you put the drum unit in the machine, match the green guides (1) of the drum unit handle to reset the drum unit counter by completing the following steps: i Turn on both sides of the machine. 2 Push the drum unit in until it stops. 2 1 2 1 h Close the front cover of the machine.


