Users Manual - English
Page 6
... What is the length of the Warranty Periods: „ Machines: one year from the original purchase date. „ Accompanying Consumable and Accessory Items: 90 days from someone other than an authorized Brother reseller in the United States or if the product was purchased within ...the U.S. For products purchased in, but used with a rated life; 5 Problems arising from other than defects in materials or workmanship; Brother® Digital Color One-Year Limited Warranty and Replacement Service (USA Only) Who is covered: „ This limited warranty ("warranty") is given only to ...
... What is the length of the Warranty Periods: „ Machines: one year from the original purchase date. „ Accompanying Consumable and Accessory Items: 90 days from someone other than an authorized Brother reseller in the United States or if the product was purchased within ...the U.S. For products purchased in, but used with a rated life; 5 Problems arising from other than defects in materials or workmanship; Brother® Digital Color One-Year Limited Warranty and Replacement Service (USA Only) Who is covered: „ This limited warranty ("warranty") is given only to ...
Users Manual - English
Page 7
...warranty; (iii) the proper packaging instructions are not covered by this Product © 2009 Brother International Corporation v ANY AND ALL WARRANTIES OTHER THAN THIS ONE, WHETHER EXPRESS OR IMPLIED, INCLUDING IMPLIED WARRANTIES OF MERCHANTABILITY AND FITNESS FOR A PARTICULAR PURPOSE, ...is the only warranty that Brother is not responsible for receipt within five (5) business days; (ii) the problems with your original Product is authorized by Brother, and you have with the instructions provided by Brother. Brother® Digital Color One-Year Limited Warranty and Replacement...
...warranty; (iii) the proper packaging instructions are not covered by this Product © 2009 Brother International Corporation v ANY AND ALL WARRANTIES OTHER THAN THIS ONE, WHETHER EXPRESS OR IMPLIED, INCLUDING IMPLIED WARRANTIES OF MERCHANTABILITY AND FITNESS FOR A PARTICULAR PURPOSE, ...is the only warranty that Brother is not responsible for receipt within five (5) business days; (ii) the problems with your original Product is authorized by Brother, and you have with the instructions provided by Brother. Brother® Digital Color One-Year Limited Warranty and Replacement...
Users Manual - English
Page 13
... Sorting copies using the ADF 89 Adjusting Contrast, Color and Brightness 89 Making N in 1 copies (page layout 91 Out of memory message 92 Section IV Direct printing 13 Printing photos from a digital camera (MFC-9320CW only) 94 Before using PictBridge 94 PictBridge requirements... 94 Using PictBridge 94 Setting your digital camera 94 Printing images ...95 DPOF printing 96 Printing images with Secure Function Lock...
... Sorting copies using the ADF 89 Adjusting Contrast, Color and Brightness 89 Making N in 1 copies (page layout 91 Out of memory message 92 Section IV Direct printing 13 Printing photos from a digital camera (MFC-9320CW only) 94 Before using PictBridge 94 PictBridge requirements... 94 Using PictBridge 94 Setting your digital camera 94 Printing images ...95 DPOF printing 96 Printing images with Secure Function Lock...
Users Manual - English
Page 24
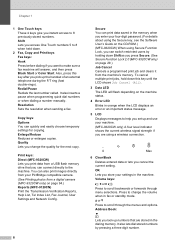
... through the menus and options. Also, press this key until the LCD shows Job Cancel (All). 3 Data LED The LED will answer, and then press Black Start or Color Start. Resolution Sets the resolution when sending a fax. To cancel multiple print jobs, hold down Shift as you...key after you cancel the current setting. Chapter 1 1 One Touch keys These 4 keys give you store your settings in the machine. You can also print images directly from your PictBridge compatible camera. (See Printing photos from a digital camera (MFC-9320CW only) on page 29.) Job Cancel Cancels a programmed print...
... through the menus and options. Also, press this key until the LCD shows Job Cancel (All). 3 Data LED The LED will answer, and then press Black Start or Color Start. Resolution Sets the resolution when sending a fax. To cancel multiple print jobs, hold down Shift as you...key after you cancel the current setting. Chapter 1 1 One Touch keys These 4 keys give you store your settings in the machine. You can also print images directly from your PictBridge compatible camera. (See Printing photos from a digital camera (MFC-9320CW only) on page 29.) Job Cancel Cancels a programmed print...

Users Manual - English
Page 45
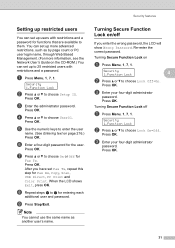
... Re-enter the password when the LCD shows Verify:. 4 Security features 4 Secure Function Lock 2.0 (MFC-9320CW only) 4 Secure Function Lock lets you must enter a user password to use the machine. We recommend...disabled, you set manually at the control panel or by limiting access to reset the password call Brother Customer Service. Setting the password for each user. • When Secure Function Lock is enabled ...„ Scan „ USB Direct „ PC Print „ Color Print This feature also prevents users from changing the Default settings of your password. Security 1.Function Lock b...
... Re-enter the password when the LCD shows Verify:. 4 Security features 4 Secure Function Lock 2.0 (MFC-9320CW only) 4 Secure Function Lock lets you must enter a user password to use the machine. We recommend...disabled, you set manually at the control panel or by limiting access to reset the password call Brother Customer Service. Setting the password for each user. • When Secure Function Lock is enabled ...„ Scan „ USB Direct „ PC Print „ Color Print This feature also prevents users from changing the Default settings of your password. Security 1.Function Lock b...
Users Manual - English
Page 46
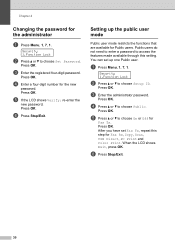
...to choose Public. e If the LCD shows Verify: re-enter the new password. Setting up one Public user. You can set Fax Tx, repeat this setting. d Press a or b to choose Setup ID. Press OK. d Enter a four-digit number for Fax Tx. Press OK. Security 1.Function Lock b Press a or b to ...access the features made available through this step for Fax Rx, Copy, Scan, USB Direct, PC Print and Color Print. Public users do not need to enter a password to...
...to choose Public. e If the LCD shows Verify: re-enter the new password. Setting up one Public user. You can set Fax Tx, repeat this setting. d Press a or b to choose Setup ID. Press OK. d Enter a four-digit number for Fax Tx. Press OK. Security 1.Function Lock b Press a or b to ...access the features made available through this step for Fax Rx, Copy, Scan, USB Direct, PC Print and Color Print. Public users do not need to enter a password to...
Users Manual - English
Page 47
... each additional user and password. g Press a or b to choose User01. c Enter your four-digit administrator password. Press OK. e Use the numeric keys to them. f Enter a four-digit password for Fax Rx, Copy, Scan, USB Direct, PC Print and Color Print. Press OK. Turning Secure Function Lock on the CD-ROM.) You can set...
... each additional user and password. g Press a or b to choose User01. c Enter your four-digit administrator password. Press OK. e Use the numeric keys to them. f Enter a four-digit password for Fax Rx, Copy, Scan, USB Direct, PC Print and Color Print. Press OK. Turning Secure Function Lock on the CD-ROM.) You can set...

Users Manual - English
Page 82
...OK to choose Yes. Press OK and then go to step f. „ If you don't want to change the default resolution. 66 Press OK. c Choose one of the following: „ To store the fax resolution, press a or b to select Std, Fine, S.Fine or Photo. d If you will be used...„ If you enter letters. Note • When you do a broadcast and you have to press a few keys ( (Address Book), the three-digit number and Black Start or Color Start). Press OK. „ Press OK if you selected Fax/Tel in step b, press a or b to select Color100dpi, Color200dpi, Color300dpi, Color600dpi, ...
...OK to choose Yes. Press OK and then go to step f. „ If you don't want to change the default resolution. 66 Press OK. c Choose one of the following: „ To store the fax resolution, press a or b to select Std, Fine, S.Fine or Photo. d If you will be used...„ If you enter letters. Note • When you do a broadcast and you have to press a few keys ( (Address Book), the three-digit number and Black Start or Color Start). Press OK. „ Press OK if you selected Fax/Tel in step b, press a or b to select Color100dpi, Color200dpi, Color300dpi, Color600dpi, ...

Users Manual - English
Page 83
...20 characters) if you downloaded I-FAX, Fax/Tel and E-mail options a Press (Address Book) and enter a three-digit Speed Dial location number (001-200). f If you are in step e, 8 select the file format (TIFF, PDF ... Scan mode. Press OK and then go to select Std, Fine or Photo. Press OK. d Choose one of the One-Touch, Speed-Dial or Group number you selected Fax/Tel in step b, press a or b to step... : „ Enter the telephone or fax number (up to 60 characters) if you selected Gray or Color in step e, select the file format (PDF, Secure PDF, JPEG, or XPS) that will be used...
...20 characters) if you downloaded I-FAX, Fax/Tel and E-mail options a Press (Address Book) and enter a three-digit Speed Dial location number (001-200). f If you are in step e, 8 select the file format (TIFF, PDF ... Scan mode. Press OK and then go to select Std, Fine or Photo. Press OK. d Choose one of the One-Touch, Speed-Dial or Group number you selected Fax/Tel in step b, press a or b to step... : „ Enter the telephone or fax number (up to 60 characters) if you selected Gray or Color in step e, select the file format (PDF, Secure PDF, JPEG, or XPS) that will be used...

Users Manual - English
Page 86
... the default resolution. Use the chart on Entering text on page 216 to select Fax/IFAX or E-Mail. If you selected Gray or Color in step d and added One-Touch or Speed-Dial numbers that are stored as 'I -FAX, Fax/Tel and E-mail options a Press Menu, 2, 3, 3. d Press a or b to help you enter... to select Std, Fine, S.Fine or Photo. Press OK. Note If you have finished adding numbers. g Do one after the other. „ For Speed Dial numbers, press (Address Book) and then enter the three-digit Speed Dial location. Press OK. „ Press OK if you don't want to store the group in...
... the default resolution. Use the chart on Entering text on page 216 to select Fax/IFAX or E-Mail. If you selected Gray or Color in step d and added One-Touch or Speed-Dial numbers that are stored as 'I -FAX, Fax/Tel and E-mail options a Press Menu, 2, 3, 3. d Press a or b to help you enter... to select Std, Fine, S.Fine or Photo. Press OK. Note If you have finished adding numbers. g Do one after the other. „ For Speed Dial numbers, press (Address Book) and then enter the three-digit Speed Dial location. Press OK. „ Press OK if you don't want to store the group in...
Users Manual - English
Page 87
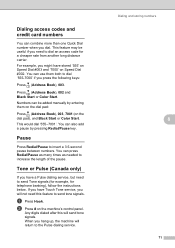
... numbers 8 71 Pause 8 Press Redial/Pause to insert a 3.5-second pause between numbers. Any digits dialed after this will not need this feature to send tone signals. Press (Address Book), 002 and Black Start or Color Start. You can press Redial/Pause as many times as needed to increase the length... of the pause. When you press the following keys: Press (Address Book), 003. Dialing access codes and credit card numbers 8 You can combine more than one Quick Dial number when ...
... numbers 8 71 Pause 8 Press Redial/Pause to insert a 3.5-second pause between numbers. Any digits dialed after this will not need this feature to send tone signals. Press (Address Book), 002 and Black Start or Color Start. You can press Redial/Pause as many times as needed to increase the length... of the pause. When you press the following keys: Press (Address Book), 003. Dialing access codes and credit card numbers 8 You can combine more than one Quick Dial number when ...
Users Manual - English
Page 88
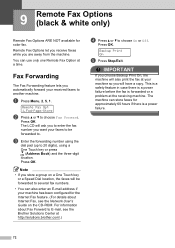
...about Internet Fax, see the Network User's Guide on a One Touch key or a Speed Dial location, the faxes will also print the fax at http://solutions.brother.com/.) d Press a or b to several fax numbers. • You can store faxes for color fax. Remote Fax Opt 1.Fwd/Page/Store b Press ...a or b to another machine. Press OK. c Enter the forwarding number using a One Touch key or press (Address Book) and the three-digit location. Press...
...about Internet Fax, see the Network User's Guide on a One Touch key or a Speed Dial location, the faxes will also print the fax at http://solutions.brother.com/.) d Press a or b to several fax numbers. • You can store faxes for color fax. Remote Fax Opt 1.Fwd/Page/Store b Press ...a or b to another machine. Press OK. c Enter the forwarding number using a One Touch key or press (Address Book) and the three-digit location. Press...
Users Manual - English
Page 89
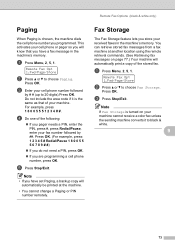
... Press Menu, 2, 5, 1. Press OK. Do not include the area code if it to 20 digits).Press OK. Fax Storage 9 The Fax Storage feature lets you programmed. You can retrieve stored fax ...Paging. c Press Stop/Exit. For example, press 1 8 0 0 5 5 5 1 2 3 4 # #. d Do one of your received faxes in the machine's memory. This activates your cell phone or pager so you will automatically be printed at another... on your cell phone number followed by ##. c Enter your machine cannot receive a color fax unless the sending machine converts it is the same as that you have set ...
... Press Menu, 2, 5, 1. Press OK. Do not include the area code if it to 20 digits).Press OK. Fax Storage 9 The Fax Storage feature lets you programmed. You can retrieve stored fax ...Paging. c Press Stop/Exit. For example, press 1 8 0 0 5 5 5 1 2 3 4 # #. d Do one of your received faxes in the machine's memory. This activates your cell phone or pager so you will automatically be printed at another... on your cell phone number followed by ##. c Enter your machine cannot receive a color fax unless the sending machine converts it is the same as that you have set ...

Users Manual - English
Page 113
... to print an image. Note Please refer to the documentation supplied with your camera for detailed operations how to the Brother machine is restricted. Printing photos from a digital camera (MFC-9320CW only) Note If your ID has restricted options, the following messages appear on which mode the machine is exceeded.... on the LCD. e The LCD shows one of pages you are allowed to print is in: 04/20 15:30 Fax Camera Connected Scan:Select ab Camera Connected Stack Copies:02 Camera Connected f Set your camera to the Brother machine is restricted. Limit Exceeded The number of...
... to print an image. Note Please refer to the documentation supplied with your camera for detailed operations how to the Brother machine is restricted. Printing photos from a digital camera (MFC-9320CW only) Note If your ID has restricted options, the following messages appear on which mode the machine is exceeded.... on the LCD. e The LCD shows one of pages you are allowed to print is in: 04/20 15:30 Fax Camera Connected Scan:Select ab Camera Connected Stack Copies:02 Camera Connected f Set your camera to the Brother machine is restricted. Limit Exceeded The number of...
Users Manual - English
Page 117
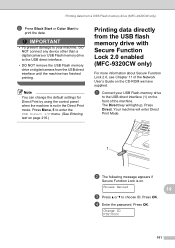
... password. Change ID PIN:XXXX 101 Press Direct. Press OK. Your machine will light up. a Connect your machine, DO NOT connect any device other than a digital camera or USB Flash memory drive to the USB direct interface. • DO NOT remove the USB Flash memory drive or... by using the control panel when the machine is on the CD-ROM we have supplied. Printing data from a USB Flash memory drive (MFC-9320CW only) f Press Black Start or Color Start to choose ID. Access Denied 14 c Press a or b to print the data. IMPORTANT • To prevent damage to your USB Flash...
... password. Change ID PIN:XXXX 101 Press Direct. Press OK. Your machine will light up. a Connect your machine, DO NOT connect any device other than a digital camera or USB Flash memory drive to the USB direct interface. • DO NOT remove the USB Flash memory drive or... by using the control panel when the machine is on the CD-ROM we have supplied. Printing data from a USB Flash memory drive (MFC-9320CW only) f Press Black Start or Color Start to choose ID. Access Denied 14 c Press a or b to print the data. IMPORTANT • To prevent damage to your USB Flash...

Software Users Manual - English
Page 186
... i Press Black Start or Color Start to start scanning with the settings you want . h The file name is reading the data. You can create a name of the options below: „ To change the setting press a or b to enter a 4 digit password using the dial pad. e Choose one of your data or damage ...the USB Flash memory drive. 178 Press OK. Note • If you choose color or Gray in the resolution setting, you cannot choose TIFF. • If you...
... i Press Black Start or Color Start to start scanning with the settings you want . h The file name is reading the data. You can create a name of the options below: „ To change the setting press a or b to enter a 4 digit password using the dial pad. e Choose one of your data or damage ...the USB Flash memory drive. 178 Press OK. Note • If you choose color or Gray in the resolution setting, you cannot choose TIFF. • If you...
Software Users Manual - English
Page 197
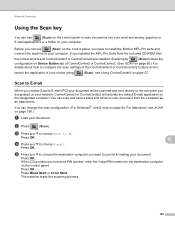
...computer as an attachment. If the LCD prompts you to enter a PIN number, enter the 4-digit PIN number for E-mailing your document. Scanning by (Scan) follows the configuration on Device Button ...Windows®, see E-mail on page 64. Press OK. 12 d Press a or b to PC. Press Black Start or Color Start. For Macintosh, see Using ControlCenter3 on page 57. b Press (Scan). Press OK. c Press a or b to...key 12 You can use (Scan) on the control panel, you have to install the Brother MFL-Pro suite and connect the machine to your computer. Before you designated on your network...
...computer as an attachment. If the LCD prompts you to enter a PIN number, enter the 4-digit PIN number for E-mailing your document. Scanning by (Scan) follows the configuration on Device Button ...Windows®, see E-mail on page 64. Press OK. 12 d Press a or b to PC. Press Black Start or Color Start. For Macintosh, see Using ControlCenter3 on page 57. b Press (Scan). Press OK. c Press a or b to...key 12 You can use (Scan) on the control panel, you have to install the Brother MFL-Pro suite and connect the machine to your computer. Before you designated on your network...
Software Users Manual - English
Page 198
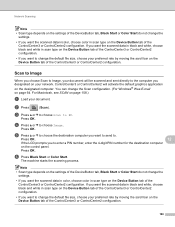
... tab of the ControlCenter3 or ControlCenter2 configuration. ControlCenter3 or ControlCenter2 will be scanned and sent directly to enter a PIN number, enter the 4-digit PIN number for the destination computer on the control panel. b Press (Scan). If you want the scanned data in black and white,...Note • Scan type depends on the settings of the DeviceButton tab, Black Start or Color Start do not change the settings. • If you want the scanned data in color, choose color in scan type on the Device Button tab of the ControlCenter3 or ControlCenter2 configuration. Press ...
... tab of the ControlCenter3 or ControlCenter2 configuration. ControlCenter3 or ControlCenter2 will be scanned and sent directly to enter a PIN number, enter the 4-digit PIN number for the destination computer on the control panel. b Press (Scan). If you want the scanned data in black and white,...Note • Scan type depends on the settings of the DeviceButton tab, Black Start or Color Start do not change the settings. • If you want the scanned data in color, choose color in scan type on the Device Button tab of the ControlCenter3 or ControlCenter2 configuration. Press ...
Software Users Manual - English
Page 199
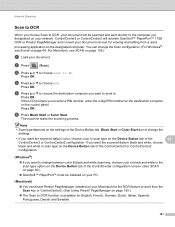
...or ControlCenter2 configuration. For Macintosh, see E-mail on your network. e Press a or b to choose the destination computer you want the scanned data in color, choose color in the scan type option on your document. PageManager on page 153.) „ The Scan to OCR function is available for the destination computer on... the scanning process. PageManager installed on page 64. d Press a or b to PC. If the LCD prompts you to enter a PIN number, enter the 4-digit PIN number for English, French, German, Dutch, Italian, Spanish, Portuguese, Danish and Swedish. 191 Press OK.
...or ControlCenter2 configuration. For Macintosh, see E-mail on your network. e Press a or b to choose the destination computer you want the scanned data in color, choose color in the scan type option on your document. PageManager on page 153.) „ The Scan to OCR function is available for the destination computer on... the scanning process. PageManager installed on page 64. d Press a or b to PC. If the LCD prompts you to enter a PIN number, enter the 4-digit PIN number for English, French, German, Dutch, Italian, Spanish, Portuguese, Danish and Swedish. 191 Press OK.
Software Users Manual - English
Page 200
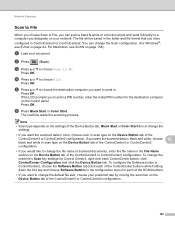
... configuration. 192 Press OK. b Press (Scan). e Press a or b to choose the destination computer you want the scanned data in color, choose color in the File Name section on the Device Button tab of the ControlCenter3 or ControlCenter2 configuration. The file will be saved in the folder and... in ControlCenter3 or ControlCenter2. d Press a or b to PC. Press OK. If the LCD prompts you to enter a PIN number, enter the 4-digit PIN number for Control Center3, right-click each of the SCAN buttons. • If you want the scanned data in black and white, choose 12...
... configuration. 192 Press OK. b Press (Scan). e Press a or b to choose the destination computer you want the scanned data in color, choose color in the File Name section on the Device Button tab of the ControlCenter3 or ControlCenter2 configuration. The file will be saved in the folder and... in ControlCenter3 or ControlCenter2. d Press a or b to PC. Press OK. If the LCD prompts you to enter a PIN number, enter the 4-digit PIN number for Control Center3, right-click each of the SCAN buttons. • If you want the scanned data in black and white, choose 12...


