Users Manual - English
Page 6
... does not cover: 1 Physical damage to this Product; 2 Damage caused by improper installation, improper or abnormal use of non Brother®-brand parts and Consumable and Accessory Items); 4 Consumable and Accessory Items that you insure your Machine and/or accompanying Consumable ...limited to the Authorized Service Center together with a rated life; 5 Problems arising from other than defects in materials or workmanship; Brother® Digital Color One-Year Limited Warranty and Replacement Service (USA Only) Who is covered: „ This limited warranty ("warranty") is given only ...
... does not cover: 1 Physical damage to this Product; 2 Damage caused by improper installation, improper or abnormal use of non Brother®-brand parts and Consumable and Accessory Items); 4 Consumable and Accessory Items that you insure your Machine and/or accompanying Consumable ...limited to the Authorized Service Center together with a rated life; 5 Problems arising from other than defects in materials or workmanship; Brother® Digital Color One-Year Limited Warranty and Replacement Service (USA Only) Who is covered: „ This limited warranty ("warranty") is given only ...
Users Manual - English
Page 7
...your original Machine shall become the property of Brother. Because some states do not return your original Product to Brother within two business days, with the understanding that you ship this Product © 2009 Brother International Corporation v It is sent to the manufacturer's... only) and exclusive remedies under this warranty. Important: We recommend that you keep the replacement Machine that Brother is entitled to you. Brother® Digital Color One-Year Limited Warranty and Replacement Service (USA Only) Machine and/or accompanying Consumable and Accessory Items and use...
...your original Machine shall become the property of Brother. Because some states do not return your original Product to Brother within two business days, with the understanding that you ship this Product © 2009 Brother International Corporation v It is sent to the manufacturer's... only) and exclusive remedies under this warranty. Important: We recommend that you keep the replacement Machine that Brother is entitled to you. Brother® Digital Color One-Year Limited Warranty and Replacement Service (USA Only) Machine and/or accompanying Consumable and Accessory Items and use...
Users Manual - English
Page 13
... Sorting copies using the ADF 89 Adjusting Contrast, Color and Brightness 89 Making N in 1 copies (page layout 91 Out of memory message 92 Section IV Direct printing 13 Printing photos from a digital camera (MFC-9320CW only) 94 Before using PictBridge 94 PictBridge requirements... 94 Using PictBridge 94 Setting your digital camera 94 Printing images ...95 DPOF printing 96 Printing images with Secure Function Lock...
... Sorting copies using the ADF 89 Adjusting Contrast, Color and Brightness 89 Making N in 1 copies (page layout 91 Out of memory message 92 Section IV Direct printing 13 Printing photos from a digital camera (MFC-9320CW only) 94 Before using PictBridge 94 PictBridge requirements... 94 Using PictBridge 94 Setting your digital camera 94 Printing images ...95 DPOF printing 96 Printing images with Secure Function Lock...
Users Manual - English
Page 24
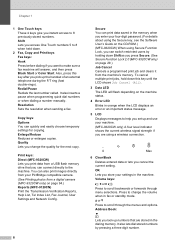
...up numbers that you can connect directly to help you pick up and use your PictBridge compatible camera. (See Printing photos from a digital camera (MFC-9320CW only) on page 29.) Job Cancel Cancels a programmed print job and clears it from a USB flash memory drive that are using... Data LED The LED will answer, and then press Black Start or Color Start. Quality Lets you instant access to 8 previously stored numbers. To cancel multiple print jobs, hold down Shift as you cancel the current setting. Resolution Sets the resolution when sending a fax. Print keys: Direct (MFC-9320CW) Lets ...
...up numbers that you can connect directly to help you pick up and use your PictBridge compatible camera. (See Printing photos from a digital camera (MFC-9320CW only) on page 29.) Job Cancel Cancels a programmed print job and clears it from a USB flash memory drive that are using... Data LED The LED will answer, and then press Black Start or Color Start. Quality Lets you instant access to 8 previously stored numbers. To cancel multiple print jobs, hold down Shift as you cancel the current setting. Resolution Sets the resolution when sending a fax. Print keys: Direct (MFC-9320CW) Lets ...

Users Manual - English
Page 45
...will have to reset the password call Brother Customer Service. For more information, .... We recommend using numbers 0-9. Security 1.Function Lock b Enter a four-digit number for each user. • When Secure Function Lock is used to... The password you cannot use the machine. 4 Security features 4 Secure Function Lock 2.0 (MFC-9320CW only) 4 Secure Function Lock lets you restrict Public access to the following machine functions: &#... Copy „ Scan „ USB Direct „ PC Print „ Color Print This feature also prevents users from changing the Default settings of your password....
...will have to reset the password call Brother Customer Service. For more information, .... We recommend using numbers 0-9. Security 1.Function Lock b Enter a four-digit number for each user. • When Secure Function Lock is used to... The password you cannot use the machine. 4 Security features 4 Secure Function Lock 2.0 (MFC-9320CW only) 4 Secure Function Lock lets you restrict Public access to the following machine functions: &#... Copy „ Scan „ USB Direct „ PC Print „ Color Print This feature also prevents users from changing the Default settings of your password....
Users Manual - English
Page 46
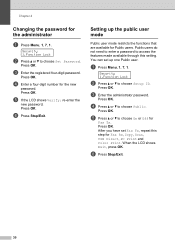
...e Press a or b to choose On or Off for Fax Rx, Copy, Scan, USB Direct, PC Print and Color Print. When the LCD shows Exit, press OK. d Press a or b to choose Set Password. Press OK. ... Public user mode restricts the functions that are available for the new password. Setting up one Public user. Public users do not need to enter a password to choose Setup ID.... You can set Fax Tx, repeat this setting. Press OK. d Enter a four-digit number for Public users. Press OK. Chapter 4 Changing the password for the administrator 4 a Press Menu, 1, 7,...
...e Press a or b to choose On or Off for Fax Rx, Copy, Scan, USB Direct, PC Print and Color Print. When the LCD shows Exit, press OK. d Press a or b to choose Set Password. Press OK. ... Public user mode restricts the functions that are available for the new password. Setting up one Public user. Public users do not need to enter a password to choose Setup ID.... You can set Fax Tx, repeat this setting. Press OK. d Enter a four-digit number for Public users. Press OK. Chapter 4 Changing the password for the administrator 4 a Press Menu, 1, 7,...
Users Manual - English
Page 47
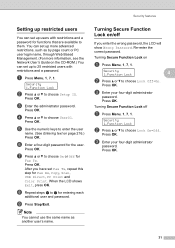
...OK. Turning Secure Function Lock off 4 If you have set Fax Tx, repeat this step for Fax Rx, Copy, Scan, USB Direct, PC Print and Color Print. c Enter your four-digit administrator password. Security features Setting up restricted users 4 You can set up users with restrictions and a password. a Press Menu, 1, 7, 1. f Enter... for functions that are available to enter the user name. (See Entering text on a Press Menu, 1, 7, 1. c Enter your four-digit administrator password. Press OK. d Press a or b to choose Lock OniOff. Press OK. Note You cannot use the same name as by page ...
...OK. Turning Secure Function Lock off 4 If you have set Fax Tx, repeat this step for Fax Rx, Copy, Scan, USB Direct, PC Print and Color Print. c Enter your four-digit administrator password. Security features Setting up restricted users 4 You can set up users with restrictions and a password. a Press Menu, 1, 7, 1. f Enter... for functions that are available to enter the user name. (See Entering text on a Press Menu, 1, 7, 1. c Enter your four-digit administrator password. Press OK. d Press a or b to choose Lock OniOff. Press OK. Note You cannot use the same name as by page ...

Users Manual - English
Page 82
... machine can also store the number by pressing Menu, 2, 3, 1. Press OK. c Choose one of the One-Touch, Speed-Dial or Group number you have to press a few keys ( (Address Book), the three-digit number and Black Start or Color Start). Press OK. „ Press OK to choose Yes. Press OK. „ Press OK... if you selected Gray or Color in step b, press a or b to change the...
... machine can also store the number by pressing Menu, 2, 3, 1. Press OK. c Choose one of the One-Touch, Speed-Dial or Group number you have to press a few keys ( (Address Book), the three-digit number and Black Start or Color Start). Press OK. „ Press OK to choose Yes. Press OK. „ Press OK... if you selected Gray or Color in step b, press a or b to change the...

Users Manual - English
Page 83
... OK. „ If you are in step b, press a or b to help you downloaded I-FAX, Fax/Tel and E-mail options a Press (Address Book) and enter a three-digit Speed Dial location number (001-200). Note • When you do a broadcast and you have saved a scan profile along with the number or E-mail address...; Enter the telephone or fax number (up to store the number or E-mail address without a name. Press OK. „ Press OK to 15 characters). d Choose one of the following : „ Enter the name using the dial pad (up to 20 characters) if you selected Gray or Color in Fax mode.
... OK. „ If you are in step b, press a or b to help you downloaded I-FAX, Fax/Tel and E-mail options a Press (Address Book) and enter a three-digit Speed Dial location number (001-200). Note • When you do a broadcast and you have saved a scan profile along with the number or E-mail address...; Enter the telephone or fax number (up to store the number or E-mail address without a name. Press OK. „ Press OK to 15 characters). d Choose one of the following : „ Enter the name using the dial pad (up to 20 characters) if you selected Gray or Color in Fax mode.

Users Manual - English
Page 86
...finished adding numbers. e To add One Touch or Speed Dial numbers follow the instructions below: „ For One Touch numbers, press the One Touch keys one of the following ways: „ Press a One Touch key. „ Press (Address Book) and then enter the three-digit Speed Dial location. Press OK. Address.... Press OK. „ If you enter letters. i If you selected Gray or Color in one after the other. „ For Speed Dial numbers, press (Address Book) and then enter the three-digit Speed Dial location. Use the chart on Entering text on page 216 to help you selected...
...finished adding numbers. e To add One Touch or Speed Dial numbers follow the instructions below: „ For One Touch numbers, press the One Touch keys one of the following ways: „ Press a One Touch key. „ Press (Address Book) and then enter the three-digit Speed Dial location. Press OK. Address.... Press OK. „ If you enter letters. i If you selected Gray or Color in one after the other. „ For Speed Dial numbers, press (Address Book) and then enter the three-digit Speed Dial location. Use the chart on Entering text on page 216 to help you selected...
Users Manual - English
Page 87
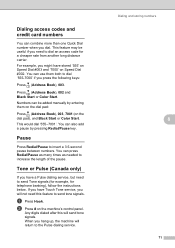
...' on Speed Dial #002. b Press # on the dial pad), and Black Start or Color Start. Press (Address Book), 002 and Black Start or Color Start. You can use them on the dial pad: Press (Address Book), 003, 7001 (...on the machine's control panel. This feature may be added manually by pressing Redial/Pause key. Dialing access codes and credit card numbers 8 You can combine more than one...hang up, the machine will not need this will send tone signals. Any digits dialed after this feature to send tone signals.
...' on Speed Dial #002. b Press # on the dial pad), and Black Start or Color Start. Press (Address Book), 002 and Black Start or Color Start. You can use them on the dial pad: Press (Address Book), 003, 7001 (...on the machine's control panel. This feature may be added manually by pressing Redial/Pause key. Dialing access codes and credit card numbers 8 You can combine more than one...hang up, the machine will not need this will send tone signals. Any digits dialed after this feature to send tone signals.
Users Manual - English
Page 88
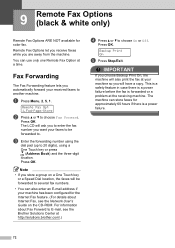
...color fax. c Enter the forwarding number using the dial pad (up to choose Fax Forward. For information about Internet Fax, see the Brother Solutions Center at http://solutions.brother.com/.) d Press a or b to . Press OK. Remote Fax Opt 1.Fwd/Page/Store b Press a or b to 20 digits), using a One... Touch key or press (Address Book) and the three-digit location. The machine can store...
...color fax. c Enter the forwarding number using the dial pad (up to choose Fax Forward. For information about Internet Fax, see the Brother Solutions Center at http://solutions.brother.com/.) d Press a or b to . Press OK. Remote Fax Opt 1.Fwd/Page/Store b Press a or b to 20 digits), using a One... Touch key or press (Address Book) and the three-digit location. The machine can store...
Users Manual - English
Page 89
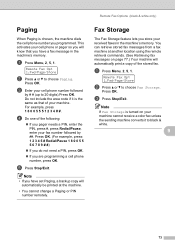
...same as that you will automatically be printed at another location using the remote retrieval commands. (See Retrieving fax messages on your machine cannot receive a color fax unless the sending machine converts it to black & white. 9 73 e Press Stop/Exit. Note • If you have a fax message...pager needs a PIN, enter the PIN, press #, press Redial/Pause, enter your fax number followed by # # (up to 20 digits).Press OK. a Press Menu, 2, 5, 1. d Do one of the stored fax. Note If Fax Storage is turned on page 77.) Your machine will automatically print a copy of the following: ...
...same as that you will automatically be printed at another location using the remote retrieval commands. (See Retrieving fax messages on your machine cannot receive a color fax unless the sending machine converts it to black & white. 9 73 e Press Stop/Exit. Note • If you have a fax message...pager needs a PIN, enter the PIN, press #, press Redial/Pause, enter your fax number followed by # # (up to 20 digits).Press OK. a Press Menu, 2, 5, 1. d Do one of the stored fax. Note If Fax Storage is turned on page 77.) Your machine will automatically print a copy of the following: ...

Users Manual - English
Page 113
... 97 e The LCD shows one of pages you are allowed to print is in: 04/20 15:30 Fax Camera Connected Scan:Select ab Camera Connected Stack Copies:02 Camera Connected f Set your camera to the Brother machine is restricted. IMPORTANT DO NOT remove the digital camera from a digital camera (MFC-9320CW only) Note If your... print using PictBridge. Note Please refer to the documentation supplied with your ID has restricted options, the following message: PictBridge Printing. Mono Print Only Printing color documents is restricted.
... 97 e The LCD shows one of pages you are allowed to print is in: 04/20 15:30 Fax Camera Connected Scan:Select ab Camera Connected Stack Copies:02 Camera Connected f Set your camera to the Brother machine is restricted. IMPORTANT DO NOT remove the digital camera from a digital camera (MFC-9320CW only) Note If your... print using PictBridge. Note Please refer to the documentation supplied with your ID has restricted options, the following message: PictBridge Printing. Mono Print Only Printing color documents is restricted.
Users Manual - English
Page 117
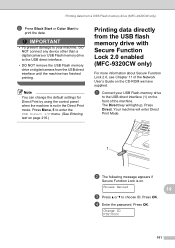
Press OK. Press OK. Printing data from a USB Flash memory drive (MFC-9320CW only) f Press Black Start or Color Start to enter the USB Direct I/F menu. (See Entering text on page 216.) Printing data directly from the USB direct interface until the machine has ... USB Flash memory drive to the USB direct interface. • DO NOT remove the USB Flash memory drive or digital camera from the USB flash memory drive with Secure Function Lock 2.0 enabled (MFC-9320CW only) 14 For more information about Secure Function Lock 2.0, see Chapter 11 of the machine. IMPORTANT • To prevent...
Press OK. Press OK. Printing data from a USB Flash memory drive (MFC-9320CW only) f Press Black Start or Color Start to enter the USB Direct I/F menu. (See Entering text on page 216.) Printing data directly from the USB direct interface until the machine has ... USB Flash memory drive to the USB direct interface. • DO NOT remove the USB Flash memory drive or digital camera from the USB flash memory drive with Secure Function Lock 2.0 enabled (MFC-9320CW only) 14 For more information about Secure Function Lock 2.0, see Chapter 11 of the machine. IMPORTANT • To prevent...

Software Users Manual - English
Page 186
...file name is reading the data. CAUTION The LCD shows Scanning while reading the data. e Choose one of the options below: „ To change the first 6 digits of the DeviceButton tab, Black Start or Color Start do not change the settings. However, you choose black & white in the Function Menu (Menu..., 5, 2), choose Start Scan. Press OK and go to USB. Press OK. i Press Black Start or Color Start to step f. „...
...file name is reading the data. CAUTION The LCD shows Scanning while reading the data. e Choose one of the options below: „ To change the first 6 digits of the DeviceButton tab, Black Start or Color Start do not change the settings. However, you choose black & white in the Function Menu (Menu..., 5, 2), choose Start Scan. Press OK and go to USB. Press OK. i Press Black Start or Color Start to step f. „...
Software Users Manual - English
Page 197
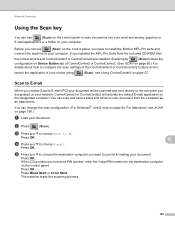
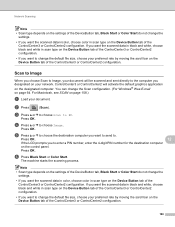
... application on the designated computer. You can scan and send a black and white or color document from the included CD-ROM then the correct drivers and ControlCenter3 or ControlCenter2 are installed... computer. e Press a or b to choose the destination computer you have to install the Brother MFL-Pro suite and connect the machine to use (Scan) on the control panel to launch...ControlCenter3 or ControlCenter2 will be scanned and sent directly to enter a PIN number, enter the 4-digit PIN number for E-mailing your document. b Press (Scan). Network Scanning Using the Scan key...
... application on the designated computer. You can scan and send a black and white or color document from the included CD-ROM then the correct drivers and ControlCenter3 or ControlCenter2 are installed... computer. e Press a or b to choose the destination computer you have to install the Brother MFL-Pro suite and connect the machine to use (Scan) on the control panel to launch...ControlCenter3 or ControlCenter2 will be scanned and sent directly to enter a PIN number, enter the 4-digit PIN number for E-mailing your document. b Press (Scan). Network Scanning Using the Scan key...
Software Users Manual - English
Page 198
... ControlCenter3 or ControlCenter2 configuration. ControlCenter3 or ControlCenter2 will be scanned and sent directly to the computer you to enter a PIN number, enter the 4-digit PIN number for the destination computer on the control panel. Press OK. Press OK. d Press a or b to PC. Press OK. f...scan type on the Device Button tab of the ControlCenter3 or ControlCenter2 configuration. • If you want the scanned data incolor, choose color in scan type on the Device Button tab of the ControlCenter3 or ControlCenter2 configuration. • If you want to change the default ...
... ControlCenter3 or ControlCenter2 configuration. ControlCenter3 or ControlCenter2 will be scanned and sent directly to the computer you to enter a PIN number, enter the 4-digit PIN number for the destination computer on the control panel. Press OK. Press OK. d Press a or b to PC. Press OK. f...scan type on the Device Button tab of the ControlCenter3 or ControlCenter2 configuration. • If you want the scanned data incolor, choose color in scan type on the Device Button tab of the ControlCenter3 or ControlCenter2 configuration. • If you want to change the default ...
Software Users Manual - English
Page 199
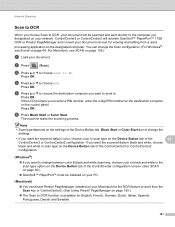
... color or black and white in scan type on page 64. PageManager installed on your Macintosh for the destination computer on page 153.) „ The Scan to . PageManager on the control panel. e Press a or b to choose the destination computer you want to enter a PIN number, enter the 4-digit ... E-mail on the Device Button tab of the 12 ControlCenter3 or ControlCenter2 configuration. Press OK. If you want the scanned data in color, choose color in scan type on the designated computer. Network Scanning Scan to OCR 12 When you choose Scan to OCR, your document will activate...
... color or black and white in scan type on page 64. PageManager installed on your Macintosh for the destination computer on page 153.) „ The Scan to . PageManager on the control panel. e Press a or b to choose the destination computer you want to enter a PIN number, enter the 4-digit ... E-mail on the Device Button tab of the 12 ControlCenter3 or ControlCenter2 configuration. Press OK. If you want the scanned data in color, choose color in scan type on the designated computer. Network Scanning Scan to OCR 12 When you choose Scan to OCR, your document will activate...
Software Users Manual - English
Page 200
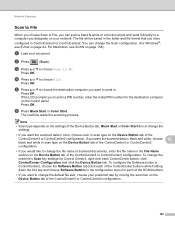
... of the ControlCenter3 or ControlCenter2 configuration. 192 e Press a or b to choose the destination computer you want the scanned data in color, choose color in scan type on the Device Button tab of the ControlCenter buttons while holding down the Ctrl key and choose Software Button) in ... (For Windows®, see SCAN on page 158.) a Load your document. If you want to enter a PIN number, enter the 4-digit PIN number for each ControlCenter button, click ControlCenter Configuration and click the Device Button tab. To configure the Software button in the configuration menu for...
... of the ControlCenter3 or ControlCenter2 configuration. 192 e Press a or b to choose the destination computer you want the scanned data in color, choose color in scan type on the Device Button tab of the ControlCenter buttons while holding down the Ctrl key and choose Software Button) in ... (For Windows®, see SCAN on page 158.) a Load your document. If you want to enter a PIN number, enter the 4-digit PIN number for each ControlCenter button, click ControlCenter Configuration and click the Device Button tab. To configure the Software button in the configuration menu for...


