Software User's Guide - English
Page 10
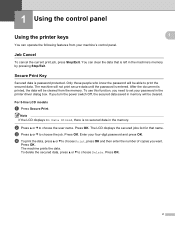
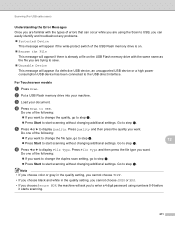
...LCD models 1 a Press Secure Print. b Press a or b to choose the job. The LCD displays the secured jobs list for that is left in the memory. Note If the LCD displays No Data Stored, there is printed, the data will be cleared from your machine's control panel. 1 1 Job Cancel 1 To... cancel the current print job, press Stop/Exit. After the document is no secured data in the machine's memory by pressing Stop/Exit. The machine prints the data. Press OK. 2 Press OK. d To print the data, press a or b to choose Print, press...
...LCD models 1 a Press Secure Print. b Press a or b to choose the job. The LCD displays the secured jobs list for that is left in the memory. Note If the LCD displays No Data Stored, there is printed, the data will be cleared from your machine's control panel. 1 1 Job Cancel 1 To... cancel the current print job, press Stop/Exit. After the document is no secured data in the machine's memory by pressing Stop/Exit. The machine prints the data. Press OK. 2 Press OK. d To print the data, press a or b to choose Print, press...
Software User's Guide - English
Page 11
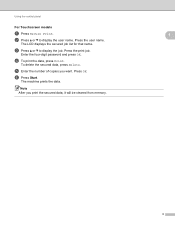
b Press a or b to display the job. Press the print job. The machine prints the data. d To print the data, press Print. Press the user name. The LCD displays the secured job list for that name. c Press a or b to display the user name. Note After you want. To delete the secured data, press Delete. Press OK. Using the control panel For Touchscreen models a Press Secure Print. e Enter the number of copies you print the secured data, it will be cleared from memory. 1 1 3 f Press Start. Enter the four-digit password and press OK.
b Press a or b to display the job. Press the print job. The machine prints the data. d To print the data, press Print. Press the user name. The LCD displays the secured job list for that name. c Press a or b to display the user name. Note After you want. To delete the secured data, press Delete. Press OK. Using the control panel For Touchscreen models a Press Secure Print. e Enter the number of copies you print the secured data, it will be cleared from memory. 1 1 3 f Press Start. Enter the four-digit password and press OK.
Software User's Guide - English
Page 23
... paper or thin paper. Remove the paper, straighten it may be paper jams or poor print quality. Before reinserting the paper, straighten it back in memory, or while scanning a document into the computer. However, when the machine is curled, turn over the stack, straighten it and then put it well, or...
... paper or thin paper. Remove the paper, straighten it may be paper jams or poor print quality. Before reinserting the paper, straighten it back in memory, or while scanning a document into the computer. However, when the machine is curled, turn over the stack, straighten it and then put it well, or...
Software User's Guide - English
Page 38
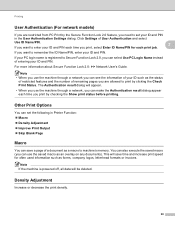
Other Print Options 2 You can set your ID and PIN. Printing User Authentication (For network models) 2 If you are allowed to machine's memory. For more information about Secure Function Lock 2.0: uu Network User's Guide. The Authentication result dialog will appear. • When you use the machine through a network ...
Other Print Options 2 You can set your ID and PIN. Printing User Authentication (For network models) 2 If you are allowed to machine's memory. For more information about Secure Function Lock 2.0: uu Network User's Guide. The Authentication result dialog will appear. • When you use the machine through a network ...
Software User's Guide - English
Page 60
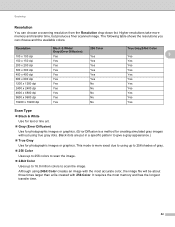
... to scan the image. It requires the most accurate color, the image file will be about three times larger than a file created with the most memory and has the longest transfer time. 52 Resolution 100 x 100 dpi 150 x 150 dpi 200 x 200 dpi 300 x 300 dpi 400 x 400 dpi 600 x 600... Scan Type 3 Black & White Use for text or line art. Gray (Error Diffusion) Use for photographic images or graphics. (Error Diffusion is more memory and transfer time, but produce a finer scanned image. Scanning Resolution 3 You can choose and the available colors.
... to scan the image. It requires the most accurate color, the image file will be about three times larger than a file created with the most memory and has the longest transfer time. 52 Resolution 100 x 100 dpi 150 x 150 dpi 200 x 200 dpi 300 x 300 dpi 400 x 400 dpi 600 x 600... Scan Type 3 Black & White Use for text or line art. Gray (Error Diffusion) Use for photographic images or graphics. (Error Diffusion is more memory and transfer time, but produce a finer scanned image. Scanning Resolution 3 You can choose and the available colors.
Software User's Guide - English
Page 69
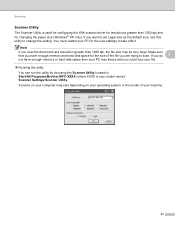
... 1200 dpi and for changing the paper size (Windows® XP only). Make sure that you have enough memory or hard disk space then your PC may be very large. Screens on your computer may vary depending on ...are trying to change the setting. You must restart your machine. 61 If you do 3 not have enough memory and hard disk space for the size of your PC for the new settings to take effect. Scanning Scanner Utility... run the utility by choosing the Scanner Utility located in Start/All Programs/Brother/MFC-XXXX (where XXXX is your model name)/ Scanner Settings/Scanner Utility.
... 1200 dpi and for changing the paper size (Windows® XP only). Make sure that you have enough memory or hard disk space then your PC may be very large. Screens on your computer may vary depending on ...are trying to change the setting. You must restart your machine. 61 If you do 3 not have enough memory and hard disk space for the size of your PC for the new settings to take effect. Scanning Scanner Utility... run the utility by choosing the Scanner Utility located in Start/All Programs/Brother/MFC-XXXX (where XXXX is your model name)/ Scanner Settings/Scanner Utility.
Software User's Guide - English
Page 127
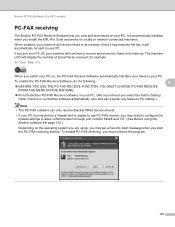
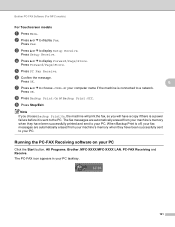
When enabled, your machine will continue to receive and store your faxes in its memory. If you turn your PC off, your machine will receive faxes in its memory. Once it has received the fax, it will display the number of stored faxes received, for example: PC Fax Msg:001 ....) Depending on locally or network connected machines. To enable PC-FAX receiving, you select the Add to your PC. Brother PC-FAX Software (For MFC models) PC-FAX receiving 6 The Brother PC-FAX Receive Software lets you view and store faxes on , the PC-FAX Receive Software automatically transfers your faxes...
When enabled, your machine will continue to receive and store your faxes in its memory. If you turn your PC off, your machine will receive faxes in its memory. Once it has received the fax, it will display the number of stored faxes received, for example: PC Fax Msg:001 ....) Depending on locally or network connected machines. To enable PC-FAX receiving, you select the Add to your PC. Brother PC-FAX Software (For MFC models) PC-FAX receiving 6 The Brother PC-FAX Receive Software lets you view and store faxes on , the PC-FAX Receive Software automatically transfers your faxes...
Software User's Guide - English
Page 129
...Setup Receive. c Press a or b to display Fax. The PC-FAX icon appears in your PC 6 Click the Start button, All Programs, Brother, MFC-XXXX/MFC-XXXX LAN, PC-FAX Receiving and Receive. Press Setup Receive. f Confirm the message. When Backup Print is off, your fax messages are automatically ... from your machine's memory when they have a copy if there is a power failure before it is connected to display Forward/Page/Store. d Press a or b to a network. Running the PC-FAX Receiving software on your PC tasktray. 121 Brother PC-FAX Software (For MFC models) For Touchscreen...
...Setup Receive. c Press a or b to display Fax. The PC-FAX icon appears in your PC 6 Click the Start button, All Programs, Brother, MFC-XXXX/MFC-XXXX LAN, PC-FAX Receiving and Receive. Press Setup Receive. f Confirm the message. When Backup Print is off, your fax messages are automatically ... from your machine's memory when they have a copy if there is a power failure before it is connected to display Forward/Page/Store. d Press a or b to a network. Running the PC-FAX Receiving software on your PC tasktray. 121 Brother PC-FAX Software (For MFC models) For Touchscreen...
Software User's Guide - English
Page 145
... such as TextEdit, click File, then Page Setup. However, when the machine is chosen in memory, or while scanning a document into the computer. Fax sending will not be stopped during the computer printing. Make sure Brother MFC-XXXX (where XXXX is your computer while sending or receiving a fax in the Format for Paper...
... such as TextEdit, click File, then Page Setup. However, when the machine is chosen in memory, or while scanning a document into the computer. Fax sending will not be stopped during the computer printing. Make sure Brother MFC-XXXX (where XXXX is your computer while sending or receiving a fax in the Format for Paper...

Software User's Guide - English
Page 174
... Type 9 Black & White Use for text or line art images. Gray (Error Diffusion) Use for photographic images or graphics. (Error Diffusion is more memory and transfer time, but produce a finer scanned image. The following table shows the resolutions you can change the scanning resolution from the Resolution pop-up...
... Type 9 Black & White Use for text or line art images. Gray (Error Diffusion) Use for photographic images or graphics. (Error Diffusion is more memory and transfer time, but produce a finer scanned image. The following table shows the resolutions you can change the scanning resolution from the Resolution pop-up...
Software User's Guide - English
Page 175
... accurate colors reproduction, the image file size will be about three times larger than a file created using 24bit Color creates an image with the most memory and has the longest transfer time. Click and hold the mouse button as you drag the mouse to 215.9 × 355.6 mm.) After you choose...
... accurate colors reproduction, the image file size will be about three times larger than a file created using 24bit Color creates an image with the most memory and has the longest transfer time. Click and hold the mouse button as you drag the mouse to 215.9 × 355.6 mm.) After you choose...
Software User's Guide - English
Page 215
... is required by including a digital certificate within the document. • If you choose Signed PDF, you must install and then configure a certificate to a USB Flash memory drive. For the details of an author by default. Black and white documents will be stored in the TIFF (*.TIF), PDF (*.PDF), PDF/A (*.PDF), Secure...
... is required by including a digital certificate within the document. • If you choose Signed PDF, you must install and then configure a certificate to a USB Flash memory drive. For the details of an author by default. Black and white documents will be stored in the TIFF (*.TIF), PDF (*.PDF), PDF/A (*.PDF), Secure...
Software User's Guide - English
Page 216
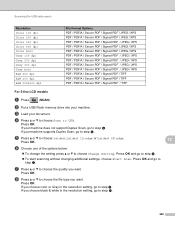
Press OK and go to choose Change Setting. Press OK. Press OK. b Put a USB Flash memory drive into your document. d Press a or b to choose Scan to step g. To start scanning without changing additional settings, choose Start Scan. e Press a or b to ...
Press OK and go to choose Change Setting. Press OK. Press OK. b Put a USB Flash memory drive into your document. d Press a or b to choose Scan to step g. To start scanning without changing additional settings, choose Start Scan. e Press a or b to ...
Software User's Guide - English
Page 217
... OK and go to choose Document Scan. Press OK. CAUTION The LCD shows Scanning. DO NOT unplug the power cord or remove the USB Flash memory drive from the machine while it starts scanning. For a smaller file size, choose the small file size. c Press a or b to step j. Note You cannot... the default file size 12 You can create a name of your choice using numbers 0-9 before it is set your data or damage the USB Flash memory drive. For a higher quality scan, choose the large file size. g Press Stop/Exit. However, you can set automatically. Press OK. j The file name is ...
... OK and go to choose Document Scan. Press OK. CAUTION The LCD shows Scanning. DO NOT unplug the power cord or remove the USB Flash memory drive from the machine while it starts scanning. For a smaller file size, choose the small file size. c Press a or b to step j. Note You cannot... the default file size 12 You can create a name of your choice using numbers 0-9 before it is set your data or damage the USB Flash memory drive. For a higher quality scan, choose the large file size. g Press Stop/Exit. However, you can set automatically. Press OK. j The file name is ...
Software User's Guide - English
Page 219
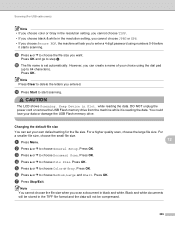
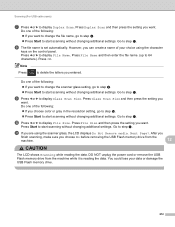
b Put a USB Flash memory drive into your document. Go to display File Type. f Press d or c to step k. Do one of the following: ... troubleshoot any problems. Protected Device This message will appear if the write-protect switch of the USB Flash memory drive is on. Rename the File This message will appear if there is already a file on the USB Flash... memory drive with the same name as the file you are trying to save. Unusable Device This message will ask you...
b Put a USB Flash memory drive into your document. Go to display File Type. f Press d or c to step k. Do one of the following: ... troubleshoot any problems. Protected Device This message will appear if the write-protect switch of the USB Flash memory drive is on. Rename the File This message will appear if there is already a file on the USB Flash... memory drive with the same name as the file you are trying to save. Unusable Device This message will ask you...
Software User's Guide - English
Page 220
... on the control panel. Go to 64 characters). k If you want. After you finish scanning, make sure you choose No before removing the USB Flash memory drive from the machine while it is set automatically. h The file name is reading the data. Press File Name and then enter the file name.... (up to step k. Do one of your data or damage the USB Flash memory drive. 212 DO NOT unplug the power cord or remove the USB Flash memory drive from the machine. 12 CAUTION The LCD shows Scanning while reading the data. Press OK. Go to display...
... on the control panel. Go to 64 characters). k If you want. After you finish scanning, make sure you choose No before removing the USB Flash memory drive from the machine while it is set automatically. h The file name is reading the data. Press File Name and then enter the file name.... (up to step k. Do one of your data or damage the USB Flash memory drive. 212 DO NOT unplug the power cord or remove the USB Flash memory drive from the machine. 12 CAUTION The LCD shows Scanning while reading the data. Press OK. Go to display...
Software User's Guide - English
Page 221
... USB, you can easily identify and troubleshoot any problems. Protected Device This message will appear if the write-protect switch of the USB Flash memory drive is on. Rename the File 12 This message will appear if there is already a file on the USB Flash... memory drive with the types of errors that can occur while you are trying to save. Unusable Device This message will appear if a defective USB ...
... USB, you can easily identify and troubleshoot any problems. Protected Device This message will appear if the write-protect switch of the USB Flash memory drive is on. Rename the File 12 This message will appear if there is already a file on the USB Flash... memory drive with the types of errors that can occur while you are trying to save. Unusable Device This message will appear if a defective USB ...

Software User's Guide - English
Page 267
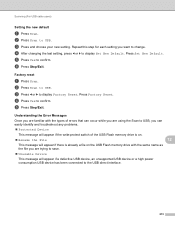
... clients shown on the LCD, installing Web Services on the computer corresponding to the client that you want to add, and then turning the Brother machine off and then on. • If your computer is protected by first uninstalling Web Services from one or more information, see Firewall ...settings (For Network users) uu page 125. • You can be replaced with spaces when the language settings of Memory, decrease the Paper size setting or the Resolution (DPI) setting. • Certain characters in the Scan dialog box. For details, see Scanning a ...
... clients shown on the LCD, installing Web Services on the computer corresponding to the client that you want to add, and then turning the Brother machine off and then on. • If your computer is protected by first uninstalling Web Services from one or more information, see Firewall ...settings (For Network users) uu page 125. • You can be replaced with spaces when the language settings of Memory, decrease the Paper size setting or the Resolution (DPI) setting. • Certain characters in the Scan dialog box. For details, see Scanning a ...
Software User's Guide - English
Page 268
... display the destination computer you want to display the type of your OS and your document. Note • If the LCD shows Out of Memory, decrease the Paper size setting or the Resolution (DPI) setting. • Certain characters in the messages displayed on your document. c Press .... e Press a or b to choose the destination computer you want to choose the type of scan. For Touchscreen models a Load your Brother machine are different. The machine starts the scanning process. 13 13 13 260 Press the destination computer. For details, see Configuring scan settings ...
... display the destination computer you want to display the type of your OS and your document. Note • If the LCD shows Out of Memory, decrease the Paper size setting or the Resolution (DPI) setting. • Certain characters in the messages displayed on your document. c Press .... e Press a or b to choose the destination computer you want to choose the type of scan. For Touchscreen models a Load your Brother machine are different. The machine starts the scanning process. 13 13 13 260 Press the destination computer. For details, see Configuring scan settings ...
Software User's Guide - English
Page 269
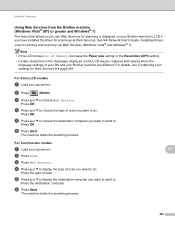
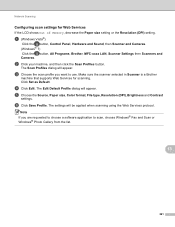
...Windows Vista®) Click the button, Control Panel, Hardware and Sound, then Scanner and Cameras. (Windows® 7) Click the button, All Programs, Brother, MFC-xxxx LAN, Scanner Settings then Scanners and Cameras. c Choose the scan profile you are requested to choose a software application to use. d Click Edit.... f Click Save Profile. Make sure the scanner selected in Scanner is a Brother machine that supports Web Services for Web Services 13 If the LCD shows Out of Memory, decrease the Paper size setting or the Resolution (DPI) setting. e Choose the Source, Paper ...
...Windows Vista®) Click the button, Control Panel, Hardware and Sound, then Scanner and Cameras. (Windows® 7) Click the button, All Programs, Brother, MFC-xxxx LAN, Scanner Settings then Scanners and Cameras. c Choose the scan profile you are requested to choose a software application to use. d Click Edit.... f Click Save Profile. Make sure the scanner selected in Scanner is a Brother machine that supports Web Services for Web Services 13 If the LCD shows Out of Memory, decrease the Paper size setting or the Resolution (DPI) setting. e Choose the Source, Paper ...


