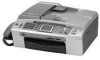
Users Manual - English
Page 46
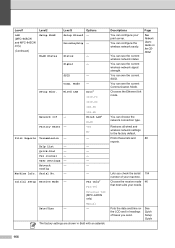
... Amplify. e Press Stop/Exit. 30 a Press Menu. Chapter 3 Setting Volume Amplify (MFC-665CW only) 3 Please carefully read Choosing the Handset Volume (For Volume Amplify) (MFC-665CW only) on page 29. Press OK. It will reset itself forward one hour in the Spring and backward one of the following . „ If none of the users are hearingimpaired, press...
... Amplify. e Press Stop/Exit. 30 a Press Menu. Chapter 3 Setting Volume Amplify (MFC-665CW only) 3 Please carefully read Choosing the Handset Volume (For Volume Amplify) (MFC-665CW only) on page 29. Press OK. It will reset itself forward one hour in the Spring and backward one of the following . „ If none of the users are hearingimpaired, press...
Users Manual - English
Page 54
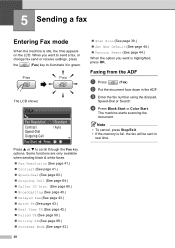
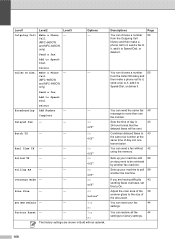
... Call Standard Auto Fax Start Press Press a or b to illuminate it in green. b Put the document face down in real time. d Press Black Start or Color Start. Faxing from the ADF 5 a Press (Fax). The machine starts scanning the document. 5 Sending a fax 5 Entering Fax mode 5 When the machine is full, ... page 89.) „ Overseas Mode (See page 43.) 38 „ Scan Size (See page 39.) „ Set New Default (See page 44.) „ Factory Reset (See page 44.) When the option you want is highlighted, press OK. Note • To cancel, press Stop/Exit. • If the memory is idle...
... Call Standard Auto Fax Start Press Press a or b to illuminate it in green. b Put the document face down in real time. d Press Black Start or Color Start. Faxing from the ADF 5 a Press (Fax). The machine starts scanning the document. 5 Sending a fax 5 Entering Fax mode 5 When the machine is full, ... page 89.) „ Overseas Mode (See page 43.) 38 „ Scan Size (See page 39.) „ Set New Default (See page 44.) „ Factory Reset (See page 44.) When the option you want is highlighted, press OK. Note • To cancel, press Stop/Exit. • If the memory is idle...
Users Manual - English
Page 60
...one of the following: „ (MFC-440CN) Press Hook or pick up the handset. „ (MFC-845CW) Press Speaker Phone on the machine. f If you hear the dialing, ringing and fax-receiving tones while sending a fax. Sending a fax at the end of a conversation (MFC-440CN and MFC-665CW...MFC-665CW) Press Speaker Phone or pick up the handset of a conversation you can restore all the settings you hear the fax tone, press Black Start or Color .../Exit. c After changing the last setting, press a or b to choose Factory Reset. c Press 1 to choose Yes. a Ask the other party before hanging up...
...one of the following: „ (MFC-440CN) Press Hook or pick up the handset. „ (MFC-845CW) Press Speaker Phone on the machine. f If you hear the dialing, ringing and fax-receiving tones while sending a fax. Sending a fax at the end of a conversation (MFC-440CN and MFC-665CW...MFC-665CW) Press Speaker Phone or pick up the handset of a conversation you can restore all the settings you hear the fax tone, press Black Start or Color .../Exit. c After changing the last setting, press a or b to choose Factory Reset. c Press 1 to choose Yes. a Ask the other party before hanging up...
Users Manual - English
Page 70
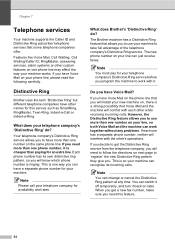
... way your machine works. Note You must pay for your machine. If you decide to get a new fax number, make sure you reset this service such as SmartRing, RingMaster, Teen-Ring, Indent-a-Call or Indent-a-Ring. Note You can change or cancel the Distinctive Ring pattern...machine to work together without any time. What does your telephone company's 'Distinctive Ring' do ? 7 The Brother machine has a Distinctive Ring feature that some telephone companies offer. This is one phone number, it is a strong possibility that you will install your new machine on your phone line, please...
... way your machine works. Note You must pay for your machine. If you decide to get a new fax number, make sure you reset this service such as SmartRing, RingMaster, Teen-Ring, Indent-a-Call or Indent-a-Ring. Note You can change or cancel the Distinctive Ring pattern...machine to work together without any time. What does your telephone company's 'Distinctive Ring' do ? 7 The Brother machine has a Distinctive Ring feature that some telephone companies offer. This is one phone number, it is a strong possibility that you will install your new machine on your phone line, please...
Users Manual - English
Page 99
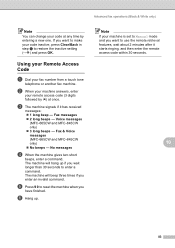
...You can change your code at any time by l) at once. Fax & Voice messages (MFC-665CW and MFC-845CW only) „ No beeps - Note If your code inactive, press Clear/Back in step e to reset the machine when you wait longer than 30 seconds to use the remote retrieval features, wait ...digits followed by entering a new one. The machine will hang up . f Hang up if you have finished. If you want to enter a command. c The machine signals if it starts ringing, and then enter the remote access code within 30 seconds. 10 83 Voice messages (MFC-665CW and MFC-845CW only) „ 3 long...
...You can change your code at any time by l) at once. Fax & Voice messages (MFC-665CW and MFC-845CW only) „ No beeps - Note If your code inactive, press Clear/Back in step e to reset the machine when you wait longer than 30 seconds to use the remote retrieval features, wait ...digits followed by entering a new one. The machine will hang up . f Hang up if you have finished. If you want to enter a command. c The machine signals if it starts ringing, and then enter the remote access code within 30 seconds. 10 83 Voice messages (MFC-665CW and MFC-845CW only) „ 3 long...
Users Manual - English
Page 102
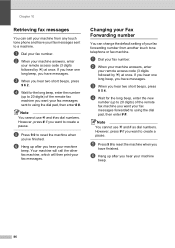
... access code (3 digits followed by l) at once. f Hang up after you have messages. However, press # if you 've finished. e Press 9 0 to reset the machine when you want your fax messages sent to using the dial pad, then enter # #. c When you have finished. Changing your Fax Forwarding number... cannot use l and # as dial numbers. a Dial your fax number. Note You cannot use l and # as dial numbers. If you hear one long beep, you want to create a pause. Your machine will call your machine from another touch tone telephone or fax machine. b When your machine answers...
... access code (3 digits followed by l) at once. f Hang up after you have messages. However, press # if you 've finished. e Press 9 0 to reset the machine when you want your fax messages sent to using the dial pad, then enter # #. c When you have finished. Changing your Fax Forwarding number... cannot use l and # as dial numbers. a Dial your fax number. Note You cannot use l and # as dial numbers. If you hear one long beep, you want to create a pause. Your machine will call your machine from another touch tone telephone or fax machine. b When your machine answers...
Users Manual - English
Page 108
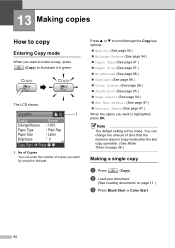
... (See page 96.) „ Stack/Sort (See page 95.) „ Page Layout (See page 94.) „ Set New Default (See page 97.) „ Factory Reset (See page 97.) When the option you want is Fax mode. Note The default setting is highlighted, press OK. Press a or b to illuminate it in ...Copy mode after the last copy operation. (See Mode Timer on page 11.) c Press Black Start or Color Start. 92 b Load your document. (See Loading documents on page 26.) Making a single copy 13 a Press (Copy). The LCD shows: COPY 01 1 Quality Enlarge/Reduce...
... (See page 96.) „ Stack/Sort (See page 95.) „ Page Layout (See page 94.) „ Set New Default (See page 97.) „ Factory Reset (See page 97.) When the option you want is Fax mode. Note The default setting is highlighted, press OK. Press a or b to illuminate it in ...Copy mode after the last copy operation. (See Mode Timer on page 11.) c Press Black Start or Color Start. 92 b Load your document. (See Loading documents on page 26.) Making a single copy 13 a Press (Copy). The LCD shows: COPY 01 1 Quality Enlarge/Reduce...

Users Manual - English
Page 113
...each setting you want . d Press Stop/Exit. 97 f If you do not want to change additional settings, press Black Start or Color Start. You can restore all the settings you have changed to choose Set New Default. Press OK. Press OK. c Enter the number ...or 4"x 6". b Press a or b to change them again. d Press 1 to choose Factory Reset. 13 Press OK. c Enter the number of copies you do not want . a Press (Copy). f If you want to choose Plain Paper, Inkjet Paper, Brother Photo, Other Photo or Transparency. b Press a or b to choose Yes. Press OK. e ...
...each setting you want . d Press Stop/Exit. 97 f If you do not want to change additional settings, press Black Start or Color Start. You can restore all the settings you have changed to choose Set New Default. Press OK. Press OK. c Enter the number ...or 4"x 6". b Press a or b to change them again. d Press 1 to choose Factory Reset. 13 Press OK. c Enter the number of copies you do not want . a Press (Copy). f If you want to choose Plain Paper, Inkjet Paper, Brother Photo, Other Photo or Transparency. b Press a or b to choose Yes. Press OK. e ...
Users Manual - English
Page 121
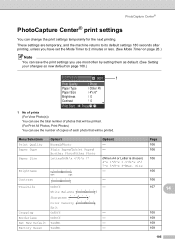
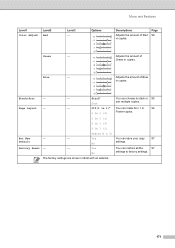
... Size Brightness Contrast Option1 Normal/Photo Plain Paper/Inkjet Paper/ Brother Photo/Other Photo Letter/A4/4"x 6"/5"x 7" Dark Light Option2 - - (When A4 or Letter is chosen) 4"x 3"/5"x 3.5"/6"x 4"/ 7"x 5"/8"x 6"/Max. Page 106 106 106 106 106 True2Life Cropping Borderless Set New Default Factory Reset On/Off White Balance Sharpness Color Density Exit On/Off On/Off Yes/No...
... Size Brightness Contrast Option1 Normal/Photo Plain Paper/Inkjet Paper/ Brother Photo/Other Photo Letter/A4/4"x 6"/5"x 7" Dark Light Option2 - - (When A4 or Letter is chosen) 4"x 3"/5"x 3.5"/6"x 4"/ 7"x 5"/8"x 6"/Max. Page 106 106 106 106 106 True2Life Cropping Borderless Set New Default Factory Reset On/Off White Balance Sharpness Color Density Exit On/Off On/Off Yes/No...
Users Manual - English
Page 124
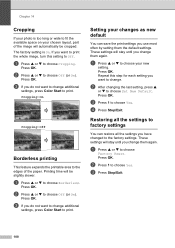
Cropping: On 14 Cropping: Off 14 Borderless printing 14 This feature expands the printable area to choose Factory Reset. Press OK. Restoring all the settings you want to print. a Press a or b to the edges of the image will stay until ...b Press 1 to choose Yes. If you have changed to print. a Press a or b to choose Off (or On). c If you change additional settings, press Color Start to change them again. Press OK. d Press Stop/Exit. Press OK. These settings will automatically be slightly slower. b Press a or b to choose Borderless....
Cropping: On 14 Cropping: Off 14 Borderless printing 14 This feature expands the printable area to choose Factory Reset. Press OK. Restoring all the settings you want to print. a Press a or b to the edges of the image will stay until ...b Press 1 to choose Yes. If you have changed to print. a Press a or b to choose Off (or On). c If you change additional settings, press Color Start to change them again. Press OK. d Press Stop/Exit. Press OK. These settings will automatically be slightly slower. b Press a or b to choose Borderless....
Users Manual - English
Page 157
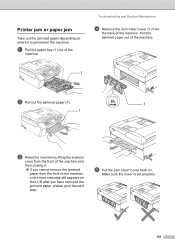
... Maintenance d Remove the Jam Clear Cover (1) from the back of the machine. Pull the jammed paper out of the machine. 1 b Pull out the jammed paper (1). 1 1 c Reset the machine by lifting the scanner cover from the front of the machine and then closing it is set properly. 141 e Put the Jam Clear...
... Maintenance d Remove the Jam Clear Cover (1) from the back of the machine. Pull the jammed paper out of the machine. 1 b Pull out the jammed paper (1). 1 1 c Reset the machine by lifting the scanner cover from the front of the machine and then closing it is set properly. 141 e Put the Jam Clear...

Users Manual - English
Page 160
...(1). 1 M brother XXXX f Lift the lock release lever and push it until the LCD shows Near Empty and Ink Empty, the machine will not be sure to automatically reset the ink dot counter for the color shown on the label. If the ink cartridge you installed is not a brand new one . (For ... cartridge will automatically reset the ink dot counter. 144 Insert the ink cartridge in the illustration below. c Open the new ink cartridge bag for that it clicks, and then close the ink cartridge cover. If you wait until it was a brand new one , be damaged. e Each color has its own ...
...(1). 1 M brother XXXX f Lift the lock release lever and push it until the LCD shows Near Empty and Ink Empty, the machine will not be sure to automatically reset the ink dot counter for the color shown on the label. If the ink cartridge you installed is not a brand new one . (For ... cartridge will automatically reset the ink dot counter. 144 Insert the ink cartridge in the illustration below. c Open the new ink cartridge bag for that it clicks, and then close the ink cartridge cover. If you wait until it was a brand new one , be damaged. e Each color has its own ...
Users Manual - English
Page 174
..., you will not lose the settings you have chosen using the menu keys. d Go back to reset the date and time. You may have to the previous menu level. Note During a power failure the MFC-665CW and MFC-845CW will not lose your machine has to the previous menu level. „ Stop the current...
..., you will not lose the settings you have chosen using the menu keys. d Go back to reset the date and time. You may have to the previous menu level. Note During a power failure the MFC-665CW and MFC-845CW will not lose your machine has to the previous menu level. „ Stop the current...

Users Manual - English
Page 180
... of the primary or secondary server. Enter the IP address. See Network User's Guide on the CDROM 100B-HD 10B-FD Factory Reset - 10B-HD Yes No LAN (MFC-665CW and MFC-845CW only) TCP/IP(Wired) BOOT Method IP Address Auto* Static RARP BOOTP DHCP [000-255]. Enter the Subnet mask. [000-255...] [000-255]. Specifies the IP address of the primary or secondary server. Automatically allocates the IP address from the link-local address range. Level1 LAN (MFC-440CN only) (Continued) Level2 TCP/IP (Continued) Setup Misc.
... of the primary or secondary server. Enter the IP address. See Network User's Guide on the CDROM 100B-HD 10B-FD Factory Reset - 10B-HD Yes No LAN (MFC-665CW and MFC-845CW only) TCP/IP(Wired) BOOT Method IP Address Auto* Static RARP BOOTP DHCP [000-255]. Enter the Subnet mask. [000-255...] [000-255]. Specifies the IP address of the primary or secondary server. Automatically allocates the IP address from the link-local address range. Level1 LAN (MFC-440CN only) (Continued) Level2 TCP/IP (Continued) Setup Misc.
Users Manual - English
Page 182
Status - SSID - Wired LAN Network I/F - Factory Reset - Fax Only* Fax/Tel External TAD (MFC-440CN only) Manual - You can see the current wireless network signal strength. Prints these lists and 88 reports. See Quick Setup Guide 166 Setup Misc. ...-FD 10B-HD Wired LAN* WLAN Yes No - You can choose the network connection type. You can configure the wireless network easily. Level1 Level2 LAN (MFC-665CW and MFC-845CW only) Setup WLAN (Continued) WLAN Status Level3 Options Setup Wizard - Serial No. - - Signal -
Status - SSID - Wired LAN Network I/F - Factory Reset - Fax Only* Fax/Tel External TAD (MFC-440CN only) Manual - You can see the current wireless network signal strength. Prints these lists and 88 reports. See Quick Setup Guide 166 Setup Misc. ...-FD 10B-HD Wired LAN* WLAN Yes No - You can choose the network connection type. You can configure the wireless network easily. Level1 Level2 LAN (MFC-665CW and MFC-845CW only) Setup WLAN (Continued) WLAN Status Level3 Options Setup Wizard - Serial No. - - Signal -
Users Manual - English
Page 184
Level1 Outgoing Call Level2 Make a Phone Call (MFC-665CW and MFC-845CW only) Level3 - Call (MFC-665CW and MFC-845CW only) Send a fax Add to SpeedDial Delete Caller ID hist. Options - - - On Off* Polling RX - - Descriptions You can choose a number 65 from the Outgoing ...fax 40 message to factory settings. 168 You can restore all the 44 settings to more than one transmission. On Off* Overseas Mode - - Yes No Factory Reset - - Combines delayed faxes to the size of day into one fax number. Adjust the scan area of the 39 scanner glass to 43 the same fax...
Level1 Outgoing Call Level2 Make a Phone Call (MFC-665CW and MFC-845CW only) Level3 - Call (MFC-665CW and MFC-845CW only) Send a fax Add to SpeedDial Delete Caller ID hist. Options - - - On Off* Polling RX - - Descriptions You can choose a number 65 from the Outgoing ...fax 40 message to factory settings. 168 You can restore all the 44 settings to more than one transmission. On Off* Overseas Mode - - Yes No Factory Reset - - Combines delayed faxes to the size of day into one fax number. Adjust the scan area of the 39 scanner glass to 43 the same fax...
Users Manual - English
Page 187
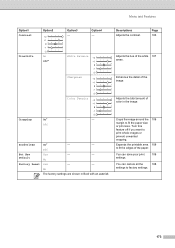
No Factory Reset - - Page Layout - - No The factory settings are shown in copies. Menu and Features Level1 Color Adjust Level2 Red Level3 - Options +2 +1 Descriptions Adjusts the amount of Blue +2 in 1 (L) Poster(3 x 3) Set New - - Off(1 in 1)* You can choose to factory settings. Yes You ...
No Factory Reset - - Page Layout - - No The factory settings are shown in copies. Menu and Features Level1 Color Adjust Level2 Red Level3 - Options +2 +1 Descriptions Adjusts the amount of Blue +2 in 1 (L) Poster(3 x 3) Set New - - Off(1 in 1)* You can choose to factory settings. Yes You ...
Users Manual - English
Page 189
White Balance +2 +1 -1 -2 Sharpness +2 +1 -1 -2 Color Density +2 +1 -1 -2 - - Default No Factory Reset Yes - - You can save your print 108 settings. Page 106 Adjusts the hue of the image. Crops the image around the 108 margin to factory settings. 173 Turn this feature off if you want to fit the edges of color in Bold with an asterisk...
White Balance +2 +1 -1 -2 Sharpness +2 +1 -1 -2 Color Density +2 +1 -1 -2 - - Default No Factory Reset Yes - - You can save your print 108 settings. Page 106 Adjusts the hue of the image. Crops the image around the 108 margin to factory settings. 173 Turn this feature off if you want to fit the edges of color in Bold with an asterisk...
Quick Setup Guide - English
Page 29
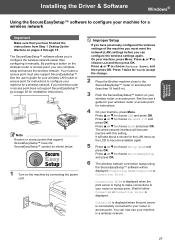
...the wireless network. See the user's guide for your wireless LAN router or access point for Yes to accept the change. 2 Place the Brother machine close to configure your machine, press Menu. Press 1 twice for instructions to the SecureEasySetup™ router or access point (less than ... a or b to choose WLAN and press OK. It will be displayed: Connecting WLAN, Connected or Connection Error. Your router or access point must reset the network (LAN) settings before you to page 29 for a wireless network. Press a or b to choose LAN and press OK. Connecting WLAN ...
...the wireless network. See the user's guide for your wireless LAN router or access point for Yes to accept the change. 2 Place the Brother machine close to configure your machine, press Menu. Press 1 twice for instructions to the SecureEasySetup™ router or access point (less than ... a or b to choose WLAN and press OK. It will be displayed: Connecting WLAN, Connected or Connection Error. Your router or access point must reset the network (LAN) settings before you to page 29 for a wireless network. Press a or b to choose LAN and press OK. Connecting WLAN ...
Quick Setup Guide - English
Page 30
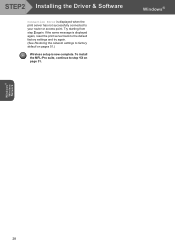
If the same message is now complete. Try starting from step 2 again. STEP2 Installing the Driver & Software Connection Error is displayed when the print server has not successfully connected to step 13 on pages 51.) Wireless setup is displayed again, reset the print server back to the default factory settings and try again. (See Restoring the network settings to factory default on page 31. Windows® Windows® Wireless Network 28 To install the MFL-Pro suite, continue to your router or access point.
If the same message is now complete. Try starting from step 2 again. STEP2 Installing the Driver & Software Connection Error is displayed when the print server has not successfully connected to step 13 on pages 51.) Wireless setup is displayed again, reset the print server back to the default factory settings and try again. (See Restoring the network settings to factory default on page 31. Windows® Windows® Wireless Network 28 To install the MFL-Pro suite, continue to your router or access point.


