
Quick Setup Guide - English
Page 5
The default display shows the date, time, and the current receive mode. 3 Note 1 2 3 01/01 13:00 Fax 1 Date 2 Time 3 Receive mode When the machine is idle (not being used) it will return to the default display shown above. Control panel 2 Getting Started ...14 13 12 11 10 01/01 13:00 Fax 12 1 Shift 2 One Touch keys 3 Copy Options key 4 Fax and telephone keys 5 Ink key 6 Dial Pad 7 Clear/Back key 3 45 6 78 9 8 OK key 9 Start keys 10 Stop/Exit key 11...
The default display shows the date, time, and the current receive mode. 3 Note 1 2 3 01/01 13:00 Fax 1 Date 2 Time 3 Receive mode When the machine is idle (not being used) it will return to the default display shown above. Control panel 2 Getting Started ...14 13 12 11 10 01/01 13:00 Fax 12 1 Shift 2 One Touch keys 3 Copy Options key 4 Fax and telephone keys 5 Ink key 6 Dial Pad 7 Clear/Back key 3 45 6 78 9 8 OK key 9 Start keys 10 Stop/Exit key 11...

Quick Setup Guide - English
Page 12
..., and then press OK. Month:03 (e.g. Time:15:25 (e.g. Enter 0 3 for March.) 4 Enter the two digits for improved viewing. 1 Press Menu, 1, 7. 2 Press a or b to each fax you are having difficulty seeing the LCD from your position, we recommend the following contrast setting for the day on the dial pad, and then...
..., and then press OK. Month:03 (e.g. Time:15:25 (e.g. Enter 0 3 for March.) 4 Enter the two digits for improved viewing. 1 Press Menu, 1, 7. 2 Press a or b to each fax you are having difficulty seeing the LCD from your position, we recommend the following contrast setting for the day on the dial pad, and then...

Quick Setup Guide - English
Page 13
... each transmitted page, or on the same key as the last character, press to move the cursor under the incorrect character, press Clear/Back. Press One time Two key times 2 A B 3 D E 4 G H 5 J K 6 M N 7 P Q 8 T U 9 W X 4 Press Stop/Exit. For details, see Setting the date and time on page 10 and Setting ...want to repeat input, press Stop/Exit to move the cursor to the right. • If you send. 1 Press Menu, 0, 3. 2 Enter your fax number (up to send any person to use a computer or electronic device to 20 characters) using the dial pad, and then press OK...
... each transmitted page, or on the same key as the last character, press to move the cursor under the incorrect character, press Clear/Back. Press One time Two key times 2 A B 3 D E 4 G H 5 J K 6 M N 7 P Q 8 T U 9 W X 4 Press Stop/Exit. For details, see Setting the date and time on page 10 and Setting ...want to repeat input, press Stop/Exit to move the cursor to the right. • If you send. 1 Press Menu, 0, 3. 2 Enter your fax number (up to send any person to use a computer or electronic device to 20 characters) using the dial pad, and then press OK...

Quick Setup Guide - English
Page 14
... you want to pick up the call is not a fax, the phone will ring for Tone dialing service. Fax messages are four possible receive modes: Fax Only, Fax/Tel, Manual and External TAD. Fax Only Yes Your machine automatically answers every call yourself. If... machine? Press OK. 3 Press Stop/Exit. 13 Choosing a Receive Mode There are printed. 1 Press Menu, 0, 1. 2 Press a or b to answer fax and telephone calls automatically? Yes External TAD Your external telephone answering device (TAD) automatically answers every call . Voice messages are stored on the external TAD...
... you want to pick up the call is not a fax, the phone will ring for Tone dialing service. Fax messages are four possible receive modes: Fax Only, Fax/Tel, Manual and External TAD. Fax Only Yes Your machine automatically answers every call yourself. If... machine? Press OK. 3 Press Stop/Exit. 13 Choosing a Receive Mode There are printed. 1 Press Menu, 0, 1. 2 Press a or b to answer fax and telephone calls automatically? Yes External TAD Your external telephone answering device (TAD) automatically answers every call . Voice messages are stored on the external TAD...

Quick Setup Guide - English
Page 15
Setting Up the Machine 2 Put the sheet face down in the ADF (Automatic Document Feeder). 3 Make sure (Fax) is illuminated in the Product Registration and Test Sheet (USA only) 1 Fill out the Product Registration and Test Sheet. You can also register your Product ... Go to Supplied CD-ROM 'MFL-Pro Suite' on the next page to install the drivers. 13 Note You will receive a confirmation fax of your product online using the On-Line Registration link from the installation CDROM or visit http://www.brother.com/registration. 14 Sending in Green. 4 Enter the toll-free...
Setting Up the Machine 2 Put the sheet face down in the ADF (Automatic Document Feeder). 3 Make sure (Fax) is illuminated in the Product Registration and Test Sheet (USA only) 1 Fill out the Product Registration and Test Sheet. You can also register your Product ... Go to Supplied CD-ROM 'MFL-Pro Suite' on the next page to install the drivers. 13 Note You will receive a confirmation fax of your product online using the On-Line Registration link from the installation CDROM or visit http://www.brother.com/registration. 14 Sending in Green. 4 Enter the toll-free...
Software & Network Users Manual - English
Page 2
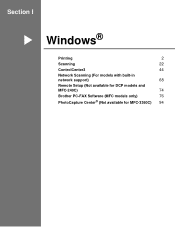
Table of Contents Section I Windows® 1 Printing Using the Brother printer driver...2 Features ...2 Choosing the right type of paper...3 Simultaneous printing, scanning and faxing 3 Clearing data from the memory ...3 Checking the print quality ...3 Status Monitor...4 Monitoring the machine's status ...4 Turning off... (Windows® 2000/XP only 10 Paper Size ...10 Page Layout ...11 Orientation ...11 Copies ...12 Paper Source (MFC-5860CN only 12 Advanced tab...13 Color ...14 Scaling ...16 Watermark ...17 Device Options ...19 Support tab ...21 2 Scanning Scanning a document using the TWAIN ...
Table of Contents Section I Windows® 1 Printing Using the Brother printer driver...2 Features ...2 Choosing the right type of paper...3 Simultaneous printing, scanning and faxing 3 Clearing data from the memory ...3 Checking the print quality ...3 Status Monitor...4 Monitoring the machine's status ...4 Turning off... (Windows® 2000/XP only 10 Paper Size ...10 Page Layout ...11 Orientation ...11 Copies ...12 Paper Source (MFC-5860CN only 12 Advanced tab...13 Color ...14 Scaling ...16 Watermark ...17 Device Options ...19 Support tab ...21 2 Scanning Scanning a document using the TWAIN ...
Software & Network Users Manual - English
Page 3
... the user interface ...46 Turning the AutoLoad feature off...46 SCAN...47 CUSTOM SCAN ...47 PHOTOCAPTURE (USB only) (Not available for MFC-3360C 47 COPY ...48 PC-FAX (MFC models only) ...48 DEVICE SETTING...48 SCAN...49 Image (example: Microsoft® Paint)...49 OCR (Word Processing program) ...51 E-... (USB only) (Not available for MFC-3360C 59 Open PCC Folder (PCC: PhotoCapture Center 59 Copy From PCC ...59 Copy To Application ...60 COPY ...61 PC-FAX (MFC models only) ...63 Send ...63 Receive/View Received (Not available for MFC-240C and MFC-3360C 64 Address Book ...65 Setup ...65...
... the user interface ...46 Turning the AutoLoad feature off...46 SCAN...47 CUSTOM SCAN ...47 PHOTOCAPTURE (USB only) (Not available for MFC-3360C 47 COPY ...48 PC-FAX (MFC models only) ...48 DEVICE SETTING...48 SCAN...49 Image (example: Microsoft® Paint)...49 OCR (Word Processing program) ...51 E-... (USB only) (Not available for MFC-3360C 59 Open PCC Folder (PCC: PhotoCapture Center 59 Copy From PCC ...59 Copy To Application ...60 COPY ...61 PC-FAX (MFC models only) ...63 Send ...63 Receive/View Received (Not available for MFC-240C and MFC-3360C 64 Address Book ...65 Setup ...65...
Software & Network Users Manual - English
Page 4
...Image ...72 Scan to OCR ...72 Scan to File...73 5 Remote Setup (Not available for DCP models and MFC-240C) Remote Setup...74 6 Brother PC-FAX Software (MFC models only) PC-FAX sending ...76 Setting up user information...77 Sending setup...78 Setting up a cover page...79 Entering cover page information...Facsimile style user interface 86 Sending a file as a PC-FAX using the Simple style user interface 87 PC-FAX receiving (Not available for MFC-240C and MFC-3360C 89 Enabling the PC-FAX Receiving software on your machine 90 Running the PC-FAX Receiving software on your PC 91 Setting up your PC ...
...Image ...72 Scan to OCR ...72 Scan to File...73 5 Remote Setup (Not available for DCP models and MFC-240C) Remote Setup...74 6 Brother PC-FAX Software (MFC models only) PC-FAX sending ...76 Setting up user information...77 Sending setup...78 Setting up a cover page...79 Entering cover page information...Facsimile style user interface 86 Sending a file as a PC-FAX using the Simple style user interface 87 PC-FAX receiving (Not available for MFC-240C and MFC-3360C 89 Enabling the PC-FAX Receiving software on your machine 90 Running the PC-FAX Receiving software on your PC 91 Setting up your PC ...
Software & Network Users Manual - English
Page 5
... ...98 Checking the print quality ...98 Status Monitor ...99 Using the Brother Ink driver ...100 Choosing page setup options ...100 Choosing printing options ...101 Media Type...101 Quality ...102 Paper Feed (MFC-5860CN only)...103 Sending a fax (MFC models only) ...104 Drag a vCard from the Mac OS® ...to E-mail ...113 Scan to Image ...114 Scan to OCR ...114 Scan to File...115 Scan to Card (Not available for MFC-240C and MFC-3360C 115 Using Presto!® PageManager® ...119 Features ...119 System requirements for Presto!® PageManager 119 Technical support ...120 10 ControlCenter2...
... ...98 Checking the print quality ...98 Status Monitor ...99 Using the Brother Ink driver ...100 Choosing page setup options ...100 Choosing printing options ...101 Media Type...101 Quality ...102 Paper Feed (MFC-5860CN only)...103 Sending a fax (MFC models only) ...104 Drag a vCard from the Mac OS® ...to E-mail ...113 Scan to Image ...114 Scan to OCR ...114 Scan to File...115 Scan to Card (Not available for MFC-240C and MFC-3360C 115 Using Presto!® PageManager® ...119 Features ...119 System requirements for Presto!® PageManager 119 Technical support ...120 10 ControlCenter2...
Software & Network Users Manual - English
Page 6
... to E-mail ...133 Scan to File...134 COPY / PC-FAX (PC-FAX is not available for DCP models 135 DEVICE SETTINGS ...136 Remote Setup (Not available for DCP models and MFC-240C 136 Quick-Dial (Not available for DCP models and MFC-240C 137 Ink Level ...137 11 Network Scanning (For models ... ...141 Scan to OCR ...141 Scan to File...142 12 Remote Setup & PhotoCapture Center® Remote Setup (Not available for DCP models and MFC-240C 143 PhotoCapture Center® (Not available for MFC-3360C 145 For USB cable users ...145 For network users (For models with built-in network support 147 I Index v
... to E-mail ...133 Scan to File...134 COPY / PC-FAX (PC-FAX is not available for DCP models 135 DEVICE SETTINGS ...136 Remote Setup (Not available for DCP models and MFC-240C 136 Quick-Dial (Not available for DCP models and MFC-240C 137 Ink Level ...137 11 Network Scanning (For models ... ...141 Scan to OCR ...141 Scan to File...142 12 Remote Setup & PhotoCapture Center® Remote Setup (Not available for DCP models and MFC-240C 143 PhotoCapture Center® (Not available for MFC-3360C 145 For USB cable users ...145 For network users (For models with built-in network support 147 I Index v
Software & Network Users Manual - English
Page 7
Section I Windows® I Printing 2 Scanning 22 ControlCenter3 44 Network Scanning (For models with built-in network support) 68 Remote Setup (Not available for DCP models and MFC-240C) 74 Brother PC-FAX Software (MFC models only) 76 PhotoCapture Center® (Not available for MFC-3360C) 94
Section I Windows® I Printing 2 Scanning 22 ControlCenter3 44 Network Scanning (For models with built-in network support) 68 Remote Setup (Not available for DCP models and MFC-240C) 74 Brother PC-FAX Software (MFC models only) 76 PhotoCapture Center® (Not available for MFC-3360C) 94
Software & Network Users Manual - English
Page 9
...paper in the memory by pressing the Stop/Exit key on paper, it pauses the PC printing operation, and then continues printing when copying or fax receiving has finished. However, when the machine is important to choose the right type of paper 1 1 For high quality printing, it is copying... or receiving a fax on the control panel. Clearing data from your PC while sending or receiving a fax in the User's Guide. 3 Fax sending will not be stopped during PC printing. Be sure to improve it, see Improving print ...
...paper in the memory by pressing the Stop/Exit key on paper, it pauses the PC printing operation, and then continues printing when copying or fax receiving has finished. However, when the machine is important to choose the right type of paper 1 1 For high quality printing, it is copying... or receiving a fax on the control panel. Clearing data from your PC while sending or receiving a fax in the User's Guide. 3 Fax sending will not be stopped during PC printing. Be sure to improve it, see Improving print ...
Software & Network Users Manual - English
Page 46
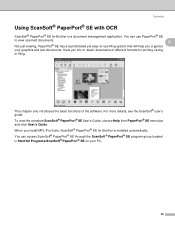
Scanning Using ScanSoft® PaperPort® SE with OCR 2 ScanSoft® PaperPort® SE for printing, faxing or filing. You can access ScanSoft® PaperPort® SE through the ScanSoft® PaperPort® SE program group located in Start/All Programs...® SE on your graphics and text documents. When you organize your PC. 40 This chapter only introduces the basic functions of different formats for Brother is installed automatically. You can use PaperPort® SE to view scanned documents. 2 Not just viewing, PaperPort® SE has a sophisticated yet easy-to...
Scanning Using ScanSoft® PaperPort® SE with OCR 2 ScanSoft® PaperPort® SE for printing, faxing or filing. You can access ScanSoft® PaperPort® SE through the ScanSoft® PaperPort® SE program group located in Start/All Programs...® SE on your graphics and text documents. When you organize your PC. 40 This chapter only introduces the basic functions of different formats for Brother is installed automatically. You can use PaperPort® SE to view scanned documents. 2 Not just viewing, PaperPort® SE has a sophisticated yet easy-to...
Software & Network Users Manual - English
Page 48
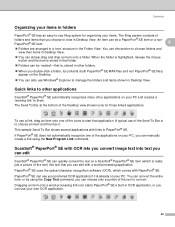
...® Explorer to manage the folders and items shown in Desktop View. To use a link, drag an item onto one of the Send To Bar is to choose an item and then fax it is stored in that folder. „ Folders can use your own OCR application. 42 A typical use of the... applications on the Desktop. „ You can be 'nested'-that you choose to view in Desktop View. If PaperPort® SE does not automatically recognize one of folders and...
...® Explorer to manage the folders and items shown in Desktop View. To use a link, drag an item onto one of the Send To Bar is to choose an item and then fax it is stored in that folder. „ Folders can use your own OCR application. 42 A typical use of the... applications on the Desktop. „ You can be 'nested'-that you choose to view in Desktop View. If PaperPort® SE does not automatically recognize one of folders and...
Software & Network Users Manual - English
Page 50
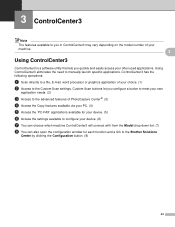
...: a Scan directly to a file, E-mail, word processor or graphics application of PhotoCapture Center®. (3) d Access the Copy features available via your PC. (4) e Access the 'PC-FAX' applications available for each function and a link to the Brother Solutions Center by clicking the Configuration button. (8) 44
...: a Scan directly to a file, E-mail, word processor or graphics application of PhotoCapture Center®. (3) d Access the Copy features available via your PC. (4) e Access the 'PC-FAX' applications available for each function and a link to the Brother Solutions Center by clicking the Configuration button. (8) 44
Software & Network Users Manual - English
Page 54
...„ Receive (Not available for MFC-240C and MFC-3360C) By clicking this button, the PC-FAX receive software is activated and your PC starts receiving fax data from the control panel menu of the Brother machine. (See PC-FAX receiving (Not available for MFC-240C and MFC-3360C) on page 89.) „ Address... Book Lets you open the Brother PC-FAX address book. (See Brother Address Book on page 82.) „...
...„ Receive (Not available for MFC-240C and MFC-3360C) By clicking this button, the PC-FAX receive software is activated and your PC starts receiving fax data from the control panel menu of the Brother machine. (See PC-FAX receiving (Not available for MFC-240C and MFC-3360C) on page 89.) „ Address... Book Lets you open the Brother PC-FAX address book. (See Brother Address Book on page 82.) „...

Software & Network Users Manual - English
Page 69
You can change the Resolution, Scan Type, Document Size, Show Scanner Interface, Brightness and Contrast settings. 63 You can also configure the address book and change some general machine settings. 3 Send 3 The Send button lets you send and receive faxes. ControlCenter3 PC-FAX (MFC models only) 3 The PC-FAX option lets you scan a document and automatically send the image as a fax from the PC using the Brother PC-FAX software. (See PC-FAX sending on page 76.) To change the Send settings, right-click the Send button and click ControlCenter Configuration.
You can change the Resolution, Scan Type, Document Size, Show Scanner Interface, Brightness and Contrast settings. 63 You can also configure the address book and change some general machine settings. 3 Send 3 The Send button lets you send and receive faxes. ControlCenter3 PC-FAX (MFC models only) 3 The PC-FAX option lets you scan a document and automatically send the image as a fax from the PC using the Brother PC-FAX software. (See PC-FAX sending on page 76.) To change the Send settings, right-click the Send button and click ControlCenter Configuration.

Software & Network Users Manual - English
Page 70
... your PC. ControlCenter3 Receive/View Received (Not available for MFC-240C and MFC-3360C) 3 The Brother PC-FAX Receiving software option lets you view and store your faxes on your Brother machine. It is activated and starts to receive fax data from the start menu. (See Running the PC-FAX Receiving software on your PC on page 91. By...
... your PC. ControlCenter3 Receive/View Received (Not available for MFC-240C and MFC-3360C) 3 The Brother PC-FAX Receiving software option lets you view and store your faxes on your Brother machine. It is activated and starts to receive fax data from the start menu. (See Running the PC-FAX Receiving software on your PC on page 91. By...
Software & Network Users Manual - English
Page 71
ControlCenter3 Address Book 3 The Address Book button lets you can configure the user settings of the PC-FAX application. (See Setting up user information on page 82.) 3 Setup 3 By clicking the Setup button, you add, amend or delete contacts from your address book. To edit this button, click the Address Book button to open the dialog box. (See Brother Address Book on page 77.) 65
ControlCenter3 Address Book 3 The Address Book button lets you can configure the user settings of the PC-FAX application. (See Setting up user information on page 82.) 3 Setup 3 By clicking the Setup button, you add, amend or delete contacts from your address book. To edit this button, click the Address Book button to open the dialog box. (See Brother Address Book on page 77.) 65
Software & Network Users Manual - English
Page 81
...brother.com) for example, to choose all your PC during the installation of settings, highlight each setting or function heading (for more information. 75 Note • You can use Remote Setup, you are using a different machine to the one that was originally registered to your settings, highlight MFC...Remote Setup Program, click the Start button, All Programs, Brother, MFC-XXXX, and Remote Setup. • If your machine. • To save all fax settings highlight Fax) from a file. Remote Setup (Not available for DCP models and MFC-240C) „ Print Lets you save a single ...
...brother.com) for example, to choose all your PC during the installation of settings, highlight each setting or function heading (for more information. 75 Note • You can use Remote Setup, you are using a different machine to the one that was originally registered to your settings, highlight MFC...Remote Setup Program, click the Start button, All Programs, Brother, MFC-XXXX, and Remote Setup. • If your machine. • To save all fax settings highlight Fax) from a file. Remote Setup (Not available for DCP models and MFC-240C) „ Print Lets you save a single ...


