
Quick Setup Guide - English
Page 3
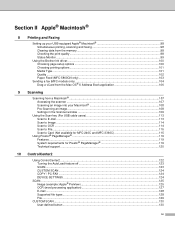
... Removing the protective parts ...4 Opening the document support and document tray 4 Loading paper ...4 Connecting the phone line ...6 Connecting the power cord ...6 Installing the ink cartridges...7 Print quality check ...9 Choosing your language (Canada only)...9 Setting the LCD contrast ...10 Setting the date and time ...10 Setting your station ID ...11 Setting tone...
... Removing the protective parts ...4 Opening the document support and document tray 4 Loading paper ...4 Connecting the phone line ...6 Connecting the power cord ...6 Installing the ink cartridges...7 Print quality check ...9 Choosing your language (Canada only)...9 Setting the LCD contrast ...10 Setting the date and time ...10 Setting your station ID ...11 Setting tone...

Quick Setup Guide - English
Page 7
... guide touch the edges of the paper tray. 8 Slowly push the paper tray completely into the machine. 5 Gently put the paper into the paper tray print side down and top edge first. it may lift at the back of the tray and cause paper feed problems. 7 Close the output paper tray...
... guide touch the edges of the paper tray. 8 Slowly push the paper tray completely into the machine. 5 Gently put the paper into the paper tray print side down and top edge first. it may lift at the back of the tray and cause paper feed problems. 7 Close the output paper tray...

Quick Setup Guide - English
Page 10
...the direction of the cartridge. • If you mix the colors by installing an ink cartridge in the wrong position, clean the print head several times after you do not refill the ink cartridges provided with only Genuine Brother Branded Supplies. STEP 1 Setting Up the Machine 6 Install ...seep out of the arrow on the cartridge package. • DO NOT dismantle or tamper with the cartridge color (2), as shown in the diagram below. 2 1 M brother XXXX 7 Lift each ink cartridge in unsatisfactory print quality. The cleaning process will clean the ink tube system for the first time.
...the direction of the cartridge. • If you mix the colors by installing an ink cartridge in the wrong position, clean the print head several times after you do not refill the ink cartridges provided with only Genuine Brother Branded Supplies. STEP 1 Setting Up the Machine 6 Install ...seep out of the arrow on the cartridge package. • DO NOT dismantle or tamper with the cartridge color (2), as shown in the diagram below. 2 1 M brother XXXX 7 Lift each ink cartridge in unsatisfactory print quality. The cleaning process will clean the ink tube system for the first time.

Quick Setup Guide - English
Page 11
... is OK for both black and color, the LCD shows: Start Cleaning? OK Poor 8 Choosing your language (Canada only) 1 Press Menu, 0, 0. 2 Press a or b to step 3. Press Color Start. q 1.Yes 2.No 5 Do one of the paper immediately after printing, the surface may not be completely dry and... may stain your language (English or French), and then press OK. q 1.Yes 2.No Color OK? q 1.Yes 2.No 7 Press 1 (Yes), the machine ...
... is OK for both black and color, the LCD shows: Start Cleaning? OK Poor 8 Choosing your language (Canada only) 1 Press Menu, 0, 0. 2 Press a or b to step 3. Press Color Start. q 1.Yes 2.No 5 Do one of the paper immediately after printing, the surface may not be completely dry and... may stain your language (English or French), and then press OK. q 1.Yes 2.No Color OK? q 1.Yes 2.No 7 Press 1 (Yes), the machine ...

Quick Setup Guide - English
Page 12
... you set up the station ID it will add it to choose Dark or Light. 3 Press OK. 4 Press Stop/Exit. Day:01 (e.g. Month:03 (e.g. See Printing Reports in 24-hour format on the dial pad, and then press OK. Enter 1 5, 2 5 for the day on the dial pad, and then press OK.... 1 Press Menu, 0, 2. 2 Enter the last two digits of the month.) 5 Enter the time in the User's Guide. 10 To confirm the current date and time, print out the Users Settings Report.
... you set up the station ID it will add it to choose Dark or Light. 3 Press OK. 4 Press Stop/Exit. Day:01 (e.g. Month:03 (e.g. See Printing Reports in 24-hour format on the dial pad, and then press OK. Enter 1 5, 2 5 for the day on the dial pad, and then press OK.... 1 Press Menu, 0, 2. 2 Enter the last two digits of the month.) 5 Enter the time in the User's Guide. 10 To confirm the current date and time, print out the Users Settings Report.

Quick Setup Guide - English
Page 13
Press One time Two key times 2 A B 3 D E 4 G H 5 J K 6 M N 7 P Q 8 T U 9 W X 4 Press Stop/Exit. Setting Up the Machine 11 Setting your station ID You should store your name and fax number to be printed on all fax pages that is sent and an identification of the business or other entity or other individual sending the message and the...
Press One time Two key times 2 A B 3 D E 4 G H 5 J K 6 M N 7 P Q 8 T U 9 W X 4 Press Stop/Exit. Setting Up the Machine 11 Setting your station ID You should store your name and fax number to be printed on all fax pages that is sent and an identification of the business or other entity or other individual sending the message and the...

Quick Setup Guide - English
Page 14
... you use the machine for Tone dialing service. No Fax/Tel Your machine controls the line and automatically answers every call yourself. Fax messages are printed. 1 Press Menu, 0, 1. 2 Press a or b to the machine? Press OK. 3 Press Stop/Exit. 13 Choosing a Receive Mode There are stored on the external TAD. Yes No...
... you use the machine for Tone dialing service. No Fax/Tel Your machine controls the line and automatically answers every call yourself. Fax messages are printed. 1 Press Menu, 0, 1. 2 Press a or b to the machine? Press OK. 3 Press Stop/Exit. 13 Choosing a Receive Mode There are stored on the external TAD. Yes No...
Quick Setup Guide - English
Page 16
... Note MFL-Pro Suite includes the Printer Driver, Scanner Driver, Brother ControlCenter3, ScanSoft® PaperPort® SE with OCR is a Web site offering information about your machine. Printing and scanning details) Brother Solutions Center You can install additional MFL-Pro Suite software utilities, ...install without PaperPort® SE, or install the printer driver only. Printing and scanning details) On-Line Registration You will be pointed to the Brother Product Registration Web page for quick registration of the MFLPro Suite, use this selection to a...
... Note MFL-Pro Suite includes the Printer Driver, Scanner Driver, Brother ControlCenter3, ScanSoft® PaperPort® SE with OCR is a Web site offering information about your machine. Printing and scanning details) Brother Solutions Center You can install additional MFL-Pro Suite software utilities, ...install without PaperPort® SE, or install the printer driver only. Printing and scanning details) On-Line Registration You will be pointed to the Brother Product Registration Web page for quick registration of the MFLPro Suite, use this selection to a...

Quick Setup Guide - English
Page 21
Macintosh® USB 12 Click Print Center, then Quit Print Center. PageManager icon and follow the on-screen instructions. Note When Presto!®PageManager® is installed OCR capability is now complete. 13 To install ... driver, scanner driver and Brother ControlCenter2 have been installed and the installation is added to the Brother ControlCenter2. Installing the Driver & Software Macintosh® 10 Choose USB. Presto!® PageManager® has been installed and the installation is now complete. 11 Choose MFC-XXXX (where XXXX is your model name), and then click...
Macintosh® USB 12 Click Print Center, then Quit Print Center. PageManager icon and follow the on-screen instructions. Note When Presto!®PageManager® is installed OCR capability is now complete. 13 To install ... driver, scanner driver and Brother ControlCenter2 have been installed and the installation is added to the Brother ControlCenter2. Installing the Driver & Software Macintosh® 10 Choose USB. Presto!® PageManager® has been installed and the installation is now complete. 11 Choose MFC-XXXX (where XXXX is your model name), and then click...
Software & Network Users Manual - English
Page 2
Table of Contents Section I Windows® 1 Printing Using the Brother printer driver...2 Features ...2 Choosing the right type of paper...3 Simultaneous printing, scanning and faxing 3 Clearing data from the memory ...3 Checking the print quality ...3 Status Monitor...4 Monitoring the machine's status ...4 Turning ... ...6 Media Type...7 Quality ...7 Enhanced Print Settings ...8 Improve Pattern Printing (Windows® 2000/XP only 10 Paper Size ...10 Page Layout ...11 Orientation ...11 Copies ...12 Paper Source (MFC-5860CN only 12 Advanced tab...13 Color ...14 Scaling ...16 Watermark ...17 ...
Table of Contents Section I Windows® 1 Printing Using the Brother printer driver...2 Features ...2 Choosing the right type of paper...3 Simultaneous printing, scanning and faxing 3 Clearing data from the memory ...3 Checking the print quality ...3 Status Monitor...4 Monitoring the machine's status ...4 Turning ... ...6 Media Type...7 Quality ...7 Enhanced Print Settings ...8 Improve Pattern Printing (Windows® 2000/XP only 10 Paper Size ...10 Page Layout ...11 Orientation ...11 Copies ...12 Paper Source (MFC-5860CN only 12 Advanced tab...13 Color ...14 Scaling ...16 Watermark ...17 ...
Software & Network Users Manual - English
Page 5
... data from the memory ...98 Checking the print quality ...98 Status Monitor ...99 Using the Brother Ink driver ...100 Choosing page setup options ...100 Choosing printing options ...101 Media Type...101 Quality ...102 Paper Feed (MFC-5860CN only)...103 Sending a fax (MFC models only) ...104 Drag a vCard from...to E-mail ...113 Scan to Image ...114 Scan to OCR ...114 Scan to File...115 Scan to Card (Not available for MFC-240C and MFC-3360C 115 Using Presto!® PageManager® ...119 Features ...119 System requirements for Presto!® PageManager 119 Technical support ...120 10 ...
... data from the memory ...98 Checking the print quality ...98 Status Monitor ...99 Using the Brother Ink driver ...100 Choosing page setup options ...100 Choosing printing options ...101 Media Type...101 Quality ...102 Paper Feed (MFC-5860CN only)...103 Sending a fax (MFC models only) ...104 Drag a vCard from...to E-mail ...113 Scan to Image ...114 Scan to OCR ...114 Scan to File...115 Scan to Card (Not available for MFC-240C and MFC-3360C 115 Using Presto!® PageManager® ...119 Features ...119 System requirements for Presto!® PageManager 119 Technical support ...120 10 ...
Software & Network Users Manual - English
Page 7
Section I Windows® I Printing 2 Scanning 22 ControlCenter3 44 Network Scanning (For models with built-in network support) 68 Remote Setup (Not available for DCP models and MFC-240C) 74 Brother PC-FAX Software (MFC models only) 76 PhotoCapture Center® (Not available for MFC-3360C) 94
Section I Windows® I Printing 2 Scanning 22 ControlCenter3 44 Network Scanning (For models with built-in network support) 68 Remote Setup (Not available for DCP models and MFC-240C) 74 Brother PC-FAX Software (MFC models only) 76 PhotoCapture Center® (Not available for MFC-3360C) 94
Software & Network Users Manual - English
Page 8
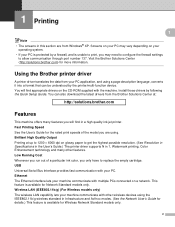
...resolution. (See Resolution in Specifications in the User's Guide.) The printer driver supports N in 1, Watermark printing, Color Enhancement technology and many features you are from the Brother Solutions Center at up to 1200 × 6000 dpi on the CD-ROM supplied with multiple PCs ... drivers from Windows® XP. You can be understood by following the Quick Setup Guide. Brilliant High Quality Output Printing at : http://solutions.brother.com Features 1 This machine offers many other wireless devices using the IEEE802.11b/g wireless standard in Infrastructure and Ad-...
...resolution. (See Resolution in Specifications in the User's Guide.) The printer driver supports N in 1, Watermark printing, Color Enhancement technology and many features you are from the Brother Solutions Center at up to 1200 × 6000 dpi on the CD-ROM supplied with multiple PCs ... drivers from Windows® XP. You can be understood by following the Quick Setup Guide. Brilliant High Quality Output Printing at : http://solutions.brother.com Features 1 This machine offers many other wireless devices using the IEEE802.11b/g wireless standard in Infrastructure and Ad-...
Software & Network Users Manual - English
Page 9
...the memory by pressing the Stop/Exit key on paper, it pauses the PC printing operation, and then continues printing when copying or fax receiving has finished. Simultaneous printing, scanning and faxing 1 Your machine can print from the memory 1 If the LCD shows Data Remaining, you want to check... or receiving a fax in memory, or while scanning a document into the PC. Printing Choosing the right type of paper 1 1 For high quality printing, it , see Improving print quality in the User's Guide. 3 Checking the print quality 1 If you can clear the data that is important to improve it is...
...the memory by pressing the Stop/Exit key on paper, it pauses the PC printing operation, and then continues printing when copying or fax receiving has finished. Simultaneous printing, scanning and faxing 1 Your machine can print from the memory 1 If the LCD shows Data Remaining, you want to check... or receiving a fax in memory, or while scanning a document into the PC. Printing Choosing the right type of paper 1 1 For high quality printing, it , see Improving print quality in the User's Guide. 3 Checking the print quality 1 If you can clear the data that is important to improve it is...
Software & Network Users Manual - English
Page 10
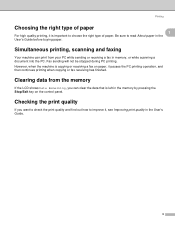
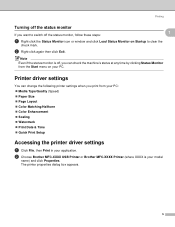
Printing Status Monitor 1 1 The Status Monitor utility is a configurable software tool for monitoring the status of error messages such as paper empty, paper jam or ink empty. You can display the status monitor on your PC-in Start/All Programs/Brother/MFC-XXXX on your PC, the Status Monitor ...icon appears on the desktop. 4 There are two locations where you to get immediate notification of one or more information about using the Status Monitor software, right-click the...
Printing Status Monitor 1 1 The Status Monitor utility is a configurable software tool for monitoring the status of error messages such as paper empty, paper jam or ink empty. You can display the status monitor on your PC-in Start/All Programs/Brother/MFC-XXXX on your PC, the Status Monitor ...icon appears on the desktop. 4 There are two locations where you to get immediate notification of one or more information about using the Status Monitor software, right-click the...
Software & Network Users Manual - English
Page 11
...Choose Brother MFC-XXXX USB Printer or Brother MFC-XXXX Printer (where XXXX is off, you want to clear the check mark. b Right-click again then click Exit. Printer driver settings 1 You can change the following printer settings when you print from...„ Page Layout „ Color Matching/Halftone „ Color Enhancement „ Scaling „ Watermark „ Print Date & Time „ Quick Print Setup Accessing the printer driver settings 1 a Click File, then Print in your application. The printer properties dialog box appears. 5 Printing Turning off the status monitor, follow...
...Choose Brother MFC-XXXX USB Printer or Brother MFC-XXXX Printer (where XXXX is off, you want to clear the check mark. b Right-click again then click Exit. Printer driver settings 1 You can change the following printer settings when you print from...„ Page Layout „ Color Matching/Halftone „ Color Enhancement „ Scaling „ Watermark „ Print Date & Time „ Quick Print Setup Accessing the printer driver settings 1 a Click File, then Print in your application. The printer properties dialog box appears. 5 Printing Turning off the status monitor, follow...
Software & Network Users Manual - English
Page 12
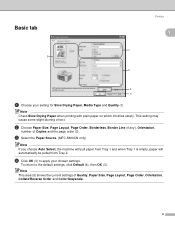
...Order, Borderless, Border Line (if any), Orientation, number of text. Note Check Slow Drying Paper when printing with plain paper on which ink dries slowly. This setting may cause some slight blurring of Copies and ...(2). d Click OK (3) to the default settings, click Default (4), then OK (3). c Select the Paper Source. (MFC-5860CN only) Note If you choose Auto Select, the machine will pull paper from Tray 1 and when Tray 1 is... Size, Page Layout, Page Order, Orientation, Collate/Reverse Order and Color/Grayscale. 6 Basic tab 5 Printing 1 1 1 2 4 3 a Choose your chosen settings.
...Order, Borderless, Border Line (if any), Orientation, number of text. Note Check Slow Drying Paper when printing with plain paper on which ink dries slowly. This setting may cause some slight blurring of Copies and ...(2). d Click OK (3) to the default settings, click Default (4), then OK (3). c Select the Paper Source. (MFC-5860CN only) Note If you choose Auto Select, the machine will pull paper from Tray 1 and when Tray 1 is... Size, Page Layout, Page Order, Orientation, Collate/Reverse Order and Color/Grayscale. 6 Basic tab 5 Printing 1 1 1 2 4 3 a Choose your chosen settings.
Software & Network Users Manual - English
Page 13
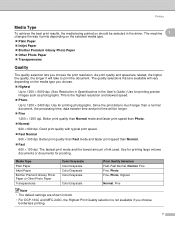
...bold. • For DCP-130C and MFC-240C, the Highest Print Quality selection is not available if you choose. „ Highest Up to 1200 × 6000 dpi. (See Resolution in Specifications in the User's Guide.) Use for printing precise images such as photographs. This ... to 1200 × 2400 dpi. The fastest print mode and the lowest amount of ink used. Media Type Plain Paper Inkjet Paper Brother Premium Glossy Photo Paper or Other Photo Paper Transparencies Color/Grayscale Color/Grayscale Color/Grayscale Color/Grayscale Color/Grayscale Print Quality Selection Fast, Fast Normal, Normal, Fine...
...bold. • For DCP-130C and MFC-240C, the Highest Print Quality selection is not available if you choose. „ Highest Up to 1200 × 6000 dpi. (See Resolution in Specifications in the User's Guide.) Use for printing precise images such as photographs. This ... to 1200 × 2400 dpi. The fastest print mode and the lowest amount of ink used. Media Type Plain Paper Inkjet Paper Brother Premium Glossy Photo Paper or Other Photo Paper Transparencies Color/Grayscale Color/Grayscale Color/Grayscale Color/Grayscale Color/Grayscale Print Quality Selection Fast, Fast Normal, Normal, Fine...
Software & Network Users Manual - English
Page 14
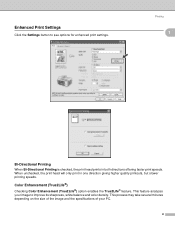
... (True2Life®) 1 Checking Color Enhancement (True2Life®) option enables the True2Life® feature. This process may take several minutes depending on the size of the image and the specifications of your image to see options for enhanced print settings. Printing 1 1 Bi-Directional Printing 1 When Bi-Directional Printing is checked, the print head prints in one direction giving higher...
... (True2Life®) 1 Checking Color Enhancement (True2Life®) option enables the True2Life® feature. This process may take several minutes depending on the size of the image and the specifications of your image to see options for enhanced print settings. Printing 1 1 Bi-Directional Printing 1 When Bi-Directional Printing is checked, the print head prints in one direction giving higher...
Software & Network Users Manual - English
Page 15
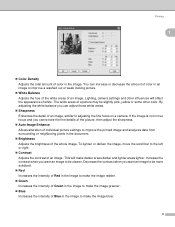
Printing 1 „ Color Density Adjusts the total amount of an image. You can adjust those white areas. „ Sharpness Enhances the detail of an image. By adjusting the white balance you want an image to improve the printed image and analyzes data from surrounding or neighboring pixels in the document. „ .... „ Green Increases the intensity of Green in an image to adjusting the fine focus on a camera. Lighting, camera settings and other color. If the image is not in true focus and you want an image to be clearer. This will effect the appearance of Blue in the...
Printing 1 „ Color Density Adjusts the total amount of an image. You can adjust those white areas. „ Sharpness Enhances the detail of an image. By adjusting the white balance you want an image to improve the printed image and analyzes data from surrounding or neighboring pixels in the document. „ .... „ Green Increases the intensity of Green in an image to adjusting the fine focus on a camera. Lighting, camera settings and other color. If the image is not in true focus and you want an image to be clearer. This will effect the appearance of Blue in the...


