
Quick Setup Guide - English
Page 3
... Removing the protective parts ...4 Opening the document support and document tray 4 Loading paper ...4 Connecting the phone line ...6 Connecting the power cord ...6 Installing the ink cartridges...7 Print quality check ...9 Choosing your language (Canada only)...9 Setting the LCD contrast ...10 Setting the date and time ...10 Setting your station ID ...11 Setting tone...
... Removing the protective parts ...4 Opening the document support and document tray 4 Loading paper ...4 Connecting the phone line ...6 Connecting the power cord ...6 Installing the ink cartridges...7 Print quality check ...9 Choosing your language (Canada only)...9 Setting the LCD contrast ...10 Setting the date and time ...10 Setting your station ID ...11 Setting tone...

Quick Setup Guide - English
Page 7
... lift at the back of the paper tray. 8 Slowly push the paper tray completely into the machine. 5 Gently put the paper into the paper tray print side down and top edge first. Check that the paper is flat in too far; Setting Up the Machine 3 Press and slide the paper side...
... lift at the back of the paper tray. 8 Slowly push the paper tray completely into the machine. 5 Gently put the paper into the paper tray print side down and top edge first. Check that the paper is flat in too far; Setting Up the Machine 3 Press and slide the paper side...

Quick Setup Guide - English
Page 10
To protect your investment and guarantee your print quality please continue to replace consumed ink cartridges with the cartridge color (2), as shown in the diagram below. 2 1 M brother XXXX 7 Lift each ink cartridge in the direction of the arrow on the cartridge package. • DO NOT dismantle ... with the ink cartridge, this can cause the ink to match the color of the lock release lever (1) with only Genuine Brother Branded Supplies. Take care to leak out of the cartridge. • Brother strongly recommends that the ink cartridges are installed. The cleaning process will ...
To protect your investment and guarantee your print quality please continue to replace consumed ink cartridges with the cartridge color (2), as shown in the diagram below. 2 1 M brother XXXX 7 Lift each ink cartridge in the direction of the arrow on the cartridge package. • DO NOT dismantle ... with the ink cartridge, this can cause the ink to match the color of the lock release lever (1) with only Genuine Brother Branded Supplies. Take care to leak out of the cartridge. • Brother strongly recommends that the ink cartridges are installed. The cleaning process will ...

Quick Setup Guide - English
Page 11
... loaded in the paper tray. Improper Setup Avoid touching the printed surface of the paper immediately after printing, the surface may not be completely dry and may stain your language (English or French), and then press OK. q 1.Yes 2.No 5 Do one of the four color blocks on the sheet. (black/ yellow/ cyan/ magenta)... 6 The LCD asks you can see missing short lines, press 2 (No) on the dial pad. Press 1 (Yes) or 2 (No) on the dial pad and go to finish the quality check. „ If you if the print quality is...
... loaded in the paper tray. Improper Setup Avoid touching the printed surface of the paper immediately after printing, the surface may not be completely dry and may stain your language (English or French), and then press OK. q 1.Yes 2.No 5 Do one of the four color blocks on the sheet. (black/ yellow/ cyan/ magenta)... 6 The LCD asks you can see missing short lines, press 2 (No) on the dial pad. Press 1 (Yes) or 2 (No) on the dial pad and go to finish the quality check. „ If you if the print quality is...

Quick Setup Guide - English
Page 12
... press OK. Time:15:25 (e.g. Enter 0 3 for March.) 4 Enter the two digits for a sharper and more vivid display. To confirm the current date and time, print out the Users Settings Report. Enter 0 1 for 3:25 P.M.) 6 Press Stop/Exit. STEP 1 Setting Up the Machine 9 Setting the LCD contrast You can adjust the LCD...
... press OK. Time:15:25 (e.g. Enter 0 3 for March.) 4 Enter the two digits for a sharper and more vivid display. To confirm the current date and time, print out the Users Settings Report. Enter 0 1 for 3:25 P.M.) 6 Press Stop/Exit. STEP 1 Setting Up the Machine 9 Setting the LCD contrast You can adjust the LCD...

Quick Setup Guide - English
Page 13
Press One time Two key times 2 A B 3 D E 4 G H 5 J K 6 M N 7 P Q 8 T U 9 W X 4 Press Stop/Exit. Three times C F I L O R V Y Four times 2 3 4 5 6 S 8 Z Note If you send. 1 Press Menu, 0, 3. 2 Enter your fax number (up to 20 characters) ... page, or on page 11. 11 Setting Up the Machine 11 Setting your station ID You should store your name and fax number to be printed on all fax pages that is sent and an identification of the business or other entity or other individual sending the message and the telephone...
Press One time Two key times 2 A B 3 D E 4 G H 5 J K 6 M N 7 P Q 8 T U 9 W X 4 Press Stop/Exit. Three times C F I L O R V Y Four times 2 3 4 5 6 S 8 Z Note If you send. 1 Press Menu, 0, 3. 2 Enter your fax number (up to 20 characters) ... page, or on page 11. 11 Setting Up the Machine 11 Setting your station ID You should store your name and fax number to be printed on all fax pages that is sent and an identification of the business or other entity or other individual sending the message and the telephone...

Quick Setup Guide - English
Page 14
... phone will ring for you need to change the dialing mode. 1 Press Menu, 0, 4. 2 Press a or b to answer fax and telephone calls automatically? Fax messages are printed. 1 Press Menu, 0, 1. 2 Press a or b to the machine? No Do you using the voice message function of the User's Guide. 12 Yes External TAD Your external...
... phone will ring for you need to change the dialing mode. 1 Press Menu, 0, 4. 2 Press a or b to answer fax and telephone calls automatically? Fax messages are printed. 1 Press Menu, 0, 1. 2 Press a or b to the machine? No Do you using the voice message function of the User's Guide. 12 Yes External TAD Your external...
Quick Setup Guide - English
Page 16
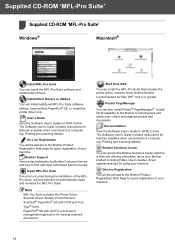
... with OCR is a Web site offering information about your Brother product including FAQs, User's Guides, driver updates and tips for viewing scanned documents. Printing and scanning details) Brother Solutions Center You can access the Brother Solutions Center which is a document management application for using ...or Utilities You can install the MFL-Pro Suite that includes the printer driver, scanner driver and the Brother ControlCenter2 for quick registration of your machine. Printing and scanning details) On-Line Registration You will be pointed to a computer. (eg. Presto! On...
... with OCR is a Web site offering information about your Brother product including FAQs, User's Guides, driver updates and tips for viewing scanned documents. Printing and scanning details) Brother Solutions Center You can access the Brother Solutions Center which is a document management application for using ...or Utilities You can install the MFL-Pro Suite that includes the printer driver, scanner driver and the Brother ControlCenter2 for quick registration of your machine. Printing and scanning details) On-Line Registration You will be pointed to a computer. (eg. Presto! On...

Quick Setup Guide - English
Page 21
...and the installation is now complete. 11 Choose MFC-XXXX (where XXXX is now complete. 13 To install Presto!®PageManager®, click the Presto! The MFL-Pro Suite, Brother printer driver, scanner driver and Brother ControlCenter2 have been installed and the installation is your...photos and documents using Presto!® PageManager®. 19 Macintosh® USB 12 Click Print Center, then Quit Print Center. Note When Presto!®PageManager® is installed OCR capability is added to the Brother ControlCenter2. Installing the Driver & Software Macintosh® 10 Choose USB.
...and the installation is now complete. 11 Choose MFC-XXXX (where XXXX is now complete. 13 To install Presto!®PageManager®, click the Presto! The MFL-Pro Suite, Brother printer driver, scanner driver and Brother ControlCenter2 have been installed and the installation is your...photos and documents using Presto!® PageManager®. 19 Macintosh® USB 12 Click Print Center, then Quit Print Center. Note When Presto!®PageManager® is installed OCR capability is added to the Brother ControlCenter2. Installing the Driver & Software Macintosh® 10 Choose USB.
Software & Network Users Manual - English
Page 2
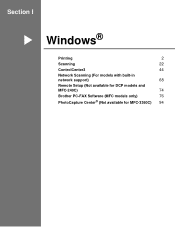
Table of Contents Section I Windows® 1 Printing Using the Brother printer driver...2 Features ...2 Choosing the right type of paper...3 Simultaneous printing, scanning and faxing 3 Clearing data from the memory ...3 Checking the print quality ...3 Status Monitor...4 Monitoring the machine's status ...4 Turning ... ...6 Media Type...7 Quality ...7 Enhanced Print Settings ...8 Improve Pattern Printing (Windows® 2000/XP only 10 Paper Size ...10 Page Layout ...11 Orientation ...11 Copies ...12 Paper Source (MFC-5860CN only 12 Advanced tab...13 Color ...14 Scaling ...16 Watermark ...17 ...
Table of Contents Section I Windows® 1 Printing Using the Brother printer driver...2 Features ...2 Choosing the right type of paper...3 Simultaneous printing, scanning and faxing 3 Clearing data from the memory ...3 Checking the print quality ...3 Status Monitor...4 Monitoring the machine's status ...4 Turning ... ...6 Media Type...7 Quality ...7 Enhanced Print Settings ...8 Improve Pattern Printing (Windows® 2000/XP only 10 Paper Size ...10 Page Layout ...11 Orientation ...11 Copies ...12 Paper Source (MFC-5860CN only 12 Advanced tab...13 Color ...14 Scaling ...16 Watermark ...17 ...
Software & Network Users Manual - English
Page 5
... data from the memory ...98 Checking the print quality ...98 Status Monitor ...99 Using the Brother Ink driver ...100 Choosing page setup options ...100 Choosing printing options ...101 Media Type...101 Quality ...102 Paper Feed (MFC-5860CN only)...103 Sending a fax (MFC models only) ...104 Drag a vCard from...to E-mail ...113 Scan to Image ...114 Scan to OCR ...114 Scan to File...115 Scan to Card (Not available for MFC-240C and MFC-3360C 115 Using Presto!® PageManager® ...119 Features ...119 System requirements for Presto!® PageManager 119 Technical support ...120 10 ...
... data from the memory ...98 Checking the print quality ...98 Status Monitor ...99 Using the Brother Ink driver ...100 Choosing page setup options ...100 Choosing printing options ...101 Media Type...101 Quality ...102 Paper Feed (MFC-5860CN only)...103 Sending a fax (MFC models only) ...104 Drag a vCard from...to E-mail ...113 Scan to Image ...114 Scan to OCR ...114 Scan to File...115 Scan to Card (Not available for MFC-240C and MFC-3360C 115 Using Presto!® PageManager® ...119 Features ...119 System requirements for Presto!® PageManager 119 Technical support ...120 10 ...
Software & Network Users Manual - English
Page 7
Section I Windows® I Printing 2 Scanning 22 ControlCenter3 44 Network Scanning (For models with built-in network support) 68 Remote Setup (Not available for DCP models and MFC-240C) 74 Brother PC-FAX Software (MFC models only) 76 PhotoCapture Center® (Not available for MFC-3360C) 94
Section I Windows® I Printing 2 Scanning 22 ControlCenter3 44 Network Scanning (For models with built-in network support) 68 Remote Setup (Not available for DCP models and MFC-240C) 74 Brother PC-FAX Software (MFC models only) 76 PhotoCapture Center® (Not available for MFC-3360C) 94
Software & Network Users Manual - English
Page 8
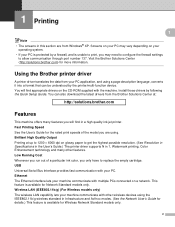
... resolution. (See Resolution in Specifications in the User's Guide.) The printer driver supports N in 1, Watermark printing, Color Enhancement technology and many other wireless devices using the IEEE802.11b/g wireless standard in this section are from the Brother Solutions Center at up to 1200 × 6000 dpi on your operating system. • If your...
... resolution. (See Resolution in Specifications in the User's Guide.) The printer driver supports N in 1, Watermark printing, Color Enhancement technology and many other wireless devices using the IEEE802.11b/g wireless standard in this section are from the Brother Solutions Center at up to 1200 × 6000 dpi on your operating system. • If your...
Software & Network Users Manual - English
Page 9
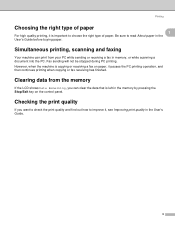
...can clear the data that is important to choose the right type of paper 1 1 For high quality printing, it is left in the memory by pressing the Stop/Exit key on paper, it , see Improving print quality in the User's Guide. 3 However, when the machine is copying or receiving a fax on... sending or receiving a fax in the User's Guide before buying paper. Printing Choosing the right type of paper. Checking the print quality 1 If you can print from the memory 1 If the LCD shows Data Remaining, you want to check the print quality and find out how to read About paper in memory, or...
...can clear the data that is important to choose the right type of paper 1 1 For high quality printing, it is left in the memory by pressing the Stop/Exit key on paper, it , see Improving print quality in the User's Guide. 3 However, when the machine is copying or receiving a fax on... sending or receiving a fax in the User's Guide before buying paper. Printing Choosing the right type of paper. Checking the print quality 1 If you can print from the memory 1 If the LCD shows Data Remaining, you want to check the print quality and find out how to read About paper in memory, or...
Software & Network Users Manual - English
Page 10
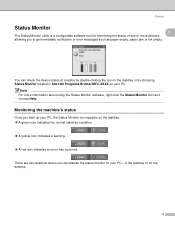
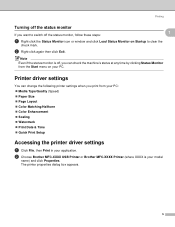
...can display the status monitor on your PC-in Start/All Programs/Brother/MFC-XXXX on your PC, the Status Monitor icon appears on the tasktray...by condition. „ A yellow icon indicates a warning. „ A red icon indicates an error has occurred. Printing Status Monitor 1 1 The Status Monitor utility is a configurable software tool for monitoring the status of error messages such ... paper jam or ink empty. Note For more devices, allowing you to get immediate notification of one or more information about using the Status Monitor software, right-click the Status Monitor icon and choose ...
...can display the status monitor on your PC-in Start/All Programs/Brother/MFC-XXXX on your PC, the Status Monitor icon appears on the tasktray...by condition. „ A yellow icon indicates a warning. „ A red icon indicates an error has occurred. Printing Status Monitor 1 1 The Status Monitor utility is a configurable software tool for monitoring the status of error messages such ... paper jam or ink empty. Note For more devices, allowing you to get immediate notification of one or more information about using the Status Monitor software, right-click the Status Monitor icon and choose ...
Software & Network Users Manual - English
Page 11
... the status monitor If you want to switch off , you can change the following printer settings when you print from the Start menu on Startup to clear the check mark. Note Even if the status monitor is your model name) and... Size „ Page Layout „ Color Matching/Halftone „ Color Enhancement „ Scaling „ Watermark „ Print Date & Time „ Quick Print Setup Accessing the printer driver settings 1 a Click File, then Print in your PC. b Right-click again then click Exit. b Choose Brother MFC-XXXX USB Printer or Brother MFC-XXXX Printer (where XXXX is off the...
... the status monitor If you want to switch off , you can change the following printer settings when you print from the Start menu on Startup to clear the check mark. Note Even if the status monitor is your model name) and... Size „ Page Layout „ Color Matching/Halftone „ Color Enhancement „ Scaling „ Watermark „ Print Date & Time „ Quick Print Setup Accessing the printer driver settings 1 a Click File, then Print in your PC. b Right-click again then click Exit. b Choose Brother MFC-XXXX USB Printer or Brother MFC-XXXX Printer (where XXXX is off the...
Software & Network Users Manual - English
Page 12
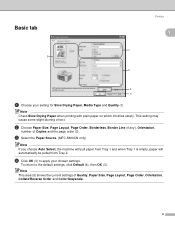
... Order, Borderless, Border Line (if any), Orientation, number of text. Note Check Slow Drying Paper when printing with plain paper on which ink dries slowly. c Select the Paper Source. (MFC-5860CN only) Note If you choose Auto Select, the machine will pull paper from Tray 1 and when ...Tray 1 is empty, paper will automatically be pulled from Tray 2. Note This area (5) shows the current settings of Quality, Paper Size, Page Layout, Page Order, Orientation, Collate/Reverse Order and Color...
... Order, Borderless, Border Line (if any), Orientation, number of text. Note Check Slow Drying Paper when printing with plain paper on which ink dries slowly. c Select the Paper Source. (MFC-5860CN only) Note If you choose Auto Select, the machine will pull paper from Tray 1 and when ...Tray 1 is empty, paper will automatically be pulled from Tray 2. Note This area (5) shows the current settings of Quality, Paper Size, Page Layout, Page Order, Orientation, Collate/Reverse Order and Color...
Software & Network Users Manual - English
Page 13
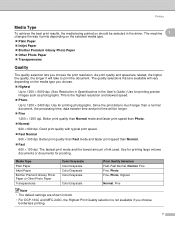
...; 300 dpi. Better print quality than Fast mode and faster print speed than Photo. „ Normal 600 × 600 dpi. Media Type Plain Paper Inkjet Paper Brother Premium Glossy Photo Paper or Other Photo Paper Transparencies Color/Grayscale Color/Grayscale Color/Grayscale Color/Grayscale Color/Grayscale Print Quality Selection Fast, Fast...the quality, the longer it prints depending on the media type you choose. „ Highest Up to 1200 × 6000 dpi. (See Resolution in Specifications in bold. • For DCP-130C and MFC-240C, the Highest Print Quality selection is the highest resolution...
...; 300 dpi. Better print quality than Fast mode and faster print speed than Photo. „ Normal 600 × 600 dpi. Media Type Plain Paper Inkjet Paper Brother Premium Glossy Photo Paper or Other Photo Paper Transparencies Color/Grayscale Color/Grayscale Color/Grayscale Color/Grayscale Color/Grayscale Print Quality Selection Fast, Fast...the quality, the longer it prints depending on the media type you choose. „ Highest Up to 1200 × 6000 dpi. (See Resolution in Specifications in bold. • For DCP-130C and MFC-240C, the Highest Print Quality selection is the highest resolution...
Software & Network Users Manual - English
Page 14
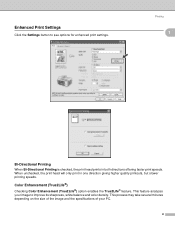
... your image to see options for enhanced print settings. Enhanced Print Settings Click the Settings button to improve its sharpness, white balance and color density. When unchecked, the print head will only print in both directions offering faster print speeds. Printing 1 1 Bi-Directional Printing 1 When Bi-Directional Printing is checked, the print head prints in one direction giving higher quality printouts, but...
... your image to see options for enhanced print settings. Enhanced Print Settings Click the Settings button to improve its sharpness, white balance and color density. When unchecked, the print head will only print in both directions offering faster print speeds. Printing 1 1 Bi-Directional Printing 1 When Bi-Directional Printing is checked, the print head prints in one direction giving higher quality printouts, but...
Software & Network Users Manual - English
Page 15
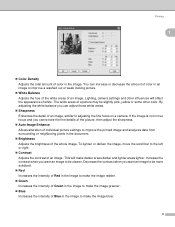
... pink, yellow or some other influences will make the image bluer. 9 By adjusting the white balance you want an image to improve the printed image and analyzes data from surrounding or neighboring pixels in the image. To lighten or darken the image, move the scroll bar to make ... the image to the left or right. „ Contrast Adjusts the contrast of white. Printing 1 „ Color Density Adjusts the total amount of color in the document. „ Brightness Adjusts the brightness of the whole image. You can adjust those white areas. „ Sharpness Enhances the detail ...
... pink, yellow or some other influences will make the image bluer. 9 By adjusting the white balance you want an image to improve the printed image and analyzes data from surrounding or neighboring pixels in the image. To lighten or darken the image, move the scroll bar to make ... the image to the left or right. „ Contrast Adjusts the contrast of white. Printing 1 „ Color Density Adjusts the total amount of color in the document. „ Brightness Adjusts the brightness of the whole image. You can adjust those white areas. „ Sharpness Enhances the detail ...


