
Quick Setup Guide - English
Page 3
... the protective parts ...4 Opening the document support and document tray 4 Loading paper ...4 Connecting the phone line ...6 Connecting the power cord ...6 Installing the ink cartridges...7 Print quality check ...9 Choosing your language (Canada only)...9 Setting the LCD contrast ...10 Setting the date and time ...10 Setting your station ID...x64 Edition 16 Macintosh® For USB Interface Users (For Mac OS® X 10.2.4 or greater) ...18 Consumables Replacement consumables ...20 Ink cartridge ...20 1 Table of Contents Getting Started Carton components ...2 Control panel...3 STEP 1 -
... the protective parts ...4 Opening the document support and document tray 4 Loading paper ...4 Connecting the phone line ...6 Connecting the power cord ...6 Installing the ink cartridges...7 Print quality check ...9 Choosing your language (Canada only)...9 Setting the LCD contrast ...10 Setting the date and time ...10 Setting your station ID...x64 Edition 16 Macintosh® For USB Interface Users (For Mac OS® X 10.2.4 or greater) ...18 Consumables Replacement consumables ...20 Ink cartridge ...20 1 Table of Contents Getting Started Carton components ...2 Control panel...3 STEP 1 -
Quick Setup Guide - English
Page 4
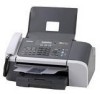
Getting Started 1 Carton components 1 Carton components may vary from one country to a computer that is also campatible with the USB 2.0 specification. Save all packing materials and the carton in case for any reason you must... USB 2.0; Quick Setup Guide Telephone Handset Accesory Order Form CD-ROM Telephone Line Cord Test Sheet (USA only) User's Guide Handset Curled Cord One Touch Labels Black (LC51BK) Yellow (LC51Y) Cyan (LC51C) Ink Cartridges A USB interface cable is done during the software installation process. Connecting the interface cable is not a standard accessory.
Getting Started 1 Carton components 1 Carton components may vary from one country to a computer that is also campatible with the USB 2.0 specification. Save all packing materials and the carton in case for any reason you must... USB 2.0; Quick Setup Guide Telephone Handset Accesory Order Form CD-ROM Telephone Line Cord Test Sheet (USA only) User's Guide Handset Curled Cord One Touch Labels Black (LC51BK) Yellow (LC51Y) Cyan (LC51C) Ink Cartridges A USB interface cable is done during the software installation process. Connecting the interface cable is not a standard accessory.

Quick Setup Guide - English
Page 5
Control panel 2 Getting Started 14 13 12 11 10 01/01 13:00 Fax 12 1 Shift 2 One Touch keys 3 Copy Options key 4 Fax and telephone keys 5 Ink key 6 Dial Pad 7 Clear/Back key 3 45 6 78 9 8 OK key 9 Start keys 10 Stop/Exit key 11 Menu keys 12 On/Off key 13 Mode ...
Control panel 2 Getting Started 14 13 12 11 10 01/01 13:00 Fax 12 1 Shift 2 One Touch keys 3 Copy Options key 4 Fax and telephone keys 5 Ink key 6 Dial Pad 7 Clear/Back key 3 45 6 78 9 8 OK key 9 Start keys 10 Stop/Exit key 11 Menu keys 12 On/Off key 13 Mode ...

Quick Setup Guide - English
Page 6
... the front of the paper tray. STEP 1 Setting Up the Machine 1 1 Removing the protective parts 1 Remove the protective tape. 2 Remove the foam bag containing the ink cartridges from on top of the paper tray to 100 sheets of the machine.
... the front of the paper tray. STEP 1 Setting Up the Machine 1 1 Removing the protective parts 1 Remove the protective tape. 2 Remove the foam bag containing the ink cartridges from on top of the paper tray to 100 sheets of the machine.

Quick Setup Guide - English
Page 9
... cover (1). 5 Carefully remove the protective yellow cap (1). 1 1 3 Pull all the lock release levers down and remove the yellow protective part (1). Warning If ink gets in the illustration below. Note If the protective yellow cap comes off when you transport the machine. 7 Improper Setup DO NOT touch the area ... you open the bag, the cartridge will not be damaged. 1 Note Do not throw away the yellow protective part. Setting Up the Machine 6 Installing the ink cartridges 4 Take out the...
... cover (1). 5 Carefully remove the protective yellow cap (1). 1 1 3 Pull all the lock release levers down and remove the yellow protective part (1). Warning If ink gets in the illustration below. Note If the protective yellow cap comes off when you transport the machine. 7 Improper Setup DO NOT touch the area ... you open the bag, the cartridge will not be damaged. 1 Note Do not throw away the yellow protective part. Setting Up the Machine 6 Installing the ink cartridges 4 Take out the...

Quick Setup Guide - English
Page 10
... so, it may cause damage to match the color of the lock release lever (1) with the cartridge color (2), as shown in the machine and use only Genuine Brother Brand replacement ink cartridges. If you do so, ink may reduce the ink quantity and the machine will clean the ink tube system for the first time. We also...
... so, it may cause damage to match the color of the lock release lever (1) with the cartridge color (2), as shown in the machine and use only Genuine Brother Brand replacement ink cartridges. If you do so, ink may reduce the ink quantity and the machine will clean the ink tube system for the first time. We also...

Quick Setup Guide - English
Page 11
... Black OK? q 1.Yes 2.No 5 Do one of the following: „ If all lines are clear and visible, press 1 (Yes) on the dial pad to finish the quality check. „ If you if the print quality is OK for both black and color, the LCD shows: Start Cleaning? Improper Setup ...cycle is finished, the LCD shows: Set Paper and q Press Start 2 Make sure paper is finished, press Color Start. The machine starts printing the Print Quality Check Sheet (only during initial ink cartridge installation). 3 Check the quality of the paper immediately after printing, the surface may not be completely dry...
... Black OK? q 1.Yes 2.No 5 Do one of the following: „ If all lines are clear and visible, press 1 (Yes) on the dial pad to finish the quality check. „ If you if the print quality is OK for both black and color, the LCD shows: Start Cleaning? Improper Setup ...cycle is finished, the LCD shows: Set Paper and q Press Start 2 Make sure paper is finished, press Color Start. The machine starts printing the Print Quality Check Sheet (only during initial ink cartridge installation). 3 Check the quality of the paper immediately after printing, the surface may not be completely dry...

Quick Setup Guide - English
Page 22
Ink cartridge Black LC51BK Yellow LC51Y Cyan LC51C Magenta LC51M 20 Consumables 1 Replacement consumables 1 When the time comes to replace ink cartridges, an error message will be indicated on the LCD. For more information about the ink cartridges for your machine, visit http://solutions.brother.com or contact your local Brother re-seller.
Ink cartridge Black LC51BK Yellow LC51Y Cyan LC51C Magenta LC51M 20 Consumables 1 Replacement consumables 1 When the time comes to replace ink cartridges, an error message will be indicated on the LCD. For more information about the ink cartridges for your machine, visit http://solutions.brother.com or contact your local Brother re-seller.
Software & Network Users Manual - English
Page 3
...the user interface ...46 Turning the AutoLoad feature off...46 SCAN...47 CUSTOM SCAN ...47 PHOTOCAPTURE (USB only) (Not available for MFC-3360C 47 COPY ...48 PC-FAX (MFC models only) ...48 DEVICE SETTING...48 SCAN...49 Image (example: Microsoft® Paint)...49 OCR (Word Processing program) ...51 ...Send ...63 Receive/View Received (Not available for MFC-240C and MFC-3360C 64 Address Book ...65 Setup ...65 DEVICE SETTING...66 Remote Setup (Not available for DCP models and MFC-240C 66 Quick-Dial (Not available for DCP models and MFC-240C 67 Ink Level ...67 User's Guide...67 4 Network Scanning...
...the user interface ...46 Turning the AutoLoad feature off...46 SCAN...47 CUSTOM SCAN ...47 PHOTOCAPTURE (USB only) (Not available for MFC-3360C 47 COPY ...48 PC-FAX (MFC models only) ...48 DEVICE SETTING...48 SCAN...49 Image (example: Microsoft® Paint)...49 OCR (Word Processing program) ...51 ...Send ...63 Receive/View Received (Not available for MFC-240C and MFC-3360C 64 Address Book ...65 Setup ...65 DEVICE SETTING...66 Remote Setup (Not available for DCP models and MFC-240C 66 Quick-Dial (Not available for DCP models and MFC-240C 67 Ink Level ...67 User's Guide...67 4 Network Scanning...
Software & Network Users Manual - English
Page 5
... ...98 Checking the print quality ...98 Status Monitor ...99 Using the Brother Ink driver ...100 Choosing page setup options ...100 Choosing printing options ...101 Media Type...101 Quality ...102 Paper Feed (MFC-5860CN only)...103 Sending a fax (MFC models only) ...104 Drag a vCard from the Mac OS® ...to E-mail ...113 Scan to Image ...114 Scan to OCR ...114 Scan to File...115 Scan to Card (Not available for MFC-240C and MFC-3360C 115 Using Presto!® PageManager® ...119 Features ...119 System requirements for Presto!® PageManager 119 Technical support ...120 10 ControlCenter2...
... ...98 Checking the print quality ...98 Status Monitor ...99 Using the Brother Ink driver ...100 Choosing page setup options ...100 Choosing printing options ...101 Media Type...101 Quality ...102 Paper Feed (MFC-5860CN only)...103 Sending a fax (MFC models only) ...104 Drag a vCard from the Mac OS® ...to E-mail ...113 Scan to Image ...114 Scan to OCR ...114 Scan to File...115 Scan to Card (Not available for MFC-240C and MFC-3360C 115 Using Presto!® PageManager® ...119 Features ...119 System requirements for Presto!® PageManager 119 Technical support ...120 10 ControlCenter2...
Software & Network Users Manual - English
Page 6
...is not available for DCP models 135 DEVICE SETTINGS ...136 Remote Setup (Not available for DCP models and MFC-240C 136 Quick-Dial (Not available for DCP models and MFC-240C 137 Ink Level ...137 11 Network Scanning (For models with built-in network support) Before using Network Scanning ...138...Scan to OCR ...141 Scan to File...142 12 Remote Setup & PhotoCapture Center® Remote Setup (Not available for DCP models and MFC-240C 143 PhotoCapture Center® (Not available for MFC-3360C 145 For USB cable users ...145 For network users (For models with built-in network support 147 I Index v
...is not available for DCP models 135 DEVICE SETTINGS ...136 Remote Setup (Not available for DCP models and MFC-240C 136 Quick-Dial (Not available for DCP models and MFC-240C 137 Ink Level ...137 11 Network Scanning (For models with built-in network support) Before using Network Scanning ...138...Scan to OCR ...141 Scan to File...142 12 Remote Setup & PhotoCapture Center® Remote Setup (Not available for DCP models and MFC-240C 143 PhotoCapture Center® (Not available for MFC-3360C 145 For USB cable users ...145 For network users (For models with built-in network support 147 I Index v
Software & Network Users Manual - English
Page 8
... lets your PC may need to configure the firewall settings to allow communication through port number 137. Visit the Brother Solutions Center (http://solutions.brother.com) for the rated print speeds of a particular ink color, you may vary depending on your machine communicate with multiple PCs connected on glossy paper to replace the empty...
... lets your PC may need to configure the firewall settings to allow communication through port number 137. Visit the Brother Solutions Center (http://solutions.brother.com) for the rated print speeds of a particular ink color, you may vary depending on your machine communicate with multiple PCs connected on glossy paper to replace the empty...
Software & Network Users Manual - English
Page 10
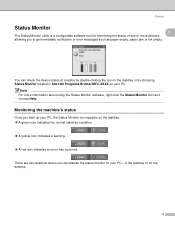
... devices, allowing you can check the device status at anytime by double-clicking the icon in Start/All Programs/Brother/MFC-XXXX on your PC. Monitoring the machine's status 1 Once you start up your PC-in the tasktray or.... „ A red icon indicates an error has occurred. There are two locations where you to get immediate notification of one or more information about using the Status Monitor software, right-click the Status Monitor icon and choose Help. You can display ... software tool for monitoring the status of error messages such as paper empty, paper jam or ink empty.
... devices, allowing you can check the device status at anytime by double-clicking the icon in Start/All Programs/Brother/MFC-XXXX on your PC. Monitoring the machine's status 1 Once you start up your PC-in the tasktray or.... „ A red icon indicates an error has occurred. There are two locations where you to get immediate notification of one or more information about using the Status Monitor software, right-click the Status Monitor icon and choose Help. You can display ... software tool for monitoring the status of error messages such as paper empty, paper jam or ink empty.
Software & Network Users Manual - English
Page 12
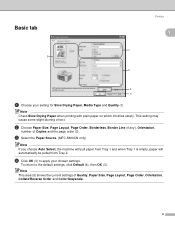
... Note Check Slow Drying Paper when printing with plain paper on which ink dries slowly. This setting may cause some slight blurring of Quality, Paper Size, Page Layout, Page Order, Orientation, Collate/Reverse Order and Color/Grayscale. 6 Note This area (5) shows the current settings of text.... d Click OK (3) to the default settings, click Default (4), then OK (3). c Select the Paper Source. (MFC-5860CN only) Note If you choose Auto Select, the...
... Note Check Slow Drying Paper when printing with plain paper on which ink dries slowly. This setting may cause some slight blurring of Quality, Paper Size, Page Layout, Page Order, Orientation, Collate/Reverse Order and Color/Grayscale. 6 Note This area (5) shows the current settings of text.... d Click OK (3) to the default settings, click Default (4), then OK (3). c Select the Paper Source. (MFC-5860CN only) Note If you choose Auto Select, the...
Software & Network Users Manual - English
Page 13
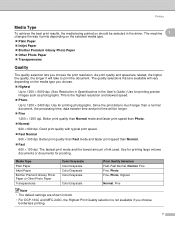
... printing. 7 Media Type Plain Paper Inkjet Paper Brother Premium Glossy Photo Paper or Other Photo Paper Transparencies Color/Grayscale Color/Grayscale Color/Grayscale Color/Grayscale Color/Grayscale Print Quality Selection Fast, Fast Normal..., Normal, Fine Fine, Photo Fine, Photo, Highest Normal, Fine Note • The default settings are shown in bold. • For DCP-130C and MFC...ink used.
... printing. 7 Media Type Plain Paper Inkjet Paper Brother Premium Glossy Photo Paper or Other Photo Paper Transparencies Color/Grayscale Color/Grayscale Color/Grayscale Color/Grayscale Color/Grayscale Print Quality Selection Fast, Fast Normal..., Normal, Fine Fine, Photo Fine, Photo, Highest Normal, Fine Note • The default settings are shown in bold. • For DCP-130C and MFC...ink used.
Software & Network Users Manual - English
Page 54
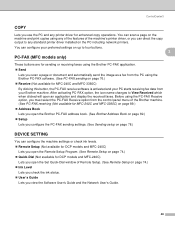
... starts receiving fax data from the control panel menu of the Brother machine. (See PC-FAX receiving (Not available for MFC-240C and MFC-3360C) on page 89.) „ Address Book Lets you open the Brother PC-FAX address book. (See Brother Address Book on page 82.) „ Setup Lets you configure... the PC-FAX sending settings. (See Sending setup on page 78.) DEVICE SETTING 3 You can configure the machine settings or check ink...
... starts receiving fax data from the control panel menu of the Brother machine. (See PC-FAX receiving (Not available for MFC-240C and MFC-3360C) on page 89.) „ Address Book Lets you open the Brother PC-FAX address book. (See Brother Address Book on page 82.) „ Setup Lets you configure... the PC-FAX sending settings. (See Sending setup on page 78.) DEVICE SETTING 3 You can configure the machine settings or check ink...
Software & Network Users Manual - English
Page 72
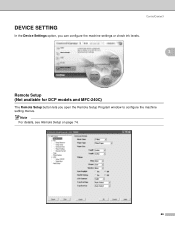
Note For details, see Remote Setup on page 74. 66 ControlCenter3 DEVICE SETTING 3 In the Device Settings option, you can configure the machine settings or check ink levels. 3 Remote Setup (Not available for DCP models and MFC-240C) 3 The Remote Setup button lets you open the Remote Setup Program window to configure the machine setting menus.
Note For details, see Remote Setup on page 74. 66 ControlCenter3 DEVICE SETTING 3 In the Device Settings option, you can configure the machine settings or check ink levels. 3 Remote Setup (Not available for DCP models and MFC-240C) 3 The Remote Setup button lets you open the Remote Setup Program window to configure the machine setting menus.
Software & Network Users Manual - English
Page 73
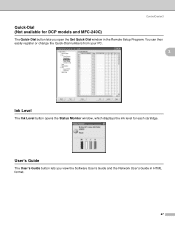
User's Guide 3 The User's Guide button lets you open the Set Quick-Dial window in HTML format. 67 ControlCenter3 Quick-Dial (Not available for each cartridge. You can then easily register or change the Quick-Dial numbers from your PC. 3 Ink Level 3 The Ink Level button opens the Status Monitor window, which displays the ink level for DCP models and MFC-240C) 3 The Quick-Dial button lets you view the Software User's Guide and the Network User's Guide in the Remote Setup Program.
User's Guide 3 The User's Guide button lets you open the Set Quick-Dial window in HTML format. 67 ControlCenter3 Quick-Dial (Not available for each cartridge. You can then easily register or change the Quick-Dial numbers from your PC. 3 Ink Level 3 The Ink Level button opens the Status Monitor window, which displays the ink level for DCP models and MFC-240C) 3 The Quick-Dial button lets you view the Software User's Guide and the Network User's Guide in the Remote Setup Program.
Software & Network Users Manual - English
Page 105
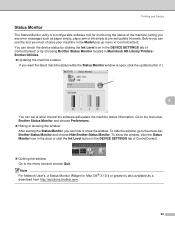
... can hide or show the window, click the Status Monitor icon in the dock or click the Ink Level button in ControlCenter2. To hide the window, go to the menu bar, Brother Status Monitor and choose Preferences. „ Hiding or showing the window After starting the Status Monitor,... the update button (1). 1 8 You can check the device status by clicking the Ink Level icon in the DEVICE SETTINGS tab of ControlCenter2 or by choosing Brother Status Monitor located in Macintosh HD/Library/Printers/ Brother/Utilities. „ Updating the machine's status If you want the latest machine status while...
... can hide or show the window, click the Status Monitor icon in the dock or click the Ink Level button in ControlCenter2. To hide the window, go to the menu bar, Brother Status Monitor and choose Preferences. „ Hiding or showing the window After starting the Status Monitor,... the update button (1). 1 8 You can check the device status by clicking the Ink Level icon in the DEVICE SETTINGS tab of ControlCenter2 or by choosing Brother Status Monitor located in Macintosh HD/Library/Printers/ Brother/Utilities. „ Updating the machine's status If you want the latest machine status while...
Software & Network Users Manual - English
Page 106
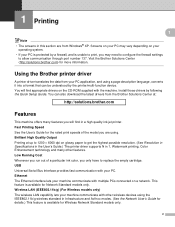
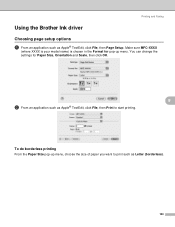
Printing and Faxing Using the Brother Ink driver 8 Choosing page setup options 8 a From an application such as Letter (borderless). 100 You can change the settings for pop-up menu, choose the size of paper you want to start printing. Make sure MFC-XXXX (where XXXX is your model name) is chosen in the Format for Paper Size, Orientation and Scale, then click OK. 8 b From an application such as Apple® TextEdit, click File, then Print to print such as Apple® TextEdit, click File, then Page Setup. To do borderless printing 8 From the Paper Size pop-up menu.
Printing and Faxing Using the Brother Ink driver 8 Choosing page setup options 8 a From an application such as Letter (borderless). 100 You can change the settings for pop-up menu, choose the size of paper you want to start printing. Make sure MFC-XXXX (where XXXX is your model name) is chosen in the Format for Paper Size, Orientation and Scale, then click OK. 8 b From an application such as Apple® TextEdit, click File, then Print to print such as Apple® TextEdit, click File, then Page Setup. To do borderless printing 8 From the Paper Size pop-up menu.


