Network Users Manual - English
Page 1
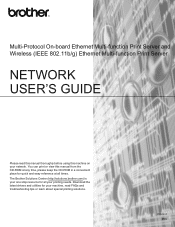
... Print Server NETWORK USER'S GUIDE Please read FAQs and troubleshooting tips or learn about special printing solutions. The Brother Solutions Center (http://solutions.brother.com) is your one stop resource for quick and easy reference at any time, please keep the CD-ROM in a convenient place... for all times. Version A ENG You can print or view this machine on your printing needs. Download the latest drivers and utilities for your machine, read this manual...
... Print Server NETWORK USER'S GUIDE Please read FAQs and troubleshooting tips or learn about special printing solutions. The Brother Solutions Center (http://solutions.brother.com) is your one stop resource for quick and easy reference at any time, please keep the CD-ROM in a convenient place... for all times. Version A ENG You can print or view this machine on your printing needs. Download the latest drivers and utilities for your machine, read this manual...
Network Users Manual - English
Page 2
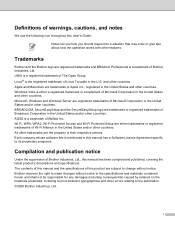
... registered trademark of The Open Group. The contents of this manual and the specifications of this manual has been compiled and published, covering the latest product's descriptions and specifications. Trademarks Brother and the Brother logo are trademarks of Apple Inc., registered in the United ... States and/or other countries. Windows Vista is mentioned in this manual has a Software License Agreement specific to its proprietary programs. Compilation and publication notice Under the supervision of Brother Industries, Ltd., this product are subject to change without notice in...
... registered trademark of The Open Group. The contents of this manual and the specifications of this manual has been compiled and published, covering the latest product's descriptions and specifications. Trademarks Brother and the Brother logo are trademarks of Apple Inc., registered in the United ... States and/or other countries. Windows Vista is mentioned in this manual has a Software License Agreement specific to its proprietary programs. Compilation and publication notice Under the supervision of Brother Industries, Ltd., this product are subject to change without notice in...
Network Users Manual - English
Page 17
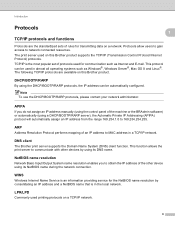
...OS X and Linux®. NetBIOS name resolution 1 Network Basic Input/Output System name resolution enables you do not assign an IP address manually (using the control panel of an IP address to network connected resources. The print server used printing protocols on a TCP/IP network. ...8 LPR/LPD 1 Commonly used on a network. DNS client 1 The Brother print server supports the Domain Name System (DNS) client function. Note To use the DHCP/BOOTP/RARP protocols, please contact your network administrator. ...
...OS X and Linux®. NetBIOS name resolution 1 Network Basic Input/Output System name resolution enables you do not assign an IP address manually (using the control panel of an IP address to network connected resources. The print server used printing protocols on a TCP/IP network. ...8 LPR/LPD 1 Commonly used on a network. DNS client 1 The Brother print server supports the Domain Name System (DNS) client function. Note To use the DHCP/BOOTP/RARP protocols, please contact your network administrator. ...

Network Users Manual - English
Page 38
...-377CW, DCP-593CW, DCP-595CW, DCP-597CW and MFC-495CW Press a or b to choose WLAN. f (For DCP-373CW, DCP-375CW, DCP-377CW, MFC-253CW, MFC-255CW and MFC-257CW) 3 When Change to choose Setup Wizard. is...earlier. j The machine starts to connect to the wireless device you chose Yes, go back to manually add the SSID name. Press OK. or WLAN Enable? If you have to step g. To ...or 1 to the access point and try starting from step a again. If the machine finds more than one network (SSID) use a or b key to choose your machine closer to accept. h Enter the password...
...-377CW, DCP-593CW, DCP-595CW, DCP-597CW and MFC-495CW Press a or b to choose WLAN. f (For DCP-373CW, DCP-375CW, DCP-377CW, MFC-253CW, MFC-255CW and MFC-257CW) 3 When Change to choose Setup Wizard. is...earlier. j The machine starts to connect to the wireless device you chose Yes, go back to manually add the SSID name. Press OK. or WLAN Enable? If you have to step g. To ...or 1 to the access point and try starting from step a again. If the machine finds more than one network (SSID) use a or b key to choose your machine closer to accept. h Enter the password...
Network Users Manual - English
Page 43
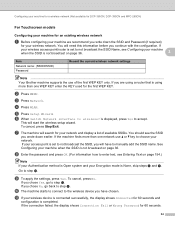
... displayed, press Yes to manually add the SSID name. ...Configuring your machine for a wireless network (Not available for DCP-365CN, DCP-395CN and MFC-295CN) For Touchscreen models 3 Configuring your machine for an existing wireless network 3 a...write down earlier. If you are using a router that is using more than one network use of available SSIDs. e Press Setup Wizard. This will need this information ...3 Item Network name: (SSID/ESSID) Password Record the current wireless network settings Note Your Brother machine supports the use a or b key to not broadcast the SSID Name, see the...
... displayed, press Yes to manually add the SSID name. ...Configuring your machine for a wireless network (Not available for DCP-365CN, DCP-395CN and MFC-295CN) For Touchscreen models 3 Configuring your machine for an existing wireless network 3 a...write down earlier. If you are using a router that is using more than one network use of available SSIDs. e Press Setup Wizard. This will need this information ...3 Item Network name: (SSID/ESSID) Password Record the current wireless network settings Note Your Brother machine supports the use a or b key to not broadcast the SSID Name, see the...
Network Users Manual - English
Page 49
... Connected, the machine has successfully connected to your access point/router and try starting from d again. The machine has detected more than one access point/router has the SecureEasySetup™ mode, the Wi-Fi Protected Setup™ mode or the AOSS™ mode enabled and ... from d again. Please refer to the instruction manual that supports SecureEasySetup™, Wi-Fi Protected Setup™ or AOSS™ for DCP-365CN, DCP-395CN and MFC-295CN) e (For DCP-373CW, DCP-375CW, DCP-377CW, MFC-253CW, MFC-255CW and MFC-257CW) When Change to the default factory settings and...
... Connected, the machine has successfully connected to your access point/router and try starting from d again. The machine has detected more than one access point/router has the SecureEasySetup™ mode, the Wi-Fi Protected Setup™ mode or the AOSS™ mode enabled and ... from d again. Please refer to the instruction manual that supports SecureEasySetup™, Wi-Fi Protected Setup™ or AOSS™ for DCP-365CN, DCP-395CN and MFC-295CN) e (For DCP-373CW, DCP-375CW, DCP-377CW, MFC-253CW, MFC-255CW and MFC-257CW) When Change to the default factory settings and...
Network Users Manual - English
Page 50
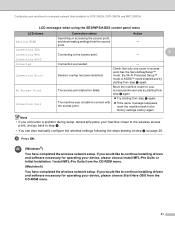
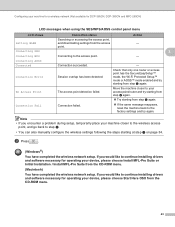
... to your machine for a wireless network (Not available for DCP-365CN, DCP-395CN and MFC-295CN) LCD messages when using the SES/WPS/AOSS control panel menu LCD shows Setting WLAN...®) You have completed the wireless network setup. Connecting to step d. • You can also manually configure the wireless settings following the steps starting from the CD-ROM menu. (Macintosh) You have completed the... wireless network setup. Check that only one router or access point has the SecureEasySetup™ mode, the Wi-Fi Protected Setup™ ...
... to your machine for a wireless network (Not available for DCP-365CN, DCP-395CN and MFC-295CN) LCD messages when using the SES/WPS/AOSS control panel menu LCD shows Setting WLAN...®) You have completed the wireless network setup. Connecting to step d. • You can also manually configure the wireless settings following the steps starting from the CD-ROM menu. (Macintosh) You have completed the... wireless network setup. Check that only one router or access point has the SecureEasySetup™ mode, the Wi-Fi Protected Setup™ ...
Network Users Manual - English
Page 51
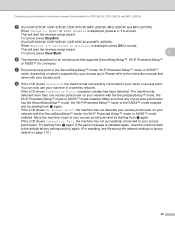
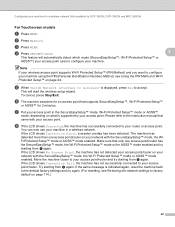
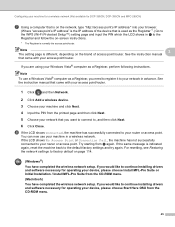
... you want to configure your machine using the PIN (Personal Identification Number) Method, see Restoring the network settings to the instruction manual that only one access point/router on page 44. g Put your access point in a wireless network. Make sure that came with the SecureEasySetup...searches for an access point that supports SecureEasySetup™, Wi-Fi Protected Setup™ or AOSS™ for DCP-365CN, DCP-395CN and MFC-295CN) For Touchscreen models 3 a Press MENU. This will automatically detect which mode (SecureEasySetup™, Wi-Fi Protected Setup™ or...
... you want to configure your machine using the PIN (Personal Identification Number) Method, see Restoring the network settings to the instruction manual that only one access point/router on page 44. g Put your access point in a wireless network. Make sure that came with the SecureEasySetup...searches for an access point that supports SecureEasySetup™, Wi-Fi Protected Setup™ or AOSS™ for DCP-365CN, DCP-395CN and MFC-295CN) For Touchscreen models 3 a Press MENU. This will automatically detect which mode (SecureEasySetup™, Wi-Fi Protected Setup™ or...
Network Users Manual - English
Page 52
... step d again. „ Try starting from step d again. Connection succeeded. Check that only one router or access point has the SecureEasySetup™ mode, the Wi-Fi Protected Setup™ mode...would like to continue installing drivers and software necessary for DCP-365CN, DCP-395CN and MFC-295CN) LCD messages when using the SES/WPS/AOSS control panel menu LCD shows Setting...choose Start Here OSX from the CD-ROM menu. 43 Connecting to step d. • You can also manually configure the wireless settings following the steps starting at step a on page 34. The access point detection ...
... step d again. „ Try starting from step d again. Connection succeeded. Check that only one router or access point has the SecureEasySetup™ mode, the Wi-Fi Protected Setup™ mode...would like to continue installing drivers and software necessary for DCP-365CN, DCP-395CN and MFC-295CN) LCD messages when using the SES/WPS/AOSS control panel menu LCD shows Setting...choose Start Here OSX from the CD-ROM menu. 43 Connecting to step d. • You can also manually configure the wireless settings following the steps starting at step a on page 34. The access point detection ...
Network Users Manual - English
Page 54
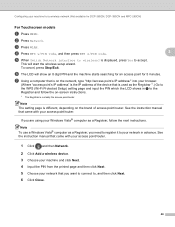
...screen instructions. 1 The Registrar is indicated again, reset the machine back to continue installing drivers and software necessary for DCP-365CN, DCP-395CN and MFC-295CN) g Using a computer that is on the network, type "http://access point's IP address/" into your browser. (Where "access point... 3 The setting page is different, depending on page 114. (Windows®) You have completed the wireless network setup. See the instruction manual that you would like to the default factory settings and try again. h If the LCD shows Connected, the machine has successfully connected to...
...screen instructions. 1 The Registrar is indicated again, reset the machine back to continue installing drivers and software necessary for DCP-365CN, DCP-395CN and MFC-295CN) g Using a computer that is on the network, type "http://access point's IP address/" into your browser. (Where "access point... 3 The setting page is different, depending on page 114. (Windows®) You have completed the wireless network setup. See the instruction manual that you would like to the default factory settings and try again. h If the LCD shows Connected, the machine has successfully connected to...
Network Users Manual - English
Page 55
...the wireless setup wizard. This will show an 8 digit PIN and the machine starts searching for an access point for DCP-365CN, DCP-395CN and MFC-295CN) For Touchscreen models 3 a Press MENU. g Using a computer that is on the brand of the device that you want to connect to... Click Close. 46 Note The setting page is normally the access point/router. b Press Network. To cancel, press Stop/Exit. See the instruction manual that came with your Windows Vista® computer as a Registrar, you need to register it to the Registrar and follow the next instructions. Configuring ...
...the wireless setup wizard. This will show an 8 digit PIN and the machine starts searching for an access point for DCP-365CN, DCP-395CN and MFC-295CN) For Touchscreen models 3 a Press MENU. g Using a computer that is on the brand of the device that you want to connect to... Click Close. 46 Note The setting page is normally the access point/router. b Press Network. To cancel, press Stop/Exit. See the instruction manual that came with your Windows Vista® computer as a Registrar, you need to register it to the Registrar and follow the next instructions. Configuring ...
Network Users Manual - English
Page 62
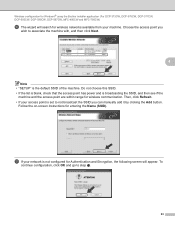
...manually add it by clicking the Add button. k If your network is not configured for Authentication and Encryption, the following screen will search for wireless networks available from your access point is set to not broadcast the SSID you wish to step m. 53 Wireless configuration for Windows® using the Brother... installer application (For DCP-373CW, DCP-375CW, DCP-377CW, DCP-593CW, DCP-595CW, DCP-597CW, MFC-495CW and MFC-795CW) j The wizard will appear. To continue configuration, click OK and ...
...manually add it by clicking the Add button. k If your network is not configured for Authentication and Encryption, the following screen will search for wireless networks available from your access point is set to not broadcast the SSID you wish to step m. 53 Wireless configuration for Windows® using the Brother... installer application (For DCP-373CW, DCP-375CW, DCP-377CW, DCP-593CW, DCP-595CW, DCP-597CW, MFC-495CW and MFC-795CW) j The wizard will appear. To continue configuration, click OK and ...

Network Users Manual - English
Page 63
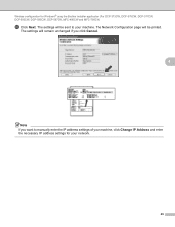
... Note • If you click Cancel. The Network Configuration page will be printed.The settings will remain unchanged if you want to manually enter the IP address settings of your machine, click Change IP Address and enter the necessary IP address settings for Windows® using the... Brother installer application (For DCP-373CW, DCP-375CW, DCP-377CW, DCP-593CW, DCP-595CW, DCP-597CW, MFC-495CW and MFC-795CW) l Then enter the Network Key and Confirm Network Key, and then click Next. 4 ...
... Note • If you click Cancel. The Network Configuration page will be printed.The settings will remain unchanged if you want to manually enter the IP address settings of your machine, click Change IP Address and enter the necessary IP address settings for Windows® using the... Brother installer application (For DCP-373CW, DCP-375CW, DCP-377CW, DCP-593CW, DCP-595CW, DCP-597CW, MFC-495CW and MFC-795CW) l Then enter the Network Key and Confirm Network Key, and then click Next. 4 ...
Network Users Manual - English
Page 68
...; (PIN Method) and you confirm the wireless setting is supported by your machine using the Brother installer application (For DCP-373CW, DCP-375CW, DCP-377CW, DCP-593CW, DCP-595CW, DCP-597CW, MFC-495CW and MFC-795CW) g Read the Important Notice. Please refer to choose WLAN and then press OK. ...Press WLAN and then press SES/WPS/AOSS. Press a or b to the instruction manual that supports SecureEasySetup™, Wi-Fi Protected Setup™ or...
...; (PIN Method) and you confirm the wireless setting is supported by your machine using the Brother installer application (For DCP-373CW, DCP-375CW, DCP-377CW, DCP-593CW, DCP-595CW, DCP-597CW, MFC-495CW and MFC-795CW) g Read the Important Notice. Please refer to choose WLAN and then press OK. ...Press WLAN and then press SES/WPS/AOSS. Press a or b to the instruction manual that supports SecureEasySetup™, Wi-Fi Protected Setup™ or...

Network Users Manual - English
Page 77
Wireless configuration for Windows® using the Brother installer application (For DCP-373CW, DCP-375CW, DCP-377CW, DCP-593CW, DCP-595CW, DCP-597CW, MFC-495CW and MFC-795CW) Note • If the list is blank, check if the machine is not configured for wireless communication. To continue configuration, click OK and go ... the Name (SSID) and the Channel number, and then click Next. 4 m If your target Ad-hoc network does not appear on the list, you can manually add it by clicking the Add button.
Wireless configuration for Windows® using the Brother installer application (For DCP-373CW, DCP-375CW, DCP-377CW, DCP-593CW, DCP-595CW, DCP-597CW, MFC-495CW and MFC-795CW) Note • If the list is blank, check if the machine is not configured for wireless communication. To continue configuration, click OK and go ... the Name (SSID) and the Channel number, and then click Next. 4 m If your target Ad-hoc network does not appear on the list, you can manually add it by clicking the Add button.
Network Users Manual - English
Page 78
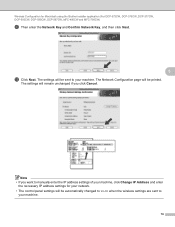
The Network Configuration page will be sent to manually enter the IP address settings of your machine, click Change IP Address and enter the necessary IP address settings for Windows® using the Brother installer application (For DCP-373CW, DCP-375CW, DCP-377CW, DCP-593CW, DCP-595CW, DCP-597CW, MFC-495CW and MFC-795CW) o Click Next. The settings will remain unchanged if you click Cancel. 4 Note If you want to your machine. Wireless configuration for your network. 69 The settings will be printed.
The Network Configuration page will be sent to manually enter the IP address settings of your machine, click Change IP Address and enter the necessary IP address settings for Windows® using the Brother installer application (For DCP-373CW, DCP-375CW, DCP-377CW, DCP-593CW, DCP-595CW, DCP-597CW, MFC-495CW and MFC-795CW) o Click Next. The settings will remain unchanged if you click Cancel. 4 Note If you want to your machine. Wireless configuration for your network. 69 The settings will be printed.
Network Users Manual - English
Page 80
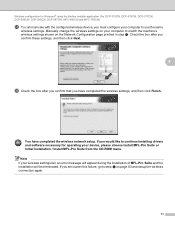
... Finish. If you would like to continue installing drivers and software necessary for Windows® using the Brother installer application (For DCP-373CW, DCP-375CW, DCP-377CW, DCP-593CW, DCP-595CW, DCP-597CW, MFC-495CW and MFC-795CW) r To communicate with the configured wireless device, you encounter this failure, go to match the... MFL-Pro Suite and the installation will be terminated. Note If your computer to step e on page 63 and setup the wireless connection again. 71 Manually change the wireless settings on the Network Configuration page printied in step o.
... Finish. If you would like to continue installing drivers and software necessary for Windows® using the Brother installer application (For DCP-373CW, DCP-375CW, DCP-377CW, DCP-593CW, DCP-595CW, DCP-597CW, MFC-495CW and MFC-795CW) r To communicate with the configured wireless device, you encounter this failure, go to match the... MFL-Pro Suite and the installation will be terminated. Note If your computer to step e on page 63 and setup the wireless connection again. 71 Manually change the wireless settings on the Network Configuration page printied in step o.

Network Users Manual - English
Page 86
... and Encryption, the following screen will search for entering the Name (SSID). Choose the access point you wish to not broadcast the SSID you can manually add it by clicking the Add button. To continue installation, click OK and go to step m. 77 Wireless Configuration for Macintosh using the...
... and Encryption, the following screen will search for entering the Name (SSID). Choose the access point you wish to not broadcast the SSID you can manually add it by clicking the Add button. To continue installation, click OK and go to step m. 77 Wireless Configuration for Macintosh using the...
Network Users Manual - English
Page 87
... will be printed. The settings will remain unchanged if you want to manually enter the IP address settings of your machine, click Change IP Address and enter the necessary IP address settings for Macintosh using the Brother installer application (For DCP-373CW, DCP-375CW, DCP-377CW, DCP-593CW..., DCP-595CW, DCP-597CW, MFC-495CW and MFC-795CW) l Then enter the Network Key and Confirm Network Key, and then click Next....
... will be printed. The settings will remain unchanged if you want to manually enter the IP address settings of your machine, click Change IP Address and enter the necessary IP address settings for Macintosh using the Brother installer application (For DCP-373CW, DCP-375CW, DCP-377CW, DCP-593CW..., DCP-595CW, DCP-597CW, MFC-495CW and MFC-795CW) l Then enter the Network Key and Confirm Network Key, and then click Next....
Network Users Manual - English
Page 92
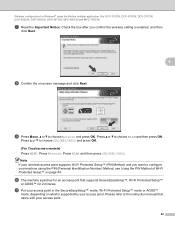
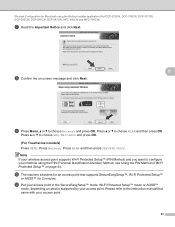
...press OK. Press a or b to choose Network and press OK. Press WLAN and then press SES/WPS/AOSS. Press a or b to the instruction manual that supports SecureEasySetup™, Wi-Fi Protected Setup™ or AOSS™ for 2 minutes. k Put your access point in the SecureEasySetup™ mode, Wi...8482; mode or AOSS™ mode, depending on what is supported by your machine using the Brother installer application (For DCP-373CW, DCP-375CW, DCP-377CW, DCP-593CW, DCP-595CW, DCP-597CW, MFC-495CW and MFC-795CW) g Read the Important Notice and click Next. 5 h Confirm the on-screen message and...
...press OK. Press a or b to choose Network and press OK. Press WLAN and then press SES/WPS/AOSS. Press a or b to the instruction manual that supports SecureEasySetup™, Wi-Fi Protected Setup™ or AOSS™ for 2 minutes. k Put your access point in the SecureEasySetup™ mode, Wi...8482; mode or AOSS™ mode, depending on what is supported by your machine using the Brother installer application (For DCP-373CW, DCP-375CW, DCP-377CW, DCP-593CW, DCP-595CW, DCP-597CW, MFC-495CW and MFC-795CW) g Read the Important Notice and click Next. 5 h Confirm the on-screen message and...


