

Software & Network Users Manual - English
Page 29
... steps may vary when using from the Scanner drop-down list. Note • For Windows® XP: Choose TW-Brother MFC-XXXX USB or TW-Brother MFC-XXXX LAN. • For other software applications. c Choose the scanner you use ScanSoft® PaperPort® SE. ...Scanning Accessing the Scanner 2 a Start the ScanSoft® PaperPort® SE software that was installed during the MFL-Pro Suite installation to scan a document. 2 Note The instructions...
... steps may vary when using from the Scanner drop-down list. Note • For Windows® XP: Choose TW-Brother MFC-XXXX USB or TW-Brother MFC-XXXX LAN. • For other software applications. c Choose the scanner you use ScanSoft® PaperPort® SE. ...Scanning Accessing the Scanner 2 a Start the ScanSoft® PaperPort® SE software that was installed during the MFL-Pro Suite installation to scan a document. 2 Note The instructions...

Software & Network Users Manual - English
Page 35
...PaperPort® SE. The Scan dialog box appears: 29 Scanning Scanning a document using from other applications that support WIA or TWAIN scanning. Note The instructions for scanning in this Guide are using the WIA driver (Windows® XP only) 2 2 WIA compliant 2 For Windows® XP you can ...c Choose the scanner you are based on the left side of the screen. b Click File, then Scan. Note • Choose WIA-Brother MFC-XXXX USB or WIA-Brother MFC-XXXX LAN (Where XXXX is your model name). • If you can choose Windows® Image Acquisition (WIA) when scanning images. ...
...PaperPort® SE. The Scan dialog box appears: 29 Scanning Scanning a document using from other applications that support WIA or TWAIN scanning. Note The instructions for scanning in this Guide are using the WIA driver (Windows® XP only) 2 2 WIA compliant 2 For Windows® XP you can ...c Choose the scanner you are based on the left side of the screen. b Click File, then Scan. Note • Choose WIA-Brother MFC-XXXX USB or WIA-Brother MFC-XXXX LAN (Where XXXX is your model name). • If you can choose Windows® Image Acquisition (WIA) when scanning images. ...
Software & Network Users Manual - English
Page 74
...) or by a firewall and is unable to scan, you may need to configure the firewall settings to 2 PCs on a network. To buy the Brother NL-5 pack which is protected by using Network Scanning 4 Network license 4 This product includes a PC license for up to use the machine as a ...-Pro Software Suite including ScanSoft® PaperPort® SE on up to one machine on the network. Before using the BRAdmin Professional software. If you want to 2 Users. If you installed the machine following the instructions for a network user in the Quick Setup Guide then the machine should...
...) or by a firewall and is unable to scan, you may need to configure the firewall settings to 2 PCs on a network. To buy the Brother NL-5 pack which is protected by using Network Scanning 4 Network license 4 This product includes a PC license for up to use the machine as a ...-Pro Software Suite including ScanSoft® PaperPort® SE on up to one machine on the network. Before using the BRAdmin Professional software. If you want to 2 Users. If you installed the machine following the instructions for a network user in the Quick Setup Guide then the machine should...
Software & Network Users Manual - English
Page 100
... a name for the volume label of the media card, this name appears instead of the machine. 7 PhotoCapture Center® (Not available for MFC-3360C) 7 CAUTION DO NOT start your PC with a media card installed in first. • While the machine is stored on the stick cannot... This product supports xD-Picture Card™ Type M/Type H (Large Capacity). You could lose your PC cannot access the PhotoCapture Center® for installation instructions. You can be used, but any other operation. For USB cable users 7 7 Note For Windows® 2000 users, to another drive on your PC...
... a name for the volume label of the media card, this name appears instead of the machine. 7 PhotoCapture Center® (Not available for MFC-3360C) 7 CAUTION DO NOT start your PC with a media card installed in first. • While the machine is stored on the stick cannot... This product supports xD-Picture Card™ Type M/Type H (Large Capacity). You could lose your PC cannot access the PhotoCapture Center® for installation instructions. You can be used, but any other operation. For USB cable users 7 7 Note For Windows® 2000 users, to another drive on your PC...

Users Manual - English
Page 4
... hours a day, 7 days a week. Service Center Locations (Canada only) For the location of a Brother authorized service center, call 1-800-284-4357. You can get instant answers to receive faxed instructions and an Index of a Brother authorized service center, call 1-877-BROTHER. For Customer Service In USA: In Canada: 1-800-284-4329 (voice) 1-901-379...
... hours a day, 7 days a week. Service Center Locations (Canada only) For the location of a Brother authorized service center, call 1-800-284-4357. You can get instant answers to receive faxed instructions and an Index of a Brother authorized service center, call 1-877-BROTHER. For Customer Service In USA: In Canada: 1-800-284-4329 (voice) 1-901-379...
Users Manual - English
Page 8
...If the Machine and/or accompanying Consumable and Accessory Items are not followed and has caused damage to this warranty. Brother® One Year Limited Warranty and Replacement Service (USA only) discretion. The replacement Machine you provide a valid major credit card... MODEL OR SAMPLE. has not been sufficiently validated with the instructions provided by the courier. The repaired or replacement Machine and/or accompanying Consumable and Accessory Items will be returned to the manufacturer's specifications for this Product. © 2003 Brother International Corporation vi
...If the Machine and/or accompanying Consumable and Accessory Items are not followed and has caused damage to this warranty. Brother® One Year Limited Warranty and Replacement Service (USA only) discretion. The replacement Machine you provide a valid major credit card... MODEL OR SAMPLE. has not been sufficiently validated with the instructions provided by the courier. The repaired or replacement Machine and/or accompanying Consumable and Accessory Items will be returned to the manufacturer's specifications for this Product. © 2003 Brother International Corporation vi
Users Manual - English
Page 14
Section V Software 13 Software features Section VI Appendixes A Safety and Legal Choosing a location 72 To use the machine safely 73 Important safety instructions 76 Standard telephone and FCC Notices (These notices are in effect on models sold and used in the United States only 77 Federal Communications Commission (...
Section V Software 13 Software features Section VI Appendixes A Safety and Legal Choosing a location 72 To use the machine safely 73 Important safety instructions 76 Standard telephone and FCC Notices (These notices are in effect on models sold and used in the United States only 77 Federal Communications Commission (...

Users Manual - English
Page 18
If you have not installed the software, you are ready to Brother, MFC-240C from the Start menu, point to learn detailed information about the machine such as how to use Windows® Explorer to view the Software User's ...-ROM. c If the language screen appears, click your CD-ROM drive. Insert the Brother CD-ROM labeled Windows® into your language. The CD-ROM main menu will appear. When you can find the documentation by following the instructions below: a Turn on the CD-ROM. Viewing Documentation 1 Viewing Documentation (For Windows®...
If you have not installed the software, you are ready to Brother, MFC-240C from the Start menu, point to learn detailed information about the machine such as how to use Windows® Explorer to view the Software User's ...-ROM. c If the language screen appears, click your CD-ROM drive. Insert the Brother CD-ROM labeled Windows® into your language. The CD-ROM main menu will appear. When you can find the documentation by following the instructions below: a Turn on the CD-ROM. Viewing Documentation 1 Viewing Documentation (For Windows®...

Users Manual - English
Page 19
...; X 10.2.4 or greater) „ ControlCenter2 (For Mac OS® X 10.2.4 or greater) Presto!® PageManager® User's Guide „ Instructions for scanning directly from Presto!® PageManager®. Viewing Documentation (For Macintosh®) 1 a Turn on your language folder. c Double-click your Macintosh®...® User's Guide can be viewed from the Help selection in the ScanSoft® PaperPort® SE with OCR. Insert the Brother CD-ROM labeled Macintosh® into your CD-ROM drive. e Click the documentation you want to read. „ Software User's...
...; X 10.2.4 or greater) „ ControlCenter2 (For Mac OS® X 10.2.4 or greater) Presto!® PageManager® User's Guide „ Instructions for scanning directly from Presto!® PageManager®. Viewing Documentation (For Macintosh®) 1 a Turn on your language folder. c Double-click your Macintosh®...® User's Guide can be viewed from the Help selection in the ScanSoft® PaperPort® SE with OCR. Insert the Brother CD-ROM labeled Macintosh® into your CD-ROM drive. e Click the documentation you want to read. „ Software User's...
Users Manual - English
Page 25
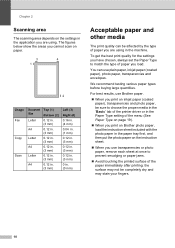
...Type setting of paper you are using in the paper tray first, and then put the photo paper on the instruction sheet. „ When you print on Brother photo paper, load the instruction sheet included with the photo paper in the machine. You can be affected by the type of the menu (...See Paper Type on page 19). „ When you use plain paper, inkjet paper (coated paper), photo paper, transparencies and envelopes. We ...
...Type setting of paper you are using in the paper tray first, and then put the photo paper on the instruction sheet. „ When you print on Brother photo paper, load the instruction sheet included with the photo paper in the machine. You can be affected by the type of the menu (...See Paper Type on page 19). „ When you use plain paper, inkjet paper (coated paper), photo paper, transparencies and envelopes. We ...
Users Manual - English
Page 34
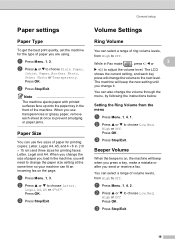
...the volume to Off. The machine will keep the new setting until you send or receive a fax. Press OK. b Press a or b to choose Plain Paper, Inkjet Paper, Brother Photo, Other Photo or Transparency. c Press Stop/Exit. 19 b Press a or b to choose Letter, Legal, A4, A5 or 4"×6". a Press Menu, 1,...each key press will beep when you press a key, make a mistake or after you change the volume through the menu, by following the instructions below: Setting the Ring Volume from High to adjust the volume level. You can also change it. You can select a range of the...
...the volume to Off. The machine will keep the new setting until you send or receive a fax. Press OK. b Press a or b to choose Plain Paper, Inkjet Paper, Brother Photo, Other Photo or Transparency. c Press Stop/Exit. 19 b Press a or b to choose Letter, Legal, A4, A5 or 4"×6". a Press Menu, 1,...each key press will beep when you press a key, make a mistake or after you change the volume through the menu, by following the instructions below: Setting the Ring Volume from High to adjust the volume level. You can also change it. You can select a range of the...

Users Manual - English
Page 45
... Do you connecting an external telephone or external telephone answering device to the machine? No Fax/Tel External TAD To set a receive mode follow the instructions below will display the current receive mode. 12/10 11:53 Fax 1 1 Current receive mode Fax: Fax Only 30 Yes Do you choose the correct...
... Do you connecting an external telephone or external telephone answering device to the machine? No Fax/Tel External TAD To set a receive mode follow the instructions below will display the current receive mode. 12/10 11:53 Fax 1 1 Current receive mode Fax: Fax Only 30 Yes Do you choose the correct...

Users Manual - English
Page 49
b Press # on the control panel of your machine. If no one is off . Fax/Tel mode does not work in Fax/Tel mode, it will work when the power key is off . (See On/Off setting ... to send you a fax, send the call . When you hang up a voice call back to send tone signals (for example, for telephone banking), follow the instructions below. Fax/Tel mode when the power key is on the line, or if someone wants to send you a fax, activate the machine by pressing...
b Press # on the control panel of your machine. If no one is off . Fax/Tel mode does not work in Fax/Tel mode, it will work when the power key is off . (See On/Off setting ... to send you a fax, send the call . When you hang up a voice call back to send tone signals (for example, for telephone banking), follow the instructions below. Fax/Tel mode when the power key is on the line, or if someone wants to send you a fax, activate the machine by pressing...

Users Manual - English
Page 53
... the telephone line cord from the external TAD into a wall jack, both your TAD into the jack labeled LINE. Make sure you carefully follow the instructions in this cord is two rings). Note • If you do not recommend using the toll saver feature on your machine, and use the Toll...
... the telephone line cord from the external TAD into a wall jack, both your TAD into the jack labeled LINE. Make sure you carefully follow the instructions in this cord is two rings). Note • If you do not recommend using the toll saver feature on your machine, and use the Toll...

Users Manual - English
Page 60
...GROUP column. (See How to change the stored number and name, or enter a new one large Group. You can have finished adding numbers. Press OK. Press OK. Note You can assign up a SpeedDial location. Follow the instructions below : For example, for the Group. Re-enter the character. Press OK. Setup ...Group:G01 d To add Speed-Dial numbers follow the instructions below : a Enter a new number. Press OK. You can then send the fax message to all your Speed-Dial numbers. Numbers that has been ...
...GROUP column. (See How to change the stored number and name, or enter a new one large Group. You can have finished adding numbers. Press OK. Press OK. Note You can assign up a SpeedDial location. Follow the instructions below : For example, for the Group. Re-enter the character. Press OK. Setup ...Group:G01 d To add Speed-Dial numbers follow the instructions below : a Enter a new number. Press OK. You can then send the fax message to all your Speed-Dial numbers. Numbers that has been ...

Users Manual - English
Page 66
...returns the machine to quickly change the copy settings temporarily for each feature. 51 of copies: 01 (01 - 99) Note You can find instructions on page 18. Making copies Press Menu Options Page selection/ Quality Normal 52 Fast Best Enlarge/ Reduce 50%/69%/78%/83 52 %/93%/97...%/100%/ 104%/142%/186% /198%/200%/ Custom(25- 400%) Paper Type Plain Paper 56 Inkjet Paper Brother Photo Other Photo Transparency Paper Size Letter 56 Legal A4 A5 4"(W)× 6"(H) Brightness - nnonn + Stack/ Sort Stack Sort 55 54 10 Page Layout...
...returns the machine to quickly change the copy settings temporarily for each feature. 51 of copies: 01 (01 - 99) Note You can find instructions on page 18. Making copies Press Menu Options Page selection/ Quality Normal 52 Fast Best Enlarge/ Reduce 50%/69%/78%/83 52 %/93%/97...%/100%/ 104%/142%/186% /198%/200%/ Custom(25- 400%) Paper Type Plain Paper 56 Inkjet Paper Brother Photo Other Photo Transparency Paper Size Letter 56 Legal A4 A5 4"(W)× 6"(H) Brightness - nnonn + Stack/ Sort Stack Sort 55 54 10 Page Layout...

Users Manual - English
Page 67
... Copy Options and a or b to be proof-read, large documents or many copies. f Press Black Start or Color Start. To change the quality setting, follow the instruction below: Press Copy Options Normal Normal is Normal. c Press Stop/Exit. b Load your document. Fast Fast copy ... of quality settings. d Press Copy Options and a or b to choose Normal, Best or Fast. To temporarily change the default setting, follow the instruction below : a Press Menu, 3, 1. 1.Quality 52 b Press a or b to 400%. Press OK. Enlarging or reducing the image copied 10 You...
... Copy Options and a or b to be proof-read, large documents or many copies. f Press Black Start or Color Start. To change the quality setting, follow the instruction below: Press Copy Options Normal Normal is Normal. c Press Stop/Exit. b Load your document. Fast Fast copy ... of quality settings. d Press Copy Options and a or b to choose Normal, Best or Fast. To temporarily change the default setting, follow the instruction below : a Press Menu, 3, 1. 1.Quality 52 b Press a or b to 400%. Press OK. Enlarging or reducing the image copied 10 You...

Users Manual - English
Page 70
...or b to choose the next color. „ Press Stop/Exit. 55 To change the brightness setting, follow the instructions below : 10 „ Return to b to make the copy lighter or darker. The contrast can only be changed through the default setting. Press OK. d Choose one of copies (up to enter... Brightness. Press OK. d Press Copy Options and a or b to make the copy lighter or darker. Making copies Adjusting Brightness, Contrast and Color 10 Brightness 10 To temporarily change the default setting follow the instruction below: a Make sure you are in Copy mode .
...or b to choose the next color. „ Press Stop/Exit. 55 To change the brightness setting, follow the instructions below : 10 „ Return to b to make the copy lighter or darker. The contrast can only be changed through the default setting. Press OK. d Choose one of copies (up to enter... Brightness. Press OK. d Press Copy Options and a or b to make the copy lighter or darker. Making copies Adjusting Brightness, Contrast and Color 10 Brightness 10 To temporarily change the default setting follow the instruction below: a Make sure you are in Copy mode .

Users Manual - English
Page 75
... a or b to choose Print Index. Chapter 11 How to print from your media card: a Make sure you print a thumbnail page, it . Follow the instructions below to start printing directly from a media card 11 Before printing a photo you must first print a thumbnail index to choose the number of the pictures.... c Press a or b to print. 60 Printing the thumbnail index 11 The PhotoCapture Center® assigns each of the image printed. d Press Color Start to choose Print Index and then press OK. See Printing Images on your media card and the number assigned to start printing the index...
... a or b to choose Print Index. Chapter 11 How to print from your media card: a Make sure you print a thumbnail page, it . Follow the instructions below to start printing directly from a media card 11 Before printing a photo you must first print a thumbnail index to choose the number of the pictures.... c Press a or b to print. 60 Printing the thumbnail index 11 The PhotoCapture Center® assigns each of the image printed. d Press Color Start to choose Print Index and then press OK. See Printing Images on your media card and the number assigned to start printing the index...
Users Manual - English
Page 77
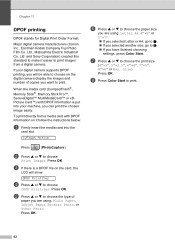
...Canon Inc., Eastman Kodak Company Fuji Photo Film Co. If your machine, you are using , Plain Paper, Inkjet Paper, Brother Photo, or Other Photo. b Press a or b to choose the print size (4"×3", 5"×3.5", ...to h. „ If you want to choose the type of copies you have finished choosing settings, press Color Start. g Press a or b to choose Print Images. When the media card (CompactFlash®, Memory...LCD will show: DPOF Print:Yes d Press a or b to make it follow the instructions below: a Firmly insert the media card into your digital camera supports DPOF printing, you will...
...Canon Inc., Eastman Kodak Company Fuji Photo Film Co. If your machine, you are using , Plain Paper, Inkjet Paper, Brother Photo, or Other Photo. b Press a or b to choose the print size (4"×3", 5"×3.5", ...to h. „ If you want to choose the type of copies you have finished choosing settings, press Color Start. g Press a or b to choose Print Images. When the media card (CompactFlash®, Memory...LCD will show: DPOF Print:Yes d Press a or b to make it follow the instructions below: a Firmly insert the media card into your digital camera supports DPOF printing, you will...


