

Users Manual - English
Page 4
... occurs or adjustment is used . • Always consult the operation manual when replacing or installing any adjustments in the needle area. • Do not use a damaged or incorrect needle plate, as it could cause the needle to break. • Do not push or pull the fabric when sewing, and follow the troubleshooting table in this manual and specifications of the operation manual to the needle. Do not use or store the machine near children...
... occurs or adjustment is used . • Always consult the operation manual when replacing or installing any adjustments in the needle area. • Do not use a damaged or incorrect needle plate, as it could cause the needle to break. • Do not push or pull the fabric when sewing, and follow the troubleshooting table in this manual and specifications of the operation manual to the needle. Do not use or store the machine near children...
Users Manual - English
Page 6
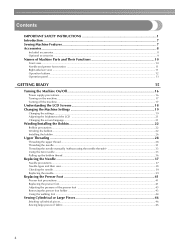
... the needle ...31 Threading the needle manually (without using the needle threader 33 Using the twin needle ...33 Pulling up the bobbin thread...36 Replacing the Needle ...37 Needle precautions ...37 Needle types and their uses...38 Checking the needle ...39 Replacing the needle...39 Replacing the Presser Foot 41 Presser foot precautions ...41 Replacing the presser foot ...41 Adjusting the pressure of the presser foot ...43 Removing the presser foot holder ...43 Using the walking foot ...44 Sewing Cylindrical or Large Pieces 46 Stitching cylindrical pieces...46 Sewing large pieces of fabric...
... the needle ...31 Threading the needle manually (without using the needle threader 33 Using the twin needle ...33 Pulling up the bobbin thread...36 Replacing the Needle ...37 Needle precautions ...37 Needle types and their uses...38 Checking the needle ...39 Replacing the needle...39 Replacing the Presser Foot 41 Presser foot precautions ...41 Replacing the presser foot ...41 Adjusting the pressure of the presser foot ...43 Removing the presser foot holder ...43 Using the walking foot ...44 Sewing Cylindrical or Large Pieces 46 Stitching cylindrical pieces...46 Sewing large pieces of fabric...
Users Manual - English
Page 7
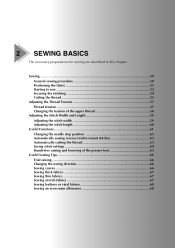
... Adjusting the Stitch Width and Length 59 Adjusting the stitch width ...59 Adjusting the stitch length ...60 Useful Functions...61 Changing the needle stop position ...61 Automatically sewing reverse/reinforcement stitches 61 Automatically cutting the thread ...63 Saving stitch settings ...64 Hands-free raising and lowering of the presser foot 65 Useful Sewing Tips ...66 Trial sewing ...66 Changing the sewing direction ...66 Sewing curves ...66 Sewing thick fabrics ...67 Sewing thin fabrics...67 Sewing stretch fabrics...67 Sewing leathers or vinyl fabrics ...68 Sewing an even seam allowance...
... Adjusting the Stitch Width and Length 59 Adjusting the stitch width ...59 Adjusting the stitch length ...60 Useful Functions...61 Changing the needle stop position ...61 Automatically sewing reverse/reinforcement stitches 61 Automatically cutting the thread ...63 Saving stitch settings ...64 Hands-free raising and lowering of the presser foot 65 Useful Sewing Tips ...66 Trial sewing ...66 Changing the sewing direction ...66 Sewing curves ...66 Sewing thick fabrics ...67 Sewing thin fabrics...67 Sewing stretch fabrics...67 Sewing leathers or vinyl fabrics ...68 Sewing an even seam allowance...
Users Manual - English
Page 9
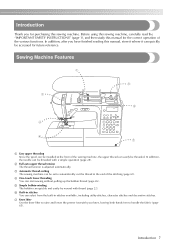
d One-touch lower threading You can select from the built-in stitches available, including utility stitches, character stitches and decorative stitches. e Simple bobbin-winding The bobbin can quickly and easily be wound with your knee, leaving both hands free to handle the fabric (page 65). Sewing Machine Features a Easy upper threading Since the spool can be threaded with a simple operation (page 28). b Full auto upper thread tension The thread tension is adjusted automatically. Introduction 7 Introduction Thank you...
d One-touch lower threading You can select from the built-in stitches available, including utility stitches, character stitches and decorative stitches. e Simple bobbin-winding The bobbin can quickly and easily be wound with your knee, leaving both hands free to handle the fabric (page 65). Sewing Machine Features a Easy upper threading Since the spool can be threaded with a simple operation (page 28). b Full auto upper thread tension The thread tension is adjusted automatically. Introduction 7 Introduction Thank you...

Users Manual - English
Page 11
... service center. Part Name 1 Buttonhole foot "A" XC2691-023 21 Cleaning brush 2 Overcasting foot "G" XE6305-101 22 Eyelet punch 3 Monogramming foot "N" XD0810-031 23 Screwdriver (large) 4 Zipper foot "I" X59370-021 24 Screwdriver (small) 5 Zigzag foot "J" (on machine) XC3021-031 25 Spool cap (large) 6 Blind stitch foot "R" XE2650-001 26 Spool cap (medium)(2) 7 Button fitting foot "M" XE2643-001 27 Spool cap (small) 8 Walking foot SA140 F033N (XC2214-002) 28 Extra spool pin 9 Quilting foot SA129 F005N (XC1948-002) 29 Spool...
... service center. Part Name 1 Buttonhole foot "A" XC2691-023 21 Cleaning brush 2 Overcasting foot "G" XE6305-101 22 Eyelet punch 3 Monogramming foot "N" XD0810-031 23 Screwdriver (large) 4 Zipper foot "I" X59370-021 24 Screwdriver (small) 5 Zigzag foot "J" (on machine) XC3021-031 25 Spool cap (large) 6 Blind stitch foot "R" XE2650-001 26 Spool cap (medium)(2) 7 Button fitting foot "M" XE2643-001 27 Spool cap (small) 8 Walking foot SA140 F033N (XC2214-002) 28 Extra spool pin 9 Quilting foot SA129 F005N (XC1948-002) 29 Spool...
Users Manual - English
Page 13
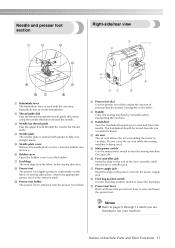
... help sew straight seams. e Needle plate cover Remove the needle plate cover to create buttonholes. d Needle plate The needle plate is marked with the one-step buttonhole foot to clean the bobbin case and race. The handwheel should be turned towards you to thread the needle. Memo z Refer to pages 9 through the thread guide disk when using the needle threader to raise and lower the needle. Names of pressure that the presser foot applies to adjust the amount of Machine Parts and Their Functions 11 a Presser foot dial Use the presser foot dial...
... help sew straight seams. e Needle plate cover Remove the needle plate cover to create buttonholes. d Needle plate The needle plate is marked with the one-step buttonhole foot to clean the bobbin case and race. The handwheel should be turned towards you to thread the needle. Memo z Refer to pages 9 through the thread guide disk when using the needle threader to raise and lower the needle. Names of pressure that the presser foot applies to adjust the amount of Machine Parts and Their Functions 11 a Presser foot dial Use the presser foot dial...
Users Manual - English
Page 14
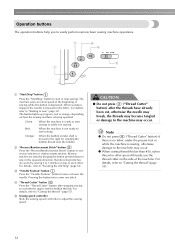
... button is depressed. a "Start/Stop" button Press the "Start/Stop" button to start or stop sewing. When sewing is stopped, the needle is moved to the right for winding the bobbin thread onto the bobbin b "Reverse/Reinforcement Stitch" button Press the "Reverse/Reinforcement Stitch" button to adjust the sewing speed. For details, refer to "Starting to raise or lower the needle. c "Needle Position" button Press the "Needle Position" button to sew" (page 52). The machine sews at a slow speed at the beginning of the machine. Operation buttons The operation buttons help...
... button is depressed. a "Start/Stop" button Press the "Start/Stop" button to start or stop sewing. When sewing is stopped, the needle is moved to the right for winding the bobbin thread onto the bobbin b "Reverse/Reinforcement Stitch" button Press the "Reverse/Reinforcement Stitch" button to adjust the sewing speed. For details, refer to "Starting to raise or lower the needle. c "Needle Position" button Press the "Needle Position" button to sew" (page 52). The machine sews at a slow speed at the beginning of the machine. Operation buttons The operation buttons help...
Users Manual - English
Page 15
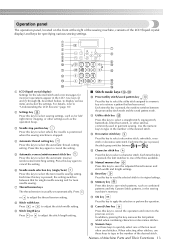
... the automatic reverse/ reinforcement stitching setting. i Stitch length keys Press or to adjust the stitch length setting. 7 9 8 D E F G I ■ Stitch mode keys (j-m) j Preset utility stitch/saved pattern key Press this key to retrieve a pattern that for single needle sewing and for incorrect operations appear in the sewing machine's memory. d Automatic thread cutting key Press this key to select a straight stitch, zigzag stitch, buttonhole, blind hem stitch, or other stitches, use these keys to type in garment sewing. s Numeric keys Use these keys to quickly...
... the automatic reverse/ reinforcement stitching setting. i Stitch length keys Press or to adjust the stitch length setting. 7 9 8 D E F G I ■ Stitch mode keys (j-m) j Preset utility stitch/saved pattern key Press this key to retrieve a pattern that for single needle sewing and for incorrect operations appear in the sewing machine's memory. d Automatic thread cutting key Press this key to select a straight stitch, zigzag stitch, buttonhole, blind hem stitch, or other stitches, use these keys to type in garment sewing. s Numeric keys Use these keys to quickly...
Users Manual - English
Page 17
... thread 28 Threading the needle 31 Threading the needle manually (without using the needle threader 33 Using the twin needle 33 Pulling up the bobbin thread 36 Replacing the Needle 37 Needle precautions 37 Needle types and their uses 38 Checking the needle 39 Replacing the needle 39 Replacing the Presser Foot 41 Presser foot precautions 41 Replacing the presser foot 41 Adjusting the pressure of the presser foot 43 Removing the presser foot holder 43 Using the walking foot 44 Sewing Cylindrical or Large Pieces 46 Stitching cylindrical pieces 46 Sewing large pieces of fabric...
... thread 28 Threading the needle 31 Threading the needle manually (without using the needle threader 33 Using the twin needle 33 Pulling up the bobbin thread 36 Replacing the Needle 37 Needle precautions 37 Needle types and their uses 38 Checking the needle 39 Replacing the needle 39 Replacing the Presser Foot 41 Presser foot precautions 41 Replacing the presser foot 41 Adjusting the pressure of the presser foot 43 Removing the presser foot holder 43 Using the walking foot 44 Sewing Cylindrical or Large Pieces 46 Stitching cylindrical pieces 46 Sewing large pieces of fabric...

Users Manual - English
Page 25
... spool pin. CAUTION ● If the spool or the spool cap is not positioned so that best fits the size of thread for the spool being used , the thread may catch on the sewing machine. Turn on the slit in the spool and the needle may break. • ("Start/Stop" button) lights up in the bobbin. Press down on the shaft fits into place. b Place the bobbin on the bobbin winder shaft...
... spool pin. CAUTION ● If the spool or the spool cap is not positioned so that best fits the size of thread for the spool being used , the thread may catch on the sewing machine. Turn on the slit in the spool and the needle may break. • ("Start/Stop" button) lights up in the bobbin. Press down on the shaft fits into place. b Place the bobbin on the bobbin winder shaft...
Users Manual - English
Page 37
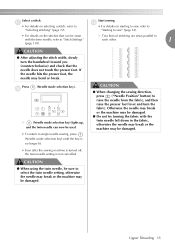
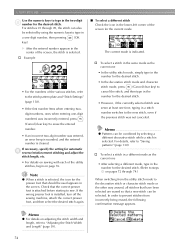
... presser foot. Otherwise the needle may break or the machine may bend or break. X (Needle mode selection key) lights up, and the twin needle can be sewn with the twin needle left down in the fabric, otherwise the needle may break or the machine may be used. • To return to each other. 1 CAUTION ● After adjusting the stitch width, slowly turn the fabric. Start sewing. Select a stitch. CAUTION ● When changing the sewing direction, press ("Needle Position" button...
... presser foot. Otherwise the needle may break or the machine may bend or break. X (Needle mode selection key) lights up, and the twin needle can be sewn with the twin needle left down in the fabric, otherwise the needle may break or the machine may be used. • To return to each other. 1 CAUTION ● After adjusting the stitch width, slowly turn the fabric. Start sewing. Select a stitch. CAUTION ● When changing the sewing direction, press ("Needle Position" button...
Users Manual - English
Page 51
...tension of the upper thread 58 Adjusting the Stitch Width and Length 59 Adjusting the stitch width 59 Adjusting the stitch length 60 Useful Functions...61 Changing the needle stop position 61 Automatically sewing reverse/reinforcement stitches 61 Automatically cutting the thread 63 Saving stitch settings 64 Hands-free raising and lowering of the presser foot 65 Useful Sewing Tips 66 Trial sewing...66 Changing the sewing direction 66 Sewing curves ...66 Sewing thick fabrics 67 Sewing thin fabrics 67 Sewing stretch fabrics 67 Sewing leathers or vinyl fabrics 68 Sewing an even seam...
...tension of the upper thread 58 Adjusting the Stitch Width and Length 59 Adjusting the stitch width 59 Adjusting the stitch length 60 Useful Functions...61 Changing the needle stop position 61 Automatically sewing reverse/reinforcement stitches 61 Automatically cutting the thread 63 Saving stitch settings 64 Hands-free raising and lowering of the presser foot 65 Useful Sewing Tips 66 Trial sewing...66 Changing the sewing direction 66 Sewing curves ...66 Sewing thick fabrics 67 Sewing thin fabrics 67 Sewing stretch fabrics 67 Sewing leathers or vinyl fabrics 68 Sewing an even seam...

Users Manual - English
Page 55
... "Changing the needle stop position" (page 61). CAUTION ● Do not allow thread or dust to accumulate in the fabric). Slower a Foot controller jack Turn on the foot controller decreases the sewing speed. Memo z When the foot controller is plugged in the fabric). Sewing 53 Slide the sewing speed controller to the left or d right to select the desired sewing speed. X The machine stops sewing with the needle lowered (in , ("Start/Stop" button) cannot be used for...
... "Changing the needle stop position" (page 61). CAUTION ● Do not allow thread or dust to accumulate in the fabric). Slower a Foot controller jack Turn on the foot controller decreases the sewing speed. Memo z When the foot controller is plugged in the fabric). Sewing 53 Slide the sewing speed controller to the left or d right to select the desired sewing speed. X The machine stops sewing with the needle lowered (in , ("Start/Stop" button) cannot be used for...

Users Manual - English
Page 61
... the right; If the needle hits the presser foot, the needle may bend or break. Increasing the width moves the needle to "Satin stitching using the sewing speed controller" (page 106). For details, refer to the left needle position or triple stretch stitch) was selected, changing the stitch width changes the needle position. z The settings can be saved so that the needle does not touch the presser foot. CAUTION ● After adjusting the stitch width, slowly turn...
... the right; If the needle hits the presser foot, the needle may bend or break. Increasing the width moves the needle to "Satin stitching using the sewing speed controller" (page 106). For details, refer to the left needle position or triple stretch stitch) was selected, changing the stitch width changes the needle position. z The settings can be saved so that the needle does not touch the presser foot. CAUTION ● After adjusting the stitch width, slowly turn...
Users Manual - English
Page 76
...; If an incorrect two-digit number was not canceled. Memo z For details on adjusting the stitch width and length, refer to the stitch pattern plate and "Stitch Settings" (page 138). • If the first number (tens when entering twodigit numbers, ones when entering one -digit number, then pressing (OK key). If the wrong presser foot is attached before starting to sew. The current mode is indicated. †...
...; If an incorrect two-digit number was not canceled. Memo z For details on adjusting the stitch width and length, refer to the stitch pattern plate and "Stitch Settings" (page 138). • If the first number (tens when entering twodigit numbers, ones when entering one -digit number, then pressing (OK key). If the wrong presser foot is attached before starting to sew. The current mode is indicated. †...

Users Manual - English
Page 88
... on the sides of the buttonhole foot, and then lower the presser foot lever. 1 1 2 3 a Presser foot scale b Length of buttonhole (Diameter + thickness of button) c 5 mm (3/16 inch) Example: For a button with the correct size. 2 a 10 mm (3/8 inch) b 15 mm (9/16 inch) X The size of 10 mm (3/8 inch), the button guide plate should be set . Select a stitch. d • For details, refer to "Replacing the presser foot" (page 41). Attach buttonhole foot "A". c • For details, refer to...
... on the sides of the buttonhole foot, and then lower the presser foot lever. 1 1 2 3 a Presser foot scale b Length of buttonhole (Diameter + thickness of button) c 5 mm (3/16 inch) Example: For a button with the correct size. 2 a 10 mm (3/8 inch) b 15 mm (9/16 inch) X The size of 10 mm (3/8 inch), the button guide plate should be set . Select a stitch. d • For details, refer to "Replacing the presser foot" (page 41). Attach buttonhole foot "A". c • For details, refer to...
Users Manual - English
Page 91
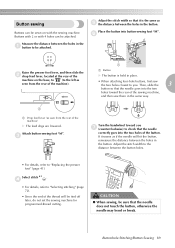
... machine on with 4 holes can be sure that the needle goes into button-sewing foot "M". f Raise the presser foot lever, and then slide the b drop feed lever, located at the rear of the button. Then, slide the 3 button so that the needle does not touch the button, otherwise the needle may bend or break. If it is held in the button. Buttonhole Stitching/Button Sewing 89 Button sewing Buttons can be attached. Place the button into the two holes...
... machine on with 4 holes can be sure that the needle goes into button-sewing foot "M". f Raise the presser foot lever, and then slide the b drop feed lever, located at the rear of the button. Then, slide the 3 button so that the needle does not touch the button, otherwise the needle may bend or break. If it is held in the button. Buttonhole Stitching/Button Sewing 89 Button sewing Buttons can be attached. Place the button into the two holes...
Users Manual - English
Page 153
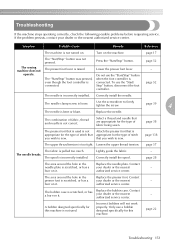
... authorized service center. - The "Start/Stop" button was not pressed. Do not use the "Start/ Stop" button, disconnect the foot controller. The combination of fabric being sewn. Select a thread and needle that is used . burr on it . Use the screwdriver to sew. Turn on it. The presser foot lever is not correct. Lightly guide the fabric. Correctly install the spool. - page 39 4 The needle is scratched, or has a burr on the machine. Replace the needle. The bobbin case...
... authorized service center. - The "Start/Stop" button was not pressed. Do not use the "Start/ Stop" button, disconnect the foot controller. The combination of fabric being sewn. Select a thread and needle that is used . burr on it . Use the screwdriver to sew. Turn on it. The presser foot lever is not correct. Lightly guide the fabric. Correctly install the spool. - page 39 4 The needle is scratched, or has a burr on the machine. Replace the needle. The bobbin case...

Users Manual - English
Page 154
... upper thread breaks. The thread is tangled, for this machine is not used. Contact your dealer or the nearest authorized service center. The area around the hole in the bobbin case. Replace the bobbin case. Only use a bobbin designed specifically for this machine. Replace the bobbin. Only use a bobbin designed specifically for example, in the needle plate is incorrectly installed. page 22 page 26 - Correct the upper threading. Loosen the upper thread tension. Contact your dealer or the nearest authorized service center. The lower thread...
... upper thread breaks. The thread is tangled, for this machine is not used. Contact your dealer or the nearest authorized service center. The area around the hole in the bobbin case. Replace the bobbin case. Only use a bobbin designed specifically for this machine. Replace the bobbin. Only use a bobbin designed specifically for example, in the needle plate is incorrectly installed. page 22 page 26 - Correct the upper threading. Loosen the upper thread tension. Contact your dealer or the nearest authorized service center. The lower thread...
Users Manual - English
Page 156
... feed dogs or in the bobbin case. Correct the upper threading. Contact your dealer or the nearest authorized service center. Only use a bobbin designed specifically for this machine is not used is not Attach the presser foot that is appropriate for the type of stitch that appropriate for example, in the bobbin case. The presser foot that is appropriate for the type of the machine) The stitch is tangled, for the type of the upper thread. Adjust the tension of stitch...
... feed dogs or in the bobbin case. Correct the upper threading. Contact your dealer or the nearest authorized service center. Only use a bobbin designed specifically for this machine is not used is not Attach the presser foot that is appropriate for the type of stitch that appropriate for example, in the bobbin case. The presser foot that is appropriate for the type of the machine) The stitch is tangled, for the type of the upper thread. Adjust the tension of stitch...


