
Users Manual - English
Page 2
... be provided to ensure that all Brother fax machines and multi-function centers. All remedies will continue to check our Web page for all non-Brother hardware, software and firmware used by our customers in connection or combination with Brother fax machines, MFCs and bundled software, accurately ...exchange date data with the Brother products. Our focus is addressing the Year 2000 related...
... be provided to ensure that all Brother fax machines and multi-function centers. All remedies will continue to check our Web page for all non-Brother hardware, software and firmware used by our customers in connection or combination with Brother fax machines, MFCs and bundled software, accurately ...exchange date data with the Brother products. Our focus is addressing the Year 2000 related...
Users Manual - English
Page 3
...technical questions and product information for all Brother products. Brother on the World Wide Web You can 't resolve a difficulty with your fax machine using this manual, call our Fax-Back System, and follow the voice prompts to receive faxed instructions about Brother products, from product specification sheets to ...) has been preprogrammed on the World Wide Web. i Brother Numbers Fax-Back System Brother Customer Service has installed an easy-to-use Fax-Back System, so you can use the system to send faxes to any fax machine, not just the one from which you can find more...
...technical questions and product information for all Brother products. Brother on the World Wide Web You can 't resolve a difficulty with your fax machine using this manual, call our Fax-Back System, and follow the voice prompts to receive faxed instructions about Brother products, from product specification sheets to ...) has been preprogrammed on the World Wide Web. i Brother Numbers Fax-Back System Brother Customer Service has installed an easy-to-use Fax-Back System, so you can use the system to send faxes to any fax machine, not just the one from which you can find more...
Users Manual - English
Page 5
... and Connections Using This Manual ...1 Finding Information ...1 Test Sheet Procedures (For USA Only 2 About Fax Machines 2 Fax Tones and Handshake 2 ECM (Error Correction Mode 3 FAX 2750 and FAX 3750 Control Panel Overview 4 FAX 2750 and FAX 3750 Control Panel Keys 5 Caution ...7 Packing List...8 Choosing a Location ...9 Assembly ...10 Installing the Drum Unit Assembly (with Toner Cartridge 10 Setting Up the...
... and Connections Using This Manual ...1 Finding Information ...1 Test Sheet Procedures (For USA Only 2 About Fax Machines 2 Fax Tones and Handshake 2 ECM (Error Correction Mode 3 FAX 2750 and FAX 3750 Control Panel Overview 4 FAX 2750 and FAX 3750 Control Panel Keys 5 Caution ...7 Packing List...8 Choosing a Location ...9 Assembly ...10 Installing the Drum Unit Assembly (with Toner Cartridge 10 Setting Up the...
Users Manual - English
Page 8
... Status List 76 Retrieving Fax Messages 76 10Printing Reports Changing Fax Forwarding Number 77 Fax Settings and Activity 79 To Print a Report ...80 Transmission Verification (Xmit) Report 80 11Making Copies Activity Report Interval 80 Using the Fax Machine as a Copier 81 ...FAX 2750 Only) Copying a Photograph 83 Memory Board ...85 Optional Memory for the Printer & Fax Operations 85 For the Printer ...85 For the Fax ...85 13 Installing the Optional Memory Board 86 Troubleshooting and Maintenance Troubleshooting ...89 Fax-Back System ...89 Brother Home Page 89 Brother...
... Status List 76 Retrieving Fax Messages 76 10Printing Reports Changing Fax Forwarding Number 77 Fax Settings and Activity 79 To Print a Report ...80 Transmission Verification (Xmit) Report 80 11Making Copies Activity Report Interval 80 Using the Fax Machine as a Copier 81 ...FAX 2750 Only) Copying a Photograph 83 Memory Board ...85 Optional Memory for the Printer & Fax Operations 85 For the Printer ...85 For the Fax ...85 13 Installing the Optional Memory Board 86 Troubleshooting and Maintenance Troubleshooting ...89 Fax-Back System ...89 Brother Home Page 89 Brother...
Users Manual - English
Page 9
Disclaimer of Conformity (For USA Only)...126 Industry Canada Compliance Statement (For Canada Only 126 Important-About the Interface Cable 126 International Energy Star Compliance Statement 126 Important Safety Instructions 127 Notice - vii T A B L E O F C O N T E N T S 14 Error Messages ...90 Document Jam ...93 ...Pavilion PC and the "HP DEMO" Screen Saver 101 Bi-Directional Parallel Ports (nibble and byte modes 101 Fax Machine Connect Failure or Bi-Directional Communication Error 102 Brother HL-6/6V/10h/630series/660series/960/1260/WL-660 102 HP LaserJet series II, IID, IIP, IIP+, ...
Disclaimer of Conformity (For USA Only)...126 Industry Canada Compliance Statement (For Canada Only 126 Important-About the Interface Cable 126 International Energy Star Compliance Statement 126 Important Safety Instructions 127 Notice - vii T A B L E O F C O N T E N T S 14 Error Messages ...90 Document Jam ...93 ...Pavilion PC and the "HP DEMO" Screen Saver 101 Bi-Directional Parallel Ports (nibble and byte modes 101 Fax Machine Connect Failure or Bi-Directional Communication Error 102 Brother HL-6/6V/10h/630series/660series/960/1260/WL-660 102 HP LaserJet series II, IID, IIP, IIP+, ...
Users Manual - English
Page 10
... Option 132 Electrical and Environment 133 A Parallel Interface Specifications (Available with Software Option 134 (Option) Multi-Function Setting Up the Fax Machine and Computer to Work Together 135 Link Pro Software Before You Install the Optional Multi-Function Link Pro Software 136 If You Don...Install NetCentric™ FaxStorm 139 Install Automatic E-Mail Printing 139 View On-Line Documentation 139 Product Support 139 Brother Web Link 139 Exit ...139 Installing the Brother Software 140 Helpful Hints for Windows® 3.1, 3.11 or Windows® 95, 98 142 Using the...
... Option 132 Electrical and Environment 133 A Parallel Interface Specifications (Available with Software Option 134 (Option) Multi-Function Setting Up the Fax Machine and Computer to Work Together 135 Link Pro Software Before You Install the Optional Multi-Function Link Pro Software 136 If You Don...Install NetCentric™ FaxStorm 139 Install Automatic E-Mail Printing 139 View On-Line Documentation 139 Product Support 139 Brother Web Link 139 Exit ...139 Installing the Brother Software 140 Helpful Hints for Windows® 3.1, 3.11 or Windows® 95, 98 142 Using the...
Users Manual - English
Page 13
... the Index in the Table of some screen displays also help you through functions. Also, throughout this manual. You will be simple to use your fax machine has a Help Key. Illustrations of Contents. Finding Information All chapter headings and subheadings are listed in the back of basic operational steps and functions. This..., and warnings. However, you can use , with LCD screen prompts to print a list of this manual, you'll see special symbols alerting you for purchasing a Brother fax machine. Press Help/Broadcast to guide you choose the correct key-presses.
... the Index in the Table of some screen displays also help you through functions. Also, throughout this manual. You will be simple to use your fax machine has a Help Key. Illustrations of Contents. Finding Information All chapter headings and subheadings are listed in the back of basic operational steps and functions. This..., and warnings. However, you can use , with LCD screen prompts to print a list of this manual, you'll see special symbols alerting you for purchasing a Brother fax machine. Press Help/Broadcast to guide you choose the correct key-presses.
Users Manual - English
Page 14
... at 4-second intervals. Each time you use automatic procedures to send a fax, you 're a first-time fax machine user, fax operation might seem a little mysterious. To get a response, be sure to set to the FAX mode, it to Brother's Automated Fax Response System as your fax machine continues to send the "chirps" for these soft beeps each time you...
... at 4-second intervals. Each time you use automatic procedures to send a fax, you 're a first-time fax machine user, fax operation might seem a little mysterious. To get a response, be sure to set to the FAX mode, it to Brother's Automated Fax Response System as your fax machine continues to send the "chirps" for these soft beeps each time you...
Users Manual - English
Page 15
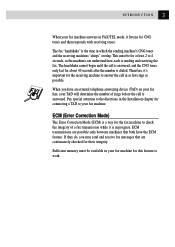
... work. This must be for connecting a TAD to your fax machine. ECM transmissions are continuously checked for this feature to 4 seconds, so the machines can understand how each is dialed. INTRODUCTION 3 When your fax machine answers in which the sending machine's CNG tones and the receiving machines "chirps" overlap. Pay special attention to the directions in your...
... work. This must be for connecting a TAD to your fax machine. ECM transmissions are continuously checked for this feature to 4 seconds, so the machines can understand how each is dialed. INTRODUCTION 3 When your fax machine answers in which the sending machine's CNG tones and the receiving machines "chirps" overlap. Pay special attention to the directions in your...
Users Manual - English
Page 17
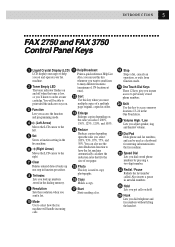
...of 174 locations at once). 12 Sort Use this key machine. Moves the LCD cursor to have the fax machine automatically calculate the reduction ratio that fits the 7 Clear size of a multiple page original, copied in function procedure. INTRODUCTION 5 FAX 2750 and FAX 3750 Control Panel Keys 1 Liquid Crystal Display (LCD) 11... 25 Hold Lets you put calls on the ratio you select: 100%, 93%, 87%, 75%, and 50%. Also inserts a pause in the fax machine. 14 Reduce Reduces copies depending upon the ratio you select: 200%, 150%, 125%, 120%, and 100%. Deletes entered data or backs up numbers...
...of 174 locations at once). 12 Sort Use this key machine. Moves the LCD cursor to have the fax machine automatically calculate the reduction ratio that fits the 7 Clear size of a multiple page original, copied in function procedure. INTRODUCTION 5 FAX 2750 and FAX 3750 Control Panel Keys 1 Liquid Crystal Display (LCD) 11... 25 Hold Lets you put calls on the ratio you select: 100%, 93%, 87%, 75%, and 50%. Also inserts a pause in the fax machine. 14 Reduce Reduces copies depending upon the ratio you select: 200%, 150%, 125%, 120%, and 100%. Deletes entered data or backs up numbers...
Users Manual - English
Page 19
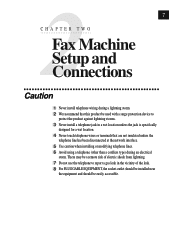
... when installing or modifying telephone lines. 6 Avoid using a telephone (other than a cordless type) during a lightning storm. 2 We recommend that this product be easily accessible. 2C H A P T E R T W O Fax Machine Setup and 7 Connections Caution 1 Never install telephone wiring during an electrical storm.
... when installing or modifying telephone lines. 6 Avoid using a telephone (other than a cordless type) during a lightning storm. 2 We recommend that this product be easily accessible. 2C H A P T E R T W O Fax Machine Setup and 7 Connections Caution 1 Never install telephone wiring during an electrical storm.
Users Manual - English
Page 20
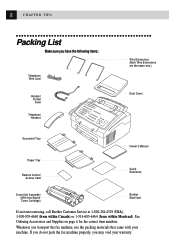
... the packing materials that came with your warranty. If you do not pack the fax machine properly, you may void your machine. See Ordering Accessories and Supplies on page ii for the correct item numbers. Whenever you have the following items: Telephone Wire Cord ...Dust Cover Document Tray Paper Tray Remote Control Access Card Owner's Manual Quick Reference Drum Unit Assembly (With free Starter Toner Cartridge) Brother StartCard If an item is missing, call Brother Customer Service at 1-800-284-4329 (USA), 1-800-853-6660 (from within Canada) or 1-514-685-6464 (from within Montreal...
... the packing materials that came with your warranty. If you do not pack the fax machine properly, you may void your machine. See Ordering Accessories and Supplies on page ii for the correct item numbers. Whenever you have the following items: Telephone Wire Cord ...Dust Cover Document Tray Paper Tray Remote Control Access Card Owner's Manual Quick Reference Drum Unit Assembly (With free Starter Toner Cartridge) Brother StartCard If an item is missing, call Brother Customer Service at 1-800-284-4329 (USA), 1-800-853-6660 (from within Canada) or 1-514-685-6464 (from within Montreal...
Users Manual - English
Page 21
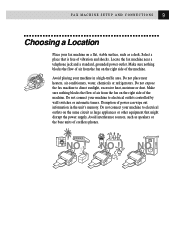
...or refrigerators. Do not connect your fax machine on the right side of air from the fan on a flat, stable surface, such as a desk. Disruption of the machine. FAX MACHINE SETUP AND CONNECTIONS 9 Choosing a Location Place your machine to electrical outlets controlled by wall switches... or automatic timers. Do not expose the fax machine to electrical outlets on the right side of power can ...
...or refrigerators. Do not connect your fax machine on the right side of air from the fan on a flat, stable surface, such as a desk. Disruption of the machine. FAX MACHINE SETUP AND CONNECTIONS 9 Choosing a Location Place your machine to electrical outlets controlled by wall switches... or automatic timers. Do not expose the fax machine to electrical outlets on the right side of power can ...

Users Manual - English
Page 22
Do NOT remove the clear plastic starter sheet! To prevent damage to the drum, do not expose it from side to light for longer than a few minutes. Do NOT remove the clear plastic starter sheet - this will be ejected while the fax machine is warming up. Clear Plastic Starter Sheet 10 CHAPTER TWO Assembly Installing the Drum Unit Assembly (with Toner Cartridge) 1 Unpack the drum unit assembly, including the toner cartridge, and gently rock it to side five or six times.
Do NOT remove the clear plastic starter sheet! To prevent damage to the drum, do not expose it from side to light for longer than a few minutes. Do NOT remove the clear plastic starter sheet - this will be ejected while the fax machine is warming up. Clear Plastic Starter Sheet 10 CHAPTER TWO Assembly Installing the Drum Unit Assembly (with Toner Cartridge) 1 Unpack the drum unit assembly, including the toner cartridge, and gently rock it to side five or six times.
Users Manual - English
Page 23
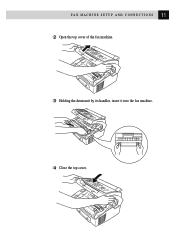
11 F A X M A C H I N E S E T U P A N D C O N N E C T I O N S 2 Open the top cover of the fax machine. 3 Holding the drum unit by its handles, insert it into the fax machine. 4 Close the top cover.
11 F A X M A C H I N E S E T U P A N D C O N N E C T I O N S 2 Open the top cover of the fax machine. 3 Holding the drum unit by its handles, insert it into the fax machine. 4 Close the top cover.

Users Manual - English
Page 24
... protect yourself when you can damage this product! 12 CHAPTER TWO Setting Up the Fax Machine Follow the instructions below to the bottom of the handset and the left side of the fax machine. 2 Connect the power cord. WARNING s This fax machine must be grounded using a three-prong plug. LINE 1 Connect the Handset. Connect the curled...
... protect yourself when you can damage this product! 12 CHAPTER TWO Setting Up the Fax Machine Follow the instructions below to the bottom of the handset and the left side of the fax machine. 2 Connect the power cord. WARNING s This fax machine must be grounded using a three-prong plug. LINE 1 Connect the Handset. Connect the curled...

Users Manual - English
Page 25
13 F A X M A C H I N E S E T U P A N D C O N N E C T I O N S 3 Connect the telephone line. Connect one end of the telephone line cord to the fax machine and pull out their extensions. Connect the other end to a modular wall jack. 4 Attach the wire extensions to the multi-purpose sheet feeder and to the document guide base. 5 Attach the document and paper trays to the jack labeled LINE on the left side of the fax machine.
13 F A X M A C H I N E S E T U P A N D C O N N E C T I O N S 3 Connect the telephone line. Connect one end of the telephone line cord to the fax machine and pull out their extensions. Connect the other end to a modular wall jack. 4 Attach the wire extensions to the multi-purpose sheet feeder and to the document guide base. 5 Attach the document and paper trays to the jack labeled LINE on the left side of the fax machine.
Users Manual - English
Page 26
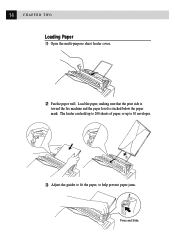
Load the paper, making sure that the print side is toward the fax machine and the paper level is stacked below the paper mark. The feeder can hold up to 200 sheets of paper, or up to 10 envelopes. 3 Adjust the guides to fit the paper, to help prevent paper jams. Press and Slide. 14 CHAPTER TWO Loading Paper 1 Open the multi-purpose sheet feeder cover. 2 Fan the paper well.
Load the paper, making sure that the print side is toward the fax machine and the paper level is stacked below the paper mark. The feeder can hold up to 200 sheets of paper, or up to 10 envelopes. 3 Adjust the guides to fit the paper, to help prevent paper jams. Press and Slide. 14 CHAPTER TWO Loading Paper 1 Open the multi-purpose sheet feeder cover. 2 Fan the paper well.
Users Manual - English
Page 27
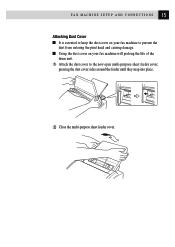
s Using the dust cover on your fax machine will prolong the life of the drum unit. 1 Attach the dust cover to prevent the dust from entering the print head and causing damage. 15 F A X M A C H I N E S E T U P A N D C O N N E C T I O N S Attaching Dust Cover s It is essential to keep the dust cover on your fax machine to the now open multi-purpose sheet feeder cover, pressing the dust cover sides around the feeder until they snap into place. 2 Close the multi-purpose sheet feeder cover.
s Using the dust cover on your fax machine will prolong the life of the drum unit. 1 Attach the dust cover to prevent the dust from entering the print head and causing damage. 15 F A X M A C H I N E S E T U P A N D C O N N E C T I O N S Attaching Dust Cover s It is essential to keep the dust cover on your fax machine to the now open multi-purpose sheet feeder cover, pressing the dust cover sides around the feeder until they snap into place. 2 Close the multi-purpose sheet feeder cover.

Users Manual - English
Page 28
... x 127-279 mm) Day-Timer® J, K, L, M 2.75-8.5 x 5-11 inches (70-216 x 127-279 mm) 2.75-8.5 x 5-14 inches (70-216 x 127-356 mm) You can receive fax messages only on Letter, Legal and A4 paper. Insert the sheet of your printer driver. If you use this slot. 16 CHAPTER TWO Manual Feed... also has a manual feed slot on face down in the Setup dialog box of paper for Portrait (vertical) or Landscape (horizontal), with Software Option) The fax machine can handle paper that you can load paper or envelopes one at the center of the manual feed slot, and be sure to choose manual...
... x 127-279 mm) Day-Timer® J, K, L, M 2.75-8.5 x 5-11 inches (70-216 x 127-279 mm) 2.75-8.5 x 5-14 inches (70-216 x 127-356 mm) You can receive fax messages only on Letter, Legal and A4 paper. Insert the sheet of your printer driver. If you use this slot. 16 CHAPTER TWO Manual Feed... also has a manual feed slot on face down in the Setup dialog box of paper for Portrait (vertical) or Landscape (horizontal), with Software Option) The fax machine can handle paper that you can load paper or envelopes one at the center of the manual feed slot, and be sure to choose manual...


