
Users Manual - English
Page 4
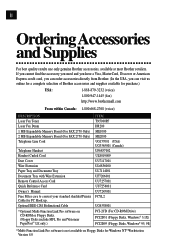
... you have a Visa, MasterCard, Discover or American Express credit card, you can order accessories directly from Brother. (In the USA, you can visit us online for a complete selection of Brother accessories and supplies available for purchase.) USA: 1-888-879-3232 (voice) 1-800-947-1445 (fax)... http://www.brothermall.com From within Canada: 1-800-668-2768 (voice) DESCRIPTION Laser Fax Toner Laser Fax Drum 1 MB Expandable Memory Board (...
... you have a Visa, MasterCard, Discover or American Express credit card, you can order accessories directly from Brother. (In the USA, you can visit us online for a complete selection of Brother accessories and supplies available for purchase.) USA: 1-888-879-3232 (voice) 1-800-947-1445 (fax)... http://www.brothermall.com From within Canada: 1-800-668-2768 (voice) DESCRIPTION Laser Fax Toner Laser Fax Drum 1 MB Expandable Memory Board (...
Users Manual - English
Page 5
... Machines 2 Fax Tones and Handshake 2 ECM (Error Correction Mode 3 FAX 2750 and FAX 3750 Control Panel Overview 4 FAX 2750 and FAX 3750 Control Panel Keys 5 Caution ...7 Packing List...8 Choosing a Location ...9 Assembly ...10 Installing the Drum Unit Assembly (with Toner Cartridge 10 Setting Up the Fax Machine 12 Loading Paper ...14 Attaching Dust Cover...
... Machines 2 Fax Tones and Handshake 2 ECM (Error Correction Mode 3 FAX 2750 and FAX 3750 Control Panel Overview 4 FAX 2750 and FAX 3750 Control Panel Keys 5 Caution ...7 Packing List...8 Choosing a Location ...9 Assembly ...10 Installing the Drum Unit Assembly (with Toner Cartridge 10 Setting Up the Fax Machine 12 Loading Paper ...14 Attaching Dust Cover...

Users Manual - English
Page 6
... ...34 Setting F/T Ring Time 34 Easy Receive ...35 Printing a Reduced Incoming Document 36 Recommended Reductions 36 Setting Paper Size ...37 Setting the Print Density 37 Toner Save ...38 Advanced Receiving Operations 38 Operation from Extension Telephone (For FAX 2750 Only) or External Telephone 38 For FAX/TEL Mode Only 39 Changing...
... ...34 Setting F/T Ring Time 34 Easy Receive ...35 Printing a Reduced Incoming Document 36 Recommended Reductions 36 Setting Paper Size ...37 Setting the Print Density 37 Toner Save ...38 Advanced Receiving Operations 38 Operation from Extension Telephone (For FAX 2750 Only) or External Telephone 38 For FAX/TEL Mode Only 39 Changing...
Users Manual - English
Page 9
...-Directional Parallel Ports (nibble and byte modes 101 Fax Machine Connect Failure or Bi-Directional Communication Error 102 Brother HL-6/6V/10h/630series/660series/960/1260/WL-660 102 HP LaserJet series II, IID, IIP, IIP...109 Cleaning the Printer 110 Cleaning the Drum Unit 111 Replacing the Toner Cartridge 112 Toner Empty Indicator 112 How to Replace the Toner Cartridge 113 Replacing the Drum Unit 117 For Customer Service 122 Standard... Only 126 Important-About the Interface Cable 126 International Energy Star Compliance Statement 126 Important Safety Instructions 127 Notice -
...-Directional Parallel Ports (nibble and byte modes 101 Fax Machine Connect Failure or Bi-Directional Communication Error 102 Brother HL-6/6V/10h/630series/660series/960/1260/WL-660 102 HP LaserJet series II, IID, IIP, IIP...109 Cleaning the Printer 110 Cleaning the Drum Unit 111 Replacing the Toner Cartridge 112 Toner Empty Indicator 112 How to Replace the Toner Cartridge 113 Replacing the Drum Unit 117 For Customer Service 122 Standard... Only 126 Important-About the Interface Cable 126 International Energy Star Compliance Statement 126 Important Safety Instructions 127 Notice -
Users Manual - English
Page 17
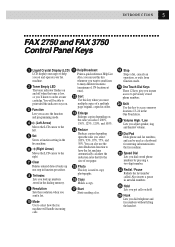
... keyboard for entering information into the fax machine. 23 Speed Dial Lets you can also use this key when you want to send faxes 2 Toner Empty LED The toner indicator flashes on . 3 Function Lets you access the function and programming mode. 4 (Left Arrow) to the left. 5 Set Stores a... fax. 10 Mode Use to select how the fax machine will be used to order a toner cartridge. Auto Reduction function to help Prints a quick reference Help List. INTRODUCTION 5 FAX 2750 and FAX 3750 Control Panel Keys 1 Liquid Crystal Display (LCD) 11 Help/Broadcast LCD displays messages to have ...
... keyboard for entering information into the fax machine. 23 Speed Dial Lets you can also use this key when you want to send faxes 2 Toner Empty LED The toner indicator flashes on . 3 Function Lets you access the function and programming mode. 4 (Left Arrow) to the left. 5 Set Stores a... fax. 10 Mode Use to select how the fax machine will be used to order a toner cartridge. Auto Reduction function to help Prints a quick reference Help List. INTRODUCTION 5 FAX 2750 and FAX 3750 Control Panel Keys 1 Liquid Crystal Display (LCD) 11 Help/Broadcast LCD displays messages to have ...
Users Manual - English
Page 20
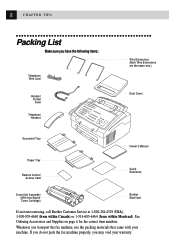
... size.) Dust Cover Document Tray Paper Tray Remote Control Access Card Owner's Manual Quick Reference Drum Unit Assembly (With free Starter Toner Cartridge) Brother StartCard If an item is missing, call Brother Customer Service at 1-800-284-4329 (USA), 1-800-853-6660 (from within Canada) or 1-514-685-6464 (from within Montreal). See...
... size.) Dust Cover Document Tray Paper Tray Remote Control Access Card Owner's Manual Quick Reference Drum Unit Assembly (With free Starter Toner Cartridge) Brother StartCard If an item is missing, call Brother Customer Service at 1-800-284-4329 (USA), 1-800-853-6660 (from within Canada) or 1-514-685-6464 (from within Montreal). See...

Users Manual - English
Page 22
Do NOT remove the clear plastic starter sheet! Do NOT remove the clear plastic starter sheet - 10 CHAPTER TWO Assembly Installing the Drum Unit Assembly (with Toner Cartridge) 1 Unpack the drum unit assembly, including the toner cartridge, and gently rock it to side five or six times. To prevent damage to the drum, do not expose it from side to light for longer than a few minutes. Clear Plastic Starter Sheet this will be ejected while the fax machine is warming up.
Do NOT remove the clear plastic starter sheet! Do NOT remove the clear plastic starter sheet - 10 CHAPTER TWO Assembly Installing the Drum Unit Assembly (with Toner Cartridge) 1 Unpack the drum unit assembly, including the toner cartridge, and gently rock it to side five or six times. To prevent damage to the drum, do not expose it from side to light for longer than a few minutes. Clear Plastic Starter Sheet this will be ejected while the fax machine is warming up.
Users Manual - English
Page 37
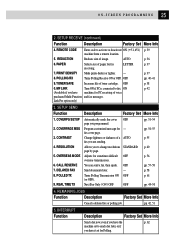
...to activate or deactivate ON ( 51, #51) machine from a remote location. 5. REMOTE CODE Enter code to change resolutions STANDARD page by page. TONER SAVE Increases life of image. RESOLUTION 5. Change lightness or darkness of paper for Polling. You can send a fax, then speak. OFF Send documents ...are sending. OFF 9. Program customized message for sometimes difficult OFF overseas transmissions. pp. 42, 51 5. REDUCTION Reduces size of toner cartridge. POLLING RX Turns Polling Receive ON or OFF. fax cover page. PAPER Selects size of a AUTO fax you programmed. 25 O N -...
...to activate or deactivate ON ( 51, #51) machine from a remote location. 5. REMOTE CODE Enter code to change resolutions STANDARD page by page. TONER SAVE Increases life of image. RESOLUTION 5. Change lightness or darkness of paper for Polling. You can send a fax, then speak. OFF Send documents ...are sending. OFF 9. Program customized message for sometimes difficult OFF overseas transmissions. pp. 42, 51 5. REDUCTION Reduces size of toner cartridge. POLLING RX Turns Polling Receive ON or OFF. fax cover page. PAPER Selects size of a AUTO fax you programmed. 25 O N -...

Users Manual - English
Page 50
... exit. At the fax machine phone, press Start , then hang up . (Your caller will have to press Start to send the fax.) For the FAX 3750, the Fax Receive Code and Telephone Answer Code can make your fax machine take the call and double-rings for you 're receiving a fax. When... Setting F/T Ring Time p. 34 See Easy Receive p. 35 Operation from an external phone. jack, you can be disconnected (the screen displays RECEIVING) before you set Toner Save to receive a fax. 38 CHAPTER FIVE Toner Save You can conserve toner using the Fax Receive Code.
... exit. At the fax machine phone, press Start , then hang up . (Your caller will have to press Start to send the fax.) For the FAX 3750, the Fax Receive Code and Telephone Answer Code can make your fax machine take the call and double-rings for you 're receiving a fax. When... Setting F/T Ring Time p. 34 See Easy Receive p. 35 Operation from an external phone. jack, you can be disconnected (the screen displays RECEIVING) before you set Toner Save to receive a fax. 38 CHAPTER FIVE Toner Save You can conserve toner using the Fax Receive Code.
Users Manual - English
Page 102
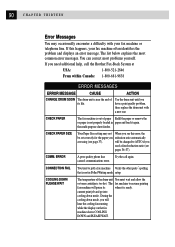
...fan running while the display on the fax machine shows COOLING DOWN and PLEASE WAIT. ERROR A poor quality phone line Try the call the Brother Fax-Back System at USA: 1-800-521-2846 From within Canada: 1-800-681-9838 ERROR MESSAGES ERROR MESSAGE CAUSE ACTION CHANGE DRUM SOON The...below explains the most problems yourself. CHECK PAPER The fax machine is out of the drum unit You must wait and allow the or toner cartridge is not properly loaded in paper and load it is not in Polled Waiting mode. caused communications error. 90 CHAPTER THIRTEEN Error Messages...
...fan running while the display on the fax machine shows COOLING DOWN and PLEASE WAIT. ERROR A poor quality phone line Try the call the Brother Fax-Back System at USA: 1-800-521-2846 From within Canada: 1-800-681-9838 ERROR MESSAGES ERROR MESSAGE CAUSE ACTION CHANGE DRUM SOON The...below explains the most problems yourself. CHECK PAPER The fax machine is out of the drum unit You must wait and allow the or toner cartridge is not properly loaded in paper and load it is not in Polled Waiting mode. caused communications error. 90 CHAPTER THIRTEEN Error Messages...

Users Manual - English
Page 104
... the Windows® printer driver, try again. TONER EMPTY Toner is not Dial number. PRINT OVERRUN The available RAM has been (May occur when the fax exceeded. a new one. (See pages 112-116.) TONER LOW If the display shows TONER Order a new toner cartridge now. machine is used up the One... Touch or Speed or Speed Dial number that is Replace the toner cartridge with not possible. But the toner is depleted and the fax machine is telling you that the toner will be deleted. • If you have reached a number that is used as Graphics...
... the Windows® printer driver, try again. TONER EMPTY Toner is not Dial number. PRINT OVERRUN The available RAM has been (May occur when the fax exceeded. a new one. (See pages 112-116.) TONER LOW If the display shows TONER Order a new toner cartridge now. machine is used up the One... Touch or Speed or Speed Dial number that is Replace the toner cartridge with not possible. But the toner is depleted and the fax machine is telling you that the toner will be deleted. • If you have reached a number that is used as Graphics...
Users Manual - English
Page 105
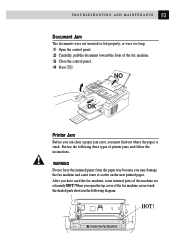
.... Inside the Fax Machine WARNING Do not force the jammed paper from the paper tray because you have used the fax machine, some internal parts of the fax machine, never touch the shaded parts shown in the following three types of the fax machine. 3 Close the control... panel. 4 Press Stop . After you may damage the fax machine and cause toner to scatter on the next printed pages. 93 T R O U B L E S H O O T I N G A N D M A I N T E N A N C E Document Jam The documents were not inserted or fed properly, or were too...
.... Inside the Fax Machine WARNING Do not force the jammed paper from the paper tray because you have used the fax machine, some internal parts of the fax machine, never touch the shaded parts shown in the following three types of the fax machine. 3 Close the control... panel. 4 Press Stop . After you may damage the fax machine and cause toner to scatter on the next printed pages. 93 T R O U B L E S H O O T I N G A N D M A I N T E N A N C E Document Jam The documents were not inserted or fed properly, or were too...
Users Manual - English
Page 109
... your document and try again. Reduce the complexity of a document; 97 T R O U B L E S H O O T I N G A N D M A I print them. • Reduce the printer resolution. This may be solved in . • The toner cartridge and drum unit are installed properly. • The interface cable is not recognizing the printer's input buffer full signal. Your computer is securely connected...
... your document and try again. Reduce the complexity of a document; 97 T R O U B L E S H O O T I N G A N D M A I print them. • Reduce the printer resolution. This may be solved in . • The toner cartridge and drum unit are installed properly. • The interface cable is not recognizing the printer's input buffer full signal. Your computer is securely connected...

Users Manual - English
Page 111
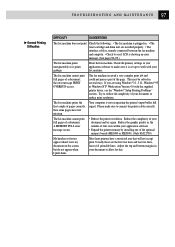
...Density" on pages 109-111. Clean the fax machine's interior and the primary corona wire of the corona wire is at the home position. Scattering Toner The whole page is not empty. Remove the drum unit and clean the fax machine's interior. After cleaning, if the printed pages are stained .... (See "Cleaning the Document Scanner" on p. 109 and "Cleaning the Drum Unit" on the page. Make sure that you still see dark stripes or toner stains and the display shows CHANGE DRUM SOON, replace the drum unit with a new one . White Stripes or Faint lmages Printed pages are still black...
...Density" on pages 109-111. Clean the fax machine's interior and the primary corona wire of the corona wire is at the home position. Scattering Toner The whole page is not empty. Remove the drum unit and clean the fax machine's interior. After cleaning, if the printed pages are stained .... (See "Cleaning the Document Scanner" on p. 109 and "Cleaning the Drum Unit" on the page. Make sure that you still see dark stripes or toner stains and the display shows CHANGE DRUM SOON, replace the drum unit with a new one . White Stripes or Faint lmages Printed pages are still black...
Users Manual - English
Page 112
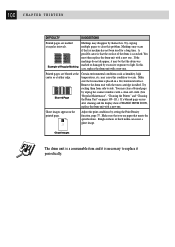
... meets the specifications. Remove the drum unit with a new one. Try rocking them from side to clear this case, replace the drum unit with the toner cartridge installed. Blurred Page Certain environmental conditions such as humidity, high temperatures, etc. You may cause this condition to light. Make sure that you use...
... meets the specifications. Remove the drum unit with a new one. Try rocking them from side to clear this case, replace the drum unit with the toner cartridge installed. Blurred Page Certain environmental conditions such as humidity, high temperatures, etc. You may cause this condition to light. Make sure that you use...
Users Manual - English
Page 118
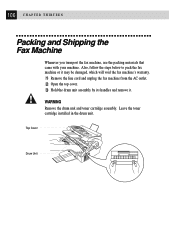
Also, follow the steps below to pack the fax machine or it may be damaged, which will void the fax machine's warranty. 1 Remove the line cord and unplug the fax machine from the AC outlet. 2 Open the top cover. 3 Hold the drum unit assembly by its handles and remove it. Top Cover Drum Unit 106 C H A P T E R T H I R T E E N Packing and Shipping the Fax Machine Whenever you transport the fax machine, use the packing materials that came with your machine. WARNING Remove the drum unit and toner cartridge assembly. Leave the toner cartridge installed in the drum unit.
Also, follow the steps below to pack the fax machine or it may be damaged, which will void the fax machine's warranty. 1 Remove the line cord and unplug the fax machine from the AC outlet. 2 Open the top cover. 3 Hold the drum unit assembly by its handles and remove it. Top Cover Drum Unit 106 C H A P T E R T H I R T E E N Packing and Shipping the Fax Machine Whenever you transport the fax machine, use the packing materials that came with your machine. WARNING Remove the drum unit and toner cartridge assembly. Leave the toner cartridge installed in the drum unit.
Users Manual - English
Page 119
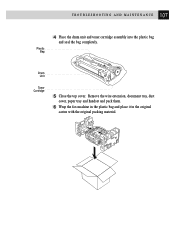
107 T R O U B L E S H O O T I N G A N D M A I N T E N A N C E Plastic Bag 4 Place the drum unit and toner cartridge assembly into the plastic bag and seal the bag completely. Remove the wire extension, document tray, dust cover, paper tray and handset and pack them. 6 Wrap the fax machine in the plastic bag and place it in the original carton with the original packing material. Drum Unit Toner Cartridge 5 Close the top cover.
107 T R O U B L E S H O O T I N G A N D M A I N T E N A N C E Plastic Bag 4 Place the drum unit and toner cartridge assembly into the plastic bag and seal the bag completely. Remove the wire extension, document tray, dust cover, paper tray and handset and pack them. 6 Wrap the fax machine in the plastic bag and place it in the original carton with the original packing material. Drum Unit Toner Cartridge 5 Close the top cover.
Users Manual - English
Page 120
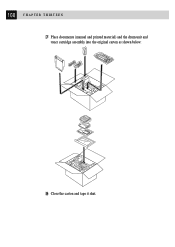
108 C H A P T E R T H I R T E E N 7 Place documents (manual and printed material) and the drum unit and toner cartridge assembly into the original carton as shown below: 8 Close the carton and tape it shut.
108 C H A P T E R T H I R T E E N 7 Place documents (manual and printed material) and the drum unit and toner cartridge assembly into the original carton as shown below: 8 Close the carton and tape it shut.
Users Manual - English
Page 122
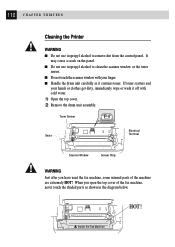
Toner Sensor Gears Electrical Terminal Scanner Window Sensor Strip WARNING Just after you open the top cover of the machine are extremely HOT! HOT! It may cause a crack on the panel. When you have used the fax machine, some internal parts of the fax machine, never touch the shaded parts as it off...
Toner Sensor Gears Electrical Terminal Scanner Window Sensor Strip WARNING Just after you open the top cover of the machine are extremely HOT! HOT! It may cause a crack on the panel. When you have used the fax machine, some internal parts of the fax machine, never touch the shaded parts as it off...

Users Manual - English
Page 123
... inside the drum unit by gently sliding the tab from right to left several times. 3 Return the tab to clean the scanner window or the toner sensor. Do NOT use isoproply alcohol to the home position (w mark position) before reinstalling the drum unit. See "Replacing the Drum Unit" on a cotton ...swab. 4 Wipe the gears with a clean dry cloth. 5 Gently wipe the scanner window and the toner sensor with isopropyl alcohol on pages 117-121. 5 Close the top cover. 6 Plug in the power cord. Cleaning the Drum Unit We recommend you do...
... inside the drum unit by gently sliding the tab from right to left several times. 3 Return the tab to clean the scanner window or the toner sensor. Do NOT use isoproply alcohol to the home position (w mark position) before reinstalling the drum unit. See "Replacing the Drum Unit" on a cotton ...swab. 4 Wipe the gears with a clean dry cloth. 5 Gently wipe the scanner window and the toner sensor with isopropyl alcohol on pages 117-121. 5 Close the top cover. 6 Plug in the power cord. Cleaning the Drum Unit We recommend you do...


