
Users Manual - English
Page 1
...Manufactured by BSI and JQA. BSI Certificate of registration No. JQA-0340 UF72250013 Printed in Japan OWNER'S MANUAL IntelliFAX 3550 CONTENTS Chapter1 SETUP & PREPARATION BEFORE USE Chapter2 THE CONTROL PANEL KEYS Chapter3 HOW TO USE ON-SCREEN PROGRAMMING(OSP... FAX OPTIONS Chapter11 PRINTING REPORTS AND LISTS Chapter12 REPLACING THE TONER CARTRIDGE AND DRUM UNIT Chapter13 REGULAR MAINTENANCE AND TROUBLESHOOTING Chapter14 IMPORTANT INFORMATION Chapter15 INDEX Chapter16 SPECIFICATIONS 3550-US-5.0 Brother International Corporation 200 Cottontail Lane, Somerset, NJ 08875-6714, U.S.A....
...Manufactured by BSI and JQA. BSI Certificate of registration No. JQA-0340 UF72250013 Printed in Japan OWNER'S MANUAL IntelliFAX 3550 CONTENTS Chapter1 SETUP & PREPARATION BEFORE USE Chapter2 THE CONTROL PANEL KEYS Chapter3 HOW TO USE ON-SCREEN PROGRAMMING(OSP... FAX OPTIONS Chapter11 PRINTING REPORTS AND LISTS Chapter12 REPLACING THE TONER CARTRIDGE AND DRUM UNIT Chapter13 REGULAR MAINTENANCE AND TROUBLESHOOTING Chapter14 IMPORTANT INFORMATION Chapter15 INDEX Chapter16 SPECIFICATIONS 3550-US-5.0 Brother International Corporation 200 Cottontail Lane, Somerset, NJ 08875-6714, U.S.A....

Users Manual - English
Page 2
Place the drum unit in the zip lock bag during transit. Warning When shipping the Fax Machine, the DRUM UNIT assembly including the TONER CARTRIDGE must ship your Fax Machine, carefully package the Fax Machine to avoid any damage during shipping, will cause severe damage to remove it...recommended that you must be adequately insured with the carrier. Remove the drum unit. 2. Failure to the Fax Machine and will VOID THE WARRANTY. 1. 3550-US-5.0 Shipment of the Fax Machine If for any reason you save and use the original packaging. The Fax Machine should be removed from the...
Place the drum unit in the zip lock bag during transit. Warning When shipping the Fax Machine, the DRUM UNIT assembly including the TONER CARTRIDGE must ship your Fax Machine, carefully package the Fax Machine to avoid any damage during shipping, will cause severe damage to remove it...recommended that you must be adequately insured with the carrier. Remove the drum unit. 2. Failure to the Fax Machine and will VOID THE WARRANTY. 1. 3550-US-5.0 Shipment of the Fax Machine If for any reason you save and use the original packaging. The Fax Machine should be removed from the...
Users Manual - English
Page 5
...7-6 Auto Reduction 7-6 Using Fixed Reduction Ratios 7-6 • Selecting the Ratios of Fixed Reduction 7-7 • Reception into Memory (Out of Paper Reception 7-7 Setting the Print Density 7-8 Toner Save Function 7-8 Speaker Volume 7-9 Ring Volume 7-9 B) REMOTE ACTIVATION 7-10 What is Remote Activation 7-10 • Connecting an External or Extension Telephone 7-10 Using Remote Codes...an Incoming Call 7-16 Which Phone Number Should I Register 7-16 What Must I Do to Set up Distinctive Ringing 7-16 Setting the Distinctive Ringing Function 7-17 3550-US-5.0 CONTENTS Chapter 7.
...7-6 Auto Reduction 7-6 Using Fixed Reduction Ratios 7-6 • Selecting the Ratios of Fixed Reduction 7-7 • Reception into Memory (Out of Paper Reception 7-7 Setting the Print Density 7-8 Toner Save Function 7-8 Speaker Volume 7-9 Ring Volume 7-9 B) REMOTE ACTIVATION 7-10 What is Remote Activation 7-10 • Connecting an External or Extension Telephone 7-10 Using Remote Codes...an Incoming Call 7-16 Which Phone Number Should I Register 7-16 What Must I Do to Set up Distinctive Ringing 7-16 Setting the Distinctive Ringing Function 7-17 3550-US-5.0 CONTENTS Chapter 7.
Users Manual - English
Page 7
3550-US-5.0 CONTENTS Chapter 12. Chapter 16. Printing the All Dial List 11-3 Transmission Verification (Xmit) Report 11-4 Memory Status List 11-5 y REPLACING THE TONER CARTRIDGE AND DRUM UNIT 12-1 Toner Empty Indicator 12-1 Replacing the Toner Cartridge 12-1 Replacing the Drum Unit 12-5 y REGULAR MAINTENANCE AND TROUBLESHOOTING 13-1 Regular Maintenance 13-1 Cleaning the Drum...
3550-US-5.0 CONTENTS Chapter 12. Chapter 16. Printing the All Dial List 11-3 Transmission Verification (Xmit) Report 11-4 Memory Status List 11-5 y REPLACING THE TONER CARTRIDGE AND DRUM UNIT 12-1 Toner Empty Indicator 12-1 Replacing the Toner Cartridge 12-1 Replacing the Drum Unit 12-5 y REGULAR MAINTENANCE AND TROUBLESHOOTING 13-1 Regular Maintenance 13-1 Cleaning the Drum...
Users Manual - English
Page 10
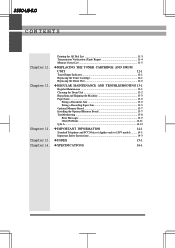
...cord Telephone handset *Manual feed slot Wire extension Multipurpose sheet feeder Dust cover Handset curled cord Drum unit assembly (with free starter toner cartridge) Document tray Wire extension Paper tray Owner's manual Remote control access card Quick setup guide Quick reference guide * Manual feed... unless the telephone line has been disconnected at the network interface. - Do not use as a printer with Multi-Function Link option. 3550-US-5.0 SETUP & PREPARATION BEFORE USE Packing List Please check to report a gas leak in wet locations unless the jack is only for...
...cord Telephone handset *Manual feed slot Wire extension Multipurpose sheet feeder Dust cover Handset curled cord Drum unit assembly (with free starter toner cartridge) Document tray Wire extension Paper tray Owner's manual Remote control access card Quick setup guide Quick reference guide * Manual feed... unless the telephone line has been disconnected at the network interface. - Do not use as a printer with Multi-Function Link option. 3550-US-5.0 SETUP & PREPARATION BEFORE USE Packing List Please check to report a gas leak in wet locations unless the jack is only for...
Users Manual - English
Page 11
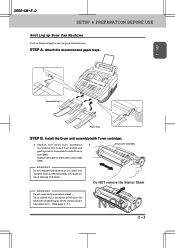
Ch. 1 Document tray Paper tray STEP B. Unseal the tape on the toner cartridge lever. Do NOT remove the Starter Sheet WARNING Do not remove the starter sheet. 3550-US-5.0 SETUP & PREPARATION BEFORE USE Setting up Your Fax Machine Follow these steps to side five or six times. ... drum unit. (See page 1-7.) NO ! 1-3 This sheet will damage the drum. Install the Drum unit assembly(with Toner cartridge). 1) Unpack the drum unit assembly 1) including the toner cartridge and gently rock it will be ejected while the machine is warming up your fax machine: STEP A. Attach the ...
Ch. 1 Document tray Paper tray STEP B. Unseal the tape on the toner cartridge lever. Do NOT remove the Starter Sheet WARNING Do not remove the starter sheet. 3550-US-5.0 SETUP & PREPARATION BEFORE USE Setting up Your Fax Machine Follow these steps to side five or six times. ... drum unit. (See page 1-7.) NO ! 1-3 This sheet will damage the drum. Install the Drum unit assembly(with Toner cartridge). 1) Unpack the drum unit assembly 1) including the toner cartridge and gently rock it will be ejected while the machine is warming up your fax machine: STEP A. Attach the ...

Users Manual - English
Page 12
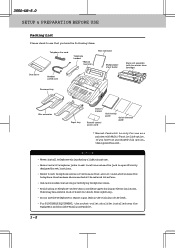
Drum unit Handles 4) Closethetopcover. 4) (See page 12-1 for more information about replacement of the fax machine 2) until the latch clicks into the fax machine. Top cover 3) Holding the drum unit by its handles, 3) insert it into place. 3550-US-5.0 SETUP & PREPARATION BEFORE USE 2) Open the top cover of toner cartridge.) Top cover 1-4
Drum unit Handles 4) Closethetopcover. 4) (See page 12-1 for more information about replacement of the fax machine 2) until the latch clicks into the fax machine. Top cover 3) Holding the drum unit by its handles, 3) insert it into place. 3550-US-5.0 SETUP & PREPARATION BEFORE USE 2) Open the top cover of toner cartridge.) Top cover 1-4

Users Manual - English
Page 23
.... (See page 3-2.) 18. Liquid Crystal Display The LCD displays messages that will stay lit. (See page 12-1.) c 3550 Set Function Clear Tel-index 16. Toner Empty This LED will start flashing when the amount of toner drops to back up one step when you set up one step in function mode (see page... 3-1) or Telephone Index. 14. Set This key is no toner, the LED will help you are in function mode (see page 3-1) or Telephone Index. 15. Z (Left Arrow) This key moves the LCD cursor to the...
.... (See page 3-2.) 18. Liquid Crystal Display The LCD displays messages that will stay lit. (See page 12-1.) c 3550 Set Function Clear Tel-index 16. Toner Empty This LED will start flashing when the amount of toner drops to back up one step when you set up one step in function mode (see page... 3-1) or Telephone Index. 14. Set This key is no toner, the LED will help you are in function mode (see page 3-1) or Telephone Index. 15. Z (Left Arrow) This key moves the LCD cursor to the...
Users Manual - English
Page 28
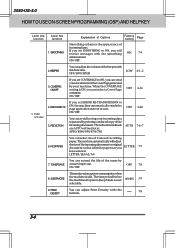
...Cover Page generated by your documents with this function. The reduction methods are AUTO or Fixed ratio: AUTO/100%/93%/87%/75% AUTO 7-6~7 6. 3550-US-5.0 HOW TO USE ON-SCREEN PROGRAMMING (OSP) AND HELP KEY Level one of 3 sizes of the beeper with the smoothing ON 7-4 enhancement....page again after an error occurs. When the COVERPAGE setting is ON, you set COVERPAGE to ON, you will adjust the size of the toner by printing a reduced copy of incoming faxes. ERRORRE-TX If you can send your machine. The machine automatically will receive messages with this ...
...Cover Page generated by your documents with this function. The reduction methods are AUTO or Fixed ratio: AUTO/100%/93%/87%/75% AUTO 7-6~7 6. 3550-US-5.0 HOW TO USE ON-SCREEN PROGRAMMING (OSP) AND HELP KEY Level one of 3 sizes of the beeper with the smoothing ON 7-4 enhancement....page again after an error occurs. When the COVERPAGE setting is ON, you set COVERPAGE to ON, you will adjust the size of the toner by printing a reduced copy of incoming faxes. ERRORRE-TX If you can send your machine. The machine automatically will receive messages with this ...

Users Manual - English
Page 73
...(right arrow) to select either ON or OFF. THE DISPLAY WILL SHOW: 09/12/1996 15:25 1.TEMP.SETTINGS 5.USER OPTIONS 7.TONER SAVE TONER SAVE:OFF SELECT { } & SET TONER SAVE:ON 7.TONER SAVE Ch. 7 7-8 The display will alternate messages. 4. KEYS TO PRESS 1. Press 7. 4. Example: ON. 5. Press Stop....SETTINGS 5.USER OPTIONS 9.PRINT DENSITY -sssssss + SELECT { } & SET 9.PRINT DENSITY Toner Save Function This function lets you can set to ON, the print appears somewhat lighter. 3550-US-5.0 BASIC SETUP TO RECEIVE FAXES RECEIVING FAXES AND OTHER CALLS Setting the Print Density You...
...(right arrow) to select either ON or OFF. THE DISPLAY WILL SHOW: 09/12/1996 15:25 1.TEMP.SETTINGS 5.USER OPTIONS 7.TONER SAVE TONER SAVE:OFF SELECT { } & SET TONER SAVE:ON 7.TONER SAVE Ch. 7 7-8 The display will alternate messages. 4. KEYS TO PRESS 1. Press 7. 4. Example: ON. 5. Press Stop....SETTINGS 5.USER OPTIONS 9.PRINT DENSITY -sssssss + SELECT { } & SET 9.PRINT DENSITY Toner Save Function This function lets you can set to ON, the print appears somewhat lighter. 3550-US-5.0 BASIC SETUP TO RECEIVE FAXES RECEIVING FAXES AND OTHER CALLS Setting the Print Density You...
Users Manual - English
Page 108
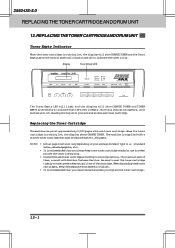
.... 3550-US-5.0 REPLACING THE TONER CARTRIDGE AND DRUM UNIT 12. Be sure to indicate that the toner is recommended that you see the toner low warning. • Discardtheusedtonercartridgeaccordingtolocalregulations.Ifyouarenotsureof them separate from domestic rubbish. • It is running low, the display shows CHANGE TONER. Replacing the Toner Cartridge The machine can print approximately 2,200 pages with Brother...
.... 3550-US-5.0 REPLACING THE TONER CARTRIDGE AND DRUM UNIT 12. Be sure to indicate that the toner is recommended that you see the toner low warning. • Discardtheusedtonercartridgeaccordingtolocalregulations.Ifyouarenotsureof them separate from domestic rubbish. • It is running low, the display shows CHANGE TONER. Replacing the Toner Cartridge The machine can print approximately 2,200 pages with Brother...
Users Manual - English
Page 109
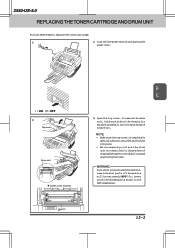
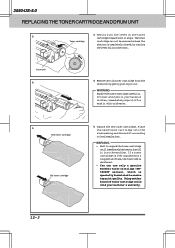
...drop cloth or large piece of the machine 2) Open the top cover. WARNING Just after you . 3550-US-5.0 REPLACING THE TONER CARTRIDGE AND DRUM UNIT Follow these steps to avoid spilling and scattering the toner. HOT ! 12-2 So, never touch the shaded parts shown in the left illustration. NOTE •...and gently lift the drum forward toward you have used the machine, some internal parts of the machine will be extremely HOT! Ch.12 : ON : OFF 2) Top cover Drum unit Inside of disposable paper to replace the toner cartridge: 1) 1) Turn off the power switch and unplug the power cord....
...drop cloth or large piece of the machine 2) Open the top cover. WARNING Just after you . 3550-US-5.0 REPLACING THE TONER CARTRIDGE AND DRUM UNIT Follow these steps to avoid spilling and scattering the toner. HOT ! 12-2 So, never touch the shaded parts shown in the left illustration. NOTE •...and gently lift the drum forward toward you have used the machine, some internal parts of the machine will be extremely HOT! Ch.12 : ON : OFF 2) Top cover Drum unit Inside of disposable paper to replace the toner cartridge: 1) 1) Turn off the power switch and unplug the power cord....
Users Manual - English
Page 110
...the aluminum bag and discard it stops. Place the used toner cartridge into the machine. WARNING Handle the toner cartridge carefully. WARNING • Waittounpackthetonercartridge until it according to the front. 3550-US-5.0 REPLACING THE TONER CARTRIDGE AND DRUM UNIT 3) Gently turn the lever on...the shutter is left unpacked for a long period of toner cartridge could void your hands or clothes, immediately wipe it off or wash it out. The toner Toner cartridge cartridge can use only a genuine Brother toner cartridge (TN5000PF series), which is specially formulated to ensure...
...the aluminum bag and discard it stops. Place the used toner cartridge into the machine. WARNING Handle the toner cartridge carefully. WARNING • Waittounpackthetonercartridge until it according to the front. 3550-US-5.0 REPLACING THE TONER CARTRIDGE AND DRUM UNIT 3) Gently turn the lever on...the shutter is left unpacked for a long period of toner cartridge could void your hands or clothes, immediately wipe it off or wash it out. The toner Toner cartridge cartridge can use only a genuine Brother toner cartridge (TN5000PF series), which is specially formulated to ensure...
Users Manual - English
Page 111
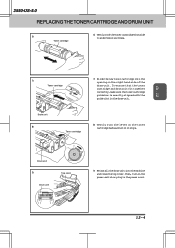
... on the power switch or plug in the drum unit. Then, turn the lever on the toner cartridge backward until it stops. 3550-US-5.0 REPLACING THE TONER CARTRIDGE AND DRUM UNIT 6) Toner cartridge 6) Gentlyrockthetonercartridgefromside to side five or six times. Drum unit 8) Toner cartridge 8) Gently turn on the right hand side of the drum unit.
... on the power switch or plug in the drum unit. Then, turn the lever on the toner cartridge backward until it stops. 3550-US-5.0 REPLACING THE TONER CARTRIDGE AND DRUM UNIT 6) Toner cartridge 6) Gentlyrockthetonercartridgefromside to side five or six times. Drum unit 8) Toner cartridge 8) Gently turn on the right hand side of the drum unit.

Users Manual - English
Page 112
... many factors that determine the actual drum life, we can not guarantee a minimum number of paper and toner that will be printed by your drum will print may be used the machine, some internal parts of its life. The drum life is nearly at 1 page per print job, etc... We ... when you may be significantly less than these steps to replace it contains toner. • You should be careful. (See page 13-2.) 12-5 For best performance, use and the number of pages your drum. 3550-US-5.0 REPLACING THE TONER CARTRIDGE AND DRUM UNIT Replacing the Drum Unit The machine uses a drum...
... many factors that determine the actual drum life, we can not guarantee a minimum number of paper and toner that will be printed by your drum will print may be used the machine, some internal parts of its life. The drum life is nearly at 1 page per print job, etc... We ... when you may be significantly less than these steps to replace it contains toner. • You should be careful. (See page 13-2.) 12-5 For best performance, use and the number of pages your drum. 3550-US-5.0 REPLACING THE TONER CARTRIDGE AND DRUM UNIT Replacing the Drum Unit The machine uses a drum...
Users Manual - English
Page 113
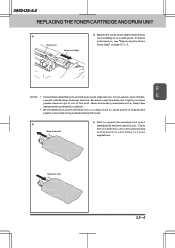
... the unit. When discarding used drum units, keep it in a safe place. 3550-US-5.0 REPLACING THE TONER CARTRIDGE AND DRUM UNIT 4) Drum unit Toner cartridge 4) Removethetonercartridgefromthedrum unit and keep them separated from domestic rubbish. • We recommend... you place the drum unit on page 12-1~4. Ch.12 NOTE: • Discardtheuseddrumunitaccordingtolocalregulations.Ifyouarenotsureofthem, consult with Brother Customer Service. Be...
... the unit. When discarding used drum units, keep it in a safe place. 3550-US-5.0 REPLACING THE TONER CARTRIDGE AND DRUM UNIT 4) Drum unit Toner cartridge 4) Removethetonercartridgefromthedrum unit and keep them separated from domestic rubbish. • We recommend... you place the drum unit on page 12-1~4. Ch.12 NOTE: • Discardtheuseddrumunitaccordingtolocalregulations.Ifyouarenotsureofthem, consult with Brother Customer Service. Be...
Users Manual - English
Page 114
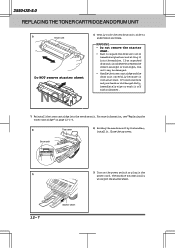
... and your hands or clothes get dirty, immediately wipe or wash it off with cold water. 7) Reinstallthetonercartridgeintothenewdrumunit.Formoreinformation,see"Replacingthe Toner Cartridge" on the power switch or plug in the 9) power cord. The machine automatically will eject the starter sheet. 12-7 ... WARNING • Do not remove the starter sheet. • Wait to unpack the drum unit until immediately before installing it . 3550-US-5.0 REPLACING THE TONER CARTRIDGE AND DRUM UNIT 6) Drum unit Do NOT remove starter sheet NO! 6) Gently rock the new drum unit side to excessive ...
... and your hands or clothes get dirty, immediately wipe or wash it off with cold water. 7) Reinstallthetonercartridgeintothenewdrumunit.Formoreinformation,see"Replacingthe Toner Cartridge" on the power switch or plug in the 9) power cord. The machine automatically will eject the starter sheet. 12-7 ... WARNING • Do not remove the starter sheet. • Wait to unpack the drum unit until immediately before installing it . 3550-US-5.0 REPLACING THE TONER CARTRIDGE AND DRUM UNIT 6) Drum unit Do NOT remove starter sheet NO! 6) Gently rock the new drum unit side to excessive ...
Users Manual - English
Page 115
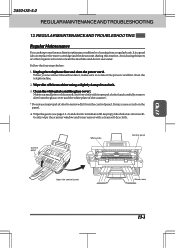
3550-US-5.0 REGULAR MAINTENANCE AND TROUBLESHOOTING 13. It is a good idea to clean the machine and do not use water. Unplug the telephone line and then the power cord. Itmaycauseacrackonthe panel. 4. Wipe dirt off the machine using thinners or other organic solvents to replace the toner... lint-free cloth with a clean soft dry cloth. Follow the four steps below: 1. Gently wipe the scanner window and toner sensor with isopropyl alcohol and carefully remove dirt from the glass cover and the white plate of the scanner. * Donotuseisopropylalcoholtoremovedirtfromthecontrolpanel. ...
3550-US-5.0 REGULAR MAINTENANCE AND TROUBLESHOOTING 13. It is a good idea to clean the machine and do not use water. Unplug the telephone line and then the power cord. Itmaycauseacrackonthe panel. 4. Wipe dirt off the machine using thinners or other organic solvents to replace the toner... lint-free cloth with a clean soft dry cloth. Follow the four steps below: 1. Gently wipe the scanner window and toner sensor with isopropyl alcohol and carefully remove dirt from the glass cover and the white plate of the scanner. * Donotuseisopropylalcoholtoremovedirtfromthecontrolpanel. ...

Users Manual - English
Page 116
... the left. Turnthedrumunitupsidedownslowly. Inside the machine WARNING Just after you have used the fax machine, some internal parts of the machine, never touch the shaded parts shown in the diagram to avoid spilling and scattering the toner. 1. 3550-US-5.0 REGULAR MAINTENANCE AND TROUBLESHOOTING WARNING • Donotuseisopropylalcoholtocleanthescannerwindoworthetonersensor. • Donottouchthescannerwindowwithyourfinger. • Handle the drum unit...
... the left. Turnthedrumunitupsidedownslowly. Inside the machine WARNING Just after you have used the fax machine, some internal parts of the machine, never touch the shaded parts shown in the diagram to avoid spilling and scattering the toner. 1. 3550-US-5.0 REGULAR MAINTENANCE AND TROUBLESHOOTING WARNING • Donotuseisopropylalcoholtocleanthescannerwindoworthetonersensor. • Donottouchthescannerwindowwithyourfinger. • Handle the drum unit...

Users Manual - English
Page 117
Ch.13 3550-US-5.0 REGULAR MAINTENANCE AND TROUBLESHOOTING 2. Install the drum unit into the machine. See the section "REPLACING THE DRUM UNIT" on page 12-5. 5. ... not position the tab at the home position, printed pages may be damaged, which will void the machine's warranty. 1. Leave the toner cartridge installed in the drum unit. Returnthetabtothehomeposition(v markposition)beforereinstallingthedrumunit. Pluginthepowercordandturnonthepowerswitch. Removethedrumunitassembly.Toremovethedrumunit,pleaserefertotheprevioussection (See page 12-5.) NOTE: Remove the drum unit and...
Ch.13 3550-US-5.0 REGULAR MAINTENANCE AND TROUBLESHOOTING 2. Install the drum unit into the machine. See the section "REPLACING THE DRUM UNIT" on page 12-5. 5. ... not position the tab at the home position, printed pages may be damaged, which will void the machine's warranty. 1. Leave the toner cartridge installed in the drum unit. Returnthetabtothehomeposition(v markposition)beforereinstallingthedrumunit. Pluginthepowercordandturnonthepowerswitch. Removethedrumunitassembly.Toremovethedrumunit,pleaserefertotheprevioussection (See page 12-5.) NOTE: Remove the drum unit and...


