
Users Manual - English
Page 1
...compatible with the power available in foreign countries. Brother International Corporation (Canada) Ltd. 1 rue Hôtel de Ville, Dollard-des-Ormeaux, QC, CANADA H9B 3H6 These machines are made for use in Japan OWNER'S MANUAL IntelliFAX 3550 CONTENTS Chapter1 SETUP & PREPARATION BEFORE USE Chapter2 ... USING THE UNIT AS A TELEPHONE Chapter6 SENDING FAXES Chapter7 RECEIVING FAXES AND OTHER CALLS Chapter8 HOW TO USE THE COPY FUNCTION Chapter9 POLLING Chapter10 REMOTE FAX OPTIONS Chapter11 PRINTING REPORTS AND LISTS Chapter12 REPLACING THE TONER CARTRIDGE AND DRUM UNIT Chapter13 REGULAR ...
...compatible with the power available in foreign countries. Brother International Corporation (Canada) Ltd. 1 rue Hôtel de Ville, Dollard-des-Ormeaux, QC, CANADA H9B 3H6 These machines are made for use in Japan OWNER'S MANUAL IntelliFAX 3550 CONTENTS Chapter1 SETUP & PREPARATION BEFORE USE Chapter2 ... USING THE UNIT AS A TELEPHONE Chapter6 SENDING FAXES Chapter7 RECEIVING FAXES AND OTHER CALLS Chapter8 HOW TO USE THE COPY FUNCTION Chapter9 POLLING Chapter10 REMOTE FAX OPTIONS Chapter11 PRINTING REPORTS AND LISTS Chapter12 REPLACING THE TONER CARTRIDGE AND DRUM UNIT Chapter13 REGULAR ...

Users Manual - English
Page 2
...zip lock bag. Failure to remove it and place it in the zip lock bag. 3. Remove the drum unit. 2. Repack the Machine. Place the drum unit in the zip lock bag during transit. 3550-US-5.0 Shipment of the Fax Machine If for any damage during shipping, will cause severe damage to the... Fax Machine and will VOID THE WARRANTY. 1. It is recommended that you must be adequately insured with the carrier. Warning When shipping the Fax Machine, the DRUM UNIT assembly ...
...zip lock bag. Failure to remove it and place it in the zip lock bag. 3. Remove the drum unit. 2. Repack the Machine. Place the drum unit in the zip lock bag during transit. 3550-US-5.0 Shipment of the Fax Machine If for any damage during shipping, will cause severe damage to the... Fax Machine and will VOID THE WARRANTY. 1. It is recommended that you must be adequately insured with the carrier. Warning When shipping the Fax Machine, the DRUM UNIT assembly ...
Users Manual - English
Page 7
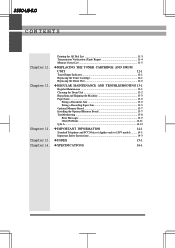
...Verification (Xmit) Report 11-4 Memory Status List 11-5 y REPLACING THE TONER CARTRIDGE AND DRUM UNIT 12-1 Toner Empty Indicator 12-1 Replacing the Toner Cartridge 12-1 Replacing the Drum Unit 12-5 y REGULAR MAINTENANCE AND TROUBLESHOOTING 13-1 Regular Maintenance 13-1 Cleaning the Drum Unit 13-2 Repacking and Shipping the Machine 13-3 Paper Jams ...13-5 Fixing a Document ... and FCC Notices (Applies only to 120V model 14-1 Important Safety Instructions 14-3 y INDEX 15-1 y SPECIFICATIONS 16-1 Chapter 15. Chapter 13. Chapter 14. 3550-US-5.0 CONTENTS Chapter 12.
...Verification (Xmit) Report 11-4 Memory Status List 11-5 y REPLACING THE TONER CARTRIDGE AND DRUM UNIT 12-1 Toner Empty Indicator 12-1 Replacing the Toner Cartridge 12-1 Replacing the Drum Unit 12-5 y REGULAR MAINTENANCE AND TROUBLESHOOTING 13-1 Regular Maintenance 13-1 Cleaning the Drum Unit 13-2 Repacking and Shipping the Machine 13-3 Paper Jams ...13-5 Fixing a Document ... and FCC Notices (Applies only to 120V model 14-1 Important Safety Instructions 14-3 y INDEX 15-1 y SPECIFICATIONS 16-1 Chapter 15. Chapter 13. Chapter 14. 3550-US-5.0 CONTENTS Chapter 12.
Users Manual - English
Page 10
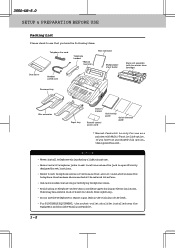
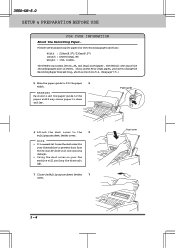
3550-US-5.0 SETUP & PREPARATION BEFORE USE Packing List Please check to report a gas leak in wet locations unless the jack is only for use as a printer ... terminals that you have the following items: Telephone line cord Telephone handset *Manual feed slot Wire extension Multipurpose sheet feeder Dust cover Handset curled cord Drum unit assembly (with Multi-Function Link option. Avoid using a telephone (other than a cordless type) during a lightningstorm. - For PLUGGABLE EQUIPMENT, the socket-outlet should be installed near...
3550-US-5.0 SETUP & PREPARATION BEFORE USE Packing List Please check to report a gas leak in wet locations unless the jack is only for use as a printer ... terminals that you have the following items: Telephone line cord Telephone handset *Manual feed slot Wire extension Multipurpose sheet feeder Dust cover Handset curled cord Drum unit assembly (with Multi-Function Link option. Avoid using a telephone (other than a cordless type) during a lightningstorm. - For PLUGGABLE EQUIPMENT, the socket-outlet should be installed near...
Users Manual - English
Page 11
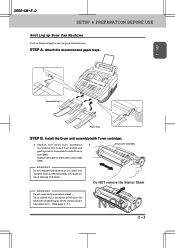
... a few minutes, because it will be ejected while the machine is warming up your fax machine: STEP A. 3550-US-5.0 SETUP & PREPARATION BEFORE USE Setting up Your Fax Machine Follow these steps to set up after installing a new drum unit. (See page 1-7.) NO ! 1-3 Ch. 1 Document tray Paper tray STEP B. This sheet will damage the...
... a few minutes, because it will be ejected while the machine is warming up your fax machine: STEP A. 3550-US-5.0 SETUP & PREPARATION BEFORE USE Setting up Your Fax Machine Follow these steps to set up after installing a new drum unit. (See page 1-7.) NO ! 1-3 Ch. 1 Document tray Paper tray STEP B. This sheet will damage the...

Users Manual - English
Page 12
Top cover 3) Holding the drum unit by its handles, 3) insert it into place. 3550-US-5.0 SETUP & PREPARATION BEFORE USE 2) Open the top cover of toner cartridge.) Top cover 1-4 Drum unit Handles 4) Closethetopcover. 4) (See page 12-1 for more information about replacement of the fax machine 2) until the latch clicks into the fax machine.
Top cover 3) Holding the drum unit by its handles, 3) insert it into place. 3550-US-5.0 SETUP & PREPARATION BEFORE USE 2) Open the top cover of toner cartridge.) Top cover 1-4 Drum unit Handles 4) Closethetopcover. 4) (See page 12-1 for more information about replacement of the fax machine 2) until the latch clicks into the fax machine.
Users Manual - English
Page 14
... paper size is function 5-6. (See page 7-5.) 5) Move the paper guide to prevent dust from entering the drum unit and causing damage. • Using the dust cover on your fax machine will prolong the drum unit life. 7) Close the Multipurpose sheet feeder 7) cover. WARNING Failure to set the paper guide to the paper....to24lb. NOTE • Itisessentialtousethedustcoverfor your fax machine to fit the paper 5) width. Dust cover 1-6 The feeder can accept letter, A4, and legal sized paper. 3550-US-5.0 SETUP & PREPARATION BEFORE USE FOR YOUR INFORMATION About the Recording Paper...
... paper size is function 5-6. (See page 7-5.) 5) Move the paper guide to prevent dust from entering the drum unit and causing damage. • Using the dust cover on your fax machine will prolong the drum unit life. 7) Close the Multipurpose sheet feeder 7) cover. WARNING Failure to set the paper guide to the paper....to24lb. NOTE • Itisessentialtousethedustcoverfor your fax machine to fit the paper 5) width. Dust cover 1-6 The feeder can accept letter, A4, and legal sized paper. 3550-US-5.0 SETUP & PREPARATION BEFORE USE FOR YOUR INFORMATION About the Recording Paper...

Users Manual - English
Page 73
... DISPLAY WILL SHOW: 09/12/1996 15:25 1.TEMP.SETTINGS 5.USER OPTIONS 7.TONER SAVE TONER SAVE:OFF SELECT { } & SET TONER SAVE:ON 7.TONER SAVE Ch. 7 7-8 3550-US-5.0 BASIC SETUP TO RECEIVE FAXES RECEIVING FAXES AND OTHER CALLS Setting the Print Density You can adjust it further by conserving its use. Press... dark, you extend the life of the toner by turning the Print Density Dial located in the right corner under the top cover. (Remove the drum unit to change the settings. 5. Press 5. 3.
... DISPLAY WILL SHOW: 09/12/1996 15:25 1.TEMP.SETTINGS 5.USER OPTIONS 7.TONER SAVE TONER SAVE:OFF SELECT { } & SET TONER SAVE:ON 7.TONER SAVE Ch. 7 7-8 3550-US-5.0 BASIC SETUP TO RECEIVE FAXES RECEIVING FAXES AND OTHER CALLS Setting the Print Density You can adjust it further by conserving its use. Press... dark, you extend the life of the toner by turning the Print Density Dial located in the right corner under the top cover. (Remove the drum unit to change the settings. 5. Press 5. 3.
Users Manual - English
Page 108
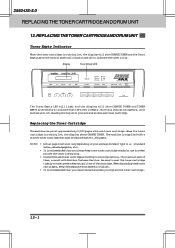
3550-US-5.0 REPLACING THE TONER CARTRIDGE AND DRUM UNIT 12. Once this indication appears, your average document type (i.e.: standard letter, detailed graphics, etc). • It is recommended that must be replaced after 1,000 pages. Replacing the Toner Cartridge The machine can print approximately 2,200 pages with Brother... them separate from domestic rubbish. • It is recommended that the toner is low. REPLACING THE TONER CARTRIDGE AND DRUM UNIT Toner Empty Indicator When the toner cartridge is supplied with a starter toner cartridge that you have installed a new toner cartridge....
3550-US-5.0 REPLACING THE TONER CARTRIDGE AND DRUM UNIT 12. Once this indication appears, your average document type (i.e.: standard letter, detailed graphics, etc). • It is recommended that must be replaced after 1,000 pages. Replacing the Toner Cartridge The machine can print approximately 2,200 pages with Brother... them separate from domestic rubbish. • It is recommended that the toner is low. REPLACING THE TONER CARTRIDGE AND DRUM UNIT Toner Empty Indicator When the toner cartridge is supplied with a starter toner cartridge that you have installed a new toner cartridge....
Users Manual - English
Page 109
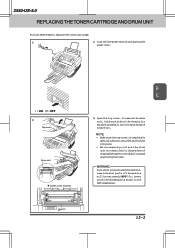
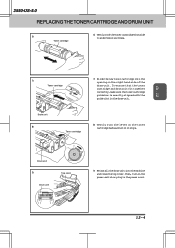
... place. • We recommend you have used the machine, some internal parts of the machine 2) Open the top cover. HOT ! 12-2 3550-US-5.0 REPLACING THE TONER CARTRIDGE AND DRUM UNIT Follow these steps to avoid spilling and scattering the toner. Ch.12 : ON : OFF 2) Top cover Drum unit Inside of the machine will be extremely HOT!
... place. • We recommend you have used the machine, some internal parts of the machine 2) Open the top cover. HOT ! 12-2 3550-US-5.0 REPLACING THE TONER CARTRIDGE AND DRUM UNIT Follow these steps to avoid spilling and scattering the toner. Ch.12 : ON : OFF 2) Top cover Drum unit Inside of the machine will be extremely HOT!
Users Manual - English
Page 110
...toner 3) cartridge forward until immediately before you install it out. 3550-US-5.0 REPLACING THE TONER CARTRIDGE AND DRUM UNIT 3) Gently turn the lever on your machine's warranty. 12-3 Drum unit 4) 4) Remove the old toner cartridge from the drum unit by turning the lever fully to the front. Place the used...your hands or clothes, immediately wipe it off or wash it stops. The toner Toner cartridge cartridge can use only a genuine Brother toner cartridge (TN5000PF series), which is completely closed, by gently pulling it into the aluminum bag and discard it according to ...
...toner 3) cartridge forward until immediately before you install it out. 3550-US-5.0 REPLACING THE TONER CARTRIDGE AND DRUM UNIT 3) Gently turn the lever on your machine's warranty. 12-3 Drum unit 4) 4) Remove the old toner cartridge from the drum unit by turning the lever fully to the front. Place the used...your hands or clothes, immediately wipe it off or wash it stops. The toner Toner cartridge cartridge can use only a genuine Brother toner cartridge (TN5000PF series), which is completely closed, by gently pulling it into the aluminum bag and discard it according to ...
Users Manual - English
Page 111
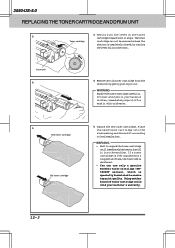
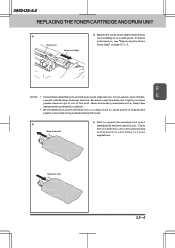
To ensure that the toner cartridge and drum unit fit together correctly, make sure the toner cartridge guide bar is exactly aligned with the guide slot in the power cord. 12... toner cartridge into the opening on the power switch or plug in the drum unit. 3550-US-5.0 REPLACING THE TONER CARTRIDGE AND DRUM UNIT 6) Toner cartridge 6) Gentlyrockthetonercartridgefromside to side five or six times. Drum unit 8) Toner cartridge 8) Gently turn on the right hand side of the drum unit. Drum unit 9) Drum unit Top cover 9) Reinstallthedrumunitintothemachine and close the top cover.
To ensure that the toner cartridge and drum unit fit together correctly, make sure the toner cartridge guide bar is exactly aligned with the guide slot in the power cord. 12... toner cartridge into the opening on the power switch or plug in the drum unit. 3550-US-5.0 REPLACING THE TONER CARTRIDGE AND DRUM UNIT 6) Toner cartridge 6) Gentlyrockthetonercartridgefromside to side five or six times. Drum unit 8) Toner cartridge 8) Gently turn on the right hand side of the drum unit. Drum unit 9) Drum unit Top cover 9) Reinstallthedrumunitintothemachine and close the top cover.

Users Manual - English
Page 112
... CHANGE DRUM is shown, then the drum unit should be used the machine, some internal parts of the machine are many factors that determine the actual drum life, such as temperature, humidity, type of paper and toner that will be printed by your drum will ...drum unit for a while. Even if the display shows CHANGE DRUM, you prepare a new drum unit to create the print images on paper. The drum unit is estimated at approximately 20,000 pages at 20 page per print job, etc... 3550-US-5.0 REPLACING THE TONER CARTRIDGE AND DRUM UNIT Replacing the Drum Unit The machine uses a drum unit...
... CHANGE DRUM is shown, then the drum unit should be used the machine, some internal parts of the machine are many factors that determine the actual drum life, such as temperature, humidity, type of paper and toner that will be printed by your drum will ...drum unit for a while. Even if the display shows CHANGE DRUM, you prepare a new drum unit to create the print images on paper. The drum unit is estimated at approximately 20,000 pages at 20 page per print job, etc... 3550-US-5.0 REPLACING THE TONER CARTRIDGE AND DRUM UNIT Replacing the Drum Unit The machine uses a drum unit...
Users Manual - English
Page 113
... unpack the new drum unit until immediately before installing it. When discarding used drum units, keep it according to local regulations. 3550-US-5.0 REPLACING THE TONER CARTRIDGE AND DRUM UNIT 4) Drum unit Toner cartridge 4) Removethetonercartridgefromthedrum unit and keep them separated from domestic rubbish. • We recommend you place the drum unit on page 12-1~4. Old drum unit 12-6 Place the old drum unit into the aluminum...
... unpack the new drum unit until immediately before installing it. When discarding used drum units, keep it according to local regulations. 3550-US-5.0 REPLACING THE TONER CARTRIDGE AND DRUM UNIT 4) Drum unit Toner cartridge 4) Removethetonercartridgefromthedrum unit and keep them separated from domestic rubbish. • We recommend you place the drum unit on page 12-1~4. Old drum unit 12-6 Place the old drum unit into the aluminum...
Users Manual - English
Page 114
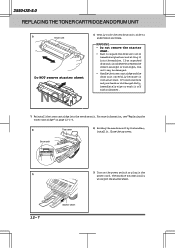
... dirty, immediately wipe or wash it . Close the top cover. 3550-US-5.0 REPLACING THE TONER CARTRIDGE AND DRUM UNIT 6) Drum unit Do NOT remove starter sheet NO! 6) Gently rock the new drum unit side to excessive direct sunlight or room light, the unit may be damaged. • Handlethetonercartridgeandthe drum unit carefully because it into the machine. The machine automatically will...
... dirty, immediately wipe or wash it . Close the top cover. 3550-US-5.0 REPLACING THE TONER CARTRIDGE AND DRUM UNIT 6) Drum unit Do NOT remove starter sheet NO! 6) Gently rock the new drum unit side to excessive direct sunlight or room light, the unit may be damaged. • Handlethetonercartridgeandthe drum unit carefully because it into the machine. The machine automatically will...
Users Manual - English
Page 115
Wipe dirt off the machine using thinners or other organic solvents to replace the toner cartridge and the drum unit during this routine. Glass cover Ch.13 13-1 Itmaycauseacrackonthe panel. 4. Clean the white plate and the glass cover: Moisten a small piece of clean soft, lint-..., then the telephone line. 2. REGULAR MAINTENANCE AND TROUBLESHOOTING Regular Maintenance You can keep your fax machine in optimum condition by cleaning it on a regular basis. 3550-US-5.0 REGULAR MAINTENANCE AND TROUBLESHOOTING 13.
Wipe dirt off the machine using thinners or other organic solvents to replace the toner cartridge and the drum unit during this routine. Glass cover Ch.13 13-1 Itmaycauseacrackonthe panel. 4. Clean the white plate and the glass cover: Moisten a small piece of clean soft, lint-..., then the telephone line. 2. REGULAR MAINTENANCE AND TROUBLESHOOTING Regular Maintenance You can keep your fax machine in optimum condition by cleaning it on a regular basis. 3550-US-5.0 REGULAR MAINTENANCE AND TROUBLESHOOTING 13.

Users Manual - English
Page 116
... the machine WARNING Just after you have used the fax machine, some internal parts of the machine, never touch the shaded parts shown in the diagram to avoid spilling and scattering the toner. 1. Cleaning the Drum Unit NOTE: Werecommendyouplacethedrumunitonadropclothorlargepieceofdisposablepaper to the left. 3550-US-5.0 REGULAR MAINTENANCE AND TROUBLESHOOTING WARNING • Donotuseisopropylalcoholtocleanthescannerwindoworthetonersensor. • Donottouchthescannerwindowwithyourfinger. •...
... the machine WARNING Just after you have used the fax machine, some internal parts of the machine, never touch the shaded parts shown in the diagram to avoid spilling and scattering the toner. 1. Cleaning the Drum Unit NOTE: Werecommendyouplacethedrumunitonadropclothorlargepieceofdisposablepaper to the left. 3550-US-5.0 REGULAR MAINTENANCE AND TROUBLESHOOTING WARNING • Donotuseisopropylalcoholtocleanthescannerwindoworthetonersensor. • Donottouchthescannerwindowwithyourfinger. •...

Users Manual - English
Page 117
...Cleantheprimarycoronawireinsidethedrumunitbygentlyslidingthetabfromrighttoleft several times. 3. TurnoffthepowerswitchandunplugthemachinefromtheACoutlet. 2. Openthetopcover. 3. Leave the toner cartridge installed in the drum unit. See the section "REPLACING THE DRUM UNIT" on page 12-5. 5. Pluginthepowercordandturnonthepowerswitch. Closethetopcover. 6. Returnthetabtothehomeposition(v markposition)beforereinstallingthedrumunit. Repacking and Shipping ... machine may have vertical stripes. 4. Ch.13 3550-US-5.0 REGULAR MAINTENANCE AND TROUBLESHOOTING 2. Top cover Drum unit 13-3
...Cleantheprimarycoronawireinsidethedrumunitbygentlyslidingthetabfromrighttoleft several times. 3. TurnoffthepowerswitchandunplugthemachinefromtheACoutlet. 2. Openthetopcover. 3. Leave the toner cartridge installed in the drum unit. See the section "REPLACING THE DRUM UNIT" on page 12-5. 5. Pluginthepowercordandturnonthepowerswitch. Closethetopcover. 6. Returnthetabtothehomeposition(v markposition)beforereinstallingthedrumunit. Repacking and Shipping ... machine may have vertical stripes. 4. Ch.13 3550-US-5.0 REGULAR MAINTENANCE AND TROUBLESHOOTING 2. Top cover Drum unit 13-3

Users Manual - English
Page 118
... and place it shut. 13-4 Close the carton box and tape it in the original carton box with the original packing material. 7. 3550-US-5.0 REGULAR MAINTENANCE AND TROUBLESHOOTING 4. Zip lock bag Drum unit Toner cartridge 5. Place the drum unit and toner cartridge assemply into the carton box as shown below. 8. Placeanydocuments(manualandanydocumentationexplainingthereasonforshippingthe machine) and the...
... and place it shut. 13-4 Close the carton box and tape it in the original carton box with the original packing material. 7. 3550-US-5.0 REGULAR MAINTENANCE AND TROUBLESHOOTING 4. Zip lock bag Drum unit Toner cartridge 5. Place the drum unit and toner cartridge assemply into the carton box as shown below. 8. Placeanydocuments(manualandanydocumentationexplainingthereasonforshippingthe machine) and the...

Users Manual - English
Page 119
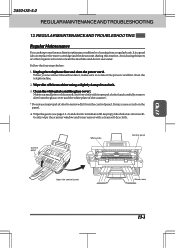
...8226; Afteryouhaveusedthemachine,someinternalpartsofthemachineareextremely HOT! Fixing a Document Jam 1. Press Stop. Paper Top Cover Multipurpose Sheet Feeder Ch.13 Drum Unit WARNING • Donotforcethejammedpaperfromthepapertraybecauseyoumaydamagethe machine and cause toner to help locate the position of the paper. HOT! Fixing a ...can clear a paper jam error, you must find out where the paper is stuck. Inside the machine 13-5 3550-US-5.0 REGULAR MAINTENANCE AND TROUBLESHOOTING Paper Jams Your fax machine will show DOCUMENT JAM or PRINTER JAM. Openthecontrolpanel. 2....
...8226; Afteryouhaveusedthemachine,someinternalpartsofthemachineareextremely HOT! Fixing a Document Jam 1. Press Stop. Paper Top Cover Multipurpose Sheet Feeder Ch.13 Drum Unit WARNING • Donotforcethejammedpaperfromthepapertraybecauseyoumaydamagethe machine and cause toner to help locate the position of the paper. HOT! Fixing a ...can clear a paper jam error, you must find out where the paper is stuck. Inside the machine 13-5 3550-US-5.0 REGULAR MAINTENANCE AND TROUBLESHOOTING Paper Jams Your fax machine will show DOCUMENT JAM or PRINTER JAM. Openthecontrolpanel. 2....

