

Users Manual - English
Page 6
...Product in accordance with a copy of your dated bill of sale showing that expired in shipping. For the name of non Brother®-brand parts and Consumable and Accessory Items); (4) Consumable and Accessory Items that this Product was purchased within the U.S. You are responsible for... thermal paper. • Except as otherwise provided herein, Brother warrants that the Machine and the accompanying Consumable and Accessory Items will repair or replace the Machine and/or accompanying Consumable and Accessory Items at 1-800-284-4329 for Fax, MFC and DCP and 1-800-276-7746 for loss ...
...Product in accordance with a copy of your dated bill of sale showing that expired in shipping. For the name of non Brother®-brand parts and Consumable and Accessory Items); (4) Consumable and Accessory Items that this Product was purchased within the U.S. You are responsible for... thermal paper. • Except as otherwise provided herein, Brother warrants that the Machine and the accompanying Consumable and Accessory Items will repair or replace the Machine and/or accompanying Consumable and Accessory Items at 1-800-284-4329 for Fax, MFC and DCP and 1-800-276-7746 for loss ...
Users Manual - English
Page 7
...EXPRESSED BY AFFIRMATION, PROMISE, DESCRIPTION, DRAWING, MODEL OR SAMPLE. It is authorized by Brother, and you and charged for new product/parts. The repaired or replacement Machine and/or accompanying Consumable and Accessory Items will be covered by the balance of the ...replacement Machine after receipt of the replacement Machine, supply the required proof of purchase information, together with the Machine that may vary from state to state. • This Limited Warranty (and Brother's obligation to you) may not apply to you ship this Product. © 2003 Brother International ...
...EXPRESSED BY AFFIRMATION, PROMISE, DESCRIPTION, DRAWING, MODEL OR SAMPLE. It is authorized by Brother, and you and charged for new product/parts. The repaired or replacement Machine and/or accompanying Consumable and Accessory Items will be covered by the balance of the ...replacement Machine after receipt of the replacement Machine, supply the required proof of purchase information, together with the Machine that may vary from state to state. • This Limited Warranty (and Brother's obligation to you) may not apply to you ship this Product. © 2003 Brother International ...

Users Manual - English
Page 8
.... 1 Rue Hôtel de Ville Dollard-Des-Ormeaux, QC H9B 3H6 vi BROTHER MULTIFUNCTION CENTER/FACSIMILE MACHINE LIMITED WARRANTY (Canada only) Pursuant to this limited warranty of 1 year from the date of purchase for labour and parts, Brother International Corporation (Canada) Ltd. ("Brother"), or its Authorized Service Centers, Distributors, Dealers, Agents or employees, shall create another...
.... 1 Rue Hôtel de Ville Dollard-Des-Ormeaux, QC H9B 3H6 vi BROTHER MULTIFUNCTION CENTER/FACSIMILE MACHINE LIMITED WARRANTY (Canada only) Pursuant to this limited warranty of 1 year from the date of purchase for labour and parts, Brother International Corporation (Canada) Ltd. ("Brother"), or its Authorized Service Centers, Distributors, Dealers, Agents or employees, shall create another...

Users Manual - English
Page 85
... and setting them up as One-Touch and Speed-Dial numbers. If you press One-Touch key 1, One-Touch key 2, and then Black Start or Color Start, you have stored '555' on One-Touch key 1 and '7000' on the time and destination. To temporarily change the number to choose from several... when you make a call. For example, to change a number, you must wait for another dial tone or signal at any combination. If you can substitute part of low rates, you can press Redial/Pause as many times as needed to insert a 3.5-second pause between numbers. Dialing options Access codes and credit...
... and setting them up as One-Touch and Speed-Dial numbers. If you press One-Touch key 1, One-Touch key 2, and then Black Start or Color Start, you have stored '555' on One-Touch key 1 and '7000' on the time and destination. To temporarily change the number to choose from several... when you make a call. For example, to change a number, you must wait for another dial tone or signal at any combination. If you can substitute part of low rates, you can press Redial/Pause as many times as needed to insert a 3.5-second pause between numbers. Dialing options Access codes and credit...
Users Manual - English
Page 134
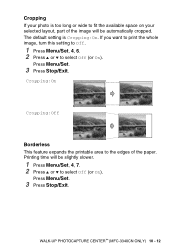
... slightly slower. 1 Press Menu/Set, 4, 7. 2 Press ▲ or ▼ to fit the available space on your photo is Cropping:On. Cropping If your selected layout, part of the paper. Cropping:On Cropping:Off Borderless This feature expands the printable area to select Off (or On). Press Menu/Set. 3 Press Stop/Exit...
... slightly slower. 1 Press Menu/Set, 4, 7. 2 Press ▲ or ▼ to fit the available space on your photo is Cropping:On. Cropping If your selected layout, part of the paper. Cropping:On Cropping:Off Borderless This feature expands the printable area to select Off (or On). Press Menu/Set. 3 Press Stop/Exit...
Users Manual - English
Page 137
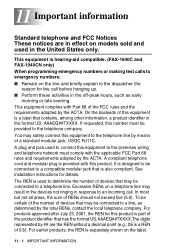
...by the ACTA. A plug and jack used in the format US: AAAEQ##TXXXX. A compliant telephone cord and modular plug is provided with Part 68 of the FCC rules and the requirements adopted by the total RENs, contact the local telephone company. This equipment complies with this equipment... (e.g., 06 is a REN of 0.6). This equipment is used to the dispatcher the reason for details. The REN is hearing-aid compatible. (FAX-1840C and FAX-1940CN only) When programming emergency numbers or making test calls to emergency numbers: ■ Remain on the label. 11 - 1 IMPORTANT INFORMATION
...by the ACTA. A plug and jack used in the format US: AAAEQ##TXXXX. A compliant telephone cord and modular plug is provided with Part 68 of the FCC rules and the requirements adopted by the total RENs, contact the local telephone company. This equipment complies with this equipment... (e.g., 06 is a REN of 0.6). This equipment is used to the dispatcher the reason for details. The REN is hearing-aid compatible. (FAX-1840C and FAX-1940CN only) When programming emergency numbers or making test calls to emergency numbers: ■ Remain on the label. 11 - 1 IMPORTANT INFORMATION
Users Manual - English
Page 139
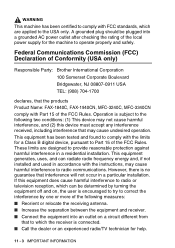
...against harmful interference in a particular installation. Federal Communications Commission (FCC) Declaration of the FCC Rules. WARNING This machine has been certified to comply with the instructions, may cause undesired operation. This equipment generates, uses, and can ... receiver is no guarantee that the products Product Name: FAX-1840C, FAX-1940CN, MFC-3240C, MFC-3340CN comply with the limits for a Class B digital device, pursuant to Part 15 of Conformity (USA only) Responsible Party: Brother International Corporation 100 Somerset Corporate Boulevard Bridgewater, NJ 08807-0911 ...
...against harmful interference in a particular installation. Federal Communications Commission (FCC) Declaration of the FCC Rules. WARNING This machine has been certified to comply with the instructions, may cause undesired operation. This equipment generates, uses, and can ... receiver is no guarantee that the products Product Name: FAX-1840C, FAX-1940CN, MFC-3240C, MFC-3340CN comply with the limits for a Class B digital device, pursuant to Part 15 of Conformity (USA only) Responsible Party: Brother International Corporation 100 Somerset Corporate Boulevard Bridgewater, NJ 08807-0911 ...

Users Manual - English
Page 142
...in front of the machine that the total ampere ratings on the cord. 11 If an extension cord is used with this product through cabinet slots, since they may void your nearest Brother Authorized Service Center, please call In USA: 1-800-284-4357 or In Canada: 1-877-BROTHER. (See Brother numbers on the ...touch dangerous voltage points or short out parts resulting in the risk of any kind into the AC power outlet does not exceed 15 amperes (USA only). 12 Do not place anything in the path of received faxes. 13 Wait until pages have exited the machine before picking them up. 14 Never push...
...in front of the machine that the total ampere ratings on the cord. 11 If an extension cord is used with this product through cabinet slots, since they may void your nearest Brother Authorized Service Center, please call In USA: 1-800-284-4357 or In Canada: 1-877-BROTHER. (See Brother numbers on the ...touch dangerous voltage points or short out parts resulting in the risk of any kind into the AC power outlet does not exceed 15 amperes (USA only). 12 Do not place anything in the path of received faxes. 13 Wait until pages have exited the machine before picking them up. 14 Never push...

Users Manual - English
Page 164
... shown in position. TROUBLESHOOTING AND ROUTINE MAINTENANCE 12 - 20 Caution It is essential that came with either the protective parts or the ink cartridges in the diagram. Caution If you could void your machine and may lead to print problems and possible damage to the print head. 1 Close the document support and...
... shown in position. TROUBLESHOOTING AND ROUTINE MAINTENANCE 12 - 20 Caution It is essential that came with either the protective parts or the ink cartridges in the diagram. Caution If you could void your machine and may lead to print problems and possible damage to the print head. 1 Close the document support and...
Users Manual - English
Page 166
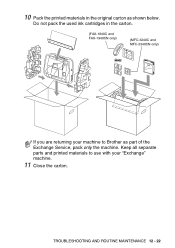
Do not pack the used ink cartridges in the original carton as part of the Exchange Service, pack only the machine. TROUBLESHOOTING AND ROUTINE MAINTENANCE 12 - 22 Keep all separate parts and printed materials to Brother as shown below. 10 Pack the printed materials in the carton. (FAX-1840C and FAX-1940CN only) (MFC-3240C and MFC-3340CN only) If you are returning your machine to use with your "Exchange" machine. 11 Close the carton.
Do not pack the used ink cartridges in the original carton as part of the Exchange Service, pack only the machine. TROUBLESHOOTING AND ROUTINE MAINTENANCE 12 - 22 Keep all separate parts and printed materials to Brother as shown below. 10 Pack the printed materials in the carton. (FAX-1840C and FAX-1940CN only) (MFC-3240C and MFC-3340CN only) If you are returning your machine to use with your "Exchange" machine. 11 Close the carton.
Quick Setup Guide - English
Page 5
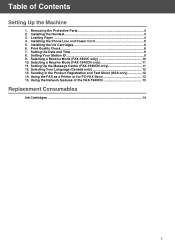
... Test Sheet (USA only 12 14. Using the FAX as a Printer or for PC-FAX Send 13 15. Removing the Protective Parts 4 2. Selecting a Receive Mode (FAX-1840C only 10 10. Setting Up the Message Center (FAX-1940CN only 11 12. Using the Network features of Contents Setting Up the Machine 1. Selecting Your Language (Canada only 12 13...
... Test Sheet (USA only 12 14. Using the FAX as a Printer or for PC-FAX Send 13 15. Removing the Protective Parts 4 2. Selecting a Receive Mode (FAX-1840C only 10 10. Setting Up the Message Center (FAX-1940CN only 11 12. Using the Network features of Contents Setting Up the Machine 1. Selecting Your Language (Canada only 12 13...
Quick Setup Guide - English
Page 6
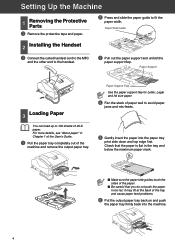
... unfold the paper support flap. Paper Support Flap Use the paper support flap for Letter, Legal and A4 size paper. 4 Fan the stack of the machine and remove the output paper tray. Check that the paper is flat in the tray and below the maximum paper mark. ■ Make sure the... tray back on and push the paper tray firmly back into the paper tray print side down and top edge first. Setting Up the Machine 1 Removing the Protective Parts 1 Remove the protective tape and paper. 2 Press and slide the paper guide to avoid paper jams and mis-feeds. 5 Gently insert the paper...
... unfold the paper support flap. Paper Support Flap Use the paper support flap for Letter, Legal and A4 size paper. 4 Fan the stack of the machine and remove the output paper tray. Check that the paper is flat in the tray and below the maximum paper mark. ■ Make sure the... tray back on and push the paper tray firmly back into the paper tray print side down and top edge first. Setting Up the Machine 1 Removing the Protective Parts 1 Remove the protective tape and paper. 2 Press and slide the paper guide to avoid paper jams and mis-feeds. 5 Gently insert the paper...

Quick Setup Guide - English
Page 8
... shown in an upright position when you insert it into the slot. If the cartridge cover comes off when you transport the machine. 6 Opening 3 Remove the protective parts. Setting Up the Machine 5 Installing the Ink Cartridges 4 Take out the ink cartridge. Top Cover 5 Carefully remove the bottom cap. The LCD shows: No Cartridge...
... shown in an upright position when you insert it into the slot. If the cartridge cover comes off when you transport the machine. 6 Opening 3 Remove the protective parts. Setting Up the Machine 5 Installing the Ink Cartridges 4 Take out the ink cartridge. Top Cover 5 Carefully remove the bottom cap. The LCD shows: No Cartridge...

