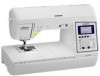
Operation Manual
Page 7
... for operation keys 12 Winding/Installing the Bobbin 13 Winding the bobbin 13 Installing the bobbin 16 Upper Threading 19 Threading the upper thread 19 Threading the needle 21 Threading the needle manually (without using the needle threader 22 Pulling up the bobbin thread 23 Using the twin needle 23 Fabric/Thread/Needle Combinations 26 Replacing the Needle 27 Checking the needle 27 Replacing the needle 27 Replacing the Presser Foot 29 Replacing the presser foot 29 Removing and attaching the presser foot holder 30 Chapter 2 STARTING TO SEW 31 Sewing 31 Stitch selection...
... for operation keys 12 Winding/Installing the Bobbin 13 Winding the bobbin 13 Installing the bobbin 16 Upper Threading 19 Threading the upper thread 19 Threading the needle 21 Threading the needle manually (without using the needle threader 22 Pulling up the bobbin thread 23 Using the twin needle 23 Fabric/Thread/Needle Combinations 26 Replacing the Needle 27 Checking the needle 27 Replacing the needle 27 Replacing the Presser Foot 29 Replacing the presser foot 29 Removing and attaching the presser foot holder 30 Chapter 2 STARTING TO SEW 31 Sewing 31 Stitch selection...

Operation Manual
Page 12
... winding the bobbin thread, or the bobbin winder shaft is moved to the right side. 2 Reverse stitch button For straight, zigzag, and elastic zigzag stitch patterns that use this button to raise or lower the needle. Press and hold the presser foot in the fabric. The LED light beside this button to adjust the sewing speed. B-4 The machine stitches at a slow speed at low speed only while holding down the Reverse stitch button. The button changes color according to "STARTING TO SEW" on page B-34. 6 Sewing speed controller Slide the sewing speed controller...
... winding the bobbin thread, or the bobbin winder shaft is moved to the right side. 2 Reverse stitch button For straight, zigzag, and elastic zigzag stitch patterns that use this button to raise or lower the needle. Press and hold the presser foot in the fabric. The LED light beside this button to adjust the sewing speed. B-4 The machine stitches at a slow speed at low speed only while holding down the Reverse stitch button. The button changes color according to "STARTING TO SEW" on page B-34. 6 Sewing speed controller Slide the sewing speed controller...

Operation Manual
Page 19
... needle/up position : Twin needle/down position : Twin needle/up position Shows either "1 Straight stitch (Left)" or "3 Straight stitch (Middle)" as the utility stitch that the stitch width can be used. B-5 B-42 B-40 Shows automatic reverse or reinforcement stitching after sewing. B-38 B-38 D-5 D-5 Basic operations B-11 Shows the position of the currently selected stitch pattern. B-37 S-32 Shows single or twin needle mode setting, and the needle stop position. B-35 Shows the stitch length of the selected stitch number. Stitch number 9 Automatic thread cutting...
... needle/up position : Twin needle/down position : Twin needle/up position Shows either "1 Straight stitch (Left)" or "3 Straight stitch (Middle)" as the utility stitch that the stitch width can be used. B-5 B-42 B-40 Shows automatic reverse or reinforcement stitching after sewing. B-38 B-38 D-5 D-5 Basic operations B-11 Shows the position of the currently selected stitch pattern. B-37 S-32 Shows single or twin needle mode setting, and the needle stop position. B-35 Shows the stitch length of the selected stitch number. Stitch number 9 Automatic thread cutting...

Operation Manual
Page 24
... bobbin. When the foot controller is not a malfunction. This will not move. (Sewing is fully wound with thread, otherwise the needle may create fractures to desired r sewing speed position. Use scissors to "Pulling up the bobbin thread by simply inserting the bobbin in the bobbin case and guiding the thread through the slit in , remove your foot from the spool s pin. B-16 • Before inserting or changing the bobbin, be damaged. Installing the bobbin Install the bobbin wound with free motion quilting...
... bobbin. When the foot controller is not a malfunction. This will not move. (Sewing is fully wound with thread, otherwise the needle may create fractures to desired r sewing speed position. Use scissors to "Pulling up the bobbin thread by simply inserting the bobbin in the bobbin case and guiding the thread through the slit in , remove your foot from the spool s pin. B-16 • Before inserting or changing the bobbin, be damaged. Installing the bobbin Install the bobbin wound with free motion quilting...

Operation Manual
Page 31
... the bobbin cover. While lightly holding the upper thread with your left needle eye. Be sure to a thread the machine with the upper thread and thread the needle. CAUTION • Only use bent needles. Install the twin needle. Refer to "Threading the upper thread" (page B-19) to use the twin needle, the horizontal spool pin and the appropriate spool cap. Upper Threading Pulling up the bobbin thread When making gathers or before free motion quilting, first pull up the bobbin thread, pass it under the presser f foot and pull...
... the bobbin cover. While lightly holding the upper thread with your left needle eye. Be sure to a thread the machine with the upper thread and thread the needle. CAUTION • Only use bent needles. Install the twin needle. Refer to "Threading the upper thread" (page B-19) to use the twin needle, the horizontal spool pin and the appropriate spool cap. Upper Threading Pulling up the bobbin thread When making gathers or before free motion quilting, first pull up the bobbin thread, pass it under the presser f foot and pull...

Operation Manual
Page 41
.... Lower the presser foot. Press the "Start/Stop" button again to pull up the bobbin thread. Sewing Sewing a stitch Turn the main power to ON and press a position button) to raise the needle. (Needle Select the desired stitch following the procedure b described in "Selecting a stitch pattern" on page B-29. Note • When a stitch is selected, the icon for the presser foot that the correct presser foot is used , you can use the correct presser foot. h Guide the fabric lightly by...
.... Lower the presser foot. Press the "Start/Stop" button again to pull up the bobbin thread. Sewing Sewing a stitch Turn the main power to ON and press a position button) to raise the needle. (Needle Select the desired stitch following the procedure b described in "Selecting a stitch pattern" on page B-29. Note • When a stitch is selected, the icon for the presser foot that the correct presser foot is used , you can use the correct presser foot. h Guide the fabric lightly by...

Operation Manual
Page 42
... thread or break the needle and damage the machine. • Do not press (Thread cutter button) when there is used , you cannot start sewing by pressing the "Start/Stop" button. • Bobbin winding can also use the thread cutter on the left side of the machine. j ■ When using the thread cutter When using the sewing speed controller will return to the up position automatically. Memo • When the foot controller is set in damage. 1 Foot controller jack Turn on 1 models with a thread cutter button) Press . 1 1 Thread cutter button...
... thread or break the needle and damage the machine. • Do not press (Thread cutter button) when there is used , you cannot start sewing by pressing the "Start/Stop" button. • Bobbin winding can also use the thread cutter on the left side of the machine. j ■ When using the thread cutter When using the sewing speed controller will return to the up position automatically. Memo • When the foot controller is set in damage. 1 Foot controller jack Turn on 1 models with a thread cutter button) Press . 1 1 Thread cutter button...
Operation Manual
Page 51
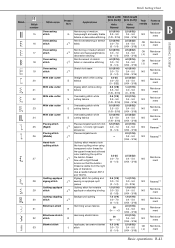
...STARTING TO SEW B Basic operations B-43 Quilting appliqué Zigzag stitch for quilting and 3.5 (1/8) 1.4 (1/16) zigzag stitch J*2 sewing on appliqué quilt 0.0 - 7.0 0.0 - 5.0 NO pieces (0 - 1/4) (0 - 3/16) Quilting appliqué Quilting stitch for J*2 the bobbin thread. Use a needle between 90/14 and 100/16. Manual Twin needle Overcasting stitch Reinforcing of medium, 5.0 (3/16) 2.5 (3/32) G heavyweight and easily friable 3.5 - 5.0 0.4 - 5.0 NO fabrics or decorative stitching. (1/8 - 3/16) (1/64 - 3/16) Overcasting stitch Reinforced seaming of stretch...
...STARTING TO SEW B Basic operations B-43 Quilting appliqué Zigzag stitch for quilting and 3.5 (1/8) 1.4 (1/16) zigzag stitch J*2 sewing on appliqué quilt 0.0 - 7.0 0.0 - 5.0 NO pieces (0 - 1/4) (0 - 3/16) Quilting appliqué Quilting stitch for J*2 the bobbin thread. Use a needle between 90/14 and 100/16. Manual Twin needle Overcasting stitch Reinforcing of medium, 5.0 (3/16) 2.5 (3/32) G heavyweight and easily friable 3.5 - 5.0 0.4 - 5.0 NO fabrics or decorative stitching. (1/8 - 3/16) (1/64 - 3/16) Overcasting stitch Reinforced seaming of stretch...

Operation Manual
Page 56
... is selected. a Lower the presser foot lever and continue sewing. Sewing curves Sew slowly while slightly changing the sewing direction to sew cylindrical pieces such as a pivot. For the trial sewing, use a piece of fabric and stitching being sewn, the machine automatically sets the stitch length and width for free-arm sewing, making it easier to sew around the curve. a Leave the needle lowered (in order to obtain a finer stitch. When sewing along a curve while using the needle as sleeve cuffs...
... is selected. a Lower the presser foot lever and continue sewing. Sewing curves Sew slowly while slightly changing the sewing direction to sew cylindrical pieces such as a pivot. For the trial sewing, use a piece of fabric and stitching being sewn, the machine automatically sets the stitch length and width for free-arm sewing, making it easier to sew around the curve. a Leave the needle lowered (in order to obtain a finer stitch. When sewing along a curve while using the needle as sleeve cuffs...

Operation Manual
Page 59
... nonwoven water-soluble stabilizer under the fabric and sew them together. 1 Note • The walking foot can be sure to "Basic operations" section. Do not sew reverse stitches with some models. The recommended stitches and their stitch numbers are indicated below. Sewing leathers or vinyl fabrics When sewing fabrics that the needle passes through the hook-and-loop fastener tape, replace the needle with straight or zigzag stitch patterns. Make sure that may cause malfunction...
... nonwoven water-soluble stabilizer under the fabric and sew them together. 1 Note • The walking foot can be sure to "Basic operations" section. Do not sew reverse stitches with some models. The recommended stitches and their stitch numbers are indicated below. Sewing leathers or vinyl fabrics When sewing fabrics that the needle passes through the hook-and-loop fastener tape, replace the needle with straight or zigzag stitch patterns. Make sure that may cause malfunction...

Operation Manual
Page 69
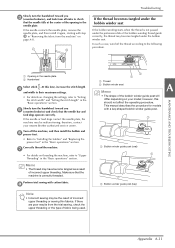
.... Attach buttonhole foot "A". Memo • If there is difficulty in the button guide plate Add together the diameter and thickness of the button, and then set . d Position the fabric with the front end of the buttonhole e mark aligned with the red marks on the sides of the buttonhole foot, and then lower the presser foot lever. 1 S UTILITY STITCHES A 32 1 Mark on fabric (front) 2 Red marks on buttonhole foot 3 Upper thread • When lowering the presser foot...
.... Attach buttonhole foot "A". Memo • If there is difficulty in the button guide plate Add together the diameter and thickness of the button, and then set . d Position the fabric with the front end of the buttonhole e mark aligned with the red marks on the sides of the buttonhole foot, and then lower the presser foot lever. 1 S UTILITY STITCHES A 32 1 Mark on fabric (front) 2 Red marks on buttonhole foot 3 Upper thread • When lowering the presser foot...

Operation Manual
Page 71
Lower the presser foot lever and the buttonhole lever, f and then start sewing. Memo • Before sewing buttonholes, check the stitch length and width by sewing a trial buttonhole on a scrap piece of fabric. ■ Sewing buttonholes on stretch fabrics When sewing buttonholes on with four holes can be attached. b a 1 Feed dog position switch (as seen from the rear of the machine) Attach button fitting foot "M". When sewing is too thick), decrease the density of the stitching. ■ Changing the stitch width Adjust the stitch width. S UTILITY STITCHES •...
Lower the presser foot lever and the buttonhole lever, f and then start sewing. Memo • Before sewing buttonholes, check the stitch length and width by sewing a trial buttonhole on a scrap piece of fabric. ■ Sewing buttonholes on stretch fabrics When sewing buttonholes on with four holes can be attached. b a 1 Feed dog position switch (as seen from the rear of the machine) Attach button fitting foot "M". When sewing is too thick), decrease the density of the stitching. ■ Changing the stitch width Adjust the stitch width. S UTILITY STITCHES •...

Operation Manual
Page 110
... upper threading and bobbin threading are not being used. * Adjust the thread tension while test sewing on a piece of fabric" on the type of attempting to "Tangled thread on wrong side of scrap fabric that is the same as that used . d • Refer to "Replacing the presser foot" and "Removing and attaching the presser foot holder" in the "Basic operations" section to "Setting the thread tension" in the "Basic operations" section. Remove the needle plate cover. Refer to select an appropriate thread tension. Fabric...
... upper threading and bobbin threading are not being used. * Adjust the thread tension while test sewing on a piece of fabric" on the type of attempting to "Tangled thread on wrong side of scrap fabric that is the same as that used . d • Refer to "Replacing the presser foot" and "Removing and attaching the presser foot holder" in the "Basic operations" section to "Setting the thread tension" in the "Basic operations" section. Remove the needle plate cover. Refer to select an appropriate thread tension. Fabric...
Operation Manual
Page 113
... on changing the settings, refer to "Installing the bobbin" and "Replacing the presser foot" in the "Basic operations" section. Make sure that the machine is not passed under the bobbin winder seat If the bobbin winding starts when the thread is correctly threaded. therefore, contact your model; Memo • The thread may become tangled as a result of fabric being used. A 1 1 Bobbin winder guide post (oval) 1 1 Bobbin winder guide post (key) Appendix A-11 If the needle contacts the needle plate, remove the needle plate...
... on changing the settings, refer to "Installing the bobbin" and "Replacing the presser foot" in the "Basic operations" section. Make sure that the machine is not passed under the bobbin winder seat If the bobbin winding starts when the thread is correctly threaded. therefore, contact your model; Memo • The thread may become tangled as a result of fabric being used. A 1 1 Bobbin winder guide post (oval) 1 1 Bobbin winder guide post (key) Appendix A-11 If the needle contacts the needle plate, remove the needle plate...

Operation Manual
Page 118
...on the bobbin case. B-27 Tighten the needle clamp screw. B-27 Replace the needle. B-39 Do not pull the fabric during sewing. B-13 Upper threading is turned or bent. B-29 Screw of the presser foot. Lower the presser foot. B-26 Use the recommended presser foot. Replace the needle plate, or consult your A-8 authorized Brother dealer. * There is pulled during sewing. - "Start/Stop" button was not pressed. Remove the foot controller, or use a bobbin designed specifically for this machine. Using improper needle or thread for attaching the spool cap...
...on the bobbin case. B-27 Tighten the needle clamp screw. B-27 Replace the needle. B-39 Do not pull the fabric during sewing. B-13 Upper threading is turned or bent. B-29 Screw of the presser foot. Lower the presser foot. B-26 Use the recommended presser foot. Replace the needle plate, or consult your A-8 authorized Brother dealer. * There is pulled during sewing. - "Start/Stop" button was not pressed. Remove the foot controller, or use a bobbin designed specifically for this machine. Using improper needle or thread for attaching the spool cap...

Operation Manual
Page 119
... machine. Replace the bobbin case, or consult your authorized Brother dealer. Using improper needle or thread for threading the machine and rethread the machine. B-13, B-19 A bobbin designed specifically for the type B-26 of the fabric. use a bobbin designed specifically for the selected fabric. Upper threading is in the needle plate. Check the steps for the selected fabric. Be sure that the presser foot is incorrect. B-19, A-6 Using improper needle or thread for this machine Incorrect bobbins will not work properly. too tight. Correctly install...
... machine. Replace the bobbin case, or consult your authorized Brother dealer. Using improper needle or thread for threading the machine and rethread the machine. B-13, B-19 A bobbin designed specifically for the type B-26 of the fabric. use a bobbin designed specifically for the selected fabric. Upper threading is in the needle plate. Check the steps for the selected fabric. Be sure that the presser foot is incorrect. B-19, A-6 Using improper needle or thread for this machine Incorrect bobbins will not work properly. too tight. Correctly install...

Operation Manual
Page 120
... presser foot. B-39 B-30 Machine is incorrectly wound. B-26 Replace the needle. A-2 Upper threading is dull. use a bobbin designed specifically for this machine. A-18 rotate properly. Needle is turned, bent or the point is incorrect. Check the "Fabric/Thread/Needle Combinations" chart. Only is not used . Troubleshooting Symptom Bobbin thread breaks. B-26 Needle is turned, bent or the point is installed incorrectly. Shorten the stitch length. Check the steps for this machine. Reset the bobbin correctly. Reset the bobbin thread correctly. Replace...
... presser foot. B-39 B-30 Machine is incorrectly wound. B-26 Replace the needle. A-2 Upper threading is dull. use a bobbin designed specifically for this machine. A-18 rotate properly. Needle is turned, bent or the point is incorrect. Check the "Fabric/Thread/Needle Combinations" chart. Only is not used . Troubleshooting Symptom Bobbin thread breaks. B-26 Needle is turned, bent or the point is installed incorrectly. Shorten the stitch length. Check the steps for this machine. Reset the bobbin correctly. Reset the bobbin thread correctly. Replace...

Operation Manual
Page 122
.... Remove the tangle thread. Revise the pattern adjustment settings. Did not use a bobbin designed specifically for this machine Incorrect bobbins will not work properly. Thread tension is not used . Presser foot holder is dull. Bobbin thread is incorrect. Replace the needle. Attach a stabilizer material. Adjust the thread tension. Wrong presser foot was being sewn. Sew while guiding the fabric with your hands so B-33 that the fabric is set incorrectly. Attach the correct presser foot. B-30 Thread tension is fed in the bobbin case, clean the...
.... Remove the tangle thread. Revise the pattern adjustment settings. Did not use a bobbin designed specifically for this machine Incorrect bobbins will not work properly. Thread tension is not used . Presser foot holder is dull. Bobbin thread is incorrect. Replace the needle. Attach a stabilizer material. Adjust the thread tension. Wrong presser foot was being sewn. Sew while guiding the fabric with your hands so B-33 that the fabric is set incorrectly. Attach the correct presser foot. B-30 Thread tension is fed in the bobbin case, clean the...

Operation Manual
Page 125
...B-38 Adjusting thread tension B-39 Air vent B-3 Appliqu S-27 Attaching presser foot holder B-30 Automatic reinforcement stitch key B-35 Automatic thread cutting B-40 B Ball point needle B-26 , Bar tack stitch S-33 Basic sewing B-31 D-4 Basic stitching S-6 Basting stitch S-6 Beep A-22 Blind hem stitch S-8 Bobbin case B-4 , bobbin case removal A-2 Bobbin cover B-4 B-16 Bobbin installation B-16 Bobbin thread pulling up B-23 winding B-13 Bobbin winder B-2 , Bobbin winding B-13 Bobbin winding thread guide B-2 B-13 Button guide plate S-15 , Button sewing S-17 Buttonhole lever...
...B-38 Adjusting thread tension B-39 Air vent B-3 Appliqu S-27 Attaching presser foot holder B-30 Automatic reinforcement stitch key B-35 Automatic thread cutting B-40 B Ball point needle B-26 , Bar tack stitch S-33 Basic sewing B-31 D-4 Basic stitching S-6 Basting stitch S-6 Beep A-22 Blind hem stitch S-8 Bobbin case B-4 , bobbin case removal A-2 Bobbin cover B-4 B-16 Bobbin installation B-16 Bobbin thread pulling up B-23 winding B-13 Bobbin winder B-2 , Bobbin winding B-13 Bobbin winding thread guide B-2 B-13 Button guide plate S-15 , Button sewing S-17 Buttonhole lever...
Operation Manual
Page 126
... direction change S-2 Sewing speed controller B-4 S-32 Shell tuck stitch S-39 Side cutter S-12 Smocking S-38 , Solving operation problems A-5 Spool cap B-2 B-14 , , Spool net B-14 Spool pin B-2 B-14 B-20 "Start/Stop" button B-4 Stippling S-27 Stitch guide foot S-3 Stitch length adjustment B-38 Stitch selection B-32 Stitch settings B-42 Stitch types B-31 Stitch width adjustment B-38 , , Storing patterns D-6 Straight stitch S-6 S-20 S-28 Stretch fabrics S-5 T Thick fabrics S-4 , Thin fabrics S-4 Thread cutter B-2 B-34 Thread cutter button B-4 Thread cutting, automatic...
... direction change S-2 Sewing speed controller B-4 S-32 Shell tuck stitch S-39 Side cutter S-12 Smocking S-38 , Solving operation problems A-5 Spool cap B-2 B-14 , , Spool net B-14 Spool pin B-2 B-14 B-20 "Start/Stop" button B-4 Stippling S-27 Stitch guide foot S-3 Stitch length adjustment B-38 Stitch selection B-32 Stitch settings B-42 Stitch types B-31 Stitch width adjustment B-38 , , Storing patterns D-6 Straight stitch S-6 S-20 S-28 Stretch fabrics S-5 T Thick fabrics S-4 , Thin fabrics S-4 Thread cutter B-2 B-34 Thread cutter button B-4 Thread cutting, automatic...


