Operation Manual
Page 7
... threader 33 Using the twin needle ...33 Pulling up the bobbin thread...36 Replacing the Needle ...37 Needle precautions ...37 Needle types and their uses...38 Checking the needle ...39 Replacing the needle...39 Replacing the Presser Foot 41 Presser foot precautions ...41 Replacing the presser foot ...41 Removing the presser foot holder ...43 Using the optional walking foot ...44 Sewing Cylindrical or Large Pieces 46 Stitching cylindrical pieces...46 Sewing large pieces of fabric ...46 SEWING BASICS 49 Sewing ...50 General sewing procedure ...50 Positioning the fabric ...51 Starting...
... threader 33 Using the twin needle ...33 Pulling up the bobbin thread...36 Replacing the Needle ...37 Needle precautions ...37 Needle types and their uses...38 Checking the needle ...39 Replacing the needle...39 Replacing the Presser Foot 41 Presser foot precautions ...41 Replacing the presser foot ...41 Removing the presser foot holder ...43 Using the optional walking foot ...44 Sewing Cylindrical or Large Pieces 46 Stitching cylindrical pieces...46 Sewing large pieces of fabric ...46 SEWING BASICS 49 Sewing ...50 General sewing procedure ...50 Positioning the fabric ...51 Starting...

Operation Manual
Page 8
...57 Changing the tension of the upper thread ...57 Adjusting the Stitch Width and Length 58 Adjusting the stitch width ...58 Adjusting the stitch length ...59 Useful Functions...60 Changing the needle stop position ...60 Automatically sewing reverse/reinforcement stitches 60 Useful Sewing Tips ...62 Trial sewing ...62 Changing the sewing direction ...62 Sewing curves ...62 Sewing thick fabrics ...62 Sewing thin fabrics...63 Sewing stretch fabrics...63 Sewing an even seam allowance ...64 Sewing hook-and-loop fastener ...64 UTILITY STITCHES 65 Selecting Stitching ...66 Selecting stitch types...
...57 Changing the tension of the upper thread ...57 Adjusting the Stitch Width and Length 58 Adjusting the stitch width ...58 Adjusting the stitch length ...59 Useful Functions...60 Changing the needle stop position ...60 Automatically sewing reverse/reinforcement stitches 60 Useful Sewing Tips ...62 Trial sewing ...62 Changing the sewing direction ...62 Sewing curves ...62 Sewing thick fabrics ...62 Sewing thin fabrics...63 Sewing stretch fabrics...63 Sewing an even seam allowance ...64 Sewing hook-and-loop fastener ...64 UTILITY STITCHES 65 Selecting Stitching ...66 Selecting stitch types...

Operation Manual
Page 11
... 4 Zipper foot "I" X59370-021 19 Extra spool pin XE2241-001 5 Zigzag foot "J" (on machine) XZ5134-001 20 Spool net XA5523-020 6 Blind stitch foot "R" 7 Button fitting foot "M" XE2650-001 XE2643-001 21 Foot controller XD0501-121 (EU area) XC8816-071 (other areas) 8 Seam ripper XZ5082-001 22 Operation manual XE2408-301 9 Bobbin (4) SA156 SFB (XA5539-151) 23 Quick reference guide XE2416-001 10 Needle set X58358-021 24 Accessory bag XC4487-021 11 Twin needle X59296...
... 4 Zipper foot "I" X59370-021 19 Extra spool pin XE2241-001 5 Zigzag foot "J" (on machine) XZ5134-001 20 Spool net XA5523-020 6 Blind stitch foot "R" 7 Button fitting foot "M" XE2650-001 XE2643-001 21 Foot controller XD0501-121 (EU area) XC8816-071 (other areas) 8 Seam ripper XZ5082-001 22 Operation manual XE2408-301 9 Bobbin (4) SA156 SFB (XA5539-151) 23 Quick reference guide XE2416-001 10 Needle set X58358-021 24 Accessory bag XC4487-021 11 Twin needle X59296...
Operation Manual
Page 13
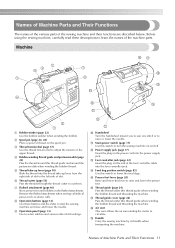
.... h Operation buttons (page 12) Use these descriptions to start the sewing machine and raise and lower the needle. Machine a Bobbin winder (page 22) Use the bobbin winder when winding the bobbin. d Bobbin-winding thread guide and pretension disk (page 22) Pass the thread around the pretension disk when winding the bobbin thread. o Presser foot lever (page 28) Raise and lower this thread guide when winding the bobbin thread and threading the machine. j Handwheel Turn the handwheel toward you to sew one stitch or to raise and lower the presser foot. m Foot controller...
.... h Operation buttons (page 12) Use these descriptions to start the sewing machine and raise and lower the needle. Machine a Bobbin winder (page 22) Use the bobbin winder when winding the bobbin. d Bobbin-winding thread guide and pretension disk (page 22) Pass the thread around the pretension disk when winding the bobbin thread. o Presser foot lever (page 28) Raise and lower this thread guide when winding the bobbin thread and threading the machine. j Handwheel Turn the handwheel toward you to sew one stitch or to raise and lower the presser foot. m Foot controller...
Operation Manual
Page 14
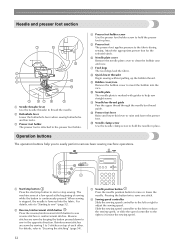
...the speed controller to the right to start /stop button to increase the sewing speed. 12 c Needle position button Press the needle position button to adjust the sewing speed. Operation buttons The operation buttons help sew straight seams. k Needle bar thread guide Pass the upper thread through the needle bar thread guide. b Buttonhole lever Lower the buttonhole lever when sewing buttonholes and bar tacks. For details, refer to "Starting to easily perform various basic sewing machine operations. Needle and presser foot section a Needle threader lever Use the needle threader to...
...the speed controller to the right to start /stop button to increase the sewing speed. 12 c Needle position button Press the needle position button to adjust the sewing speed. Operation buttons The operation buttons help sew straight seams. k Needle bar thread guide Pass the upper thread through the needle bar thread guide. b Buttonhole lever Lower the buttonhole lever when sewing buttonholes and bar tacks. For details, refer to "Starting to easily perform various basic sewing machine operations. Needle and presser foot section a Needle threader lever Use the needle threader to...

Operation Manual
Page 17
...22 Winding the bobbin 22 Installing the bobbin 26 Upper Threading ...28 Threading the upper thread 28 Threading the needle 31 Threading the needle manually (without using the needle threader 33 Using the twin needle 33 Pulling up the bobbin thread 36 Replacing the Needle 37 Needle precautions 37 Needle types and their uses 38 Checking the needle 39 Replacing the needle 39 Replacing the Presser Foot 41 Presser foot precautions 41 Replacing the presser foot 41 Removing the presser foot holder 43 Using the optional walking foot 44 Sewing Cylindrical or Large Pieces 46 Stitching...
...22 Winding the bobbin 22 Installing the bobbin 26 Upper Threading ...28 Threading the upper thread 28 Threading the needle 31 Threading the needle manually (without using the needle threader 33 Using the twin needle 33 Pulling up the bobbin thread 36 Replacing the Needle 37 Needle precautions 37 Needle types and their uses 38 Checking the needle 39 Replacing the needle 39 Replacing the Presser Foot 41 Presser foot precautions 41 Replacing the presser foot 41 Removing the presser foot holder 43 Using the optional walking foot 44 Sewing Cylindrical or Large Pieces 46 Stitching...
Operation Manual
Page 25
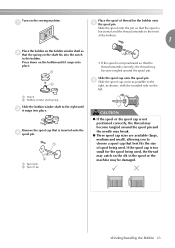
... sewing machine. CAUTION ● If the spool or the spool cap is not positioned correctly, the thread may become tangled around the spool pin and the needle may break. ● Three spool cap sizes are available (large, medium and small), allowing you to the right until it snaps into place. Winding/Installing the Bobbin 23 Remove the spool cap that best fits the size of thread for the spool being used...
... sewing machine. CAUTION ● If the spool or the spool cap is not positioned correctly, the thread may become tangled around the spool pin and the needle may break. ● Three spool cap sizes are available (large, medium and small), allowing you to the right until it snaps into place. Winding/Installing the Bobbin 23 Remove the spool cap that best fits the size of thread for the spool being used...
Operation Manual
Page 28
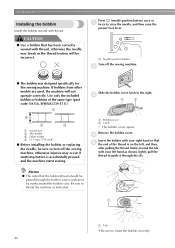
... presser foot lever. Remove the bobbin cover. c a b a Bobbin cover b Latch X The bobbin cover opens. d Insert the bobbin with your right hand so that e the end of the same type (part code: SA156, SFB(XA5539-151)). 1 4 2 3 a Actual size b This model c Other model d 11.5 mm (7/16 inch) ● Before installing the bobbin or replacing the needle, be passed through the slit. a Needle position button Turn off the sewing machine, otherwise injuries may break or the thread tension will not operate correctly. Use only the included bobbin...
... presser foot lever. Remove the bobbin cover. c a b a Bobbin cover b Latch X The bobbin cover opens. d Insert the bobbin with your right hand so that e the end of the same type (part code: SA156, SFB(XA5539-151)). 1 4 2 3 a Actual size b This model c Other model d 11.5 mm (7/16 inch) ● Before installing the bobbin or replacing the needle, be passed through the slit. a Needle position button Turn off the sewing machine, otherwise injuries may break or the thread tension will not operate correctly. Use only the included bobbin...

Operation Manual
Page 37
... break or the machine may bend or break. j • For details on adjusting the stitch length, refer to "Selecting stitching" (page 67). CAUTION ● When changing the sewing direction, press (needle position button) to each other. 1 CAUTION ● After adjusting the stitch width, slowly turn the handwheel toward you (counterclockwise) and check that are sewn parallel to raise the needle from the fabric, and then raise the presser foot lever...
... break or the machine may bend or break. j • For details on adjusting the stitch length, refer to "Selecting stitching" (page 67). CAUTION ● When changing the sewing direction, press (needle position button) to each other. 1 CAUTION ● After adjusting the stitch width, slowly turn the handwheel toward you (counterclockwise) and check that are sewn parallel to raise the needle from the fabric, and then raise the presser foot lever...

Operation Manual
Page 60
... after the stitch is changed. z If the straight stitch (left . For details on selecting a stitch, refer to make the stitch wider or narrower. Adjusting the stitch width The stitch width (zigzag width) can be set , refer to "Satin stitching using the sewing speed controller" (page 98). a - + • If the setting is changed with the sewing speed controller. If the needle hits the presser foot, the needle may bend or break. 58 Normally, when a stitch is erased. z The sewing machine can easily...
... after the stitch is changed. z If the straight stitch (left . For details on selecting a stitch, refer to make the stitch wider or narrower. Adjusting the stitch width The stitch width (zigzag width) can be set , refer to "Satin stitching using the sewing speed controller" (page 98). a - + • If the setting is changed with the sewing speed controller. If the needle hits the presser foot, the needle may bend or break. 58 Normally, when a stitch is erased. z The sewing machine can easily...

Operation Manual
Page 71
... adjusting the stitch width and length, refer to "Saving patterns" (page 114). For stitches 01 through 09, the stitch can be selected by selecting a different decorative stitch while a stitch is installed, turn off the sewing machine, attach the correct presser foot, and then select the desired stitch again. If the wrong presser foot is selected. Use the numeric keys to type in a one • In the utility stitch mode, simply type...
... adjusting the stitch width and length, refer to "Saving patterns" (page 114). For stitches 01 through 09, the stitch can be selected by selecting a different decorative stitch while a stitch is installed, turn off the sewing machine, attach the correct presser foot, and then select the desired stitch again. If the wrong presser foot is selected. Use the numeric keys to type in a one • In the utility stitch mode, simply type...

Operation Manual
Page 83
... the buttonhole is positioned behind the bracket on the buttonhole foot. 1 2 a Buttonhole lever b Bracket Buttonhole Stitching/Button Sewing 81 Pull down through the hole in the presser foot. • When lowering the presser foot, do not push 3 in the button guide plate Add together the diameter and thickness of the button, and then set the button guide plate to the calculated length. (The distance between the markings on the presser foot scale is 5 mm (3/16 inch).) Position the fabric...
... the buttonhole is positioned behind the bracket on the buttonhole foot. 1 2 a Buttonhole lever b Bracket Buttonhole Stitching/Button Sewing 81 Pull down through the hole in the presser foot. • When lowering the presser foot, do not push 3 in the button guide plate Add together the diameter and thickness of the button, and then set the button guide plate to the calculated length. (The distance between the markings on the presser foot scale is 5 mm (3/16 inch).) Position the fabric...

Operation Manual
Page 86
... the presser foot lever, and then slide the b drop feed lever, located at the rear of the machine on the base, to (to the left as seen from the rear of the sewing machine, and then sew them in the button. c Select stitch 53 . e Turn the handwheel toward the rear of the machine). Place the button into the two holes of the machine) X The feed dogs are lowered. Then...
... the presser foot lever, and then slide the b drop feed lever, located at the rear of the machine on the base, to (to the left as seen from the rear of the sewing machine, and then sew them in the button. c Select stitch 53 . e Turn the handwheel toward the rear of the machine). Place the button into the two holes of the machine) X The feed dogs are lowered. Then...

Operation Manual
Page 136
...; Never use bent needles. Turn on changing the settings, refer to "Adjusting the Stitch Width and Length" (page 58). Attach the needle plate cover according to "Installing the bobbin" (page 26) and "Replacing the presser foot" (page 41). 134 CAUTION ● Never use a bobbin case that is scratched, otherwise the upper thread may become tangled, the needle may break or sewing performance may have been damaged when the fabric was caught in "Removing the fabric from all...
...; Never use bent needles. Turn on changing the settings, refer to "Adjusting the Stitch Width and Length" (page 58). Attach the needle plate cover according to "Installing the bobbin" (page 26) and "Replacing the presser foot" (page 41). 134 CAUTION ● Never use a bobbin case that is scratched, otherwise the upper thread may become tangled, the needle may break or sewing performance may have been damaged when the fabric was caught in "Removing the fabric from all...

Operation Manual
Page 139
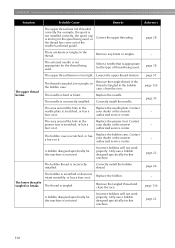
... install the spool. - The bobbin case is incorrectly installed. Only use a bobbin designed specifically for this machine. Correctly install the needle. Replace the bobbin case. A bobbin designed specifically for this machine is connected. page 17 The start/stop button was pressed, even though the foot controller is not used is not Attach the presser foot that is appropriate for the type of stitch that you wish to firmly tighten the screw. page 39 4 The needle is too tight. page 120 The upper thread tension...
... install the spool. - The bobbin case is incorrectly installed. Only use a bobbin designed specifically for this machine. Correctly install the needle. Replace the bobbin case. A bobbin designed specifically for this machine is connected. page 17 The start/stop button was pressed, even though the foot controller is not used is not Attach the presser foot that is appropriate for the type of stitch that you wish to firmly tighten the screw. page 39 4 The needle is too tight. page 120 The upper thread tension...
Operation Manual
Page 140
... nearest authorized service center. Replace the bobbin case. Replace the bobbin. page 126 page 22 138 Remove the tangle thread. Contact your dealer or the nearest authorized service center. The bobbin is tangled. Incorrect bobbins will not work properly. Loosen the upper thread tension. The area around the hole in the thread. Contact your dealer or the nearest authorized service center. Only use a bobbin designed specifically for the type of the needle bar thread guide). The thread is...
... nearest authorized service center. Replace the bobbin case. Replace the bobbin. page 126 page 22 138 Remove the tangle thread. Contact your dealer or the nearest authorized service center. The bobbin is tangled. Incorrect bobbins will not work properly. Loosen the upper thread tension. The area around the hole in the thread. Contact your dealer or the nearest authorized service center. Only use a bobbin designed specifically for the type of the needle bar thread guide). The thread is...

Operation Manual
Page 142
... stitch that you wish to sew. Correctly install the needle. The presser foot that appropriate for the type of stitch you wish to keep the presser foot level while sewing. Use the presser foot locking pin (black button on the left side) on zigzag foot "J" to sew. While winding the bobbin, the bobbin thread was not threaded correctly. A high-pitched noise is tangled in the bobbin case. A bobbin designed specifically for example, in the bobbin case, clean the race. The feed dogs are lowered. Remove the tangle thread. Zigzag foot...
... stitch that you wish to sew. Correctly install the needle. The presser foot that appropriate for the type of stitch you wish to keep the presser foot level while sewing. Use the presser foot locking pin (black button on the left side) on zigzag foot "J" to sew. While winding the bobbin, the bobbin thread was not threaded correctly. A high-pitched noise is tangled in the bobbin case. A bobbin designed specifically for example, in the bobbin case, clean the race. The feed dogs are lowered. Remove the tangle thread. Zigzag foot...
Operation Manual
Page 144
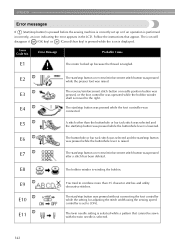
... the bobbin winder shaft is set up because the thread is lowered. The start/stop button was pressed while the buttonhole lever is tangled. Error Code No. Error Message Probable Cause E1 The motor locked up or if an operation is selected. 142 E5 A stitch other than the buttonhole or bar tack stitch was selected and the start/stop button was pressed without connecting the foot controller while the setting for adjusting the stitch width using the sewing speed controller...
... the bobbin winder shaft is set up because the thread is lowered. The start/stop button was pressed while the buttonhole lever is tangled. Error Code No. Error Message Probable Cause E1 The motor locked up or if an operation is selected. 142 E5 A stitch other than the buttonhole or bar tack stitch was selected and the start/stop button was pressed without connecting the foot controller while the setting for adjusting the stitch width using the sewing speed controller...

Operation Manual
Page 148
...accessory bag 9 adjustable zipper/piping foot 10 air vent 11 appliqu 94 automatic reinforcement stitching 60 automatic reverse stitching 60 automatic reverse/reinforcement stitch key 13 B bar tack 100 baseline 76 basic stitching 75 blind hem stitch 77 blind stitch foot 9 , bobbin 9 26 bobbin case 126 , bobbin cover 12 27 bobbin thread 26 pulling up 36 bobbin winder 11 bobbin winder shaft spring 23 , bobbin-winding 8 22 bobbin-winding thread guide and pretension disk .. 11, 24 brightness 21 built-in stitches 8 , button fitting foot 9 84 , button sewing 79 84 , buttonhole...
...accessory bag 9 adjustable zipper/piping foot 10 air vent 11 appliqu 94 automatic reinforcement stitching 60 automatic reverse stitching 60 automatic reverse/reinforcement stitch key 13 B bar tack 100 baseline 76 basic stitching 75 blind hem stitch 77 blind stitch foot 9 , bobbin 9 26 bobbin case 126 , bobbin cover 12 27 bobbin thread 26 pulling up 36 bobbin winder 11 bobbin winder shaft spring 23 , bobbin-winding 8 22 bobbin-winding thread guide and pretension disk .. 11, 24 brightness 21 built-in stitches 8 , button fitting foot 9 84 , button sewing 79 84 , buttonhole...

Operation Manual
Page 149
... 23, 29 spool net 9 spool pin 11, 23, 29 , start/stop button 12 52 starting to sew 52 stitch guide foot 10 stitch length 59 stitch length keys 13 stitch mode 66 stitch pattern plate 9 stitch settings 120 stitch width 58 controlling 98 stitch width keys 13 straight stitch 120 , stretch fabrics 63 91 T thick fabrics 62 thin fabrics 63 thread cutter 11 thread guide 11 thread guide cover 11 thread take-up lever 11 thread tension 57 thread tension adjustment 57 , thread tension dial 11 57 trial sewing 62 triple stretch stitch 100 troubleshooting 128 twin needle 9, 33, 40...
... 23, 29 spool net 9 spool pin 11, 23, 29 , start/stop button 12 52 starting to sew 52 stitch guide foot 10 stitch length 59 stitch length keys 13 stitch mode 66 stitch pattern plate 9 stitch settings 120 stitch width 58 controlling 98 stitch width keys 13 straight stitch 120 , stretch fabrics 63 91 T thick fabrics 62 thin fabrics 63 thread cutter 11 thread guide 11 thread guide cover 11 thread take-up lever 11 thread tension 57 thread tension adjustment 57 , thread tension dial 11 57 trial sewing 62 triple stretch stitch 100 troubleshooting 128 twin needle 9, 33, 40...


