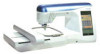
Users Manual - English
Page 2
The images and patterns used in this manual are for illustration purposes and may differ from the actual items. This is a kit used for sewing bobbin work. CONTENTS ABOUT BOBBIN WORK ...2 INCLUDED ACCESSORIES ...2 ... Templates for sewing (utility stitches, decorative stitches or free-motion sewing). For specific details on operating the machine, refer to the Operation Manual provided with your machine. This manual describes the procedures for machine embroidering. This kit cannot be used for Free-Motion Sewing ...12 ADJUSTING THE THREAD TENSION...13 Adjusting the...
The images and patterns used in this manual are for illustration purposes and may differ from the actual items. This is a kit used for sewing bobbin work. CONTENTS ABOUT BOBBIN WORK ...2 INCLUDED ACCESSORIES ...2 ... Templates for sewing (utility stitches, decorative stitches or free-motion sewing). For specific details on operating the machine, refer to the Operation Manual provided with your machine. This manual describes the procedures for machine embroidering. This kit cannot be used for Free-Motion Sewing ...12 ADJUSTING THE THREAD TENSION...13 Adjusting the...

Users Manual - English
Page 3
... the bobbin cover with the same shape as the bobbin cover included with tabs (*See Note.) Screwdriver (small) (X55468-051) CD-ROM (Contains the Operation Manual and the Templates for freemotion sewing.) (USA/CANADA: XE9382-001, Other areas: XE9501-001) Note • Two bobbin covers may be fed through the sewing...
... the bobbin cover with the same shape as the bobbin cover included with tabs (*See Note.) Screwdriver (small) (X55468-051) CD-ROM (Contains the Operation Manual and the Templates for freemotion sewing.) (USA/CANADA: XE9382-001, Other areas: XE9501-001) Note • Two bobbin covers may be fed through the sewing...
Users Manual - English
Page 8
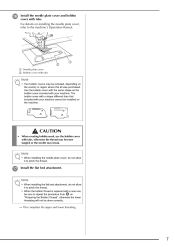
... that included with tabs. q Install the flat bed attachment. Note • When installing the flat bed attachment, do not allow it to the machine's Operation Manual. CAUTION • When creating bobbin work, use the bobbin cover with tabs Note • Two bobbin covers may break. a Needle plate cover b Bobbin cover with...
... that included with tabs. q Install the flat bed attachment. Note • When installing the flat bed attachment, do not allow it to the machine's Operation Manual. CAUTION • When creating bobbin work, use the bobbin cover with tabs Note • Two bobbin covers may break. a Needle plate cover b Bobbin cover with...

Users Manual - English
Page 10
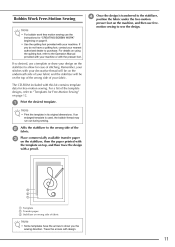
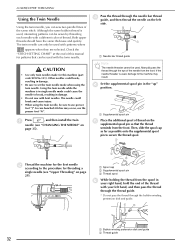
... be damaged. If sewing is enough thread in the bobbin. We recommend selecting a simple stitch and sewing trial stitches to the machine's Operation Manual. p CAUTION • Before sewing, make sure the automatic thread cutting and automatic reinforcement/reverse stitching have been made. h Align the upper...foot toward the rear of the stitching, otherwise the threads may become tangled or the machine may be possible to the machine's Operation Manual. • Depending on the fabric, bunched stitches may result. Threads can be difficult to pull the bobbin thread up to feed ...
... be damaged. If sewing is enough thread in the bobbin. We recommend selecting a simple stitch and sewing trial stitches to the machine's Operation Manual. p CAUTION • Before sewing, make sure the automatic thread cutting and automatic reinforcement/reverse stitching have been made. h Align the upper...foot toward the rear of the stitching, otherwise the threads may become tangled or the machine may be possible to the machine's Operation Manual. • Depending on the fabric, bunched stitches may result. Threads can be difficult to pull the bobbin thread up to feed ...
Users Manual - English
Page 12
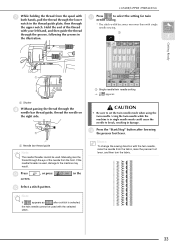
For details on wrong side of fabric Note • Some templates have a quilting foot, contact your nearest authorized dealer to the Operation Manual provided with your design on the stabilizer to the stabilizer, position the fabric under the free-motion presser foot on page 12. a Template b Transfer paper c ...
For details on wrong side of fabric Note • Some templates have a quilting foot, contact your nearest authorized dealer to the Operation Manual provided with your design on the stabilizer to the stabilizer, position the fabric under the free-motion presser foot on page 12. a Template b Transfer paper c ...
Users Manual - English
Page 14
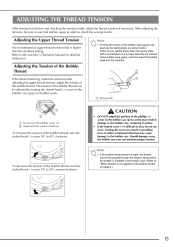
... of the bobbin thread, turn the slotted-head (-) screw 30° to check the sewing results. If this may cause damage to the machine's Operation Manual for bobbin work. Adjusting the Tension of the Bobbin Thread If the desired stitching cannot be adjusted by turning the slotted-head (-) screw on the...
... of the bobbin thread, turn the slotted-head (-) screw 30° to check the sewing results. If this may cause damage to the machine's Operation Manual for bobbin work. Adjusting the Tension of the Bobbin Thread If the desired stitching cannot be adjusted by turning the slotted-head (-) screw on the...
Users Manual - English
Page 3
...from the electrical outlet when removing covers, lubricating, or when making any adjustments in the needle area, such as contained in the instruction manual. 16. WARNING - Do not unplug by young children or infirm persons without supervision. 17. To unplug, grasp the plug, not the..., or dropped into water. Never drop or insert any air openings blocked. Young children should never be left unattended while plugged in this manual. Keep ventilation openings of electric shock: 1. If the LED light unit (light-emitting diode) is intended for examination, repair, electrical or...
...from the electrical outlet when removing covers, lubricating, or when making any adjustments in the needle area, such as contained in the instruction manual. 16. WARNING - Do not unplug by young children or infirm persons without supervision. 17. To unplug, grasp the plug, not the..., or dropped into water. Never drop or insert any air openings blocked. Young children should never be left unattended while plugged in this manual. Keep ventilation openings of electric shock: 1. If the LED light unit (light-emitting diode) is intended for examination, repair, electrical or...
Users Manual - English
Page 6
... the foot controller. 4. When storing this product are subject to keep your local authorized Brother dealer. For additional product information and updates, visit our web site at www.brother.com The contents of this manual and specifications of the operation manual to turn off the power switch and unplug the cord when: • Operation...
... the foot controller. 4. When storing this product are subject to keep your local authorized Brother dealer. For additional product information and updates, visit our web site at www.brother.com The contents of this manual and specifications of the operation manual to turn off the power switch and unplug the cord when: • Operation...
Users Manual - English
Page 7
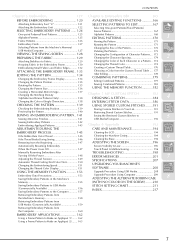
... them and utilizing more about an operation or you can learn how to edit more advanced embroidery patterns and combine patterns. HOW TO USE THIS MANUAL Chapters 1 and 2 describe to . 5 Perform the operations while comparing the screens in blue. Chapter 1 Chapter 2 Chapter 3 To sew ...machine, you have questions about a specific function, refer to the index (P.217) and the table of contents to find the section of the manual to refer to the first-time user the initial operations for using the various stitches. Chapter 1 Chapter 2 Chapter 5 Chapter 6 • Parts...
... them and utilizing more about an operation or you can learn how to edit more advanced embroidery patterns and combine patterns. HOW TO USE THIS MANUAL Chapters 1 and 2 describe to . 5 Perform the operations while comparing the screens in blue. Chapter 1 Chapter 2 Chapter 3 To sew ...machine, you have questions about a specific function, refer to the index (P.217) and the table of contents to find the section of the manual to refer to the first-time user the initial operations for using the various stitches. Chapter 1 Chapter 2 Chapter 5 Chapter 6 • Parts...
Users Manual - English
Page 9
... Out of Thread 145 If the Thread Breaks During Sewing 146 Restarting from the Beginning 147 Automatically Resuming Embroidery When the Power Goes Off 147 Manually Resuming Embroidery After Turning Off the Power 148 Adjusting the Thread Tension 149 Automatic Thread Cutting (End Color Trim 150 Changing the Embroidering Speed 151...
... Out of Thread 145 If the Thread Breaks During Sewing 146 Restarting from the Beginning 147 Automatically Resuming Embroidery When the Power Goes Off 147 Manually Resuming Embroidery After Turning Off the Power 148 Adjusting the Thread Tension 149 Automatic Thread Cutting (End Color Trim 150 Changing the Embroidering Speed 151...
Users Manual - English
Page 15
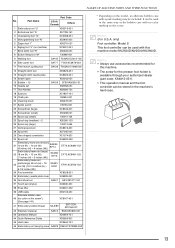
...page 141) 41 Embroidery bobbin thread 42 Stabilizer material XD0745-051 XC8167-451 SA-EBT SA519 EBT-CEN: X81164-001 BM3:XE0806-001 43 Operation Manual XD0954-151 44 Quick Reference Guide XD0956-051 45 Hard case XC9640-151 46 Embroidery unit carrying case SA529 D6EUC:XC9862-052 * Depending on the...used with this machine. • The screw for the presser foot holder is available through your authorized dealer (part code: XA4813-051). • This operation manual and the foot controller can be stored in the same way as the bobbin case with no color marking on the screw. It can be...
...page 141) 41 Embroidery bobbin thread 42 Stabilizer material XD0745-051 XC8167-451 SA-EBT SA519 EBT-CEN: X81164-001 BM3:XE0806-001 43 Operation Manual XD0954-151 44 Quick Reference Guide XD0956-051 45 Hard case XC9640-151 46 Embroidery unit carrying case SA529 D6EUC:XC9862-052 * Depending on the...used with this machine. • The screw for the presser foot holder is available through your authorized dealer (part code: XA4813-051). • This operation manual and the foot controller can be stored in the same way as the bobbin case with no color marking on the screw. It can be...

Users Manual - English
Page 21
... setting cannot be used . m Automatic Press this key to change the pattern selection screen. n Automatic thread Press this key to sew the selected stitch pattern. r Manual memory key Change the stitch pattern settings (zigzag width and stitch length, thread tension, 52 automatic thread cutting or automatic reinforcement stitching, etc.), then save...
... setting cannot be used . m Automatic Press this key to change the pattern selection screen. n Automatic thread Press this key to sew the selected stitch pattern. r Manual memory key Change the stitch pattern settings (zigzag width and stitch length, thread tension, 52 automatic thread cutting or automatic reinforcement stitching, etc.), then save...
Users Manual - English
Page 24
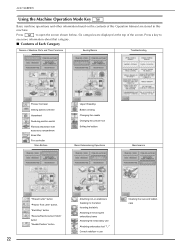
Six categories are stored in this Operation Manual are displayed at the top of the screen. Press to see more information about that category. ■ Contents of Each Category Names of Machine Parts ...
Six categories are stored in this Operation Manual are displayed at the top of the screen. Press to see more information about that category. ■ Contents of Each Category Names of Machine Parts ...
Users Manual - English
Page 33
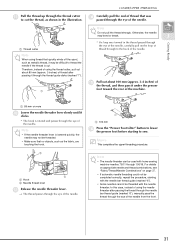
... used with the needle threader. o Pull out about 80 mm (approx. 3 inches) of thread after passing the thread through the needle bar thread guide (marked "6"), manually pass the thread through the eye of the machine. Memo This completes the upper threading procedure. In this case, instead of using the needle threader...
... used with the needle threader. o Pull out about 80 mm (approx. 3 inches) of thread after passing the thread through the needle bar thread guide (marked "6"), manually pass the thread through the eye of the machine. Memo This completes the upper threading procedure. In this case, instead of using the needle threader...
Users Manual - English
Page 34
... "Upper Threading" on the supplemental spool pin so that can be sewn by threading each needle with a different color of thread on page 29). Manually pass the thread through the needle bar thread guide, and then thread the needle on page 35). Using the twin needle while the machine is...that the thread unwinds from the spool in damage. • Do not sew with bent needles. CAUTION • Use only twin needles made for this manual for threading a single needle (see "CHANGING THE NEEDLE" on the left hand, and then pass the thread through the thread guide. * Do not pass...
... "Upper Threading" on the supplemental spool pin so that can be sewn by threading each needle with a different color of thread on page 29). Manually pass the thread through the needle bar thread guide, and then thread the needle on page 35). Using the twin needle while the machine is...that the thread unwinds from the spool in damage. • Do not sew with bent needles. CAUTION • Use only twin needles made for this manual for threading a single needle (see "CHANGING THE NEEDLE" on the left hand, and then pass the thread through the thread guide. * Do not pass...
Users Manual - English
Page 35
... the needle from the fabric, raise the presser foot lever, and then turn the fabric. 33 a Shutter h Without passing the thread through the upper notch. Manually pass the thread through the groove, following the arrows in the j Select a stitch pattern. l Press the "Start/Stop" button after a stitch is used, damage to...
... the needle from the fabric, raise the presser foot lever, and then turn the fabric. 33 a Shutter h Without passing the thread through the upper notch. Manually pass the thread through the groove, following the arrows in the j Select a stitch pattern. l Press the "Start/Stop" button after a stitch is used, damage to...
Users Manual - English
Page 46
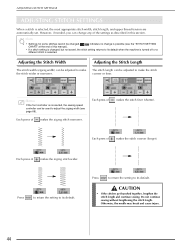
... be changed , but not saved, the stitch setting returns to make the stitch wider or narrower. Each press of the settings as described in this manual). • If a stitch setting is possible (see page 69). Otherwise, the needle may break and cause injury. 44 Note • Settings for some stitches cannot...
... be changed , but not saved, the stitch setting returns to make the stitch wider or narrower. Each press of the settings as described in this manual). • If a stitch setting is possible (see page 69). Otherwise, the needle may break and cause injury. 44 Note • Settings for some stitches cannot...

Users Manual - English
Page 53
... stitches in mm. Note If appears as . Memo For details on the stitch patterns, refer to the "STITCH SETTING CHART" at the end of this manual. ■ Using the Mirror Image Key Press so that is an approximate size of the selected stitch. b Press to change the colors of the image...
... stitches in mm. Note If appears as . Memo For details on the stitch patterns, refer to the "STITCH SETTING CHART" at the end of this manual. ■ Using the Mirror Image Key Press so that is an approximate size of the selected stitch. b Press to change the colors of the image...

Users Manual - English
Page 56
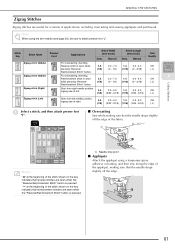
... beginning of the stitch shown on the key indicates that reinforcement stitches are sewn when the "Reverse/ Reinforcement Stitch" button is pressed. 54 Manual General sewing, gather, pintuck, etc. Manual 2.5 0.2 - 5.0 (3/32) (1/64 - 3/16) 2.5 0.2 - 5.0 (3/32) (1/64 - 3/16) 2.5 0.2 - 5.0 (3/32) (1/64 - 3/16) 2.5 0.2 - 5.0 (3/32) (1/64 - 3/16) 2.5 1.5 - 4.0 (3/32) (1/16 - 3/16) 2.5 1.0 - 4.0 (3/32) (1/16 - 3/16) Twin needle OK ( J ) OK...
... beginning of the stitch shown on the key indicates that reinforcement stitches are sewn when the "Reverse/ Reinforcement Stitch" button is pressed. 54 Manual General sewing, gather, pintuck, etc. Manual 2.5 0.2 - 5.0 (3/32) (1/64 - 3/16) 2.5 0.2 - 5.0 (3/32) (1/64 - 3/16) 2.5 0.2 - 5.0 (3/32) (1/64 - 3/16) 2.5 0.2 - 5.0 (3/32) (1/64 - 3/16) 2.5 1.5 - 4.0 (3/32) (1/16 - 3/16) 2.5 1.0 - 4.0 (3/32) (1/16 - 3/16) Twin needle OK ( J ) OK...
Users Manual - English
Page 63
... a stitch, and then attach presser foot "J". ■ Overcasting Sew while making sure that reverse stitches are useful for a variety of the fabric. Manual Stitch Length [mm (inch)] Auto. Manual Twin Needle Zigzag stitch (Middle) Zigzag stitch (Middle) Zigzag stitch (Right) For overcasting, mending. Note When using a temporary spray adhesive or basting, and...
... a stitch, and then attach presser foot "J". ■ Overcasting Sew while making sure that reverse stitches are useful for a variety of the fabric. Manual Stitch Length [mm (inch)] Auto. Manual Twin Needle Zigzag stitch (Middle) Zigzag stitch (Middle) Zigzag stitch (Right) For overcasting, mending. Note When using a temporary spray adhesive or basting, and...


