Basic Users Guide
Page 13
... 4 Access Brother Utilities 6 Initial Setup...7 Set the Date and Time 7 Adjust the Ring Volume 7 Adjust the Beeper Volume 7 Adjust the Speaker Volume 7 2 Paper Handling ...9 Load Paper ...9 Load and Print using the Paper Tray 9 Set the Check Size 10 Change the Paper Size 10 Change the Paper Type 11 Recommended Print Media 11 Using Special Paper 12 3 Print ...13 Print from Your Computer (Windows 13 Print a Document (Windows 13 Print on Both Sides of the Paper (Windows 13 Print More Than One Page on a Single Sheet of Paper (N in 1) (Windows®)...14 Printing on Envelopes, Thick...
... 4 Access Brother Utilities 6 Initial Setup...7 Set the Date and Time 7 Adjust the Ring Volume 7 Adjust the Beeper Volume 7 Adjust the Speaker Volume 7 2 Paper Handling ...9 Load Paper ...9 Load and Print using the Paper Tray 9 Set the Check Size 10 Change the Paper Size 10 Change the Paper Type 11 Recommended Print Media 11 Using Special Paper 12 3 Print ...13 Print from Your Computer (Windows 13 Print a Document (Windows 13 Print on Both Sides of the Paper (Windows 13 Print More Than One Page on a Single Sheet of Paper (N in 1) (Windows®)...14 Printing on Envelopes, Thick...
Basic Users Guide
Page 14
... a PDF File Using ControlCenter4 Advanced Mode (Windows 27 Scan Using the Scan Button on Your Brother Machine 28 Scan Using the Scan Button on the Machine 28 6 Fax ...30 Before Faxing ...30 Set Your Station ID 30 Set Telephone Line Compatibility for Interference and VoIP Systems ..........31 Receive Modes 31 Choose the Correct Receive Mode 33 Set the F/T Ring Time (Pseudo/Double-ring 35 Set the Number of Rings Before the Machine Answers (Ring Delay 35 Store Numbers ...36 Store Address Book Numbers 36 Change...
... a PDF File Using ControlCenter4 Advanced Mode (Windows 27 Scan Using the Scan Button on Your Brother Machine 28 Scan Using the Scan Button on the Machine 28 6 Fax ...30 Before Faxing ...30 Set Your Station ID 30 Set Telephone Line Compatibility for Interference and VoIP Systems ..........31 Receive Modes 31 Choose the Correct Receive Mode 33 Set the F/T Ring Time (Pseudo/Double-ring 35 Set the Number of Rings Before the Machine Answers (Ring Delay 35 Store Numbers ...36 Store Address Book Numbers 36 Change...
Basic Users Guide
Page 18
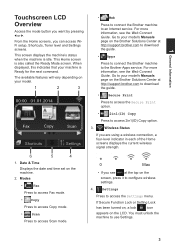
.... 0 Max • If you see the Web Connect Guide. For more information, see at http://support.brother.com to download the guide. • Apps Press to connect the Brother machine to use Settings. 3 This screen displays the machine's status when the machine is idle. From the Home screens, you want by pressing d or c. 1 General Information Touchscreen LCD Overview Access the mode button you can access WiFi setup, Shortcuts, Toner level and Settings screens. Settings Press to configure wireless settings. 4.
.... 0 Max • If you see the Web Connect Guide. For more information, see at http://support.brother.com to download the guide. • Apps Press to connect the Brother machine to use Settings. 3 This screen displays the machine's status when the machine is idle. From the Home screens, you want by pressing d or c. 1 General Information Touchscreen LCD Overview Access the mode button you can access WiFi setup, Shortcuts, Toner level and Settings screens. Settings Press to configure wireless settings. 4.

Basic Users Guide
Page 19
... sending a fax, making a copy, scanning and using Web Connect. • Three Shortcuts screens are available. • To display the other Shortcuts screens, press d or c. To display and access all the options, press d c or a b on the Toner icon. 6. Stored Fax(es) Stored Fax(es):01 Print Fax Copy Scan Shortcuts Settings The number of the screen. Press Print to access the Toner menu. NOTE • This product adopts the font of life or has a problem, an error...
... sending a fax, making a copy, scanning and using Web Connect. • Three Shortcuts screens are available. • To display the other Shortcuts screens, press d or c. To display and access all the options, press d c or a b on the Toner icon. 6. Stored Fax(es) Stored Fax(es):01 Print Fax Copy Scan Shortcuts Settings The number of the screen. Press Print to access the Toner menu. NOTE • This product adopts the font of life or has a problem, an error...

Basic Users Guide
Page 25
... want. 3 Press . 10 Set the Check Size Your Brother machine's Check Size setting causes the machine to display a message when you remove the paper tray from sliding off the output tray. 8 Send your print job to jam or misfeed. 5 Make sure the paper is On. 1 Press (Settings) > All Settings > General Setup > Tray Setting > Check Size. 2 Press On or Off. 3 Press . The default setting is below the maximum paper mark (b b b). Change the Paper Size When you change the paper size setting on the LCD at the same time. Doing this may...
... want. 3 Press . 10 Set the Check Size Your Brother machine's Check Size setting causes the machine to display a message when you remove the paper tray from sliding off the output tray. 8 Send your print job to jam or misfeed. 5 Make sure the paper is On. 1 Press (Settings) > All Settings > General Setup > Tray Setting > Check Size. 2 Press On or Off. 3 Press . The default setting is below the maximum paper mark (b b b). Change the Paper Size When you change the paper size setting on the LCD at the same time. Doing this may...
Basic Users Guide
Page 28
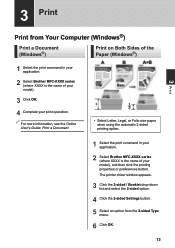
... click the printing properties or preferences button. The printer driver window appears. 3 Click the 2-sided / Booklet drop-down list and select the 2-sided option. 4 Click the 2-sided Settings button. 5 Select an option from Your Computer (Windows®) Print a Document (Windows®) Print on Both Sides of the Paper (Windows®) 1 Select the print command in your application. 2 Select Brother MFC-XXXX series (where XXXX is the name of your print operation. 3 Print 3 Print Print from the 2-sided Type menu. 6 Click...
... click the printing properties or preferences button. The printer driver window appears. 3 Click the 2-sided / Booklet drop-down list and select the 2-sided option. 4 Click the 2-sided Settings button. 5 Select an option from Your Computer (Windows®) Print a Document (Windows®) Print on Both Sides of the Paper (Windows®) 1 Select the print command in your application. 2 Select Brother MFC-XXXX series (where XXXX is the name of your print operation. 3 Print 3 Print Print from the 2-sided Type menu. 6 Click...
Basic Users Guide
Page 29
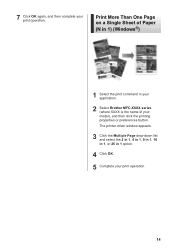
7 Click OK again, and then complete your print operation. 14 The printer driver window appears. 3 Click the Multiple Page drop-down list and select the 2 in 1, 4 in 1, 9 in 1, 16 in 1, or 25 in your application. 2 Select Brother MFC-XXXX series (where XXXX is the name of your model), and then click the printing properties or preferences button. Print More Than One Page on a Single Sheet of Paper (N in 1) (Windows®) 1 Select the print command in 1 option. 4 Click OK. 5 Complete your print operation.
7 Click OK again, and then complete your print operation. 14 The printer driver window appears. 3 Click the Multiple Page drop-down list and select the 2 in 1, 4 in 1, 9 in 1, 16 in 1, or 25 in your application. 2 Select Brother MFC-XXXX series (where XXXX is the name of your model), and then click the printing properties or preferences button. Print More Than One Page on a Single Sheet of Paper (N in 1) (Windows®) 1 Select the print command in 1 option. 4 Click OK. 5 Complete your print operation.
Basic Users Guide
Page 31
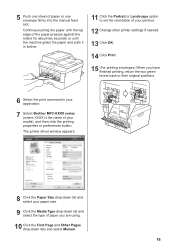
... the print command in your application. 7 Select Brother MFC-XXXX series (where XXXX is the name of your paper size. 9 Click the Media Type drop-down list and select the type of paper or one envelope firmly into the manual feed slot. The printer driver window appears. 8 Click the Paper Size drop-down lists and select Manual. 16 Continue pushing the paper until the top edge of the paper presses against the rollers...
... the print command in your application. 7 Select Brother MFC-XXXX series (where XXXX is the name of your paper size. 9 Click the Media Type drop-down list and select the type of paper or one envelope firmly into the manual feed slot. The printer driver window appears. 8 Click the Paper Size drop-down lists and select Manual. 16 Continue pushing the paper until the top edge of the paper presses against the rollers...
Basic Users Guide
Page 33
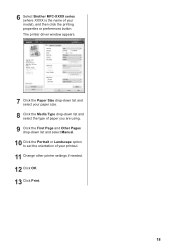
The printer driver window appears. 7 Click the Paper Size drop-down list and select your paper size. 8 Click the Media Type drop-down list and select the type of paper you are using. 9 Click the First Page and Other Pages drop-down list and select Manual. 10 Click the Portrait or Landscape option to set the orientation of your printout. 11 Change other printer settings if needed. 12 Click OK. 13 Click Print. 18 6 Select Brother MFC-XXXX series (where XXXX is the name of your model), and then click the printing properties or preferences button.
The printer driver window appears. 7 Click the Paper Size drop-down list and select your paper size. 8 Click the Media Type drop-down list and select the type of paper you are using. 9 Click the First Page and Other Pages drop-down list and select Manual. 10 Click the Portrait or Landscape option to set the orientation of your printout. 11 Change other printer settings if needed. 12 Click OK. 13 Click Print. 18 6 Select Brother MFC-XXXX series (where XXXX is the name of your model), and then click the printing properties or preferences button.
Basic Users Guide
Page 44
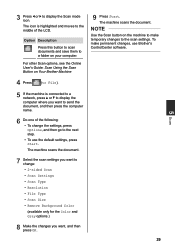
For other Scan options, see the Online User's Guide: Scan Using the Scan Button on Your Brother Machine 4 Press (to display the Scan mode icon. NOTE Use the Scan button on your computer. To make temporary changes to the next step. • To use Brother's ControlCenter software. 5 Scan 5 If the machine is highlighted and moves to a folder on the machine to make permanent changes, use the default settings, press Start. 3 Press d or c to File). 9 Press Start. The icon is connected to a network, press...
For other Scan options, see the Online User's Guide: Scan Using the Scan Button on Your Brother Machine 4 Press (to display the Scan mode icon. NOTE Use the Scan button on your computer. To make temporary changes to the next step. • To use Brother's ControlCenter software. 5 Scan 5 If the machine is highlighted and moves to a folder on the machine to make permanent changes, use the default settings, press Start. 3 Press d or c to File). 9 Press Start. The icon is connected to a network, press...
Basic Users Guide
Page 60
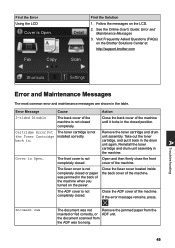
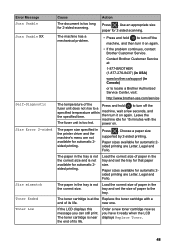
... machine. See the Online User's Guide: Error and Maintenance Messages 3. Follow the messages on the power. Cause The back cover of the machine when you turned on the LCD. 2. Close the fuser cover located inside the back cover of the machine. the document scanned from the ADF was not Remove the jammed paper from the inserted or fed correctly, or ADF unit. Error Message 2-sided Disable Cartridge Error Put the Toner Cartridge back in the drum unit again. If the error message remains, press, . Document Jam The document...
... machine. See the Online User's Guide: Error and Maintenance Messages 3. Follow the messages on the power. Cause The back cover of the machine when you turned on the LCD. 2. Close the fuser cover located inside the back cover of the machine. the document scanned from the ADF was not Remove the jammed paper from the inserted or fed correctly, or ADF unit. Error Message 2-sided Disable Cartridge Error Put the Toner Cartridge back in the drum unit again. If the error message remains, press, . Document Jam The document...
Basic Users Guide
Page 61
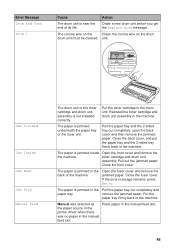
... the printer driver when there was selected as Place paper in the manual feed slot. 46 Error Message Drum End Soon Drum ! The paper is near the end of the machine. toner cartridge and drum unit assembly. Manual was no paper in the manual feed slot. Order a new drum unit before you get the Replace Drum message. Put the toner cartridge in the machine. Pull the paper tray and the 2‑sided tray out completely, open the back cover and then remove the jammed paper. Close the fuser cover...
... the printer driver when there was selected as Place paper in the manual feed slot. 46 Error Message Drum End Soon Drum ! The paper is near the end of the machine. toner cartridge and drum unit assembly. Manual was no paper in the manual feed slot. Order a new drum unit before you get the Replace Drum message. Put the toner cartridge in the machine. Pull the paper tray and the 2‑sided tray out completely, open the back cover and then remove the jammed paper. Close the fuser cover...
Basic Users Guide
Page 62
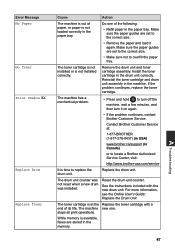
... print operations. Error Message No Paper No Toner Print Unable XX Replace Drum Replace Toner Cause Action The machine is out of paper, or paper is time to replace the drum unit. Make sure the paper guides are set to the correct size. • Make sure not to locate a Brother Authorized Service Center, visit: http://www.brother-usa.com/service It is not loaded correctly in Canada) or to overfill the paper tray. Contact Brother Customer Service at the Replace the toner cartridge with the new drum unit. Reset the drum unit counter. While memory...
... print operations. Error Message No Paper No Toner Print Unable XX Replace Drum Replace Toner Cause Action The machine is out of paper, or paper is time to replace the drum unit. Make sure the paper guides are set to the correct size. • Make sure not to locate a Brother Authorized Service Center, visit: http://www.brother-usa.com/service It is not loaded correctly in Canada) or to overfill the paper tray. Contact Brother Customer Service at the Replace the toner cartridge with the new drum unit. Reset the drum unit counter. While memory...
Basic Users Guide
Page 63
... fuser unit does not rise to turn off the machine, and then turn it on again. • If the problem continues, contact Brother Customer Service. The paper in the tray is at : 1-877-BROTHER (1-877-276-8437) (in USA) www.brother.ca/support (in the printer driver and the machine's menu are not available for automatic 2sided printing. The toner cartridge is not Load the correct size of paper in the tray and set the size...
... fuser unit does not rise to turn off the machine, and then turn it on again. • If the problem continues, contact Brother Customer Service. The paper in the tray is at : 1-877-BROTHER (1-877-276-8437) (in USA) www.brother.ca/support (in the printer driver and the machine's menu are not available for automatic 2sided printing. The toner cartridge is not Load the correct size of paper in the tray and set the size...
Basic Users Guide
Page 64
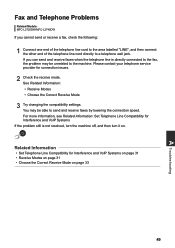
Fax and Telephone Problems Related Models: MFC-L2720DW/MFC-L2740DW If you can send and receive faxes when the telephone line is not resolved, turn the machine off, and then turn it on page 33 49 A Troubleshooting You may be able to send and receive faxes by lowering the connection speed. Related Information • Set Telephone Line Compatibility for Interference and VoIP Systems on page 31 • Receive Modes on...
Fax and Telephone Problems Related Models: MFC-L2720DW/MFC-L2740DW If you can send and receive faxes when the telephone line is not resolved, turn the machine off, and then turn it on page 33 49 A Troubleshooting You may be able to send and receive faxes by lowering the connection speed. Related Information • Set Telephone Line Compatibility for Interference and VoIP Systems on page 31 • Receive Modes on...
Basic Users Guide
Page 67
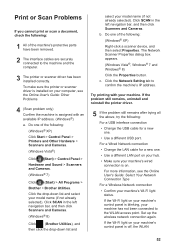
...;, Windows® 7 and Windows® 8) Click the Properties button. For more information, see the Online User's Guide: Other Problems 4 (Scan problem only) Confirm the machine is off, the WLAN 52 To make sure the printer or scanner driver is installed on your machine's control panel is assigned with your computer, see the Online User's Guide: Select Your Network Connection Type For a Wireless Network connection • Confirm your model name (if not already selected). Do one . • Use a different USB port. If...
...;, Windows® 7 and Windows® 8) Click the Properties button. For more information, see the Online User's Guide: Other Problems 4 (Scan problem only) Confirm the machine is off, the WLAN 52 To make sure the printer or scanner driver is installed on your machine's control panel is assigned with your computer, see the Online User's Guide: Select Your Network Connection Type For a Wireless Network connection • Confirm your model name (if not already selected). Do one . • Use a different USB port. If...

Basic Users Guide
Page 78
The toner cartridge and drum unit are using Windows®, double-click the Brother CreativeCenter icon on your machine's control panel or in the Status Monitor. Toner Cartridge Standard Toner: TN-630 High Yield Toner: TN-660 Drum Unit DR-630 If you easily create and print customized materials for your machine, visit http://www.brother.com/original/index.html or contact your local Brother reseller. Mac users can access Brother CreativeCenter at this web address: http://www.brother.com...
The toner cartridge and drum unit are using Windows®, double-click the Brother CreativeCenter icon on your machine's control panel or in the Status Monitor. Toner Cartridge Standard Toner: TN-630 High Yield Toner: TN-660 Drum Unit DR-630 If you easily create and print customized materials for your machine, visit http://www.brother.com/original/index.html or contact your local Brother reseller. Mac users can access Brother CreativeCenter at this web address: http://www.brother.com...
Basic Users Guide
Page 79
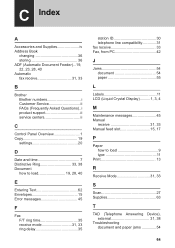
... B Brother Brother numbers i Customer Service ii FAQs (Frequently Asked Questions)..i product support ii service centers ii C Control Panel Overview 1 Copy 19 settings 20 D Date and time 7 Distinctive Ring 33, 38 Document how to load 19, 28, 40 E Entering Text 62 Envelopes 15 Error messages 45 F Fax F/T ring time 35 receive mode 31, 33 ring delay 35 station ID 30 telephone line compatibility 31 fax receive 33 Fax, from PC 42 J Jams 54 document 54 paper 55...
... B Brother Brother numbers i Customer Service ii FAQs (Frequently Asked Questions)..i product support ii service centers ii C Control Panel Overview 1 Copy 19 settings 20 D Date and time 7 Distinctive Ring 33, 38 Document how to load 19, 28, 40 E Entering Text 62 Envelopes 15 Error messages 45 F Fax F/T ring time 35 receive mode 31, 33 ring delay 35 station ID 30 telephone line compatibility 31 fax receive 33 Fax, from PC 42 J Jams 54 document 54 paper 55...
Quick Setup Guide
Page 1
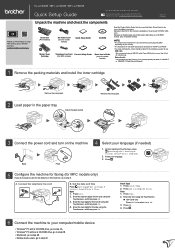
.... 4. Press Clock Type. 2. Press 12h Clock or 24h Clock. Press Time. 2. Press . 6 Connect the machine to your language. 3. The latest manuals are available in the paper tray Adjust the paper guides. 3 Connect the power cord and turn on this Quick Setup Guide for the day using the Touchscreen, and then press OK. 3. Remove the orange part. 2 Load paper in all models are available at the Brother Solutions Center: solutions.brother.com/manuals. Press OK. 4. Time 1. Press Date...
.... 4. Press Clock Type. 2. Press 12h Clock or 24h Clock. Press Time. 2. Press . 6 Connect the machine to your language. 3. The latest manuals are available in the paper tray Adjust the paper guides. 3 Connect the power cord and turn on this Quick Setup Guide for the day using the Touchscreen, and then press OK. 3. Remove the orange part. 2 Load paper in all models are available at the Brother Solutions Center: solutions.brother.com/manuals. Press OK. 4. Time 1. Press Date...
Quick Setup Guide
Page 2
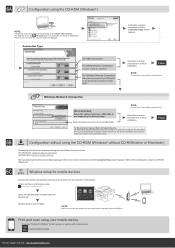
...&Scan" to continue installation. Follow the on -screen instructions to start .exe. We recommend immediately changing the default password to use network tools/utilities securely and to 6A Configuration using the CD-ROM (Windows®). 6C Wireless setup for mobile devices Connect the machine and wireless LAN access point/router from the Brother Solutions Center. (For Windows®) solutions.brother.com/windows (For Macintosh) solutions.brother.com/mac After you do not have a USB cable...
...&Scan" to continue installation. Follow the on -screen instructions to start .exe. We recommend immediately changing the default password to use network tools/utilities securely and to 6A Configuration using the CD-ROM (Windows®). 6C Wireless setup for mobile devices Connect the machine and wireless LAN access point/router from the Brother Solutions Center. (For Windows®) solutions.brother.com/windows (For Macintosh) solutions.brother.com/mac After you do not have a USB cable...


