Network User's Guide - English
Page 14
...network settings BRPrint Auditor (Windows®) 2 The BRPrint Auditor software brings the monitoring power of Brother network management tools to collect usage and status information from a Brother machine connected via the parallel or USB interface. This utility allows a client computer to locally ...XML file format (SMTP Mail support required). In addition to reporting to Brother network management applications this utility can then pass this information to check items such as page counts, toner and drum status and the firmware version. This allows the 2 administrator...
...network settings BRPrint Auditor (Windows®) 2 The BRPrint Auditor software brings the monitoring power of Brother network management tools to collect usage and status information from a Brother machine connected via the parallel or USB interface. This utility allows a client computer to locally ...XML file format (SMTP Mail support required). In addition to reporting to Brother network management applications this utility can then pass this information to check items such as page counts, toner and drum status and the firmware version. This allows the 2 administrator...
Network User's Guide - English
Page 41
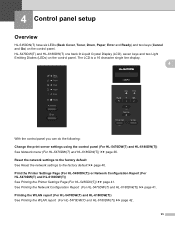
... the print server settings using the control panel (For HL-5470DW(T) and HL-6180DW(T)) 4 See Network menu (For HL-5470DW(T) and HL-6180DW(T)) uu page 36. See Printing the Network Configuration Report (For HL-5470DW(T) and HL-6180DW(T)) uu page 41. 4 Control panel setup 4 Overview 4 HL-5450DN(T) have six LEDs (Back Cover, Toner, Drum, Paper, Error and Ready) and two keys...
... the print server settings using the control panel (For HL-5470DW(T) and HL-6180DW(T)) 4 See Network menu (For HL-5470DW(T) and HL-6180DW(T)) uu page 36. See Printing the Network Configuration Report (For HL-5470DW(T) and HL-6180DW(T)) uu page 41. 4 Control panel setup 4 Overview 4 HL-5450DN(T) have six LEDs (Back Cover, Toner, Drum, Paper, Error and Ready) and two keys...
Network User's Guide - English
Page 84
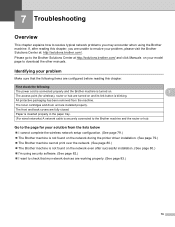
... button is blinking. If, after successful installation. (See page 80.) I'm using the Brother machine. Identifying your solution from the machine. The access point (for your problem Make sure that my network devices are installed properly. The toner cartridges and drum unit are working properly. (See page 83.) 78 Paper is inserted...
... button is blinking. If, after successful installation. (See page 80.) I'm using the Brother machine. Identifying your solution from the machine. The access point (for your problem Make sure that my network devices are installed properly. The toner cartridges and drum unit are working properly. (See page 83.) 78 Paper is inserted...
Quick Setup Guide - English
Page 1
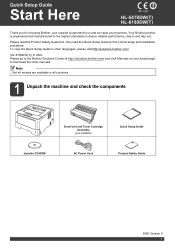
...components Drum Unit and Toner Cartridge Assembly (pre-installed) Quick Setup Guide Installer CD-ROM AC Power Cord Product Safety Guide ENG Version 0 1 Please read the Product Safety Guide first, then read this Quick Setup Guide for choosing Brother, your support is ...Guide Start Here HL-5470DW(T) HL-6180DW(T) Thank you for the correct setup and installation procedure. Your Brother product is important to download the other languages, please visit http://solutions.brother.com/. (HL-6180DW(T)) In USA: Please go to the Brother Solutions Center at http://solutions.brother.com/ and ...
...components Drum Unit and Toner Cartridge Assembly (pre-installed) Quick Setup Guide Installer CD-ROM AC Power Cord Product Safety Guide ENG Version 0 1 Please read the Product Safety Guide first, then read this Quick Setup Guide for choosing Brother, your support is ...Guide Start Here HL-5470DW(T) HL-6180DW(T) Thank you for the correct setup and installation procedure. Your Brother product is important to download the other languages, please visit http://solutions.brother.com/. (HL-6180DW(T)) In USA: Please go to the Brother Solutions Center at http://solutions.brother.com/ and ...
Quick Setup Guide - English
Page 3
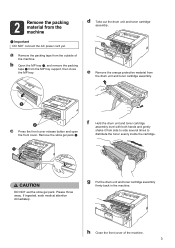
...level with both hands and gently shake it from the machine Important DO NOT connect the AC power cord yet. g Put the drum unit and toner cartridge assembly firmly back in the machine. h Close the front cover of the machine. 2 Remove the packing material from side to side several ...times to distribute the toner evenly inside the cartridge. e Remove the orange protective material from the outside of the machine. 3 CCAAUUTTIOINON DO NOT eat the silica gel pack. a ...
...level with both hands and gently shake it from the machine Important DO NOT connect the AC power cord yet. g Put the drum unit and toner cartridge assembly firmly back in the machine. h Close the front cover of the machine. 2 Remove the packing material from side to side several ...times to distribute the toner evenly inside the cartridge. e Remove the orange protective material from the outside of the machine. 3 CCAAUUTTIOINON DO NOT eat the silica gel pack. a ...
Quick Setup Guide - English
Page 33
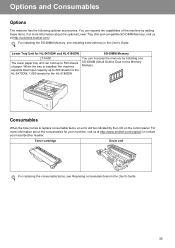
...Unit and compatible SO-DIMM Memory, visit us at http://solutions.brother.com/. For more information about the consumables for your machine, visit us at http://www.brother.com/original/ or contact your local Brother reseller. You can hold up to replace consumable items, an... Toner cartridge Drum unit For replacing the consumable items, see Installing extra memory in the User's Guide. 33 Options and Consumables Options The machine has the following optional accessories. Consumables When the time comes to 800 sheets for the HL-5470DW, 1,050 sheets for HL-5470DW and HL-...
...Unit and compatible SO-DIMM Memory, visit us at http://solutions.brother.com/. For more information about the consumables for your machine, visit us at http://www.brother.com/original/ or contact your local Brother reseller. You can hold up to replace consumable items, an... Toner cartridge Drum unit For replacing the consumable items, see Installing extra memory in the User's Guide. 33 Options and Consumables Options The machine has the following optional accessories. Consumables When the time comes to 800 sheets for the HL-5470DW, 1,050 sheets for HL-5470DW and HL-...
User's Guide - English
Page 5
......91 Secure data ...91 How to print Secure data ...91 Security features...92 Secure Function Lock 2.0...92 Setting Lock...92 Ecology features ...94 Toner Save ...94 Sleep Time ...94 Deep Sleep mode...94 Quiet mode feature ...95 Turning Quiet mode on/off...95 4 Options 96 Lower tray...5400) ...97 SO-DIMM ...98 SO-DIMM types ...98 Installing extra memory ...99 5 Routine Maintenance 101 Replacing consumable items...101 Replacing the toner cartridge ...103 Replacing the drum unit...110 Cleaning and Checking the machine ...116 Cleaning the outside of the machine 116 Cleaning the corona wire......
......91 Secure data ...91 How to print Secure data ...91 Security features...92 Secure Function Lock 2.0...92 Setting Lock...92 Ecology features ...94 Toner Save ...94 Sleep Time ...94 Deep Sleep mode...94 Quiet mode feature ...95 Turning Quiet mode on/off...95 4 Options 96 Lower tray...5400) ...97 SO-DIMM ...98 SO-DIMM types ...98 Installing extra memory ...99 5 Routine Maintenance 101 Replacing consumable items...101 Replacing the toner cartridge ...103 Replacing the drum unit...110 Cleaning and Checking the machine ...116 Cleaning the outside of the machine 116 Cleaning the corona wire......
User's Guide - English
Page 30
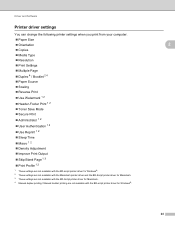
... Print Settings Multiple Page Duplex 4 / Booklet 2 4 Paper Source Scaling Reverse Print Use Watermark 1 2 Header-Footer Print 1 2 Toner Save Mode Secure Print Administrator 1 2 User Authentication 1 2 Use Reprint 1 2 Sleep Time Macro 1 2 Density Adjustment Improve Print Output...
... Print Settings Multiple Page Duplex 4 / Booklet 2 4 Paper Source Scaling Reverse Print Use Watermark 1 2 Header-Footer Print 1 2 Toner Save Mode Secure Print Administrator 1 2 User Authentication 1 2 Use Reprint 1 2 Sleep Time Macro 1 2 Density Adjustment Improve Print Output...
User's Guide - English
Page 34
... sheet. Print cut-out line When 1 in NxN pages option is selected, the Print cut -out line around the printable area. 28 If the toner is the best mode for printing one page on what print quality setting you use envelopes, choose Envelopes. button. Resolution 2 You can choose the resolution...
... sheet. Print cut-out line When 1 in NxN pages option is selected, the Print cut -out line around the printable area. 28 If the toner is the best mode for printing one page on what print quality setting you use envelopes, choose Envelopes. button. Resolution 2 You can choose the resolution...

User's Guide - English
Page 37
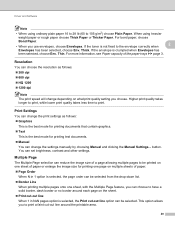
Reverse Print Check Reverse Print to reverse the data from up to down. 2 2 2 2 31 Driver and Software Advanced tab 1 2 3 4 5 6 7 8 9 Change the tab settings by clicking one of the following selections: Scaling (1) Reverse Print (2) Use Watermark (3) Header-Footer Print (4) Toner Save Mode (5) Secure Print (6) Administrator (7) User Authentication (8) Other Print Options (9) Scaling You can change the print image scaling.
Reverse Print Check Reverse Print to reverse the data from up to down. 2 2 2 2 31 Driver and Software Advanced tab 1 2 3 4 5 6 7 8 9 Change the tab settings by clicking one of the following selections: Scaling (1) Reverse Print (2) Use Watermark (3) Header-Footer Print (4) Toner Save Mode (5) Secure Print (6) Administrator (7) User Authentication (8) Other Print Options (9) Scaling You can change the print image scaling.
User's Guide - English
Page 40
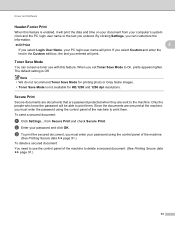
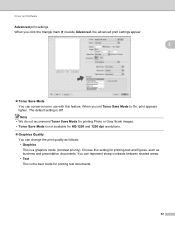
...Secure Print 2 Secure documents are documents that are password protected when they are secured at the machine, you entered. Note • We do not recommend Toner Save Mode for HQ 1200 and 1200 dpi resolutions. from your PC login user name will print the date and time on your password and... click OK. Toner Save Mode 2 You can customize the information. ID Print 2 If you select Login User Name, your computer's system clock and the PC login...
...Secure Print 2 Secure documents are documents that are password protected when they are secured at the machine, you entered. Note • We do not recommend Toner Save Mode for HQ 1200 and 1200 dpi resolutions. from your PC login user name will print the date and time on your password and... click OK. Toner Save Mode 2 You can customize the information. ID Print 2 If you select Login User Name, your computer's system clock and the PC login...

User's Guide - English
Page 43
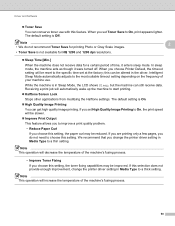
... setting in Media Type to a thin setting. Note This operation will decrease the temperature of the machine's fusing process. Improve Toner Fixing If you choose this setting, the toner fixing capabilities may be improved. Macro 2 You can be reset to the most suitable timeout setting depending on the frequency of time...
... setting in Media Type to a thin setting. Note This operation will decrease the temperature of the machine's fusing process. Improve Toner Fixing If you choose this setting, the toner fixing capabilities may be improved. Macro 2 You can be reset to the most suitable timeout setting depending on the frequency of time...
User's Guide - English
Page 56
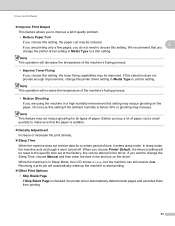
... the driver. While the machine is Off. Note This operation will increase the temperature of the machine's fusing process. • Improve Toner Fixing If you choose this setting, the paper curl may be slower. Improve Print Output This feature allows you set High...modifying the Halftone settings. Note This operation will decrease the temperature of the machine's fusing process. 50 When you choose this setting, the toner fixing capabilities may be altered in Media Type to a thin setting. Receiving a print job will be reset to improve a print quality problem...
... the driver. While the machine is Off. Note This operation will increase the temperature of the machine's fusing process. • Improve Toner Fixing If you choose this setting, the paper curl may be slower. Improve Print Output This feature allows you set High...modifying the Halftone settings. Note This operation will decrease the temperature of the machine's fusing process. 50 When you choose this setting, the toner fixing capabilities may be altered in Media Type to a thin setting. Receiving a print job will be reset to improve a print quality problem...
User's Guide - English
Page 68
... printing text and figures, such as follows: • Graphics This is Off. Driver and Software Advanced print settings When you set Toner Save Mode to On, print appears lighter. You can change the print quality as business and presentation documents. When you click the... triangle mark (c) beside Advanced, the advanced print settings appear. 2 Toner Save Mode You can conserve toner use with this setting for printing text documents. 62 The default setting is a graphics mode (contrast priority). Choose this feature....
... printing text and figures, such as follows: • Graphics This is Off. Driver and Software Advanced print settings When you set Toner Save Mode to On, print appears lighter. You can change the print quality as business and presentation documents. When you click the... triangle mark (c) beside Advanced, the advanced print settings appear. 2 Toner Save Mode You can conserve toner use with this setting for printing text documents. 62 The default setting is a graphics mode (contrast priority). Choose this feature....
User's Guide - English
Page 69
... then enter the time in Media Type to a thick setting. Before you buy a lot of the machine's fusing process. • Improve Toner Fixing If you choose this setting, the toner fixing capabilities may be improved. If you want to change the printer driver setting in the text box on the paper. Do...
... then enter the time in Media Type to a thick setting. Before you buy a lot of the machine's fusing process. • Improve Toner Fixing If you choose this setting, the toner fixing capabilities may be improved. If you want to change the printer driver setting in the text box on the paper. Do...
User's Guide - English
Page 73
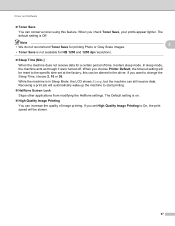
...dpi resolutions. Sleep Time [Min.] When the machine does not receive data for a certain period of image printing. Note 2 • We do not recommend Toner Save for printing Photo or Gray Scale images. • Toner Save is in the driver. When you set at the factory; If you check... Toner Save, your prints appear lighter. Driver and Software Toner Save You can conserve toner using this can be altered in Sleep Mode, the LCD shows Sleep, but the machine can still receive data. If you choose Printer ...
...dpi resolutions. Sleep Time [Min.] When the machine does not receive data for a certain period of image printing. Note 2 • We do not recommend Toner Save for printing Photo or Gray Scale images. • Toner Save is in the driver. When you set at the factory; If you check... Toner Save, your prints appear lighter. Driver and Software Toner Save You can conserve toner using this can be altered in Sleep Mode, the LCD shows Sleep, but the machine can still receive data. If you choose Printer ...
User's Guide - English
Page 74
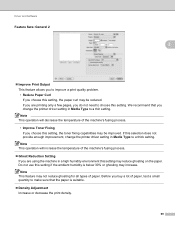
... machine's fusing process. Ghost Reduction Setting If you are printing only a few pages, you do not need to choose this setting, the toner fixing capabilities may be reduced. Note This operation will increase the temperature of the machine's fusing process. • Improve... Toner Fixing If you choose this setting. Driver and Software Feature Sets: General 2 2 Improve Print Output This feature allows you to improve a print quality ...
... machine's fusing process. Ghost Reduction Setting If you are printing only a few pages, you do not need to choose this setting, the toner fixing capabilities may be reduced. Note This operation will increase the temperature of the machine's fusing process. • Improve... Toner Fixing If you choose this setting. Driver and Software Feature Sets: General 2 2 Improve Print Output This feature allows you to improve a print quality ...
User's Guide - English
Page 86
...LCD. Deletes the data in the ROM. - - From Level 1=0.2 sec to Level 10=2.0 sec. -nnonn+ Adjusts the contrast of the toner cartridge. Turns the reprint settings On or Off. Formats the ROM. Chooses the interface you choose Auto, the machine automatically changes the interface ...receiving data. 1 / 2 / 3 / 4 / 5* / ... / 99Sec You need to Ready mode. - On / Off* Increases the page yield of the LCD. Sleep Time Toner Save Button Repeat Message Scroll LCD Contrast Auto Online Select Auto IF Time Input Buffer Macro ID (ROM) Font ID (ROM) Format (ROM) 3 Options Descriptions...
...LCD. Deletes the data in the ROM. - - From Level 1=0.2 sec to Level 10=2.0 sec. -nnonn+ Adjusts the contrast of the toner cartridge. Turns the reprint settings On or Off. Formats the ROM. Chooses the interface you choose Auto, the machine automatically changes the interface ...receiving data. 1 / 2 / 3 / 4 / 5* / ... / 99Sec You need to Ready mode. - On / Off* Increases the page yield of the LCD. Sleep Time Toner Save Button Repeat Message Scroll LCD Contrast Auto Online Select Auto IF Time Input Buffer Macro ID (ROM) Font ID (ROM) Format (ROM) 3 Options Descriptions...
User's Guide - English
Page 100
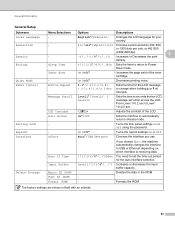
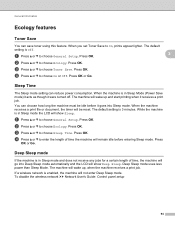
... receives a print job. The default setting is enabled, the machine will be idle before entering Sleep mode. Sleep Time 3 The Sleep mode setting can save toner using this feature. b Press a or b to choose Ecology. Press OK. 3 b Press a or b to choose Ecology. a Press a or b to On... the wireless network uu Network User's Guide: Control panel setup 94 When you set Toner Save to choose General Setup. If a wireless network is Off. General Information Ecology features 3 Toner Save 3 You can reduce power consumption. You can choose how long the machine must...
... receives a print job. The default setting is enabled, the machine will be idle before entering Sleep mode. Sleep Time 3 The Sleep mode setting can save toner using this feature. b Press a or b to choose Ecology. Press OK. 3 b Press a or b to choose Ecology. a Press a or b to On... the wireless network uu Network User's Guide: Control panel setup 94 When you set Toner Save to choose General Setup. If a wireless network is Off. General Information Ecology features 3 Toner Save 3 You can reduce power consumption. You can choose how long the machine must...
User's Guide - English
Page 107
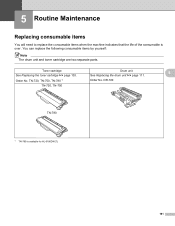
DR-720 TN-720, TN-750 TN-780 1 TN-780 is over. Order No. 5 Routine Maintenance 5 Replacing consumable items 5 You will need to replace the consumable items when the machine indicates that the life of the consumable is available for HL-6180DW(T). 101 Toner cartridge Drum unit 5 See Replacing the toner cartridge uu page 103. TN-720, TN-750, TN-780 1 Order No. You can replace the following consumable items by yourself: Note The drum unit and toner cartridge are two separate parts. See Replacing the drum unit uu page 111.
DR-720 TN-720, TN-750 TN-780 1 TN-780 is over. Order No. 5 Routine Maintenance 5 Replacing consumable items 5 You will need to replace the consumable items when the machine indicates that the life of the consumable is available for HL-6180DW(T). 101 Toner cartridge Drum unit 5 See Replacing the toner cartridge uu page 103. TN-720, TN-750, TN-780 1 Order No. You can replace the following consumable items by yourself: Note The drum unit and toner cartridge are two separate parts. See Replacing the drum unit uu page 111.


