Users Manual - English
Page 86
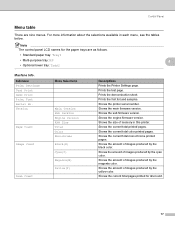
... images produced by the black color. Shows the current total monochrome printed pages. Prints the font list and samples. Shows the engine firmware version. Submenu Print Settings Test Print Demo Print Print Font Serial No. For more information about the selections available in this printer. Note The control panel LCD names for drum unit. 77 Prints the test page. Shows...
... images produced by the black color. Shows the current total monochrome printed pages. Prints the font list and samples. Shows the engine firmware version. Submenu Print Settings Test Print Demo Print Print Font Serial No. For more information about the selections available in this printer. Note The control panel LCD names for drum unit. 77 Prints the test page. Shows...
Users Manual - English
Page 87
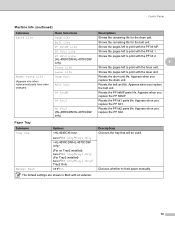
... Life PF Kit2 Life (HL-4050CDN/HL-4070CDW only) Fuser Life Laser Life Drum Unit Belt Unit PF KitMP PF Kit1 PF Kit2 (HL-4050CDN/HL-4070CDW only) Descriptions Shows the remaining life for the belt unit. Resets the drum unit life. Appears when you replace the PF Kit1. Shows the pages left to print with the fuser unit. Shows...
... Life PF Kit2 Life (HL-4050CDN/HL-4070CDW only) Fuser Life Laser Life Drum Unit Belt Unit PF KitMP PF Kit1 PF Kit2 (HL-4050CDN/HL-4070CDW only) Descriptions Shows the remaining life for the belt unit. Resets the drum unit life. Appears when you replace the PF Kit1. Shows the pages left to print with the fuser unit. Shows...
Users Manual - English
Page 106
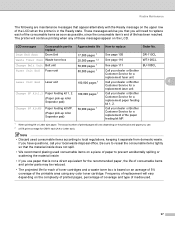
...printer is based on the LCD. Change PF Kit1,2 Paper feeding kit 1, 2. (Paper pick-up roller Separator pad) 50,000 pages 1 Call your dealer or Brother... to replace each (A4 or Letter size). Drum End Soon Drum Unit 17,000 pages 1 See page 105 DR...print coverage for a replacement laser unit. Frequency of replacement will continue printing when any of these messages appear on an average of 5% coverage of the printable area using any color...Laser Unit End Laser unit 100,000 pages 1 Call your dealer or Brother Customer Service for a replacement fuser unit. The actual number of printed...
...printer is based on the LCD. Change PF Kit1,2 Paper feeding kit 1, 2. (Paper pick-up roller Separator pad) 50,000 pages 1 Call your dealer or Brother... to replace each (A4 or Letter size). Drum End Soon Drum Unit 17,000 pages 1 See page 105 DR...print coverage for a replacement laser unit. Frequency of replacement will continue printing when any of these messages appear on an average of 5% coverage of the printable area using any color...Laser Unit End Laser unit 100,000 pages 1 Call your dealer or Brother Customer Service for a replacement fuser unit. The actual number of printed...
Users Manual - English
Page 108
... be covered by the use of optimum performance when used . We also strongly recommend that you continue to the print quality, DO NOT touch the shaded parts shown in the Brother machine may be shortened. Brother cannot guarantee this optimum performance if toner or toner cartridges of other than genuine...and/or cartridges. Our warranty coverage does not apply to the drum unit or other part of genuine Brother supplies. If damage is caused to any degradation to use of this machine. Put the toner cartridge in the printer. Routine Maintenance CA UTI ON Wait to unpack the toner ...
... be covered by the use of optimum performance when used . We also strongly recommend that you continue to the print quality, DO NOT touch the shaded parts shown in the Brother machine may be shortened. Brother cannot guarantee this optimum performance if toner or toner cartridges of other than genuine...and/or cartridges. Our warranty coverage does not apply to the drum unit or other part of genuine Brother supplies. If damage is caused to any degradation to use of this machine. Put the toner cartridge in the printer. Routine Maintenance CA UTI ON Wait to unpack the toner ...

Users Manual - English
Page 111
If you do not, printed pages may have a vertical stripe. 102 2 2 1 2 1 2 1 1 1 1 1 1 2 2 1 2 1 2 Routine Maintenance d Clean the corona wire as follows: 1 Push to release the latches of the white corona wire cover (1), and then open the cover. 6 1 2 Clean the corona wire inside the drum unit by gently sliding the green tab from left to right and right to left several times. 1 CA UTI ON Be sure to return the tab to the home position a (1).
If you do not, printed pages may have a vertical stripe. 102 2 2 1 2 1 2 1 1 1 1 1 1 2 2 1 2 1 2 Routine Maintenance d Clean the corona wire as follows: 1 Push to release the latches of the white corona wire cover (1), and then open the cover. 6 1 2 Clean the corona wire inside the drum unit by gently sliding the green tab from left to right and right to left several times. 1 CA UTI ON Be sure to return the tab to the home position a (1).
Users Manual - English
Page 114
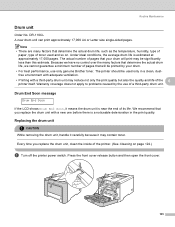
... is near the end of toner used only in the print quality. The printer should be printed by the use only genuine Brother toner. Every time you replace the drum unit with a third-party drum unit may contain toner. Drum End Soon message 6 Drum End Soon If the LCD shows Drum End Soon, it may reduce not only the...
... is near the end of toner used only in the print quality. The printer should be printed by the use only genuine Brother toner. Every time you replace the drum unit with a third-party drum unit may contain toner. Drum End Soon message 6 Drum End Soon If the LCD shows Drum End Soon, it may reduce not only the...

Users Manual - English
Page 116
Routine Maintenance d Hold the handle of the toner cartridge and pull it out of the drum unit. To avoid print quality problems, DO NOT touch the shaded parts shown in the illustration. Repeat this for all the toner cartridges. 6 CA UTI ON To prevent damage to the printer from static electricity, DO NOT touch the electrodes shown in the illustrations. 107
Routine Maintenance d Hold the handle of the toner cartridge and pull it out of the drum unit. To avoid print quality problems, DO NOT touch the shaded parts shown in the illustration. Repeat this for all the toner cartridges. 6 CA UTI ON To prevent damage to the printer from static electricity, DO NOT touch the electrodes shown in the illustrations. 107
Users Manual - English
Page 120
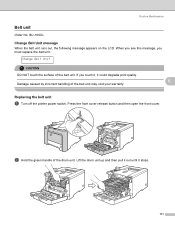
... touch the surface of the belt unit. Replacing the belt unit 6 a Turn off the printer power switch. Lift the drum unit up and then pull it out until it could degrade print quality. 6 Damage caused by incorrect handling of the drum unit. Routine Maintenance Belt unit 6 Order No. When you see this message, you...
... touch the surface of the belt unit. Replacing the belt unit 6 a Turn off the printer power switch. Lift the drum unit up and then pull it out until it could degrade print quality. 6 Damage caused by incorrect handling of the drum unit. Routine Maintenance Belt unit 6 Order No. When you see this message, you...
Users Manual - English
Page 131
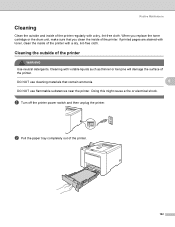
...or electrical shock. When you replace the toner cartridge or the drum unit, make sure that contain ammonia. 6 DO NOT use flammable substances near the printer. DO NOT use cleaning materials that you clean the inside of the printer regularly with a dry, lint-free cloth. Cleaning with a ...dry, lint-free cloth. a Turn off the printer power switch and then unplug the printer. If printed pages are stained with toner, clean the inside of the printer with volatile liquids such as ...
...or electrical shock. When you replace the toner cartridge or the drum unit, make sure that contain ammonia. 6 DO NOT use flammable substances near the printer. DO NOT use cleaning materials that you clean the inside of the printer regularly with a dry, lint-free cloth. Cleaning with a ...dry, lint-free cloth. a Turn off the printer power switch and then unplug the printer. If printed pages are stained with toner, clean the inside of the printer with volatile liquids such as ...
Users Manual - English
Page 136
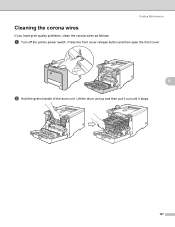
Lift the drum unit up and then pull it out until it stops. 127 Routine Maintenance Cleaning the corona wires 6 If you have print quality problems, clean the corona wires as follows: a Turn off the printer power switch. Press the front cover release button and then open the front cover. 6 b Hold the green handle of the drum unit.
Lift the drum unit up and then pull it out until it stops. 127 Routine Maintenance Cleaning the corona wires 6 If you have print quality problems, clean the corona wires as follows: a Turn off the printer power switch. Press the front cover release button and then open the front cover. 6 b Hold the green handle of the drum unit.
Users Manual - English
Page 137
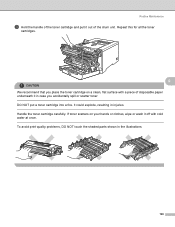
... toner scatters on a clean, flat surface with cold water at once. DO NOT put a toner cartridge into a fire. Handle the toner cartridge carefully. To avoid print quality problems, DO NOT touch the shaded parts shown in injuries. Routine Maintenance c Hold the handle of the...
... toner scatters on a clean, flat surface with cold water at once. DO NOT put a toner cartridge into a fire. Handle the toner cartridge carefully. To avoid print quality problems, DO NOT touch the shaded parts shown in injuries. Routine Maintenance c Hold the handle of the...

Users Manual - English
Page 139
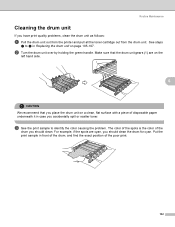
If you do not, printed pages may have a vertical stripe. f Close the corona wire cover. 2 2 1 2 1 2 1 1 1 Routine Maintenance e Clean the corona wire inside the drum unit by gently sliding the green tab from left to right and right to left several times. 1 6 CA UTI ON Be sure to return the tab to clean each of the remaining corona wires. 130 1 1 1 2 2 1 2 1 2 g Repeat steps d to f to the home position a (1).
If you do not, printed pages may have a vertical stripe. f Close the corona wire cover. 2 2 1 2 1 2 1 1 1 Routine Maintenance e Clean the corona wire inside the drum unit by gently sliding the green tab from left to right and right to left several times. 1 6 CA UTI ON Be sure to return the tab to clean each of the remaining corona wires. 130 1 1 1 2 2 1 2 1 2 g Repeat steps d to f to the home position a (1).
Users Manual - English
Page 141
... the color causing the problem. The color of the spots is the color of disposable paper underneath it in case you accidentally spill or scatter toner. c See the print sample to d in front of the drum, and find the exact position of the poor print. 132 b Turn the drum unit over...CA UTI ON We recommend that the drum unit gears (1) are cyan, you have print quality problems, clean the drum unit as follows: a Pull the drum unit out from the printer and pull all the toner cartridge out from the drum unit. Put the print sample in Replacing the drum unit on a clean, flat surface...
... the color causing the problem. The color of the spots is the color of disposable paper underneath it in case you accidentally spill or scatter toner. c See the print sample to d in front of the drum, and find the exact position of the poor print. 132 b Turn the drum unit over...CA UTI ON We recommend that the drum unit gears (1) are cyan, you have print quality problems, clean the drum unit as follows: a Pull the drum unit out from the printer and pull all the toner cartridge out from the drum unit. Put the print sample in Replacing the drum unit on a clean, flat surface...
Users Manual - English
Page 142
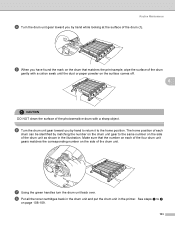
... you by hand while looking at the surface of the drum (1). 1 e When you by matching the number on the drum unit gear to the same number on the side of the drum unit as shown in the printer. g Using the green handles turn the drum unit back over. The home position of each of the... the corresponding number on the side of the drum unit. h Put all the toner cartridges back in the drum unit and put the drum unit in the illustration. See steps f to the home position. Make sure that matches the print sample, wipe the surface of the drum gently with a cotton swab until the dust or...
... you by hand while looking at the surface of the drum (1). 1 e When you by matching the number on the drum unit gear to the same number on the side of the drum unit as shown in the printer. g Using the green handles turn the drum unit back over. The home position of each of the... the corresponding number on the side of the drum unit. h Put all the toner cartridges back in the drum unit and put the drum unit in the illustration. See steps f to the home position. Make sure that matches the print sample, wipe the surface of the drum gently with a cotton swab until the dust or...
Users Manual - English
Page 143
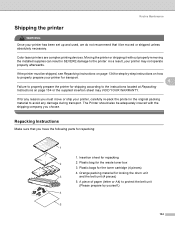
...to avoid any reason you choose. Color laser printers are complex printing devices. If the printer must move or ship your printer, carefully re-pack the printer in SEVERE damage to the printer. Plastic bag for repacking 2. Routine Maintenance Shipping the printer 6 WA RNING Once your printer has been set up and used..., see Repacking Instructions on how to properly prepare your printer for transport. 6 Failure to protect the belt unit (Please prepare by -step instructions on page 134 for step-by yourself.) 134 If for locking the drum unit and the belt unit (4 pieces) 5. Plastic ...
...to avoid any reason you choose. Color laser printers are complex printing devices. If the printer must move or ship your printer, carefully re-pack the printer in SEVERE damage to the printer. Plastic bag for repacking 2. Routine Maintenance Shipping the printer 6 WA RNING Once your printer has been set up and used..., see Repacking Instructions on how to properly prepare your printer for transport. 6 Failure to protect the belt unit (Please prepare by -step instructions on page 134 for step-by yourself.) 134 If for locking the drum unit and the belt unit (4 pieces) 5. Plastic ...
Users Manual - English
Page 146
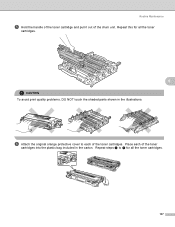
Repeat steps e to each of the toner cartridges into the plastic bag included in the illustrations. f Attach the original orange protective cover to f for all the toner cartridges. 137 Routine Maintenance e Hold the handle of the toner cartridge and pull it out of the toner cartridges. Place each of the drum unit. Repeat this for all the toner cartridges. 6 CA UTI ON To avoid print quality problems, DO NOT touch the shaded parts shown in the carton.
Repeat steps e to each of the toner cartridges into the plastic bag included in the illustrations. f Attach the original orange protective cover to f for all the toner cartridges. 137 Routine Maintenance e Hold the handle of the toner cartridge and pull it out of the toner cartridges. Place each of the drum unit. Repeat this for all the toner cartridges. 6 CA UTI ON To avoid print quality problems, DO NOT touch the shaded parts shown in the carton.
Users Manual - English
Page 151
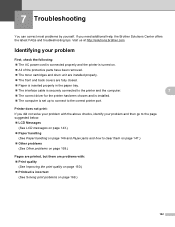
... http://solutions.brother.com. The toner cartridges and drum unit are fully closed. The correct driver for the printer has been chosen and is securely connected to the page suggested below. If you did not solve your problem with : Print quality (See Improving the print quality on ... turned on page 169.) 7 7 7 7 7 142 Identifying your problem and then go to the printer and the computer. Printer does not print: If you need additional help, the Brother Solutions Center offers the latest FAQs and troubleshooting tips. The interface cable is installed. LCD Messages (See ...
... http://solutions.brother.com. The toner cartridges and drum unit are fully closed. The correct driver for the printer has been chosen and is securely connected to the page suggested below. If you did not solve your problem with : Print quality (See Improving the print quality on ... turned on page 169.) 7 7 7 7 7 142 Identifying your problem and then go to the printer and the computer. Printer does not print: If you need additional help, the Brother Solutions Center offers the latest FAQs and troubleshooting tips. The interface cable is installed. LCD Messages (See ...
Users Manual - English
Page 152
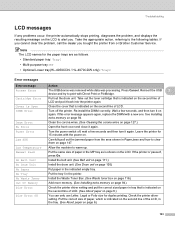
...8226; Optional Lower tray(HL-4050CDN / HL-4070CDW only): Tray2 Error messages Error message A ction Access Error The USB device was removed while data was processing. If the printer is shown on page 6.) Size Error DX You can only use Letter, Legal or Folio size for duplex printing. Reinsert the USB ... the DIMM with Direct Print or PictBridge. Jam XXX Carefully pull out the jammed paper from or Brother Customer Service. Cover is Open Close the cover that is indicated on the second line of paper in tray that is indicated on page 6.) 143 Drum Error Clean the corona ...
...8226; Optional Lower tray(HL-4050CDN / HL-4070CDW only): Tray2 Error messages Error message A ction Access Error The USB device was removed while data was processing. If the printer is shown on page 6.) Size Error DX You can only use Letter, Legal or Folio size for duplex printing. Reinsert the USB ... the DIMM with Direct Print or PictBridge. Jam XXX Carefully pull out the jammed paper from or Brother Customer Service. Cover is Open Close the cover that is indicated on the second line of paper in tray that is indicated on page 6.) 143 Drum Error Clean the corona ...
Users Manual - English
Page 169
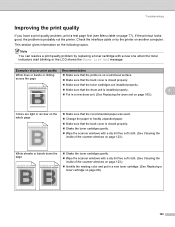
...printer is probably not the printer. abcdefghijklmnopqrstuvwxyz. abcdefghijklmnopqrstuvwxyz. abcdefghijklmnopqrstuvwxyz. abcdefghijklmnopqrstuvwxyz. abcdefghijklmnopqrstuvwxyz. ABCDEFGHIJKLMNOPQRSTUVWXYZ. 0123456789. Wipe the scanner windows with a dry lint free soft cloth. (See Cleaning the inside of the scanner windows on page 98.) 160 Troubleshooting Improving the print quality 7 If you have a print quality problem, print... on page 123.) Identify the missing color and put in a new drum unit. (See Replacing the drum unit on the whole page ABCDEFGHIJKLMNOPQRSTUVWXYZ. 0123456789...
...printer is probably not the printer. abcdefghijklmnopqrstuvwxyz. abcdefghijklmnopqrstuvwxyz. abcdefghijklmnopqrstuvwxyz. abcdefghijklmnopqrstuvwxyz. abcdefghijklmnopqrstuvwxyz. ABCDEFGHIJKLMNOPQRSTUVWXYZ. 0123456789. Wipe the scanner windows with a dry lint free soft cloth. (See Cleaning the inside of the scanner windows on page 98.) 160 Troubleshooting Improving the print quality 7 If you have a print quality problem, print... on page 123.) Identify the missing color and put in a new drum unit. (See Replacing the drum unit on the whole page ABCDEFGHIJKLMNOPQRSTUVWXYZ. 0123456789...
Users Manual - English
Page 170
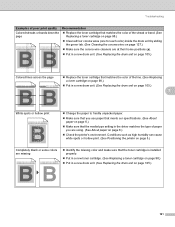
...drum unit. (See Replacing the drum unit on page 5.) Completely blank or some colors are at their home positions (a). Conditions such as high humidity can cause white spots or hollow print. (See Positioning the printer on page 105.) 7 White spots or hollow print.... Clean all four corona wires (one for each color) inside the drum unit by sliding the green tab. (See Cleaning the corona wires on page 6.) Check the printer's environment. abcdefghijklmnopqrstuvwxyz. abcdefghijklmnopqrstuvwxyz. abcdefghijklmnopqrstuvwxyz. ABCDEFGHIJKLMNOPQRSTUVWXYZ. 0123456789....
...drum unit. (See Replacing the drum unit on page 5.) Completely blank or some colors are at their home positions (a). Conditions such as high humidity can cause white spots or hollow print. (See Positioning the printer on page 105.) 7 White spots or hollow print.... Clean all four corona wires (one for each color) inside the drum unit by sliding the green tab. (See Cleaning the corona wires on page 6.) Check the printer's environment. abcdefghijklmnopqrstuvwxyz. abcdefghijklmnopqrstuvwxyz. abcdefghijklmnopqrstuvwxyz. ABCDEFGHIJKLMNOPQRSTUVWXYZ. 0123456789....


