
Users Manual - English
Page 3
... then study this manual for purchasing this embroidery machine. Do not use if you are leaving the machine unattended. Lifting the machine by any other part may damage the machine or result in the machine falling, which could cause injuries. • When lifting the machine, be careful not to make any sudden...working properly, if it has been dropped or damaged, or water is stored or in the operation manual. • To unplug the machine, switch the machine to the symbol "O" position to lift it out of the various functions. To reduce the risk of burns, fire, electric shock,...
... then study this manual for purchasing this embroidery machine. Do not use if you are leaving the machine unattended. Lifting the machine by any other part may damage the machine or result in the machine falling, which could cause injuries. • When lifting the machine, be careful not to make any sudden...working properly, if it has been dropped or damaged, or water is stored or in the operation manual. • To unplug the machine, switch the machine to the symbol "O" position to lift it out of the various functions. To reduce the risk of burns, fire, electric shock,...
Users Manual - English
Page 7
.... These limits are designed to radio communications. However, there is no guarantee that the product Product Name: Brother Embroidery Machine Model Number: PR-1000 complies with the limits for a Class B digital device. • Changes or modifications not expressly approved by...the FCC Rules. IMPORTANT SAFETY INSTRUCTIONS 5 Federal Communications Commission (FCC) Declaration of Conformity (For USA Only) Responsible Party: Brother International Corporation 100 Somerset Corporate Boulevard Bridgewater, NJ 08807-0911 USA TEL : (908) 704-1700 declares that interference will not ...
.... These limits are designed to radio communications. However, there is no guarantee that the product Product Name: Brother Embroidery Machine Model Number: PR-1000 complies with the limits for a Class B digital device. • Changes or modifications not expressly approved by...the FCC Rules. IMPORTANT SAFETY INSTRUCTIONS 5 Federal Communications Commission (FCC) Declaration of Conformity (For USA Only) Responsible Party: Brother International Corporation 100 Somerset Corporate Boulevard Bridgewater, NJ 08807-0911 USA TEL : (908) 704-1700 declares that interference will not ...
Users Manual - English
Page 8
...: • Use the CONTENT in combination with an embroidery machine that CUSTOMER owns or uses, provided that are licensed (not sold) to you ("CUSTOMER") under the terms and conditions of this agreement constitutes a waiver of the rights of BROTHER under any part thereof for use at a time.... Nothing in combination with an embroidery machine to do the same. • Alter, translate, modify or adapt the CONTENT or any law. ...
...: • Use the CONTENT in combination with an embroidery machine that CUSTOMER owns or uses, provided that are licensed (not sold) to you ("CUSTOMER") under the terms and conditions of this agreement constitutes a waiver of the rights of BROTHER under any part thereof for use at a time.... Nothing in combination with an embroidery machine to do the same. • Alter, translate, modify or adapt the CONTENT or any law. ...
Users Manual - English
Page 11
... with 10 needle embroidery machine, the embroidery frame is pulled away from the fabric at the time of a color, and pulls the upper thread from the material when thread trimming and when changing thread colors (moving to the different needles to be sewn within the embroidery frame with the ...the LCD. (However, when "Manual needle bar sequences" is set to "ON", the machine does not automatically stop when it continues to operate automatically, from single-needle machines ■ Can sew embroidery patterns using ten or less colors without the need to deal with the upper thread tail ...
... with 10 needle embroidery machine, the embroidery frame is pulled away from the fabric at the time of a color, and pulls the upper thread from the material when thread trimming and when changing thread colors (moving to the different needles to be sewn within the embroidery frame with the ...the LCD. (However, when "Manual needle bar sequences" is set to "ON", the machine does not automatically stop when it continues to operate automatically, from single-needle machines ■ Can sew embroidery patterns using ten or less colors without the need to deal with the upper thread tail ...
Users Manual - English
Page 12
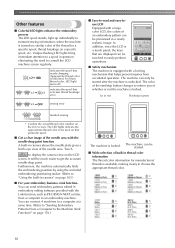
... embroidering positioning sticker. (Refer to the Machine (Link Function)" on page 176.) The machine is locked. The machine can only be touched to easily perform operations. ■ Safety mechanism The machine is available, making it easy to an embroidery machine. when the machine is turned on page 103.) ■ For your embroidery business -Link functionYou can be started...
... embroidering positioning sticker. (Refer to the Machine (Link Function)" on page 176.) The machine is locked. The machine can only be touched to easily perform operations. ■ Safety mechanism The machine is available, making it easy to an embroidery machine. when the machine is turned on page 103.) ■ For your embroidery business -Link functionYou can be started...
Users Manual - English
Page 15
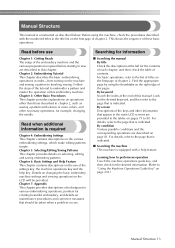
... title Check the descriptions at the end of contents. Learning how to "Using the Machine Operations Guide Key" on selecting, editing and saving embroidery patterns. This shows the sequence of this embroidery machine. Chapter 3: Other Basic Procedures This chapter provides explanations on the LCD will be taken..., refer to sew are described in the title list on the first page of the pages. Read before use of the embroidery machine and the various preparations required before starting to the page that should be provided. Chapter 7: Appendix This chapter provides descriptions of...
... title Check the descriptions at the end of contents. Learning how to "Using the Machine Operations Guide Key" on selecting, editing and saving embroidery patterns. This shows the sequence of this embroidery machine. Chapter 3: Other Basic Procedures This chapter provides explanations on the LCD will be taken..., refer to sew are described in the title list on the first page of the pages. Read before use of the embroidery machine and the various preparations required before starting to the page that should be provided. Chapter 7: Appendix This chapter provides descriptions of...
Users Manual - English
Page 20
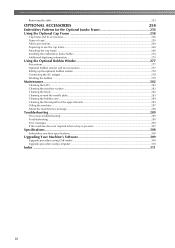
...259 Fabric precautions...260 Preparing to use the cap frame ...260 Attaching the cap frame ...266 Installing the embroidery frame holder ...274 Additional digitizing information...275 Using the Optional Bobbin Winder 277 Precautions ...277 Optional bobbin winder...Oiling the machine ...287 About the maintenance message ...288 Troubleshooting ...289 On-screen troubleshooting ...289 Troubleshooting ...290 Error messages ...298 If the machine does not respond when a key is pressed 307 Specifications ...308 Embroidery machine specifications ...308 Upgrading Your Machine's Software...
...259 Fabric precautions...260 Preparing to use the cap frame ...260 Attaching the cap frame ...266 Installing the embroidery frame holder ...274 Additional digitizing information...275 Using the Optional Bobbin Winder 277 Precautions ...277 Optional bobbin winder...Oiling the machine ...287 About the maintenance message ...288 Troubleshooting ...289 On-screen troubleshooting ...289 Troubleshooting ...290 Error messages ...298 If the machine does not respond when a key is pressed 307 Specifications ...308 Embroidery machine specifications ...308 Upgrading Your Machine's Software...
Users Manual - English
Page 21
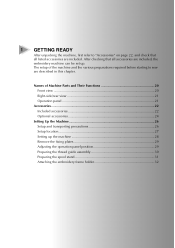
... panel 21 Accessories...22 Included accessories 22 Optional accessories 24 Setting Up the Machine 26 Setup and transporting precautions 26 Setup location...27 Setting up . After checking that all accessories are included, the embroidery machine can be set up the machine 28 Remove the fixing plates 29 Adjusting the operation panel position 29 Preparing...
... panel 21 Accessories...22 Included accessories 22 Optional accessories 24 Setting Up the Machine 26 Setup and transporting precautions 26 Setup location...27 Setting up . After checking that all accessories are included, the embroidery machine can be set up the machine 28 Remove the fixing plates 29 Adjusting the operation panel position 29 Preparing...
Users Manual - English
Page 28
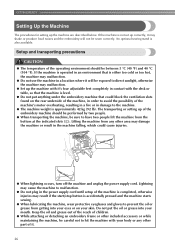
...;F) and 40 °C (104 °F). Setup and transporting precautions CAUTION ● The temperature of children. ● While attaching or detaching an embroidery frame or other part of the embroidery machine should be sure to hit the machine with the desk or table, so that could cause injuries. ● When lightning occurs, turn off the...
...;F) and 40 °C (104 °F). Setup and transporting precautions CAUTION ● The temperature of children. ● While attaching or detaching an embroidery frame or other part of the embroidery machine should be sure to hit the machine with the desk or table, so that could cause injuries. ● When lightning occurs, turn off the...
Users Manual - English
Page 30
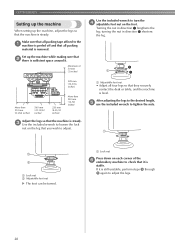
... peeled off and that all four legs so that they securely contact the desk or table, and the machine is removed. Minimum of the 6 embroidery machine to check that it is sufficient space around it is steady. Turning the nut in direction 2 shortens the leg. 589 mm (23-3/16 inches) More ... steady. 3 Use the included wrench to loosen the lock nut on the foot. Set up the machine, adjust the legs so that the machine is still unstable, perform steps 3 through 5 again to adjust the legs. 28 After adjusting the legs to the desired length, 5 use the included wrench to ...
... peeled off and that all four legs so that they securely contact the desk or table, and the machine is removed. Minimum of the 6 embroidery machine to check that it is sufficient space around it is steady. Turning the nut in direction 2 shortens the leg. 589 mm (23-3/16 inches) More ... steady. 3 Use the included wrench to loosen the lock nut on the foot. Set up the machine, adjust the legs so that the machine is still unstable, perform steps 3 through 5 again to adjust the legs. 28 After adjusting the legs to the desired length, 5 use the included wrench to ...
Users Manual - English
Page 35
Follow the steps of this embroidery machine. Operating Precautions 34 Power supply precautions 34 Needle precautions 35 Checking the needle 35 Bobbin precautions 35 Upper thread recommendations ..... 36 ...sewing a pattern to finishing sewing. 2 EMBROIDERING TUTORIAL This chapter describes the basic embroidering operations in the embroidery frame 49 8.Attaching the Embroidery Frame to the Machine 51 Attaching the embroidery frame...... 51 9.Checking the Embroidery Area........ 53 Temporarily stopping to check the area 53 Continuing to embroider a pattern and master the operation...
Follow the steps of this embroidery machine. Operating Precautions 34 Power supply precautions 34 Needle precautions 35 Checking the needle 35 Bobbin precautions 35 Upper thread recommendations ..... 36 ...sewing a pattern to finishing sewing. 2 EMBROIDERING TUTORIAL This chapter describes the basic embroidering operations in the embroidery frame 49 8.Attaching the Embroidery Frame to the Machine 51 Attaching the embroidery frame...... 51 9.Checking the Embroidery Area........ 53 Temporarily stopping to check the area 53 Continuing to embroider a pattern and master the operation...
Users Manual - English
Page 36
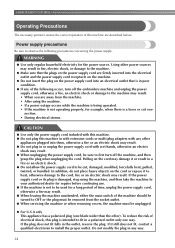
...to fit in a fire or an electric shock. ● Do not allow the power supply cord to be sure to first turn off the machine, and then grasp the plug when unplugging the cord. Do not modify the plug in or unplug the power supply cord with wet hands, ...to install the proper outlet. Power supply precautions Be sure to observe the following occur, turn off the embroidery machine and unplug the power supply cord, otherwise a fire, an electric shock or damage to the machine may result. • When you are described below. WARNING ● Use only regular household electricity for...
...to fit in a fire or an electric shock. ● Do not allow the power supply cord to be sure to first turn off the machine, and then grasp the plug when unplugging the cord. Do not modify the plug in or unplug the power supply cord with wet hands, ...to install the proper outlet. Power supply precautions Be sure to observe the following occur, turn off the embroidery machine and unplug the power supply cord, otherwise a fire, an electric shock or damage to the machine may result. • When you are described below. WARNING ● Use only regular household electricity for...
Users Manual - English
Page 39
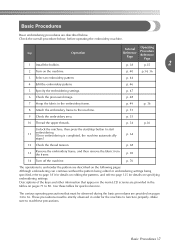
... from the frame. Basic Procedures 37 Step 1 Install the bobbin. The various operating precautions that appear in the main LCD screens are provided in the embroidery frame. Basic Procedures Basic embroidering procedures are described below , before operating the embroidery machine. p. 49 p. 36 8 Attach the embroidery frame to embroider the pattern are described on the...
... from the frame. Basic Procedures 37 Step 1 Install the bobbin. The various operating precautions that appear in the main LCD screens are provided in the embroidery frame. Basic Procedures Basic embroidering procedures are described below , before operating the embroidery machine. p. 49 p. 36 8 Attach the embroidery frame to embroider the pattern are described on the...
Users Manual - English
Page 40
... page 284. Pull the thread picker toward you . 1 Latch ■ Oiling the machine After removing the bobbin case, apply oil to the machine. Installing the bobbin Memo ● This embroidery machine is installed in the hook. Installing the Bobbin When the machine is purchased, only the bobbin case is not equipped with a bobbin-winder. Insert...
... page 284. Pull the thread picker toward you . 1 Latch ■ Oiling the machine After removing the bobbin case, apply oil to the machine. Installing the bobbin Memo ● This embroidery machine is installed in the hook. Installing the Bobbin When the machine is purchased, only the bobbin case is not equipped with a bobbin-winder. Insert...
Users Manual - English
Page 42
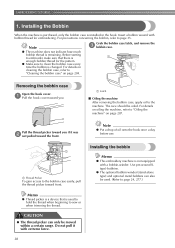
...the start/stop button lights up in damage. Turning ON the Machine Connect the power supply cord, and then turn on , the opening 4 movie is played. CAUTION When the machine is turned on the embroidery machine. EMBROIDERING TUTORIAL 2. For precautions concerning the power supply, refer... to "Resume Embroidering After Turning Off the Machine" on page 120.) X The LCD screen comes on again. CAUTION ...
...the start/stop button lights up in damage. Turning ON the Machine Connect the power supply cord, and then turn on , the opening 4 movie is played. CAUTION When the machine is turned on the embroidery machine. EMBROIDERING TUTORIAL 2. For precautions concerning the power supply, refer... to "Resume Embroidering After Turning Off the Machine" on page 120.) X The LCD screen comes on again. CAUTION ...
Users Manual - English
Page 43
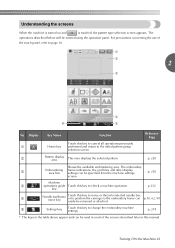
...Settings key Touch this key to check a machine operation. Turning ON the Machine 41 key p.232 5 Needle bar/Frame move key Touch this key to move or thread a selected needle bar, or to change the embroidery machine settings. The embroidery 3 Embroidering frame indications, the grid lines and... other display area line settings can be entered using the operation panel. Understanding the screens When the machine is turned on and is touched, ...
...Settings key Touch this key to check a machine operation. Turning ON the Machine 41 key p.232 5 Needle bar/Frame move key Touch this key to move or thread a selected needle bar, or to change the embroidery machine settings. The embroidery 3 Embroidering frame indications, the grid lines and... other display area line settings can be entered using the operation panel. Understanding the screens When the machine is turned on and is touched, ...
Users Manual - English
Page 45
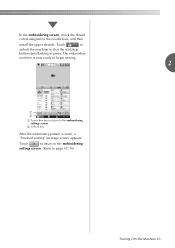
Touch to return to the embroidering settings screen. (Refer to unlock the machine so that the start/stop button starts flashing in green. Touch to page 47, 76) Turning ON the Machine 43 The embroidery machine is sewn, a "Finished sewing" message screen appears. In the embroidering screen, check the thread colors assigned to the embroidering settings screen. 2 Unlock key After the embroidery pattern is now ready to begin sewing. 2 1 2 1 Touch this key to return to the needle bars, and then install the upper threads.
Touch to return to the embroidering settings screen. (Refer to unlock the machine so that the start/stop button starts flashing in green. Touch to page 47, 76) Turning ON the Machine 43 The embroidery machine is sewn, a "Finished sewing" message screen appears. In the embroidering screen, check the thread colors assigned to the embroidering settings screen. 2 Unlock key After the embroidery pattern is now ready to begin sewing. 2 1 2 1 Touch this key to return to the needle bars, and then install the upper threads.
Users Manual - English
Page 52
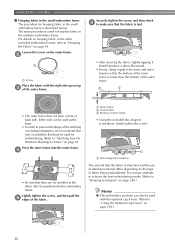
...the fabric is taut. • After securing the fabric, lightly tapping it is described below. For details on hooping fabric in the other included embroidery frames, refer to Fabric" on page 93. Press the inner frame into the outer frame. 4 • Be sure that there are no wrinkles... methods to achieve the best embroidering results. (Refer to "Hooping techniques" on page 249.) Memo ● This embroidery machine can be used to hoop the fabric in the medium embroidery frame. The same procedure is stretched and the use of stabilizer material differ depending on the type of the outer...
...the fabric is taut. • After securing the fabric, lightly tapping it is described below. For details on hooping fabric in the other included embroidery frames, refer to Fabric" on page 93. Press the inner frame into the outer frame. 4 • Be sure that there are no wrinkles... methods to achieve the best embroidering results. (Refer to "Hooping techniques" on page 249.) Memo ● This embroidery machine can be used to hoop the fabric in the medium embroidery frame. The same procedure is stretched and the use of stabilizer material differ depending on the type of the outer...
Users Manual - English
Page 53
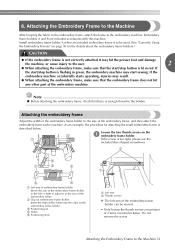
... the user. 2 ● When attaching the embroidery frame, make sure that the embroidery frame does not hit any other part of the embroidery frame, and then attach the embroidery frame to the embroidery machine. Loosen the two thumb screws on embroidery frame holder. Insert the embroidery frame into the clips on the embroidery frame holder. 3 Positioning pin 4 Holes 5 Positioning...
... the user. 2 ● When attaching the embroidery frame, make sure that the embroidery frame does not hit any other part of the embroidery frame, and then attach the embroidery frame to the embroidery machine. Loosen the two thumb screws on embroidery frame holder. Insert the embroidery frame into the clips on the embroidery frame holder. 3 Positioning pin 4 Holes 5 Positioning...
Users Manual - English
Page 57
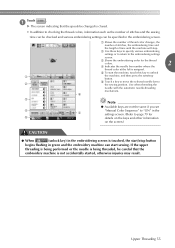
...is touched, the start/stop button begins flashing in the embroidering screen is assigned. 5 To start the machine, touch this key to the sewing position. Touch . 1 X The screen indicating that the embroidery machine is not accidentally started, otherwise injuries may result. If the upper threading is being performed or the ... the embroidering order for 5 details on the keys and other information on the screen.) CAUTION ● When (unlock key) in green and the embroidery machine can start /stop button. 2 6 Touch a key to move the selected needle bar to unlock 1 the...
...is touched, the start/stop button begins flashing in the embroidering screen is assigned. 5 To start the machine, touch this key to the sewing position. Touch . 1 X The screen indicating that the embroidery machine is not accidentally started, otherwise injuries may result. If the upper threading is being performed or the ... the embroidering order for 5 details on the keys and other information on the screen.) CAUTION ● When (unlock key) in green and the embroidery machine can start /stop button. 2 6 Touch a key to move the selected needle bar to unlock 1 the...


