
Users Manual - English
Page 11
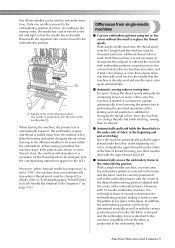
... determine the embroidering position, making it is not necessary to change threads and finish stitching, sewing time is automatically lowered. If the pattern uses eleven or more thread colors, the machine will come back to the needle that the needle bar and needle thread with patterns containing eleven or more than eleven times, machine will stop when a thread spool must be changed and the machine must be correctly positioned within the embroidery). In addition, the embroidering position can be changed . Not all...
... determine the embroidering position, making it is not necessary to change threads and finish stitching, sewing time is automatically lowered. If the pattern uses eleven or more thread colors, the machine will come back to the needle that the needle bar and needle thread with patterns containing eleven or more than eleven times, machine will stop when a thread spool must be changed and the machine must be correctly positioned within the embroidery). In addition, the embroidering position can be changed . Not all...
Users Manual - English
Page 14
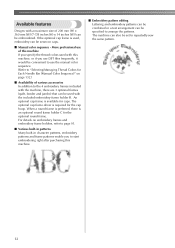
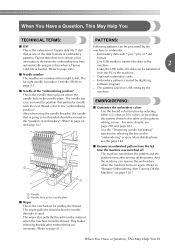
... thread colors used with this machine. ■ Embroidery pattern editing Lettering and embroidery patterns can be combined or a text arrangement can be specified to arrange the patterns. Available features Designs with a maximum size of 200 mm (H) × 360 mm (W) (7-7/8 inches (H) × 14 inches (W)) can also be set to repeatedly sew the same pattern. 12 The machine can be used , embroidery can be embroidered. The optional cap frame driver...
... thread colors used with this machine. ■ Embroidery pattern editing Lettering and embroidery patterns can be combined or a text arrangement can be specified to arrange the patterns. Available features Designs with a maximum size of 200 mm (H) × 360 mm (W) (7-7/8 inches (H) × 14 inches (W)) can also be set to repeatedly sew the same pattern. 12 The machine can be used , embroidery can be embroidered. The optional cap frame driver...
Users Manual - English
Page 16
... machine...28 Remove the fixing plates ...29 Adjusting the operation panel position ...29 Preparing the thread guide assembly ...30 Preparing the spool stand ...31 Attaching the embroidery frame holder ...32 EMBROIDERING TUTORIAL 33 Operating Precautions...34 Power supply precautions ...34 Needle precautions ...35 Checking the needle ...35 Bobbin precautions ...35 Upper thread recommendations ...36 Fabric recommendations ...36 Display recommendations...36 Basic Procedures ...37 Installing the Bobbin ...38 Removing the bobbin case ...38 Installing the bobbin ...38 Installing the bobbin case...
... machine...28 Remove the fixing plates ...29 Adjusting the operation panel position ...29 Preparing the thread guide assembly ...30 Preparing the spool stand ...31 Attaching the embroidery frame holder ...32 EMBROIDERING TUTORIAL 33 Operating Precautions...34 Power supply precautions ...34 Needle precautions ...35 Checking the needle ...35 Bobbin precautions ...35 Upper thread recommendations ...36 Fabric recommendations ...36 Display recommendations...36 Basic Procedures ...37 Installing the Bobbin ...38 Removing the bobbin case ...38 Installing the bobbin ...38 Installing the bobbin case...

Users Manual - English
Page 17
... 54 Upper threading ...56 Threading the needle ...60 Sewing the Embroidery 64 Starting embroidering ...64 Stopping embroidering ...66 Checking the Thread Tension 68 Removing the Embroidery Frame and Fabric 69 Removing the embroidery frame ...69 Removing the fabric...69 Turning OFF the Machine 70 Screen Quick Reference Guide 71 Key displays...71 Common screen controls ...71 Understanding the pattern type selection screen 72 Understanding the pattern list screen ...73 Understanding the pattern editing screen ...74 Understanding the embroidering settings...
... 54 Upper threading ...56 Threading the needle ...60 Sewing the Embroidery 64 Starting embroidering ...64 Stopping embroidering ...66 Checking the Thread Tension 68 Removing the Embroidery Frame and Fabric 69 Removing the embroidery frame ...69 Removing the fabric...69 Turning OFF the Machine 70 Screen Quick Reference Guide 71 Key displays...71 Common screen controls ...71 Understanding the pattern type selection screen 72 Understanding the pattern list screen ...73 Understanding the pattern editing screen ...74 Understanding the embroidering settings...
Users Manual - English
Page 18
... Adjusting the tension of the upper thread 123 EMBROIDERING SETTINGS 125 Basting Embroidery ...126 Creating an Appliqué Piece 127 Creating an appliqué piece ...127 Using a frame pattern for the outline ...130 Selecting/Managing Thread Colors for Each Needle Bar (Manual Color Sequence) .... 132 Convenience of the manual color sequence 132 Specifying the manual color sequence ...132 Using the manual color sequence ...133 Precautions on the manual color sequence 133 Automatic Lock Stitch Setting...
... Adjusting the tension of the upper thread 123 EMBROIDERING SETTINGS 125 Basting Embroidery ...126 Creating an Appliqué Piece 127 Creating an appliqué piece ...127 Using a frame pattern for the outline ...130 Selecting/Managing Thread Colors for Each Needle Bar (Manual Color Sequence) .... 132 Convenience of the manual color sequence 132 Specifying the manual color sequence ...132 Using the manual color sequence ...133 Precautions on the manual color sequence 133 Automatic Lock Stitch Setting...
Users Manual - English
Page 19
... create appliqués (1 237 Using a frame pattern to create appliqués (2 238 Sewing Large-size (Split) Embroidery Patterns 240 Helpful Tips for the Operation of the Machine 243 Checking the thread tension of built-in patterns 243 Sewing a pattern aligned with a mark on the fabric 244 Color thread table ...246 Colors of Tajima (.dst) embroidery data ...246 Creating Beautiful Embroidery 247 Threads...247 Stabilizers (backing) ...247 Hooping techniques ...249 Fabric/stabilizer compatibility chart ...250 Installing...
... create appliqués (1 237 Using a frame pattern to create appliqués (2 238 Sewing Large-size (Split) Embroidery Patterns 240 Helpful Tips for the Operation of the Machine 243 Checking the thread tension of built-in patterns 243 Sewing a pattern aligned with a mark on the fabric 244 Color thread table ...246 Colors of Tajima (.dst) embroidery data ...246 Creating Beautiful Embroidery 247 Threads...247 Stabilizers (backing) ...247 Hooping techniques ...249 Fabric/stabilizer compatibility chart ...250 Installing...
Users Manual - English
Page 31
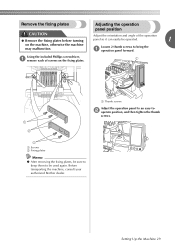
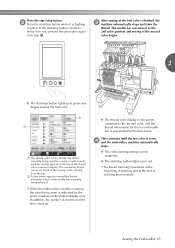
... screws to be used again. Setting Up the Machine 29 Using the included Phillips screwdriver, 1 remove each of the operation ● Remove the fixing plates before turning panel so it can easily be operated. 1 on the fixing plates. 1 Thumb screws Adjust the operation panel to an easy-to2 operate position, and then tighten the thumb screws. 1 Screws 2 Fixing plates Memo ● After removing the fixing plates, be sure to keep them to bring the 1 operation panel...
... screws to be used again. Setting Up the Machine 29 Using the included Phillips screwdriver, 1 remove each of the operation ● Remove the fixing plates before turning panel so it can easily be operated. 1 on the fixing plates. 1 Thumb screws Adjust the operation panel to an easy-to2 operate position, and then tighten the thumb screws. 1 Screws 2 Fixing plates Memo ● After removing the fixing plates, be sure to keep them to bring the 1 operation panel...
Users Manual - English
Page 53
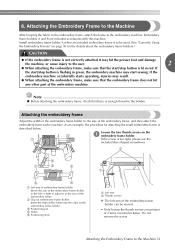
... green, the embroidery machine may result. ● When attaching the embroidery frame, make sure that the start sewing. If the start/stop button is to be moved. • Only loosen the thumb screws a maximum of the embroidery frame holder can be used. (See "Correctly Using the Embroidery Frames" on the embroidery frame holder. 3 Positioning pin 4 Holes 5 Positioning slots 1 Left arm 2 Thumb screws X The left or right to adjust it may hit the presser foot and damage...
... green, the embroidery machine may result. ● When attaching the embroidery frame, make sure that the start sewing. If the start/stop button is to be moved. • Only loosen the thumb screws a maximum of the embroidery frame holder can be used. (See "Correctly Using the Embroidery Frames" on the embroidery frame holder. 3 Positioning pin 4 Holes 5 Positioning slots 1 Left arm 2 Thumb screws X The left or right to adjust it may hit the presser foot and damage...
Users Manual - English
Page 58
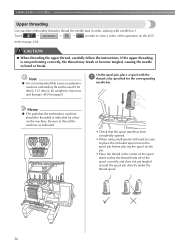
... the thread feeds off of the operation on the machine. On the spool pin, place a spool with needle bar 1. Touch → → → in order, starting with the 1 thread color specified for the corresponding needle bar. If the upper threading is not performing correctly, the thread may break or become tangled, causing the needle to thread the needle bars in order to page 232). CAUTION ● When threading the upper thread, carefully follow the instructions.
... the thread feeds off of the operation on the machine. On the spool pin, place a spool with needle bar 1. Touch → → → in order, starting with the 1 thread color specified for the corresponding needle bar. If the upper threading is not performing correctly, the thread may break or become tangled, causing the needle to thread the needle bars in order to page 232). CAUTION ● When threading the upper thread, carefully follow the instructions.
Users Manual - English
Page 67
... embroidering settings screen reappears. The needle bar case moves to the 2nd color position and sewing of the second color begins. 2 X The start/stop button lights up in the pattern display area. The remaining thread colors are necessary. Sewing the Embroidery 65 X The start/stop button lights up . This continues until the last color is indicated by the blue frame. If the start/stop button returns to being used for sewing...
... embroidering settings screen reappears. The needle bar case moves to the 2nd color position and sewing of the second color begins. 2 X The start/stop button lights up in the pattern display area. The remaining thread colors are necessary. Sewing the Embroidery 65 X The start/stop button lights up . This continues until the last color is indicated by the blue frame. If the start/stop button returns to being used for sewing...
Users Manual - English
Page 83
... machine. - Optional embroidery cards - The wiper also pulls the thread from the PC to page 8.) from the material when the machine trims the thread. Embroidery data with the next thread color to position that is placed above the needle hole in the needle plate ■ Wiper This is the needle that particular needle EMBROIDERING: with *.pes, *.phc or *.dst patterns. The needle bar case is moved to the "embroidering position". Use the "Temporary needle bar setting...
... machine. - Optional embroidery cards - The wiper also pulls the thread from the PC to page 8.) from the material when the machine trims the thread. Embroidery data with the next thread color to position that is placed above the needle hole in the needle plate ■ Wiper This is the needle that particular needle EMBROIDERING: with *.pes, *.phc or *.dst patterns. The needle bar case is moved to the "embroidering position". Use the "Temporary needle bar setting...
Users Manual - English
Page 92
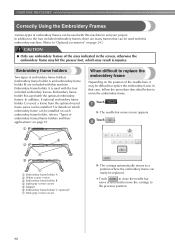
... . 2 1 Embroidery frame holder A 2 White corner covers 3 Embroidery frame holder B 4 Light gray corner covers 5 Magnet 6 Embroidery frame holder C (optional) 7 Dark gray corner covers X The carriage automatically moves to a position where the embroidery frame can easily be replaced. • Touch to close the needle bar move screen and to "Optional accessories" on which may be difficult to the previous position. 90 In addition, if optional embroidery frame holder C is used with this embroidery machine. (Refer...
... . 2 1 Embroidery frame holder A 2 White corner covers 3 Embroidery frame holder B 4 Light gray corner covers 5 Magnet 6 Embroidery frame holder C (optional) 7 Dark gray corner covers X The carriage automatically moves to a position where the embroidery frame can easily be replaced. • Touch to close the needle bar move screen and to "Optional accessories" on which may be difficult to the previous position. 90 In addition, if optional embroidery frame holder C is used with this embroidery machine. (Refer...
Users Manual - English
Page 115
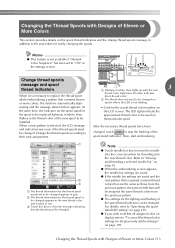
... previously stitched design" on page 109. Change the thread spools according to be used on page 62. ● When the embroidering screen appears, the needle bar settings are saved. ● If the needle bar settings are the same as those from the previous pattern, the same needle bars will be assigned the same thread colors from the previous pattern. ● The settings for threading into the correct position for the lighting and...
... previously stitched design" on page 109. Change the thread spools according to be used on page 62. ● When the embroidering screen appears, the needle bar settings are saved. ● If the needle bar settings are the same as those from the previous pattern, the same needle bars will be assigned the same thread colors from the previous pattern. ● The settings for threading into the correct position for the lighting and...
Users Manual - English
Page 293
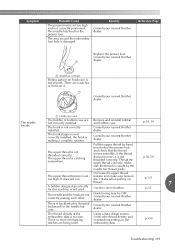
... nearest Brother dealer. Remove and reinstall bobbin and bobbin case. p.38, 39 The hook stopper is not correctly installed, the hook is caught by hand from below the presser foot, and check that the thread moves smoothly. Consult your nearest Brother dealer. 1 Hook race area The needle breaks. Pull the upper thread by the needle bar thread guide. Make sure the thread is making a complete rotation. disc rotates when pulling on p.123 A bobbin designed specifically for this machine...
... nearest Brother dealer. Remove and reinstall bobbin and bobbin case. p.38, 39 The hook stopper is not correctly installed, the hook is caught by hand from below the presser foot, and check that the thread moves smoothly. Consult your nearest Brother dealer. 1 Hook race area The needle breaks. Pull the upper thread by the needle bar thread guide. Make sure the thread is making a complete rotation. disc rotates when pulling on p.123 A bobbin designed specifically for this machine...

Users Manual - English
Page 294
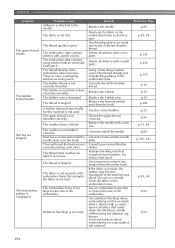
... embroidery foot hole is damaged. Replace the needle with a new one. The upper thread breaks. The needle hits/touches the presser foot. Slow down the machine sewing speed. p.139 292 The needle set screw. The needle is not correctly installed. Remedy Correctly install the needle. Use the Allen screw driver to tighten the needle set screw is damaged. The area around the hole in the needle plate is loose. Replace the presser foot. APPENDIX Symptom Probable Cause The needle is bent or blunt. Consult your nearest Brother...
... embroidery foot hole is damaged. Replace the needle with a new one. The upper thread breaks. The needle hits/touches the presser foot. Slow down the machine sewing speed. p.139 292 The needle set screw. The needle is not correctly installed. Remedy Correctly install the needle. Use the Allen screw driver to tighten the needle set screw is damaged. The area around the hole in the needle plate is loose. Replace the presser foot. APPENDIX Symptom Probable Cause The needle is bent or blunt. Consult your nearest Brother...
Users Manual - English
Page 296
... needle plate. The bobbin case is not used . Use tweezers to shrink. A bobbin designed specifically for the size of the embroidery data is not taut. Replace the bobbin case. Remove the thread jammed and clean the hook. Correctly install the needle. The thread is too large for this machine is damaged. The embroidery frame is tangled. Replace thread. Try using a new spool. The embroidery data contains many stitches with a coarse weave or fabrics that it is poor. The thread is misaligned. Thread the upper thread...
... needle plate. The bobbin case is not used . Use tweezers to shrink. A bobbin designed specifically for the size of the embroidery data is not taut. Replace the bobbin case. Remove the thread jammed and clean the hook. Correctly install the needle. The thread is too large for this machine is damaged. The embroidery frame is tangled. Replace thread. Try using a new spool. The embroidery data contains many stitches with a coarse weave or fabrics that it is poor. The thread is misaligned. Thread the upper thread...

Users Manual - English
Page 298
... settings screen. Try sewing with one of thread to be used on this machine. Oil recommended parts. Consult your nearest Brother dealer. If the thread breakage sensor in the bobbin, the thread does not feed from the bobbin, or the thread that is fed from the bobbin is being fed and stops. The upper thread comes out of the bobbin thread. Rethread and make sure tension disc rotates when pulling on the automatic needle-threading...
... settings screen. Try sewing with one of thread to be used on this machine. Oil recommended parts. Consult your nearest Brother dealer. If the thread breakage sensor in the bobbin, the thread does not feed from the bobbin, or the thread that is fed from the bobbin is being fed and stops. The upper thread comes out of the bobbin thread. Rethread and make sure tension disc rotates when pulling on the automatic needle-threading...

Users Manual - English
Page 314
... Link function 176 Lock stitching key 77, 134 Locking mechanism 64 Locking the needle bar 100 Low Profile (Low fitting 259 Lower thread guide 20 M Machine operations guide key 232 Main power switch 21, 40, 70 Maintenance 232, 282 Manual color sequence 132 Manual needle bar settings 145 Maximum sewing speed key 80 Monogram and frame designs 155 Mounting jig cap frame 264 Mouse pointer shape 231 Moving a pattern 183 Moving needle 63 Multi color...
... Link function 176 Lock stitching key 77, 134 Locking mechanism 64 Locking the needle bar 100 Low Profile (Low fitting 259 Lower thread guide 20 M Machine operations guide key 232 Main power switch 21, 40, 70 Maintenance 232, 282 Manual color sequence 132 Manual needle bar settings 145 Maximum sewing speed key 80 Monogram and frame designs 155 Mounting jig cap frame 264 Mouse pointer shape 231 Moving a pattern 183 Moving needle 63 Multi color...
Users Manual - English
Page 315
... 77 Sewing light 20, 229 Sewing order 79 Sewing speed 139 Thread guide assembly 30 Thread mark 195 Thread recommendations 36 Thread sensor 230 Thread spools 113 changing 113 easily changing 114 Thread tail length 227 Thread tension 122, 281 Thread tension disc 58 Thread tension knobs 20, 123 Thread trimming button 21, 67 Threading needle 60 upper thread 54, 56 Thumbnail size 224 Tips for machine operation 243 Touch panel 21 Trial sewing key 53, 77 Troubleshooting 232, 289 T-shirt 250 Sewing the embroidery 64 Sewing time...
... 77 Sewing light 20, 229 Sewing order 79 Sewing speed 139 Thread guide assembly 30 Thread mark 195 Thread recommendations 36 Thread sensor 230 Thread spools 113 changing 113 easily changing 114 Thread tail length 227 Thread tension 122, 281 Thread tension disc 58 Thread tension knobs 20, 123 Thread trimming button 21, 67 Threading needle 60 upper thread 54, 56 Thumbnail size 224 Tips for machine operation 243 Touch panel 21 Trial sewing key 53, 77 Troubleshooting 232, 289 T-shirt 250 Sewing the embroidery 64 Sewing time...
Accessory Catalog - English
Page 22
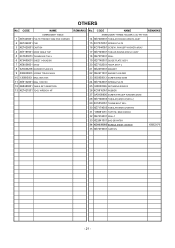
CODE NAME REMARKS EMBROIDERY FRAME HOLDER C (for PR-1000) 14 XE7400001 TUBULAR ROUND ARM RA ASSY 15 XC7076051 SPRING,PLATE 16 XC7644051 SCREW, PAM (S/P WASHER) M3X5 17 XE7149001 TUBLAR ROUND ARM LC ASSY 18 XE7375001 SEAL 19 XE7140001 GUIDE PLATE ASSY 20 XE7152001 HOOP STAY C 21 XE2270001 MAGNET 22 XE2271001 MAGNET HOLDER 23 060300613 SCREW BIND M3X6 24 XE7143001 SPRING PLATE 25 048030346 RETAINING RING E3 26 XC5816051...
CODE NAME REMARKS EMBROIDERY FRAME HOLDER C (for PR-1000) 14 XE7400001 TUBULAR ROUND ARM RA ASSY 15 XC7076051 SPRING,PLATE 16 XC7644051 SCREW, PAM (S/P WASHER) M3X5 17 XE7149001 TUBLAR ROUND ARM LC ASSY 18 XE7375001 SEAL 19 XE7140001 GUIDE PLATE ASSY 20 XE7152001 HOOP STAY C 21 XE2270001 MAGNET 22 XE2271001 MAGNET HOLDER 23 060300613 SCREW BIND M3X6 24 XE7143001 SPRING PLATE 25 048030346 RETAINING RING E3 26 XC5816051...


