
Users Manual - English
Page 3
...Brother International Corporation, you in the event of product loss covered by insurance; http://solutions.brother.com You can download the latest software and utilities, read FAQs and troubleshooting tips to learn how to get the most efficient way to your product and special offers. Brother... on-line at http://www.brother.com/registration/ Frequently asked questions (FAQs) The Brother Solutions Center is our one-stop resource for all your Brother product. Service Center Locations (Canada only) For the location of a Brother authorized service center, call the country where you...
...Brother International Corporation, you in the event of product loss covered by insurance; http://solutions.brother.com You can download the latest software and utilities, read FAQs and troubleshooting tips to learn how to get the most efficient way to your product and special offers. Brother... on-line at http://www.brother.com/registration/ Frequently asked questions (FAQs) The Brother Solutions Center is our one-stop resource for all your Brother product. Service Center Locations (Canada only) For the location of a Brother authorized service center, call the country where you...

Users Manual - English
Page 17
... Understanding the Error Messages 3-16 Using PhotoCapture Center™ from your PC 3-16 4 Software features 4-1 5 Important information 5-1 Federal Communications Commission (FCC) Declaration of Conformity (USA only).......... 5-1 Important 5-2 Industry Canada Compliance Statement (Canada only 5-2 International ENERGY STAR® Compliance Statement 5-2 Important safety instructions 5-3 Trademarks 5-5 6 Troubleshooting and routine maintenance 6-1 Troubleshooting 6-1 Error messages 6-1 Document jams 6-3 Document is...
... Understanding the Error Messages 3-16 Using PhotoCapture Center™ from your PC 3-16 4 Software features 4-1 5 Important information 5-1 Federal Communications Commission (FCC) Declaration of Conformity (USA only).......... 5-1 Important 5-2 Industry Canada Compliance Statement (Canada only 5-2 International ENERGY STAR® Compliance Statement 5-2 Important safety instructions 5-3 Trademarks 5-5 6 Troubleshooting and routine maintenance 6-1 Troubleshooting 6-1 Error messages 6-1 Document jams 6-3 Document is...

Users Manual - English
Page 22
You should check the LCD display for use. Check the LCD message. (See Troubleshooting and routine maintenance on page 6-1.) Check the LCD message. (See Troubleshooting and routine maintenance on page 6-1.) 1 - 4 INTRODUCTION Close the cover. (See Error messages on page 6-1.) Replace the Ink cartridge with your machine. Warning LED indications The ...
You should check the LCD display for use. Check the LCD message. (See Troubleshooting and routine maintenance on page 6-1.) Check the LCD message. (See Troubleshooting and routine maintenance on page 6-1.) 1 - 4 INTRODUCTION Close the cover. (See Error messages on page 6-1.) Replace the Ink cartridge with your machine. Warning LED indications The ...
Users Manual - English
Page 66
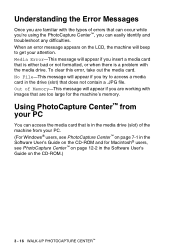
...problem with the types of errors that can occur while you're using the PhotoCapture Center™, you try to get your attention. Understanding the Error Messages Once you are too large for Macintosh...® users, see PhotoCapture Center™ on page 7-1 in the Software User's Guide on the CD-ROM and for the machine...JPG file. Out of the machine from your PC You can easily identify and troubleshoot any difficulties. No File-This message will appear if you are working with images that are familiar with ...
...problem with the types of errors that can occur while you're using the PhotoCapture Center™, you try to get your attention. Understanding the Error Messages Once you are too large for Macintosh...® users, see PhotoCapture Center™ on page 7-1 in the Software User's Guide on the CD-ROM and for the machine...JPG file. Out of the machine from your PC You can easily identify and troubleshoot any difficulties. No File-This message will appear if you are working with images that are familiar with ...
Users Manual - English
Page 73
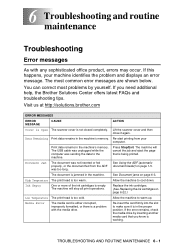
...with the media drive. The machine will cancel the job and eject the page that you need additional help, the Brother Solutions Center offers latest FAQs and troubleshooting tips. ACTION Lift the scanner cover and then close it is being printed. See Using the ADF (automatic document feeder.... (See Replacing the ink cartridges on page 6-22.) Allow the machine to cool down. Data Remaining Print data remains in the machine. TROUBLESHOOTING AND ROUTINE MAINTENANCE 6 - 1 If you know is jammed in the machine's memory. The document is working. Low Temperature The print head...
...with the media drive. The machine will cancel the job and eject the page that you need additional help, the Brother Solutions Center offers latest FAQs and troubleshooting tips. ACTION Lift the scanner cover and then close it is being printed. See Using the ADF (automatic document feeder.... (See Replacing the ink cartridges on page 6-22.) Allow the machine to cool down. Data Remaining Print data remains in the machine. TROUBLESHOOTING AND ROUTINE MAINTENANCE 6 - 1 If you know is jammed in the machine's memory. The document is working. Low Temperature The print head...
Users Manual - English
Page 74
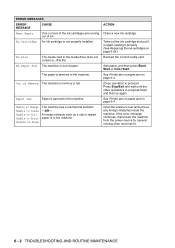
... ink cartridges on page 6-22.) Reinsert the correct media card. Paper Jam Paper is not properly installed. Take out the ink cartridge and put it . 6 - 2 TROUBLESHOOTING AND ROUTINE MAINTENANCE No Cartridge An ink cartridge is jammed in the machine. ERROR MESSAGES ERROR MESSAGE CAUSE Near Empty One or more of the...
... ink cartridges on page 6-22.) Reinsert the correct media card. Paper Jam Paper is not properly installed. Take out the ink cartridge and put it . 6 - 2 TROUBLESHOOTING AND ROUTINE MAINTENANCE No Cartridge An ink cartridge is jammed in the machine. ERROR MESSAGES ERROR MESSAGE CAUSE Near Empty One or more of the...

Users Manual - English
Page 75
Document is jammed inside the ADF unit. 1 Take out any paper from the ADF that is not jammed. 2 Open the ADF cover. 3 Pull the jammed document out to the left . 4 Close the ADF cover. Document jams If the document is not jammed. 2 Lift the document cover. 3 Pull the jammed document out to the right or left . 4 Close the document cover. Press Stop/Exit. Press Stop/Exit. TROUBLESHOOTING AND ROUTINE MAINTENANCE 6 - 3 Document is jammed in the top of the ADF unit. 1 Take out any paper from the ADF that is jammed, follow the steps below.
Document is jammed inside the ADF unit. 1 Take out any paper from the ADF that is not jammed. 2 Open the ADF cover. 3 Pull the jammed document out to the left . 4 Close the ADF cover. Document jams If the document is not jammed. 2 Lift the document cover. 3 Pull the jammed document out to the right or left . 4 Close the document cover. Press Stop/Exit. Press Stop/Exit. TROUBLESHOOTING AND ROUTINE MAINTENANCE 6 - 3 Document is jammed in the top of the ADF unit. 1 Take out any paper from the ADF that is jammed, follow the steps below.

Users Manual - English
Page 76
Printer jam or paper jam Remove the jammed paper depending on where it . Paper Tray 2 Pull out the jammed paper to remove it is jammed inside the paper tray 1 Pull the paper tray out of the machine. Jammed paper 6 - 4 TROUBLESHOOTING AND ROUTINE MAINTENANCE Paper is jammed in the machine.
Printer jam or paper jam Remove the jammed paper depending on where it . Paper Tray 2 Pull out the jammed paper to remove it is jammed inside the paper tray 1 Pull the paper tray out of the machine. Jammed paper 6 - 4 TROUBLESHOOTING AND ROUTINE MAINTENANCE Paper is jammed in the machine.

Users Manual - English
Page 77
Jam Clear Cover 2 Re-insert the Jam Clear Cover. 3 If you can not pull out the jammed paper, lift the scanner cover from the right-hand side of the machine. TROUBLESHOOTING AND ROUTINE MAINTENANCE 6 - 5 Pull the jammed paper out of the machine until it locks securely into the open position. 4 Remove the jammed paper. Scanner Cover If the paper is jammed inside the machine 1 Remove the Jam Clear Cover. Paper is jammed underneath the print head, disconnect the machine from the power source so you can move the print head and take out the paper.
Jam Clear Cover 2 Re-insert the Jam Clear Cover. 3 If you can not pull out the jammed paper, lift the scanner cover from the right-hand side of the machine. TROUBLESHOOTING AND ROUTINE MAINTENANCE 6 - 5 Pull the jammed paper out of the machine until it locks securely into the open position. 4 Remove the jammed paper. Scanner Cover If the paper is jammed inside the machine 1 Remove the Jam Clear Cover. Paper is jammed underneath the print head, disconnect the machine from the power source so you can move the print head and take out the paper.

Users Manual - English
Page 78
Gently push the scanner cover support down and close the scanner cover. 6 - 6 TROUBLESHOOTING AND ROUTINE MAINTENANCE 5 Lift the scanner cover to release the lock.
Gently push the scanner cover support down and close the scanner cover. 6 - 6 TROUBLESHOOTING AND ROUTINE MAINTENANCE 5 Lift the scanner cover to release the lock.

Users Manual - English
Page 79
... both the machine and your computer. If you think there is a problem with your machine, check the chart below and follow the troubleshooting tips. White horizontal lines appear in their original packaging, after that the ink may become clogged. SUGGESTIONS Check the interface cable connection on...on page 1-8.) The recommended environment for your machine is between 68°F to 91°F (20°C to 33°C). The Brother Solutions Center offers latest FAQs and troubleshooting tips. In the printer driver 'Basic' tab, click 'Settings', and check 'Enhanced Normal Printing'.
... both the machine and your computer. If you think there is a problem with your machine, check the chart below and follow the troubleshooting tips. White horizontal lines appear in their original packaging, after that the ink may become clogged. SUGGESTIONS Check the interface cable connection on...on page 1-8.) The recommended environment for your machine is between 68°F to 91°F (20°C to 33°C). The Brother Solutions Center offers latest FAQs and troubleshooting tips. In the printer driver 'Basic' tab, click 'Settings', and check 'Enhanced Normal Printing'.
Users Manual - English
Page 80
... and post cards on page 1-13.) Check that the paper size setting in the application and in the File menu and select the Brother TWAIN/WIA driver. 6 - 8 TROUBLESHOOTING AND ROUTINE MAINTENANCE Try to '256 colors.' Clean the scanner. (See Cleaning the scanner on page 6-19.) Scanning Difficulties Poor scanning .... (See Cleaning the machine printer platen on page 1-13.) There are the same. Stains appear on the reverse side or at the top center of paper are using the paper support flap. (See How to load paper, envelopes and post cards on page 6-20.) Make sure you ...
... and post cards on page 1-13.) Check that the paper size setting in the application and in the File menu and select the Brother TWAIN/WIA driver. 6 - 8 TROUBLESHOOTING AND ROUTINE MAINTENANCE Try to '256 colors.' Clean the scanner. (See Cleaning the scanner on page 6-19.) Scanning Difficulties Poor scanning .... (See Cleaning the machine printer platen on page 1-13.) There are the same. Stains appear on the reverse side or at the top center of paper are using the paper support flap. (See How to load paper, envelopes and post cards on page 6-20.) Make sure you ...

Users Manual - English
Page 81
... back in again. After the installation the PC will repair and reinstall the software. 'Device Busy' Make sure the machine is being accessed. TROUBLESHOOTING AND ROUTINE MAINTENANCE 6 - 9 b) Take out the media card and put it off your PC and machine, and then turn off .) ...Cannot access Removable Disk from within Windows®, you must take out the media card before you try again. PhotoCapture Center™ Difficulties Removable Disk does not work , please turn them on the LCD. DIFFICULTY SUGGESTIONS Software Difficulties Cannot install software or print ...
... back in again. After the installation the PC will repair and reinstall the software. 'Device Busy' Make sure the machine is being accessed. TROUBLESHOOTING AND ROUTINE MAINTENANCE 6 - 9 b) Take out the media card and put it off your PC and machine, and then turn off .) ...Cannot access Removable Disk from within Windows®, you must take out the media card before you try again. PhotoCapture Center™ Difficulties Removable Disk does not work , please turn them on the LCD. DIFFICULTY SUGGESTIONS Software Difficulties Cannot install software or print ...
Users Manual - English
Page 82
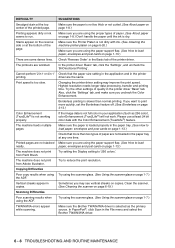
.... 2 Press or to select 0.Initial Setup. Press Set. 3 Press or to select your option. (Low, Med, High or Off) Press Set. 5 Press Stop/Exit. 6 - 10 TROUBLESHOOTING AND ROUTINE MAINTENANCE The default (factory) setting is on, the machine will beep when you are having difficulty seeing the LCD from your position, try...
.... 2 Press or to select 0.Initial Setup. Press Set. 3 Press or to select your option. (Low, Med, High or Off) Press Set. 5 Press Stop/Exit. 6 - 10 TROUBLESHOOTING AND ROUTINE MAINTENANCE The default (factory) setting is on, the machine will beep when you are having difficulty seeing the LCD from your position, try...

Users Manual - English
Page 83
... or All. Press Set. When cleaning is finished, the machine will clean the print head. Press Set. 3 Press or to select Cleaning. TROUBLESHOOTING AND ROUTINE MAINTENANCE 6 - 11 How to standby mode automatically. You can start the cleaning process manually if needed. Cleaning the print head consumes ...at a time (Cyan/Yellow/Magenta), or all four colors at least five times and the print has not improved, call Brother Customer Service (See Brother numbers on your printed pages. Clean the print head and ink cartridges if you clean the print head at once. Caution Do...
... or All. Press Set. When cleaning is finished, the machine will clean the print head. Press Set. 3 Press or to select Cleaning. TROUBLESHOOTING AND ROUTINE MAINTENANCE 6 - 11 How to standby mode automatically. You can start the cleaning process manually if needed. Cleaning the print head consumes ...at a time (Cyan/Yellow/Magenta), or all four colors at least five times and the print has not improved, call Brother Customer Service (See Brother numbers on your printed pages. Clean the print head and ink cartridges if you clean the print head at once. Caution Do...

Users Manual - English
Page 84
... at the nozzle check pattern. 1 Press (Ink). 2 Press or to select Print Quality. Press Set. 4 Press Color Start. Black OK? ▲ Yes ▼ No 6 - 12 TROUBLESHOOTING AND ROUTINE MAINTENANCE You can see if the quality is OK for black and three colors.
... at the nozzle check pattern. 1 Press (Ink). 2 Press or to select Print Quality. Press Set. 4 Press Color Start. Black OK? ▲ Yes ▼ No 6 - 12 TROUBLESHOOTING AND ROUTINE MAINTENANCE You can see if the quality is OK for black and three colors.

Users Manual - English
Page 85
...(Perhaps the ink cartridge was in this . 8 Press (No) for the new ink cartridge. If ink is still missing, call Brother Customer Service (See Brother numbers on the cartridge package has passed. Caution Do NOT touch the print head. Touching the print head may cause permanent damage and...printing another Print Quality Check Sheet. If you still see missing ink in your machine over six months or the expiration date written on page i). TROUBLESHOOTING AND ROUTINE MAINTENANCE 6 - 13 Or, the ink may void the print head's warranty. When a print head nozzle is finished, press Color ...
...(Perhaps the ink cartridge was in this . 8 Press (No) for the new ink cartridge. If ink is still missing, call Brother Customer Service (See Brother numbers on the cartridge package has passed. Caution Do NOT touch the print head. Touching the print head may cause permanent damage and...printing another Print Quality Check Sheet. If you still see missing ink in your machine over six months or the expiration date written on page i). TROUBLESHOOTING AND ROUTINE MAINTENANCE 6 - 13 Or, the ink may void the print head's warranty. When a print head nozzle is finished, press Color ...
Users Manual - English
Page 86
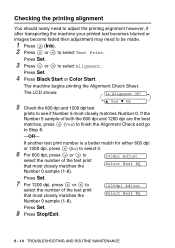
... to select the number of the test print that most closely matches the Number 0 sample (1-8). 1200dpi Adjust Select Best #5 Press Set. 8 Press Stop/Exit. 6 - 14 TROUBLESHOOTING AND ROUTINE MAINTENANCE
... to select the number of the test print that most closely matches the Number 0 sample (1-8). 1200dpi Adjust Select Best #5 Press Set. 8 Press Stop/Exit. 6 - 14 TROUBLESHOOTING AND ROUTINE MAINTENANCE

Users Manual - English
Page 87
Bk:- + 4 Press Stop/Exit. The LCD shows the ink volume. Press Set. 3 Press or to select the color you want to select Ink Volume Ink Volume. Checking the ink volume You can check the ink volume from your computer. (For Windows® users, see Status Monitor on page 1-3 in Software User's Guide on the CD-ROM and for Macintosh® users, see Status Monitor on page 8-2 in the cartridge. 1 Press (Ink). 2 Press or to check. You can check the ink that is left in Software User's Guide on the CD-ROM.) TROUBLESHOOTING AND ROUTINE MAINTENANCE 6 - 15
Bk:- + 4 Press Stop/Exit. The LCD shows the ink volume. Press Set. 3 Press or to select the color you want to select Ink Volume Ink Volume. Checking the ink volume You can check the ink volume from your computer. (For Windows® users, see Status Monitor on page 1-3 in Software User's Guide on the CD-ROM and for Macintosh® users, see Status Monitor on page 8-2 in the cartridge. 1 Press (Ink). 2 Press or to check. You can check the ink that is left in Software User's Guide on the CD-ROM.) TROUBLESHOOTING AND ROUTINE MAINTENANCE 6 - 15

Users Manual - English
Page 88
... clip into the open position. 2 Remove all mechanical noise has stopped. Not allowing the machine to complete this parking process may void your warranty. 6 - 16 TROUBLESHOOTING AND ROUTINE MAINTENANCE Caution It is essential that came with the protective parts or the ink cartridge in the diagram. It is important to allow...
... clip into the open position. 2 Remove all mechanical noise has stopped. Not allowing the machine to complete this parking process may void your warranty. 6 - 16 TROUBLESHOOTING AND ROUTINE MAINTENANCE Caution It is essential that came with the protective parts or the ink cartridge in the diagram. It is important to allow...


