Users Manual - English
Page 8
... 24 Scanning using a scanner driver 25 Scanning using the ControlCenter 25 A Routine maintenance 26 Replacing the ink cartridges 26 Cleaning and checking the machine 29 Cleaning the scanner glass 29 Cleaning the print head 29 Checking the print quality 30 Checking the print alignment 31 B Troubleshooting 32 Error and Maintenance messages 32 Printer jam...
... 24 Scanning using a scanner driver 25 Scanning using the ControlCenter 25 A Routine maintenance 26 Replacing the ink cartridges 26 Cleaning and checking the machine 29 Cleaning the scanner glass 29 Cleaning the print head 29 Checking the print quality 30 Checking the print alignment 31 B Troubleshooting 32 Error and Maintenance messages 32 Printer jam...
Users Manual - English
Page 16
If you turn the machine on and off , it will still periodically clean the print head to maintain print quality. To prolong print head life, provide the best ink cartridge economy, and maintain print quality, you start a scanning operation (in color or black & white, depending on the scan setting ...
If you turn the machine on and off , it will still periodically clean the print head to maintain print quality. To prolong print head life, provide the best ink cartridge economy, and maintain print quality, you start a scanning operation (in color or black & white, depending on the scan setting ...
Users Manual - English
Page 38
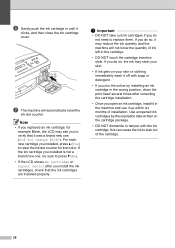
...; DO NOT dismantle or tamper with soap or detergent. • If you mix the colors by installing an ink cartridge in the wrong position, clean the print head several times after you installed, press a (Yes) to reset the ink dot counter for example Black, the LCD may reduce the ink quantity and...
...; DO NOT dismantle or tamper with soap or detergent. • If you mix the colors by installing an ink cartridge in the wrong position, clean the print head several times after you installed, press a (Yes) to reset the ink dot counter for example Black, the LCD may reduce the ink quantity and...

Users Manual - English
Page 39
If you clean the print head at once. Cleaning too often uses ink unnecessarily. If the print has not improved call Brother Customer Service. (See Brother numbers uu page i.) 29 You may void the print head's A warranty. You can start the cleaning process manually if there is finished, the machine will automatically clean the print head when needed. You can...
If you clean the print head at once. Cleaning too often uses ink unnecessarily. If the print has not improved call Brother Customer Service. (See Brother numbers uu page i.) 29 You may void the print head's A warranty. You can start the cleaning process manually if there is finished, the machine will automatically clean the print head when needed. You can...

Users Manual - English
Page 40
... quality is still poor, replace the ink cartridge for black and three colors. The machine starts cleaning the print head. Repeat the procedure from step f. Touching the print head may cause permanent damage and may be clogged. Checking the print quality A If faded or streaked...four colors are clear and visible, press a to choose Yes, and go to start cleaning. k After cleaning is still missing, call Brother Customer Service. (See Brother numbers uu page i.) Important DO NOT touch the print head. The machine starts printing the Print Quality Check Sheet again. l Press Stop/Exit. ...
... quality is still poor, replace the ink cartridge for black and three colors. The machine starts cleaning the print head. Repeat the procedure from step f. Touching the print head may cause permanent damage and may be clogged. Checking the print quality A If faded or streaked...four colors are clear and visible, press a to choose Yes, and go to start cleaning. k After cleaning is still missing, call Brother Customer Service. (See Brother numbers uu page i.) Important DO NOT touch the print head. The machine starts printing the Print Quality Check Sheet again. l Press Stop/Exit. ...

Users Manual - English
Page 41
.... g For the "B" pattern, press a or b to choose the number of the test print that has the least visible vertical stripes (1-9). Press OK. After the print head nozzle is clogged the printed sample looks like this. When a print head nozzle is cleaned, the horizontal lines are gone. Press OK. b Press a or b to choose Alignment.
.... g For the "B" pattern, press a or b to choose the number of the test print that has the least visible vertical stripes (1-9). Press OK. After the print head nozzle is clogged the printed sample looks like this. When a print head nozzle is cleaned, the horizontal lines are gone. Press OK. b Press a or b to choose Alignment.
Users Manual - English
Page 43
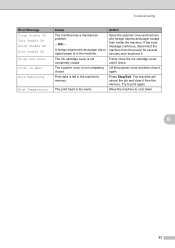
... reconnect it from inside the machine. The ink cartridge cover is not completely closed . The print head is left in the machine. Press Stop/Exit. B 33 Print data is too warm. Troubleshooting Error Message Clean Unable XX Init Unable XX Print Unable XX Scan Unable XX Close Ink Cover Cover is in...
... reconnect it from inside the machine. The ink cartridge cover is not completely closed . The print head is left in the machine. Press Stop/Exit. B 33 Print data is too warm. Troubleshooting Error Message Clean Unable XX Init Unable XX Print Unable XX Scan Unable XX Close Ink Cover Cover is in...
Users Manual - English
Page 44
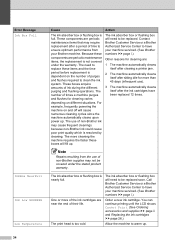
... The ink absorber box or flushing box will need to have been replaced 12 times. The print head is resolved by cleaning. Call Brother Customer Service or a Brother Authorized Service Center to be replaced soon. One or more cleaning the machine requires the faster these items and the time period before replacement is full. Note...
... The ink absorber box or flushing box will need to have been replaced 12 times. The print head is resolved by cleaning. Call Brother Customer Service or a Brother Authorized Service Center to be replaced soon. One or more cleaning the machine requires the faster these items and the time period before replacement is full. Note...
Users Manual - English
Page 51
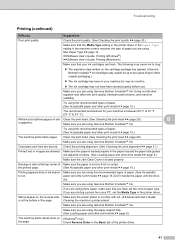
Clean the print head. (See Cleaning the print head uu page 29.) Make sure you are skewed. Check the printing alignment. (See Checking the print alignment uu page 31.) Printed text or images are using Genuine Brother Innobella™ Ink. the printed page. (See Acceptable paper and other print media... Check Reverse Order in the machine's menu matches the type of Make sure the paper is loaded properly in text Clean the print head. (See Cleaning the print head uu page 29.) B or graphics. Make sure you have been stored properly before use. If you are adjusted correctly...
Clean the print head. (See Cleaning the print head uu page 29.) Make sure you are skewed. Check the printing alignment. (See Checking the print alignment uu page 31.) Printed text or images are using Genuine Brother Innobella™ Ink. the printed page. (See Acceptable paper and other print media... Check Reverse Order in the machine's menu matches the type of Make sure the paper is loaded properly in text Clean the print head. (See Cleaning the print head uu page 29.) B or graphics. Make sure you have been stored properly before use. If you are adjusted correctly...
Users Manual - English
Page 58
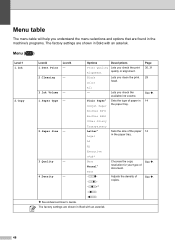
Lets you check the available ink volume. 1.Paper Type - Lets you clean the print head. 3.Ink Volume - Adjusts the density of document. The factory settings are shown in Bold with an asterisk. Page 30, 31 29 See . 14 14 See ....an asterisk. All - Transparency Letter* Legal Sets the size of paper in the paper tray. Menu ( Level1 1.Ink 2.Copy ) C Level2 Level3 Options Descriptions 1.Test Print - 2.Cleaning - Plain Paper* Inkjet Paper Sets the type of the paper in the paper tray. Print Quality Alignment Black Color Lets you check the print quality...
Lets you check the available ink volume. 1.Paper Type - Lets you clean the print head. 3.Ink Volume - Adjusts the density of document. The factory settings are shown in Bold with an asterisk. Page 30, 31 29 See . 14 14 See ....an asterisk. All - Transparency Letter* Legal Sets the size of paper in the paper tray. Menu ( Level1 1.Ink 2.Copy ) C Level2 Level3 Options Descriptions 1.Test Print - 2.Cleaning - Plain Paper* Inkjet Paper Sets the type of the paper in the paper tray. Print Quality Alignment Black Color Lets you check the print quality...
Users Manual - English
Page 74
... supplies ii Brother numbers i CreativeCenter 4 Customer Service i FAQs (frequently asked questions i product support i service centers i Solutions Center i warranties iii C Cleaning print head 29 scanner 29 Consumable items 63 Control panel overview 6 ControlCenter See Software User's Guide. E Index A Accessories and supplies ii Apple ... loading 19 64 E Envelopes 11, 17, 18 Error messages on LCD 32 B&W Print Only 32 Cannot Detect 32 Cannot Print 32 Clean Unable 33 Cover is Open 33 Data Remaining 33 Init Unable 33 Ink Box Full 34 Ink Low 34 InkBox Near Full 34 No...
... supplies ii Brother numbers i CreativeCenter 4 Customer Service i FAQs (frequently asked questions i product support i service centers i Solutions Center i warranties iii C Cleaning print head 29 scanner 29 Consumable items 63 Control panel overview 6 ControlCenter See Software User's Guide. E Index A Accessories and supplies ii Apple ... loading 19 64 E Envelopes 11, 17, 18 Error messages on LCD 32 B&W Print Only 32 Cannot Detect 32 Cannot Print 32 Clean Unable 33 Cover is Open 33 Data Remaining 33 Init Unable 33 Ink Box Full 34 Ink Low 34 InkBox Near Full 34 No...
Quick Setup Guide - English
Page 6
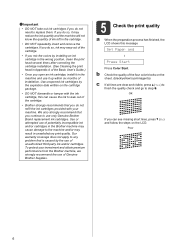
...Brother Supplies. 5 Check the print quality a When the preparation process has finished, the LCD shows this can see missing short lines, press b (No) and follow the steps on the LCD. To protect your machine. Use unopened ink cartridges by installing an ink cartridge in the wrong position, clean the print head... several times after correcting the cartridge installation. (See Cleaning the print head in Appendix A of the Basic User's Guide.) • Once you continue to the...
...Brother Supplies. 5 Check the print quality a When the preparation process has finished, the LCD shows this can see missing short lines, press b (No) and follow the steps on the LCD. To protect your machine. Use unopened ink cartridges by installing an ink cartridge in the wrong position, clean the print head... several times after correcting the cartridge installation. (See Cleaning the print head in Appendix A of the Basic User's Guide.) • Once you continue to the...

Quick Setup Guide - English
Page 8
... OK. Enter 0 1 for the first day of the year, and then press OK. Enter 2 5 for the day, and then press OK. c Press a or b to clean the print head regularly and maintain optimum print quality. Year:2013 (e.g. Day:01 (e.g. Press OK. 8 Set the date and time Setting the date and time allows the...
... OK. Enter 0 1 for the first day of the year, and then press OK. Enter 2 5 for the day, and then press OK. c Press a or b to clean the print head regularly and maintain optimum print quality. Year:2013 (e.g. Day:01 (e.g. Press OK. 8 Set the date and time Setting the date and time allows the...


