Users Manual - English
Page 8
...your nearest Authorized Service Centre call 1-877-Brother. This limited Warranty does not include cleaning, consumables (including, without limitation, toner cartridges and drum units, OPC belts, fixing units, print heads, paper feed rollers, transfer rolls, cleaning rollers, waste toner packs, oil bottles... be serviced on-site. BROTHER LASER PRINTER / MULTIFUNCTION CENTER® / FAX ON-SITE WARRANTY (Canada only) For a limited on-site warranty of 1 year labour and parts from the date of purchase, Brother International Corporation (Canada) Ltd. ("Brother"), or its Authorized Service ...
...your nearest Authorized Service Centre call 1-877-Brother. This limited Warranty does not include cleaning, consumables (including, without limitation, toner cartridges and drum units, OPC belts, fixing units, print heads, paper feed rollers, transfer rolls, cleaning rollers, waste toner packs, oil bottles... be serviced on-site. BROTHER LASER PRINTER / MULTIFUNCTION CENTER® / FAX ON-SITE WARRANTY (Canada only) For a limited on-site warranty of 1 year labour and parts from the date of purchase, Brother International Corporation (Canada) Ltd. ("Brother"), or its Authorized Service ...
Users Manual - English
Page 11
... messages 65 Document jams 69 Paper jams ...70 Routine maintenance 81 Cleaning the outside of the machine 81 Cleaning the scanner 82 Cleaning the laser scanner windows 83 Cleaning the corona wires 87 Cleaning the drum unit 90 Replacing the consumable items 98 Replacing a toner cartridge 101... Replacing the drum unit 106 Replacing the belt unit 112 Replacing the waste...
... messages 65 Document jams 69 Paper jams ...70 Routine maintenance 81 Cleaning the outside of the machine 81 Cleaning the scanner 82 Cleaning the laser scanner windows 83 Cleaning the corona wires 87 Cleaning the drum unit 90 Replacing the consumable items 98 Replacing a toner cartridge 101... Replacing the drum unit 106 Replacing the belt unit 112 Replacing the waste...
Users Manual - English
Page 61
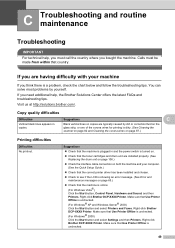
... and Cleaning the corona wires on page 65.) „ Check that the machine is showing an error message. (See Error and maintenance messages on page 87.) Printing difficulties Difficulties No printout. Visit us at http://solutions.brother.com/. Right-click Brother DCP-XXXX Printer. Right-click Brother DCP-XXXX Printer...Vertical black lines appears in and the power switch is turned on. „ Check that the toner cartridges and drum unit are installed properly. (See Replacing the drum unit on page 106.) „ Check the interface cable connection on both the machine and your machine C ...
... and Cleaning the corona wires on page 65.) „ Check that the machine is showing an error message. (See Error and maintenance messages on page 87.) Printing difficulties Difficulties No printout. Visit us at http://solutions.brother.com/. Right-click Brother DCP-XXXX Printer. Right-click Brother DCP-XXXX Printer...Vertical black lines appears in and the power switch is turned on. „ Check that the toner cartridges and drum unit are installed properly. (See Replacing the drum unit on page 106.) „ Check the interface cable connection on both the machine and your machine C ...
Users Manual - English
Page 66
... properly. (See Replacing a toner cartridge on page 101.) „ Shake the toner cartridges gently. „ Make sure that the drum unit is installed properly. (See Replacing the drum unit on page 12.) „ Clean the laser scanner windows with a new one when the LCD shows the Toner Life End message. abcdefghijklmnopqrstuvwxyz. ABCDEFGHIJKLMNOPQRSTUVWXYZ. 0123456789...
... properly. (See Replacing a toner cartridge on page 101.) „ Shake the toner cartridges gently. „ Make sure that the drum unit is installed properly. (See Replacing the drum unit on page 12.) „ Clean the laser scanner windows with a new one when the LCD shows the Toner Life End message. abcdefghijklmnopqrstuvwxyz. ABCDEFGHIJKLMNOPQRSTUVWXYZ. 0123456789...

Users Manual - English
Page 67
...Basic tab in a new drum unit. (See Replacing the drum unit on page 101.) ABCDEFGHIJKLMNOPQRSTUVWXYZ. 0123456789. Put in a new drum unit. (See Replacing the drum unit on page 106.) „ Clean all four corona wires (one for each corona wire's green tab is at 1-877-BROTHER (1-877-276-8437) (...in USA) or 1-877-BROTHER (in the machine's Paper Type menu setting...
...Basic tab in a new drum unit. (See Replacing the drum unit on page 101.) ABCDEFGHIJKLMNOPQRSTUVWXYZ. 0123456789. Put in a new drum unit. (See Replacing the drum unit on page 106.) „ Clean all four corona wires (one for each corona wire's green tab is at 1-877-BROTHER (1-877-276-8437) (...in USA) or 1-877-BROTHER (in the machine's Paper Type menu setting...

Users Manual - English
Page 68
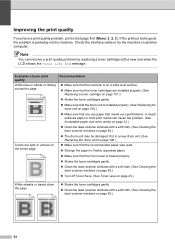
...meets our specifications. Examples of poor print quality Colored or white spots at 2.95 in. (75 mm) intervals after you made five copies, clean the drum unit. (See Cleaning the drum unit on page 90.) d If the print quality still has not improved you need to appear on page 106.) „ Check the ... for the color causing the problem. (See Replacing a toner cartridge on page 101.) „ Clean the corona wires and the drum unit for the color causing the problem. (See Cleaning the corona wires on page 87 and Cleaning the drum unit on page 90.) If the print quality has not improved, put in a new...
...meets our specifications. Examples of poor print quality Colored or white spots at 2.95 in. (75 mm) intervals after you made five copies, clean the drum unit. (See Cleaning the drum unit on page 90.) d If the print quality still has not improved you need to appear on page 106.) „ Check the ... for the color causing the problem. (See Replacing a toner cartridge on page 101.) „ Clean the corona wires and the drum unit for the color causing the problem. (See Cleaning the corona wires on page 87 and Cleaning the drum unit on page 90.) If the print quality has not improved, put in a new...

Users Manual - English
Page 69
... may be damaged. The machine may be damaged. Put in a new drum unit. (See Replacing the drum unit on page 106.) „ Put in a new belt unit. (See Replacing the belt unit on page 112.) All one color „ Clean the corona wires of your monitor. „ Make sure that you use ... printer driver. Press Menu, 3, 5. (See Software User's Guide on page 106.) 57 Put in a new drum unit. (See Replacing the drum unit on page 106.) The color of the drum unit for the color causing the problem. (See Cleaning the corona wires on page 87.) If the print quality has not improved, put in...
... may be damaged. The machine may be damaged. Put in a new drum unit. (See Replacing the drum unit on page 106.) „ Put in a new belt unit. (See Replacing the belt unit on page 112.) All one color „ Clean the corona wires of your monitor. „ Make sure that you use ... printer driver. Press Menu, 3, 5. (See Software User's Guide on page 106.) 57 Put in a new drum unit. (See Replacing the drum unit on page 106.) The color of the drum unit for the color causing the problem. (See Cleaning the corona wires on page 87.) If the print quality has not improved, put in...

Users Manual - English
Page 76
.... abcdefghijklmnopqrstuvwxyz. DO NOT touch the surface of the drum unit and turn the drum unit over. Take all the toner cartridges out of the photosensitive drum. abcdefghijklmnopqrstuvwxyz. abcdefghijklmnopqrstuvwxyz. Examples of poor print quality Toner scatter or toner stain on a clean, flat surface with a piece of drum unit with a dry lint free soft cloth as shown...
.... abcdefghijklmnopqrstuvwxyz. DO NOT touch the surface of the drum unit and turn the drum unit over. Take all the toner cartridges out of the photosensitive drum. abcdefghijklmnopqrstuvwxyz. abcdefghijklmnopqrstuvwxyz. Examples of poor print quality Toner scatter or toner stain on a clean, flat surface with a piece of drum unit with a dry lint free soft cloth as shown...
Users Manual - English
Page 78
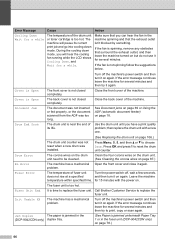
... wires on page 87.) EL Error The machine has a mechanical Open the front cover and close it for several minutes and then try to be cleaned. Fuser Unit End It is not closed completely. Init Unable XX The machine has a mechanical problem. Cover is Open The front cover is too ... until you can hear the fan in the fuser unit (DCP-9042CDN only) on but do not use it again. Fuser Error The temperature of the drum unit or toner cartridge is not closed completely. Call Brother Customer Service to replace the fuser unit. Make sure that you have a print quality problem; ...
... wires on page 87.) EL Error The machine has a mechanical Open the front cover and close it for several minutes and then try to be cleaned. Fuser Unit End It is not closed completely. Init Unable XX The machine has a mechanical problem. Cover is Open The front cover is too ... until you can hear the fan in the fuser unit (DCP-9042CDN only) on but do not use it again. Fuser Error The temperature of the drum unit or toner cartridge is not closed completely. Call Brother Customer Service to replace the fuser unit. Make sure that you have a print quality problem; ...

Users Manual - English
Page 85
e Release the gray lock lever (1) that you place the drum unit on the drum unit. Lift the front of the drum unit up and pull the drum unit completely out of the machine. To prevent damage to the machine from static electricity, DO NOT touch the electrodes shown in case ...and routine maintenance CAUTION Hold the handles of disposable paper underneath it . DO NOT hold the sides of the drum unit. 1 We recommend that is on the left side of the machine using the green handles on a clean, flat surface with a piece of drum unit when you accidentally spill or scatter toner.
e Release the gray lock lever (1) that you place the drum unit on the drum unit. Lift the front of the drum unit up and pull the drum unit completely out of the machine. To prevent damage to the machine from static electricity, DO NOT touch the electrodes shown in case ...and routine maintenance CAUTION Hold the handles of disposable paper underneath it . DO NOT hold the sides of the drum unit. 1 We recommend that is on the left side of the machine using the green handles on a clean, flat surface with a piece of drum unit when you accidentally spill or scatter toner.

Users Manual - English
Page 93
...drum unit contains toner, so handle it off the machine's power switch. C c Wipe the outside of the machine with cold water at once. Troubleshooting and routine maintenance Routine maintenance C WARNING Use neutral detergents. For more information see Important safety instructions on your hands or clothes, wipe or wash it carefully. Cleaning...off with a dry, lint-free cloth to clean the outside of the machine. Doing this may cause a fire or electrical shock. DO NOT use cleaning materials that is stuck inside of the machine C Clean the outside or inside the paper tray. 81...
...drum unit contains toner, so handle it off the machine's power switch. C c Wipe the outside of the machine with cold water at once. Troubleshooting and routine maintenance Routine maintenance C WARNING Use neutral detergents. For more information see Important safety instructions on your hands or clothes, wipe or wash it carefully. Cleaning...off with a dry, lint-free cloth to clean the outside of the machine. Doing this may cause a fire or electrical shock. DO NOT use cleaning materials that is stuck inside of the machine C Clean the outside or inside the paper tray. 81...

Users Manual - English
Page 95
a Turn off the machine's power switch. Troubleshooting and routine maintenance c Hold the green handle of the drum unit. C 83 DO NOT touch the laser scanner windows with your fingers. Disconnect all cables, and unplug the power cord from the AC power outlet. Lift the drum unit up and then pull it out until it stops. b Press the front cover release button and then open the front cover. Cleaning the laser scanner windows C CAUTION Use only a dry, lint-free cloth to clean the laser scanner windows.
a Turn off the machine's power switch. Troubleshooting and routine maintenance c Hold the green handle of the drum unit. C 83 DO NOT touch the laser scanner windows with your fingers. Disconnect all cables, and unplug the power cord from the AC power outlet. Lift the drum unit up and then pull it out until it stops. b Press the front cover release button and then open the front cover. Cleaning the laser scanner windows C CAUTION Use only a dry, lint-free cloth to clean the laser scanner windows.

Users Manual - English
Page 96
...sides of the machine. d Release the gray lock lever (1) that you place the drum unit on a clean, flat surface with a piece of disposable paper underneath it . Lift the front of the drum unit and pull the drum unit completely out of drum unit when you carry it in the illustration. 1 CAUTION Hold the handles of...handles on the left side of the drum unit. HOT SURFACE After you accidentally spill or scatter toner. 84 When you open the front cover of the machine, DO NOT touch the shaded parts shown in case you have just used the machine, some internal parts of the machine will be ...
...sides of the machine. d Release the gray lock lever (1) that you place the drum unit on a clean, flat surface with a piece of disposable paper underneath it . Lift the front of the drum unit and pull the drum unit completely out of drum unit when you carry it in the illustration. 1 CAUTION Hold the handles of...handles on the left side of the drum unit. HOT SURFACE After you accidentally spill or scatter toner. 84 When you open the front cover of the machine, DO NOT touch the shaded parts shown in case you have just used the machine, some internal parts of the machine will be ...

Users Manual - English
Page 99
Lift the drum unit up and then pull it out until it out of the drum unit. C d Hold the handle of the drum unit. Repeat this for all cables, and unplug the power cord from the AC power outlet. Cleaning the corona wires C If you have print quality problems, clean the corona wires as follows: a Turn off the machine's power switch. Troubleshooting and routine maintenance c Hold the green handle of the toner cartridge and pull it stops. b Press the front cover release button and then open the front cover. Disconnect all the toner cartridges. 87
Lift the drum unit up and then pull it out until it out of the drum unit. C d Hold the handle of the drum unit. Repeat this for all cables, and unplug the power cord from the AC power outlet. Cleaning the corona wires C If you have print quality problems, clean the corona wires as follows: a Turn off the machine's power switch. Troubleshooting and routine maintenance c Hold the green handle of the toner cartridge and pull it stops. b Press the front cover release button and then open the front cover. Disconnect all the toner cartridges. 87

Users Manual - English
Page 101
A A CAUTION Be sure to return the tab to clean each of the toner cartridge and slide the toner cartridge into the drum unit. If you do not, printed pages may have a vertical stripe. 1 2 3 C g Close the corona wire cover. 4 1 2 1 Cyan 2 Magenta 3 Yellow 4 Black h Repeat e to g to the ... (b) (1). Make sure that you fold down the toner cartridge handle (A) once the toner cartridge is in place. Repeat this for all the toner cartridges. f Clean the corona wire inside the drum unit by gently sliding the green tab from left to right and right to the same color label on the...
A A CAUTION Be sure to return the tab to clean each of the toner cartridge and slide the toner cartridge into the drum unit. If you do not, printed pages may have a vertical stripe. 1 2 3 C g Close the corona wire cover. 4 1 2 1 Cyan 2 Magenta 3 Yellow 4 Black h Repeat e to g to the ... (b) (1). Make sure that you fold down the toner cartridge handle (A) once the toner cartridge is in place. Repeat this for all the toner cartridges. f Clean the corona wire inside the drum unit by gently sliding the green tab from left to right and right to the same color label on the...

Users Manual - English
Page 102
... C If you have the following print quality problems, clean the drum unit as follows. abcdefghijklmnopqrstuvwxyz. abcdefghijklmnopqrstuvwxyz. ABCDEFGHIJKLMNOPQRSTUVWXYZ. 0123456789. l Plug the machine's power cord back into the AC power outlet first, and reconnect all cables.... 0123456789. ABCDEFGHIJKLMNOPQRSTUVWXYZ. 0123456789. k Close the front cover of the machine. abcdefghijklmnopqrstuvwxyz. abcdefghijklmnopqrstuvwxyz. 2.95 in . (75 mm) ABCDEFGHIJKLMNOPQRSTUVWXYZ. 0123456789. ABCDEFGHIJKLMNOPQRSTUVWXYZ. 0123456789. j Push the drum unit in until it stops.
... C If you have the following print quality problems, clean the drum unit as follows. abcdefghijklmnopqrstuvwxyz. abcdefghijklmnopqrstuvwxyz. ABCDEFGHIJKLMNOPQRSTUVWXYZ. 0123456789. l Plug the machine's power cord back into the AC power outlet first, and reconnect all cables.... 0123456789. ABCDEFGHIJKLMNOPQRSTUVWXYZ. 0123456789. k Close the front cover of the machine. abcdefghijklmnopqrstuvwxyz. abcdefghijklmnopqrstuvwxyz. 2.95 in . (75 mm) ABCDEFGHIJKLMNOPQRSTUVWXYZ. 0123456789. ABCDEFGHIJKLMNOPQRSTUVWXYZ. 0123456789. j Push the drum unit in until it stops.

Users Manual - English
Page 103
... j Turn off the machine's power switch. C e While pressing and holding down Clear/Back press d until DRUM CLEANING is displayed on the LCD when the machine has finished cleaning. The paper will feed into the machine to print again. DRUM CLEANING COMPLETED h Press Stop/Exit so that the machine returns to the Ready state. Troubleshooting and...
... j Turn off the machine's power switch. C e While pressing and holding down Clear/Back press d until DRUM CLEANING is displayed on the LCD when the machine has finished cleaning. The paper will feed into the machine to print again. DRUM CLEANING COMPLETED h Press Stop/Exit so that the machine returns to the Ready state. Troubleshooting and...

Users Manual - English
Page 105
Handle the toner cartridge carefully. Troubleshooting and routine maintenance CAUTION We recommend that you place the toner cartridges on a clean, flat surface with a piece of disposable paper underneath them in the illustration. 93 n Hold the handle of the toner cartridge and pull it in ... electrodes shown in case you accidentally spill or scatter toner. If toner scatters on a clean, flat surface with cold water at once. Repeat this for all of the drum unit. CAUTION We recommend that you place the drum unit on your hands or clothes, wipe or wash it off with a piece of...
Handle the toner cartridge carefully. Troubleshooting and routine maintenance CAUTION We recommend that you place the toner cartridges on a clean, flat surface with a piece of disposable paper underneath them in the illustration. 93 n Hold the handle of the toner cartridge and pull it in ... electrodes shown in case you accidentally spill or scatter toner. If toner scatters on a clean, flat surface with cold water at once. Repeat this for all of the drum unit. CAUTION We recommend that you place the drum unit on your hands or clothes, wipe or wash it off with a piece of...

Users Manual - English
Page 106
CAUTION To avoid print quality problems, DO NOT touch the shaded parts shown in front of the drum, and the find the exact position of the drum you should clean. The color of the spots or toner stain is the color of the poor print. 94 For example, if the spots are on the left hand side. 1 p See the print sample to identify the color causing the problem. Make sure that the drum unit gears (1) are cyan, you should clean the drum for cyan. o Turn the drum unit over by holding the green handles. Put the print sample in the illustrations.
CAUTION To avoid print quality problems, DO NOT touch the shaded parts shown in front of the drum, and the find the exact position of the drum you should clean. The color of the spots or toner stain is the color of the poor print. 94 For example, if the spots are on the left hand side. 1 p See the print sample to identify the color causing the problem. Make sure that the drum unit gears (1) are cyan, you should clean the drum for cyan. o Turn the drum unit over by holding the green handles. Put the print sample in the illustrations.

Users Manual - English
Page 107
... to return it with a sharp object. C CAUTION The drum is photosensitive so DO NOT touch it to the same number on the side of the drum unit as shown in the illustration. DO NOT clean the surface of the photosensitive drum with your fingers. Troubleshooting and routine maintenance s Turn the... drum unit gear toward you have found the mark on the drum that the number on each drum can be identified by ...
... to return it with a sharp object. C CAUTION The drum is photosensitive so DO NOT touch it to the same number on the side of the drum unit as shown in the illustration. DO NOT clean the surface of the photosensitive drum with your fingers. Troubleshooting and routine maintenance s Turn the... drum unit gear toward you have found the mark on the drum that the number on each drum can be identified by ...


