Quick Setup Guide - English
Page 18
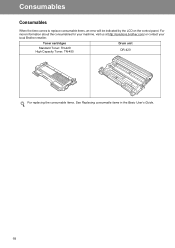
For more information about the consumables for your machine, visit us at http://solutions.brother.com/ or contact your local Brother reseller. Consumables Consumables When the time comes to replace consumable items, an error will be indicated by the LCD on the control panel. Toner cartridges Standard Toner: TN-420 High Capacity Toner: TN-450 Drum unit DR-420 For replacing the consumable items, See Replacing consumable items in the Basic User's Guide. 18
For more information about the consumables for your machine, visit us at http://solutions.brother.com/ or contact your local Brother reseller. Consumables Consumables When the time comes to replace consumable items, an error will be indicated by the LCD on the control panel. Toner cartridges Standard Toner: TN-420 High Capacity Toner: TN-450 Drum unit DR-420 For replacing the consumable items, See Replacing consumable items in the Basic User's Guide. 18
Advanced Users Manual - English
Page 18
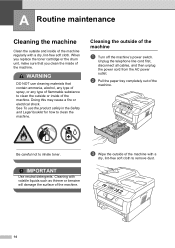
... soft cloth. Be careful not to clean the machine. IMPORTANT Use neutral detergents. Cleaning the outside or inside of the machine. When you replace the toner cartridge or the drum unit, make sure that contain ammonia, alcohol, any type of spray, or any type of flammable substance to clean the outside of...
... soft cloth. Be careful not to clean the machine. IMPORTANT Use neutral detergents. Cleaning the outside or inside of the machine. When you replace the toner cartridge or the drum unit, make sure that contain ammonia, alcohol, any type of spray, or any type of flammable substance to clean the outside of...
Users Manual - English
Page 6
... no charge to you for loss or damage to this warranty covers only warranty service within the applicable warranty period. Brother® One-Year Limited Warranty and Replacement Service (USA Only) Who is covered: This limited warranty ("warranty") is given only to the original ... within the U.S. You are not limited to print heads, toner, drums, ink cartridges, print cartridges, cordless handset battery, refill ribbons, therma PLUS paper and thermal paper. Except as otherwise provided herein, Brother warrants that this Product has been altered or modified in any way ...
... no charge to you for loss or damage to this warranty covers only warranty service within the applicable warranty period. Brother® One-Year Limited Warranty and Replacement Service (USA Only) Who is covered: This limited warranty ("warranty") is given only to the original ... within the U.S. You are not limited to print heads, toner, drums, ink cartridges, print cartridges, cordless handset battery, refill ribbons, therma PLUS paper and thermal paper. Except as otherwise provided herein, Brother warrants that this Product has been altered or modified in any way ...

Users Manual - English
Page 8
...limitation, ink cartridges, print cartridges, print rolls, thermal paper rolls, toner cartridges, drum units, OPC belts, fixing units, print heads, paper feed rollers, transfer rolls... cartridges installed. For Technical Assistance or for labour and parts, Brother International Corporation (Canada) Ltd. ("Brother"), or its Authorized Service Centres, Distributors, Dealers, Agents or...the ink cartridges or the protective parts will repair or replace (at Brother Authorized Service Centres throughout Canada. BROTHER DISCLAIMS ALL OTHER WARRANTIES EXPRESSED OR IMPLIED INCLUDING, WITHOUT ...
...limitation, ink cartridges, print cartridges, print rolls, thermal paper rolls, toner cartridges, drum units, OPC belts, fixing units, print heads, paper feed rollers, transfer rolls... cartridges installed. For Technical Assistance or for labour and parts, Brother International Corporation (Canada) Ltd. ("Brother"), or its Authorized Service Centres, Distributors, Dealers, Agents or...the ink cartridges or the protective parts will repair or replace (at Brother Authorized Service Centres throughout Canada. BROTHER DISCLAIMS ALL OTHER WARRANTIES EXPRESSED OR IMPLIED INCLUDING, WITHOUT ...
Users Manual - English
Page 12
... the corona wire 34 Replacing the drum unit 35 B Troubleshooting 40 Error and maintenance messages 40 Document Jams 43 Document is jammed in the top of the ADF unit (For DCP-7065DN 43 Document is jammed under the document cover (For DCP-7065DN) ..........43 Removing small documents jammed in the ADF (For DCP-7065DN 44 Document is jammed...
... the corona wire 34 Replacing the drum unit 35 B Troubleshooting 40 Error and maintenance messages 40 Document Jams 43 Document is jammed in the top of the ADF unit (For DCP-7065DN 43 Document is jammed under the document cover (For DCP-7065DN) ..........43 Removing small documents jammed in the ADF (For DCP-7065DN 44 Document is jammed...
Users Manual - English
Page 42
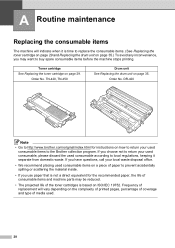
...28 A Routine maintenance A Replacing the consumable items A The machine will vary depending on the complexity of printed pages, percentage of coverage and type of media used consumable items to the Brother collection program. TN-420, TN-450 Drum unit See Replacing the drum unit on page 29. Order... No. Frequency of replacement will indicate when it separate from domestic waste. Order No.
...28 A Routine maintenance A Replacing the consumable items A The machine will vary depending on the complexity of printed pages, percentage of coverage and type of media used consumable items to the Brother collection program. TN-420, TN-450 Drum unit See Replacing the drum unit on page 29. Order... No. Frequency of replacement will indicate when it separate from domestic waste. Order No.
Users Manual - English
Page 48
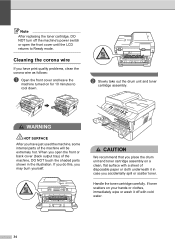
...you open the front cover until the LCD returns to cool down. Note After replacing the toner cartridge, DO NOT turn off with a sheet of disposable paper or...WARNING HOT SURFACE After you may burn yourself. CAUTION We recommend that you have just used the machine, some internal parts of the machine, DO NOT touch the shaded parts shown in case you accidentally spill or scatter toner. ... clean, flat surface with cold water. 34 Cleaning the corona wire A If you place the drum unit and toner cartridge assembly on your hands or clothes, immediately wipe or wash it in the illustration. b Slowly...
...you open the front cover until the LCD returns to cool down. Note After replacing the toner cartridge, DO NOT turn off with a sheet of disposable paper or...WARNING HOT SURFACE After you may burn yourself. CAUTION We recommend that you have just used the machine, some internal parts of the machine, DO NOT touch the shaded parts shown in case you accidentally spill or scatter toner. ... clean, flat surface with cold water. 34 Cleaning the corona wire A If you place the drum unit and toner cartridge assembly on your hands or clothes, immediately wipe or wash it in the illustration. b Slowly...
Users Manual - English
Page 49
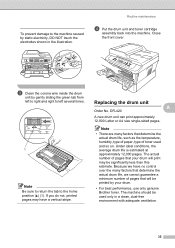
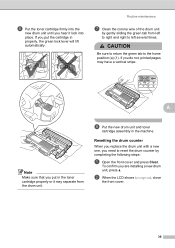
...type of paper, type of pages that determine the actual drum life, we have a vertical stripe. Note • There are many factors that your drum. • For best performance, use only genuine Brother toner. Under ideal conditions, the average drum life is estimated at approximately 12,000 pages. If ...The actual number of toner used only in the illustration. To prevent damage to the home position (a) (1). Replacing the drum unit Order No. c Clean the corona wire inside the drum unit by gently sliding the green tab from left to right and right to left several times. 1 Note ...
...type of paper, type of pages that determine the actual drum life, we have a vertical stripe. Note • There are many factors that your drum. • For best performance, use only genuine Brother toner. Under ideal conditions, the average drum life is estimated at approximately 12,000 pages. If ...The actual number of toner used only in the illustration. To prevent damage to the home position (a) (1). Replacing the drum unit Order No. c Clean the corona wire inside the drum unit by gently sliding the green tab from left to right and right to left several times. 1 Note ...
Users Manual - English
Page 50
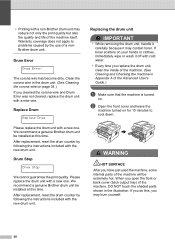
... is turned on page 34.) If you have just used the machine, some internal parts of the machine itself. Replace Drum A Replace Drum Please replace the drum unit with cold water. • Every time you do this time. If ...replace the drum unit, clean the inside of a nonBrother drum unit. After replacement, reset the drum counter by the use of the machine. (See Cleaning and Checking the machine in the illustration. We recommend a genuine Brother drum unit be extremely hot. Please replace the drum unit with the new drum unit. • Printing with a non-Brother drum...
... is turned on page 34.) If you have just used the machine, some internal parts of the machine itself. Replace Drum A Replace Drum Please replace the drum unit with cold water. • Every time you do this time. If ...replace the drum unit, clean the inside of a nonBrother drum unit. After replacement, reset the drum counter by the use of the machine. (See Cleaning and Checking the machine in the illustration. We recommend a genuine Brother drum unit be extremely hot. Please replace the drum unit with the new drum unit. • Printing with a non-Brother drum...
Users Manual - English
Page 53
Resetting the drum counter A When you replace the drum unit with a new one, you need to reset the drum counter by gently sliding the green tab from the drum unit. To confirm you hear it may separate from left to right and right to the home position (a) (1). b When the LCD shows ...Accepted, close the front cover. 39 Routine maintenance g Clean the corona wire of the drum unit by completing the following steps: a Open the front cover and press Clear. If you do not, printed pages may have a vertical stripe. 1 A...
Resetting the drum counter A When you replace the drum unit with a new one, you need to reset the drum counter by gently sliding the green tab from the drum unit. To confirm you hear it may separate from left to right and right to the home position (a) (1). b When the LCD shows ...Accepted, close the front cover. 39 Routine maintenance g Clean the corona wire of the drum unit by completing the following steps: a Open the front cover and press Clear. If you do not, printed pages may have a vertical stripe. 1 A...
Users Manual - English
Page 54
... jammed in the back of the ADF unit (For DCP-7065DN) on page 43 or Using the automatic document feeder (ADF) (For DCP-7065DN) on page 34.) It is time to replace the drum unit. You can hear the fan in the drum unit. If you will pause its current print job ...spinning, remove any sophisticated office product, errors may occur and consumable items may need more help, the Brother Solutions Center offers the latest FAQs and troubleshooting tips: Visit us at http://solutions.brother.com/. B Troubleshooting B Error and maintenance messages B As with any obstacles that the exhaust outlet ...
... jammed in the back of the ADF unit (For DCP-7065DN) on page 43 or Using the automatic document feeder (ADF) (For DCP-7065DN) on page 34.) It is time to replace the drum unit. You can hear the fan in the drum unit. If you will pause its current print job ...spinning, remove any sophisticated office product, errors may occur and consumable items may need more help, the Brother Solutions Center offers the latest FAQs and troubleshooting tips: Visit us at http://solutions.brother.com/. B Troubleshooting B Error and maintenance messages B As with any obstacles that the exhaust outlet ...
Users Manual - English
Page 56
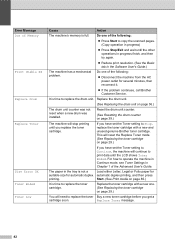
... suitable size for several minutes, then reconnect it. If the problem continues, call Brother Customer Service. The paper in the Software User's Guide.) The machine has a mechanical problem. Error Message Out of Memory Print Unable XX Replace Drum Replace Toner Size Error DX Toner Ended Toner Low Cause Action The machine's memory is...
... suitable size for several minutes, then reconnect it. If the problem continues, call Brother Customer Service. The paper in the Software User's Guide.) The machine has a mechanical problem. Error Message Out of Memory Print Unable XX Replace Drum Replace Toner Size Error DX Toner Ended Toner Low Cause Action The machine's memory is...
Users Manual - English
Page 69
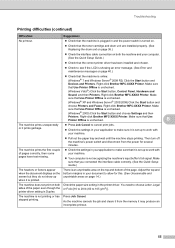
... machine is online: (Windows® 7 and Windows Server® 2008 R2) Click the Start button and Devices and Printers. Right-click Brother MFC-XXXX Printer. Troubleshooting Printing difficulties (continued) Difficulties Suggestions No printout. Check that the machine is plugged in and the power switch... is turned on. Check that the toner cartridge and drum unit are installed properly. (See Replacing the drum unit on page 36.) Check the interface cable connection on both Check the paper size setting in the ...
... machine is online: (Windows® 7 and Windows Server® 2008 R2) Click the Start button and Devices and Printers. Right-click Brother MFC-XXXX Printer. Troubleshooting Printing difficulties (continued) Difficulties Suggestions No printout. Check that the machine is plugged in and the power switch... is turned on. Check that the toner cartridge and drum unit are installed properly. (See Replacing the drum unit on page 36.) Check the interface cable connection on both Check the paper size setting in the ...
Users Manual - English
Page 73
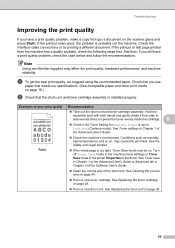
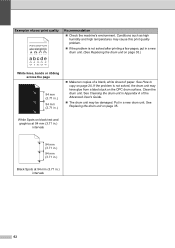
...problem is too light, Toner Save mode may be on. Note Using non-Brother supplies may cause this print fault. Conditions such as humidity, high temperatures, ... cartridge. Check if the Toner Setting for Replace Toner is installed properly. See Replacing the drum unit on page 29. Put in a new drum unit. a To get the best print quality, we...Properties of poor print quality Recommendation ABCDEFGH abcdefghijk ABCD abcde 01234 Faint Take out the drum unit and toner cartridge assembly. Check the interface cable connections or try printing a different document. ...
...problem is too light, Toner Save mode may be on. Note Using non-Brother supplies may cause this print fault. Conditions such as humidity, high temperatures, ... cartridge. Check if the Toner Setting for Replace Toner is installed properly. See Replacing the drum unit on page 29. Put in a new drum unit. a To get the best print quality, we...Properties of poor print quality Recommendation ABCDEFGH abcdefghijk ABCD abcde 01234 Faint Take out the drum unit and toner cartridge assembly. Check the interface cable connections or try printing a different document. ...
Users Manual - English
Page 74
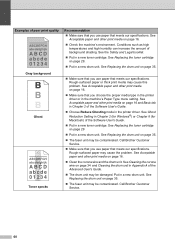
... other print media on page 29. Put in a new drum unit. See Replacing the drum unit on page 35. Make sure that you use paper that meets our specifications. Call Brother Customer Service. 60 See Replacing the drum unit on page 35. The fuser unit may be damaged.... See Replacing the toner cartridge on page 16 and Basic tab in Chapter 2 of the Software User...
... other print media on page 29. Put in a new drum unit. See Replacing the drum unit on page 35. Make sure that you use paper that meets our specifications. Call Brother Customer Service. 60 See Replacing the drum unit on page 35. The fuser unit may be damaged.... See Replacing the toner cartridge on page 16 and Basic tab in Chapter 2 of the Software User...
Users Manual - English
Page 75
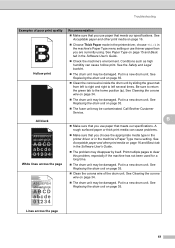
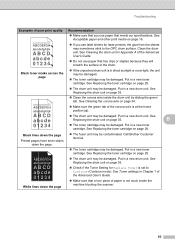
... are currently using. See Cleaning the corona wire on page 35. The fuser unit may be damaged. See Replacing the drum unit on page 34. The drum unit may be damaged. A rough surfaced paper or thick print media can cause hollow print. See Cleaning the corona wire... abcde 01234 White lines across the page 61 Call Brother Customer Service. Put in a new drum unit. Lines across the page Make sure that meets our specifications. Put in a new drum unit. ABCDEFGH abcdefghijk ABCD abcde 01234 The drum unit may be damaged. Be sure to return the...
... are currently using. See Cleaning the corona wire on page 35. The fuser unit may be damaged. See Replacing the drum unit on page 34. The drum unit may be damaged. A rough surfaced paper or thick print media can cause hollow print. See Cleaning the corona wire... abcde 01234 White lines across the page 61 Call Brother Customer Service. Put in a new drum unit. Lines across the page Make sure that meets our specifications. Put in a new drum unit. ABCDEFGH abcdefghijk ABCD abcde 01234 The drum unit may be damaged. Be sure to return the...
Users Manual - English
Page 76
...71 in.) 94 mm (3.71 in.) Black Spots at 94 mm (3.71 in a new drum unit. Conditions such as high humidity and high temperatures may cause this print quality problem. If... white sheet of paper. Clean the drum unit. Examples of the Advanced User's Guide. The drum unit may have glue from a label stuck on the OPC drum surface. See Replacing the drum unit on page 24. See How to...page 35. If the problem is not solved after printing a few pages, put in a new drum unit. (See Replacing the drum unit on page 35.) White lines, bands or ribbing across the page 94 mm (3.71 in...
...71 in.) 94 mm (3.71 in.) Black Spots at 94 mm (3.71 in a new drum unit. Conditions such as high humidity and high temperatures may cause this print quality problem. If... white sheet of paper. Clean the drum unit. Examples of the Advanced User's Guide. The drum unit may have glue from a label stuck on the OPC drum surface. See Replacing the drum unit on page 24. See How to...page 35. If the problem is not solved after printing a few pages, put in a new drum unit. (See Replacing the drum unit on page 35.) White lines, bands or ribbing across the page 94 mm (3.71 in...
Users Manual - English
Page 77
...piece of paper is not stuck inside the drum unit by sliding the green tab. B The toner cartridge may be damaged. Call Brother Customer Service. The toner cartridge may sometimes stick to Continue (Continue mode). See Replacing the toner cartridge on page 16. See ...Toner settings in a new toner cartridge. Clean the drum unit. See Cleaning the corona wire on ...
...piece of paper is not stuck inside the drum unit by sliding the green tab. B The toner cartridge may be damaged. Call Brother Customer Service. The toner cartridge may sometimes stick to Continue (Continue mode). See Replacing the toner cartridge on page 16. See ...Toner settings in a new toner cartridge. Clean the drum unit. See Cleaning the corona wire on ...
Users Manual - English
Page 108
...ii Brother numbers i Customer Service i FAQs (frequently asked questions i product support i service centers i Solutions Center i warranties iii, iv, vi C Cleaning corona wire 34 Consumable items 28 disposal 32 replacing 40 Control panel overview 6 Copy 24 keys 6 D Document how to load 21, 22 jams 43 Drum unit cleaning 34 replacing ... 36 Duplex Disabled 41 Init Unable XX 41 Jam Duplex 41 No Paper 41 Out of Memory 42 Print Unable XX 42 Replace Drum 36 Replace Toner 29 Toner Ended 30 Toner Low 29 F Folio 15, 17 G Gray scale 87 H HELP LCD messages 70 Menu Table 72 ...
...ii Brother numbers i Customer Service i FAQs (frequently asked questions i product support i service centers i Solutions Center i warranties iii, iv, vi C Cleaning corona wire 34 Consumable items 28 disposal 32 replacing 40 Control panel overview 6 Copy 24 keys 6 D Document how to load 21, 22 jams 43 Drum unit cleaning 34 replacing ... 36 Duplex Disabled 41 Init Unable XX 41 Jam Duplex 41 No Paper 41 Out of Memory 42 Print Unable XX 42 Replace Drum 36 Replace Toner 29 Toner Ended 30 Toner Low 29 F Folio 15, 17 G Gray scale 87 H HELP LCD messages 70 Menu Table 72 ...
Users Manual - English
Page 109
... 69 reset functions 69 serial number 69 Maintenance, routine replacing drum unit 35 toner cartridge 29 Menu Table 72 Mode, entering copy 24 N Network Printing See Network User's Guide Network Scanning See Software User's Guide O OPC drum 62 Out of Memory message 42 P Paper 16,... Print difficulties 54 emulation 88 quality 57 resolution 88 specifications 88 Print quality 59 Programming your machine 70 Q Quality printing 57 R Replacing drum unit 35 toner cartridge 29 Resolution copy 86 print 88 scan 87 S Safety Instructions viii Scan 6, 26 Scanner glass using 22 ...
... 69 reset functions 69 serial number 69 Maintenance, routine replacing drum unit 35 toner cartridge 29 Menu Table 72 Mode, entering copy 24 N Network Printing See Network User's Guide Network Scanning See Software User's Guide O OPC drum 62 Out of Memory message 42 P Paper 16,... Print difficulties 54 emulation 88 quality 57 resolution 88 specifications 88 Print quality 59 Programming your machine 70 Q Quality printing 57 R Replacing drum unit 35 toner cartridge 29 Resolution copy 86 print 88 scan 87 S Safety Instructions viii Scan 6, 26 Scanner glass using 22 ...


