Quick Setup Guide - English
Page 2
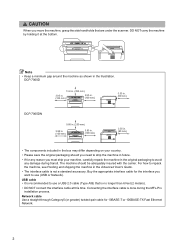
... in the original packaging to use a USB 2.0 cable (Type A/B) that are under the scanner. For how to use (USB or Network). USB cable • It is recommended to repack the machine, see Packing and shipping the machine in future. • If for any damage during the MFL-Pro installation process. DCP-7060D 13.8 in. (350 mm) 3.95...
... in the original packaging to use a USB 2.0 cable (Type A/B) that are under the scanner. For how to use (USB or Network). USB cable • It is recommended to repack the machine, see Packing and shipping the machine in future. • If for any damage during the MFL-Pro installation process. DCP-7060D 13.8 in. (350 mm) 3.95...
Quick Setup Guide - English
Page 8
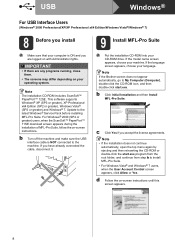
...with Administrator rights. If you have already connected the cable, disconnect it. 9 Install MFL-Pro Suite a Put the installation CD-ROM into your machine. c Click Yes if you accept the license agreements. Note If the Brother screen does not appear automatically, go to My ...; 11SE download screen appears during the installation of MFL-Pro Suite, follow the on -screen instructions until this screen appears. 8 USB Windows® For USB Interface Users (Windows® 2000 Professional/XP/XP Professional x64 Edition/Windows Vista®/Windows® 7) 8 Before you install ...
...with Administrator rights. If you have already connected the cable, disconnect it. 9 Install MFL-Pro Suite a Put the installation CD-ROM into your machine. c Click Yes if you accept the license agreements. Note If the Brother screen does not appear automatically, go to My ...; 11SE download screen appears during the installation of MFL-Pro Suite, follow the on -screen instructions until this screen appears. 8 USB Windows® For USB Interface Users (Windows® 2000 Professional/XP/XP Professional x64 Edition/Windows Vista®/Windows® 7) 8 Before you install ...
Quick Setup Guide - English
Page 9
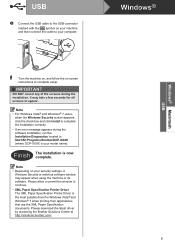
...of the screens during the software installation, run the Installation Diagnostics located in Start/All Programs/Brother/DCP-XXXX (where DCP-XXXX is now complete. Windows® 9 Windows® Macintosh USB Note • For Windows Vista® and Windows® 7 users, when the Windows...message appears during the installation. Please download the latest driver by accessing the Brother Solutions Center at http://solutions.brother.com/. Note • Depending on your machine and then connect the cable to complete setup. It may appear when using the machine or its software...
...of the screens during the software installation, run the Installation Diagnostics located in Start/All Programs/Brother/DCP-XXXX (where DCP-XXXX is now complete. Windows® 9 Windows® Macintosh USB Note • For Windows Vista® and Windows® 7 users, when the Windows...message appears during the installation. Please download the latest driver by accessing the Brother Solutions Center at http://solutions.brother.com/. Note • Depending on your machine and then connect the cable to complete setup. It may appear when using the machine or its software...

Quick Setup Guide - English
Page 10
... Users (Mac OS X 10.4.11 - 10.6.x) 8 Before you are using, visit http://solutions.brother.com/.) b Connect the USB cable to the USB connector marked with Administrator rights. b Double-click the Start Here OSX icon. Note It may take a few minutes for installation to step 10 on . Choose ... MFL-Pro Suite is ON. You must be logged on -screen instructions. Follow the on with the symbol on your machine and then connect the cable to your Macintosh. 9 Install MFL-Pro Suite a Put the installation CD-ROM into your CD-ROM drive. d When this screen appears. c Follow the on the...
... Users (Mac OS X 10.4.11 - 10.6.x) 8 Before you are using, visit http://solutions.brother.com/.) b Connect the USB cable to the USB connector marked with Administrator rights. b Double-click the Start Here OSX icon. Note It may take a few minutes for installation to step 10 on . Choose ... MFL-Pro Suite is ON. You must be logged on -screen instructions. Follow the on with the symbol on your machine and then connect the cable to your Macintosh. 9 Install MFL-Pro Suite a Put the installation CD-ROM into your CD-ROM drive. d When this screen appears. c Follow the on the...
Users Manual - English
Page 103
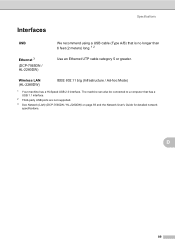
Specifications Interfaces D USB We recommend using a USB cable (Type A/B) that has a USB 1.1 interface. 2 Third-party USB ports are not supported. 3 See Network (LAN) (DCP-7065DN / HL-2280DW) on page 93 and the Network User's Guide for detailed network specifications. The machine can also be connected to a computer that is no longer than 6 feet (2 meters) long. 1 2 Ethernet 3 (DCP-7065DN / HL-2280DW) Use an Ethernet UTP cable category 5 or greater. D 89 Wireless LAN (HL-2280DW) IEEE 802.11 b/g (Infrastructure / Ad-hoc Mode) 1 Your machine has a Hi-Speed USB 2.0 interface.
Specifications Interfaces D USB We recommend using a USB cable (Type A/B) that has a USB 1.1 interface. 2 Third-party USB ports are not supported. 3 See Network (LAN) (DCP-7065DN / HL-2280DW) on page 93 and the Network User's Guide for detailed network specifications. The machine can also be connected to a computer that is no longer than 6 feet (2 meters) long. 1 2 Ethernet 3 (DCP-7065DN / HL-2280DW) Use an Ethernet UTP cable category 5 or greater. D 89 Wireless LAN (HL-2280DW) IEEE 802.11 b/g (Infrastructure / Ad-hoc Mode) 1 Your machine has a Hi-Speed USB 2.0 interface.


