
Accessory Catalog
Page 7
.... Sew. Make a cut edge like a serger or overlock. Select a stitch, and adjust settings as it stitches. To sew a curve, sew so that the fabric edge becomes a right angle against the seam guide. 3. SA108 GHILOP Straight Stitch Foot and Straight Stitch Needle Plate Use the Straight Stitch Foot with an accurate 1/4 inch, 1/2 inch, or 5/8 inch (approx. 6.5, 13, or 16 mm) seam. Brother General Sewing Accessories 11 Seam Guide Side Cutter Stitch Guide Foot Seam Guide Guides fabric edge with the Straight Stitch Needle Plate to accomplish perfect straight stitching. Use this presser foot...
.... Sew. Make a cut edge like a serger or overlock. Select a stitch, and adjust settings as it stitches. To sew a curve, sew so that the fabric edge becomes a right angle against the seam guide. 3. SA108 GHILOP Straight Stitch Foot and Straight Stitch Needle Plate Use the Straight Stitch Foot with an accurate 1/4 inch, 1/2 inch, or 5/8 inch (approx. 6.5, 13, or 16 mm) seam. Brother General Sewing Accessories 11 Seam Guide Side Cutter Stitch Guide Foot Seam Guide Guides fabric edge with the Straight Stitch Needle Plate to accomplish perfect straight stitching. Use this presser foot...

Accessory Catalog
Page 11
... guide mark on the presser foot. 2. Insert cords or threads into each guide (to fit the width of seams or pattern markings are desired. Line up the cords, and select zigzag stitch with brother sewing machines of the presser foot, and place each cord into each hole on the machine. 2. SA141 All Brother home-use the center guide). 2. Perfect for quilting appliqué! 1. Slide the plate of the guide back and forth to use single cord, use sewing machines Clear-view Foot Use this presser foot...
... guide mark on the presser foot. 2. Insert cords or threads into each guide (to fit the width of seams or pattern markings are desired. Line up the cords, and select zigzag stitch with brother sewing machines of the presser foot, and place each cord into each hole on the machine. 2. SA141 All Brother home-use the center guide). 2. Perfect for quilting appliqué! 1. Slide the plate of the guide back and forth to use single cord, use sewing machines Clear-view Foot Use this presser foot...

Accessory Catalog
Page 12
... size. Brother Embellishment Feet 21 Fringe Foot Gathering Foot SA142 All Brother home-use sewing machines SA120 All Brother home-use sewing machines Fringe Foot Used to mark construction details by creating tailor tacks. Works best on a drawn pattern line and sew (cut the center of the fabric facing down. Increase the upper thread tension. 3. Adding decorative stitches over seams or patterns: Line up the center guide mark (red) of the presser foot to 4 mm in groove of appliqué. 2. Making...
... size. Brother Embellishment Feet 21 Fringe Foot Gathering Foot SA142 All Brother home-use sewing machines SA120 All Brother home-use sewing machines Fringe Foot Used to mark construction details by creating tailor tacks. Works best on a drawn pattern line and sew (cut the center of the fabric facing down. Increase the upper thread tension. 3. Adding decorative stitches over seams or patterns: Line up the center guide mark (red) of the presser foot to 4 mm in groove of appliqué. 2. Making...

Accessory Catalog
Page 13
A specially designed bobbin cover is Project Book (See pages 16 and 17 for most consistent results. Sew slowly for details.) Brother Embellishment Feet Pin Tuck Foot 24 Ruffler Foot Pin Tuck Foot This presser foot has 7 grooves and produces perfect pin tucks and corded pin tucks using a twin needle on the lower portion of the grooves. 4. The intervals of stitch length, tuck setting and depth setting. 2. Draw a reference line to guide your first row of stitching and use that...
A specially designed bobbin cover is Project Book (See pages 16 and 17 for most consistent results. Sew slowly for details.) Brother Embellishment Feet Pin Tuck Foot 24 Ruffler Foot Pin Tuck Foot This presser foot has 7 grooves and produces perfect pin tucks and corded pin tucks using a twin needle on the lower portion of the grooves. 4. The intervals of stitch length, tuck setting and depth setting. 2. Draw a reference line to guide your first row of stitching and use that...

Accessory Catalog
Page 15
... sewing machines. Walking Foot SA140 ABCDEFJKMN SA166 L SA107 GHO SA169 I Open Toe Walking Foot SA188 ABCDEFJKMN www.brother.com Screw on the front of fabric and the walking foot with the open front when greater visibility is finished, sew about four locking stitches. 8. While starting to sew, press the needle position button twice to pull the bobbin thread to the machine. 2. Set the machine for free-motion, outline quilting, etc. 1. Sew. Select a straight stitch or your preferred stitch such as the machine's lower feed dogs to sew uniform stitches...
... sewing machines. Walking Foot SA140 ABCDEFJKMN SA166 L SA107 GHO SA169 I Open Toe Walking Foot SA188 ABCDEFJKMN www.brother.com Screw on the front of fabric and the walking foot with the open front when greater visibility is finished, sew about four locking stitches. 8. While starting to sew, press the needle position button twice to pull the bobbin thread to the machine. 2. Set the machine for free-motion, outline quilting, etc. 1. Sew. Select a straight stitch or your preferred stitch such as the machine's lower feed dogs to sew uniform stitches...

Accessory Catalog
Page 17
... sewing and embroidery machine. * Requires additional purchases. The Border Frame enables you to navigate LCD screen. - Includes three new free-motion presser feet: Free-motion quilting foot "C" for the Innov-is 4000D by adding special features to see reference stitches to give you to embroider 150 decorative sewing stitches within the frame. - The 4000D Premium Upgrade Package is compatible only with the Brother Innov-is 4000D QuattroTM 6000D Embroider y Card...
... sewing and embroidery machine. * Requires additional purchases. The Border Frame enables you to navigate LCD screen. - Includes three new free-motion presser feet: Free-motion quilting foot "C" for the Innov-is 4000D by adding special features to see reference stitches to give you to embroider 150 decorative sewing stitches within the frame. - The 4000D Premium Upgrade Package is compatible only with the Brother Innov-is 4000D QuattroTM 6000D Embroider y Card...

Accessory Catalog
Page 33
... next embroidery, quilting or sewing project. Brother Embroidery Accessories 63 Free-Standing Ten Spool Thread Stand Ten Spool Thread Stand Embroidery Machine Hoops Brother Embroidery Accessories 64 For all embroidery and sewing/embroidery machines. Each thread has it's own thread guide to deliver thread smoothly to the machine as well as a thread locking system which keeps those loose ends tamed when not in the storage slots. For all models: SA503 Free-Standing Ten Spool Thread Stand You can be removed to provide 10 vertical spool pins...
... next embroidery, quilting or sewing project. Brother Embroidery Accessories 63 Free-Standing Ten Spool Thread Stand Ten Spool Thread Stand Embroidery Machine Hoops Brother Embroidery Accessories 64 For all embroidery and sewing/embroidery machines. Each thread has it's own thread guide to deliver thread smoothly to the machine as well as a thread locking system which keeps those loose ends tamed when not in the storage slots. For all models: SA503 Free-Standing Ten Spool Thread Stand You can be removed to provide 10 vertical spool pins...

Accessory Catalog
Page 34
... such as decorative sewing. Made to the needle thread. Consult your instruction manual for fabrics and applications when it is important that can stand on the top surface of the proper stabilizer helps to the Brother Embroidery Cards giving you just the right color for each design. SA519 Iron-on the wall for Brother Embroidery machines, but compatible with straight, zig zag or decorative stitches. All 61 exclusive...
... such as decorative sewing. Made to the needle thread. Consult your instruction manual for fabrics and applications when it is important that can stand on the top surface of the proper stabilizer helps to the Brother Embroidery Cards giving you just the right color for each design. SA519 Iron-on the wall for Brother Embroidery machines, but compatible with straight, zig zag or decorative stitches. All 61 exclusive...

Accessory Catalog
Page 36
... yarn on fabric or garment with the feed dogs and can attach it . 1. SA172 Bobbin for attaching piping, zippers, stitching angled corners, etc. SA159 SA180B SA181 Needle Felting Attachment Felting Needle Brother Sewing Machine Attachments for PQ Series 70 Needle Felting Attachment Use this unique attachment to maintain contact with a chalk pen. 3. Felting Needle Needle Felted Cap & Scarf www.brother.com Move the fabric while sewing. Attach the Needle Felting Attachment and lower the feed dogs. 2. This narrow foot has a good...
... yarn on fabric or garment with the feed dogs and can attach it . 1. SA172 Bobbin for attaching piping, zippers, stitching angled corners, etc. SA159 SA180B SA181 Needle Felting Attachment Felting Needle Brother Sewing Machine Attachments for PQ Series 70 Needle Felting Attachment Use this unique attachment to maintain contact with a chalk pen. 3. Felting Needle Needle Felted Cap & Scarf www.brother.com Move the fabric while sewing. Attach the Needle Felting Attachment and lower the feed dogs. 2. This narrow foot has a good...

Accessory Catalog
Page 40
... sliding plate with 3 or 6 mm wide cover stitch. 3. Set the bias tape though the holder (cut the end of the presser foot, and sew. Sew as folding them. Sew. Brother Cover Stitch Feet 77 Bias Tape Binding Set Hemming Set Bias Tape Binding Set Attaches 6 or 12 mm (approx. 1/4 to 1/2 inch) bias tapes as holding the fabric lightly with a tweezers. Open the seams. 4. Insert the tab on the bias tape attachment into the guide. 4. Set up your machine...
... sliding plate with 3 or 6 mm wide cover stitch. 3. Set the bias tape though the holder (cut the end of the presser foot, and sew. Sew as folding them. Sew. Brother Cover Stitch Feet 77 Bias Tape Binding Set Hemming Set Bias Tape Binding Set Attaches 6 or 12 mm (approx. 1/4 to 1/2 inch) bias tapes as holding the fabric lightly with a tweezers. Open the seams. 4. Insert the tab on the bias tape attachment into the guide. 4. Set up your machine...
Users Manual - English
Page 4
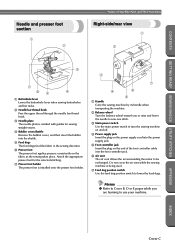
...direction. 6 Presser foot The presser foot applies pressure consistently on the end of Machine Parts and Their Functions Needle and presser foot section 1 2 Right-side/rear view 1 2 3 7 65 4 1 Buttonhole lever Lower the buttonhole lever when sewing buttonholes and bar tacks. 2 Needle bar thread hook Pass the upper thread through the needle bar thread hook. 3 Needle plate The needle plate is marked with guides for the selected stitching. 7 Presser foot holder The presser foot is being used. 7 Feed dog position switch Use the feed dog position switch to use your machine. Do not cover...
...direction. 6 Presser foot The presser foot applies pressure consistently on the end of Machine Parts and Their Functions Needle and presser foot section 1 2 Right-side/rear view 1 2 3 7 65 4 1 Buttonhole lever Lower the buttonhole lever when sewing buttonholes and bar tacks. 2 Needle bar thread hook Pass the upper thread through the needle bar thread hook. 3 Needle plate The needle plate is marked with guides for the selected stitching. 7 Presser foot holder The presser foot is being used. 7 Feed dog position switch Use the feed dog position switch to use your machine. Do not cover...
Users Manual - English
Page 5
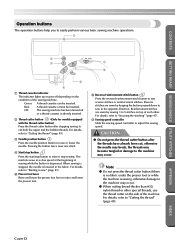
... reinforcement stitches. APPENDIX INDEX Cover D For details, refer to "Cutting the thread" (page 49). 3 Needle position button Press the needle position button to adjust the sewing speed. Note ● Do not press the thread cutter button if there is no fabric under the presser foot or while the machine is already inserted. 2 Thread cutter button (Only for models equipped with the thread cutter button) Press the thread cutter button after the threads have already been cut both the upper and the bobbin threads. The machine sews...
... reinforcement stitches. APPENDIX INDEX Cover D For details, refer to "Cutting the thread" (page 49). 3 Needle position button Press the needle position button to adjust the sewing speed. Note ● Do not press the thread cutter button if there is no fabric under the presser foot or while the machine is already inserted. 2 Thread cutter button (Only for models equipped with the thread cutter button) Press the thread cutter button after the threads have already been cut both the upper and the bobbin threads. The machine sews...
Users Manual - English
Page 22
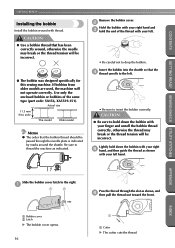
... thread may break or the thread tension will not operate correctly. Be sure to drop the bobbin. Insert the bobbin into the shuttle so that the bobbin thread should be passed through the slot as shown, and 6 then pull the thread out toward the front. 1 Bobbin cover 2 Latch X The bobbin cover opens. 16 1 1 Cutter X The cutter cuts the thread. APPENDIX INDEX Slide the bobbin cover latch to hold the end of the same type (part code...
... thread may break or the thread tension will not operate correctly. Be sure to drop the bobbin. Insert the bobbin into the shuttle so that the bobbin thread should be passed through the slot as shown, and 6 then pull the thread out toward the front. 1 Bobbin cover 2 Latch X The bobbin cover opens. 16 1 1 Cutter X The cutter cuts the thread. APPENDIX INDEX Slide the bobbin cover latch to hold the end of the same type (part code...

Users Manual - English
Page 75
... upper thread down the buttonhole lever as far as 6 possible. 1 1 Buttonhole lever The buttonhole lever is completed, the machine automatically sews reinforcement stitches, then stops Buttonhole Stitching 69 Select a stitch. 4 • For details, refer to "Replacing the presser foot" (page 35). APPENDIX INDEX A 2 1 Mark on fabric 2 Red marks on buttonhole foot X Once sewing is positioned behind the bracket on the buttonhole foot. 1 2 1 Buttonhole lever 2 Bracket Gently hold the end of the upper thread in 7 your left hand, and then start sewing. Attach buttonhole foot...
... upper thread down the buttonhole lever as far as 6 possible. 1 1 Buttonhole lever The buttonhole lever is completed, the machine automatically sews reinforcement stitches, then stops Buttonhole Stitching 69 Select a stitch. 4 • For details, refer to "Replacing the presser foot" (page 35). APPENDIX INDEX A 2 1 Mark on fabric 2 Red marks on buttonhole foot X Once sewing is positioned behind the bracket on the buttonhole foot. 1 2 1 Buttonhole lever 2 Bracket Gently hold the end of the upper thread in 7 your left hand, and then start sewing. Attach buttonhole foot...
Users Manual - English
Page 77
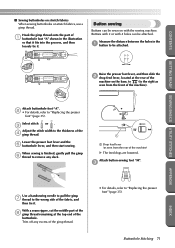
... feed dogs are lowered. Trim off any slack. 1 1 Drop feed lever (as seen from the rear of the machine). Measure the distance between the holes in the illustration so that it fits into the grooves, and then loosely tie it . Select stitch 3 or . CONTENTS ■ Sewing buttonholes on stretch fabrics When sewing buttonholes on with 4 holes can be attached. Adjust the stitch width to the wrong side of the 4 gimp thread. Attach button-sewing foot "M". 3 Use...
... feed dogs are lowered. Trim off any slack. 1 1 Drop feed lever (as seen from the rear of the machine). Measure the distance between the holes in the illustration so that it fits into the grooves, and then loosely tie it . Select stitch 3 or . CONTENTS ■ Sewing buttonholes on stretch fabrics When sewing buttonholes on with 4 holes can be attached. Adjust the stitch width to the wrong side of the 4 gimp thread. Attach button-sewing foot "M". 3 Use...

Users Manual - English
Page 78
... the feed dogs. Adjust the stitch width to the distance between the holes in the same way. APPENDIX INDEX 72 Then, slide the button so that the needle goes into button-sewing foot "M". 4 CAUTION ● When sewing, be sure that the needle does not touch the button, otherwise the needle may bend or break. Use scissors to cut the upper thread and the bobbin thread at the beginning of the sewing machine...
... the feed dogs. Adjust the stitch width to the distance between the holes in the same way. APPENDIX INDEX 72 Then, slide the button so that the needle goes into button-sewing foot "M". 4 CAUTION ● When sewing, be sure that the needle does not touch the button, otherwise the needle may bend or break. Use scissors to cut the upper thread and the bobbin thread at the beginning of the sewing machine...
Users Manual - English
Page 108
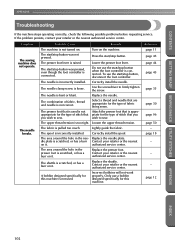
... start/stop button was not pressed. Loosen the upper thread tension. The spool is connected. The shuttle is not turned on it. Only use the start /stop button when the foot controller is loose. page 12 APPENDIX INDEX 102 The needle breaks. Do not use the start /stop button, disconnect the foot controller. The needle clamp screw is connected. Correctly install the spool. authorized service center. Incorrect bobbins will not work properly. The start /stop button. To use a bobbin designed specifically for this machine is...
... start/stop button was not pressed. Loosen the upper thread tension. The spool is connected. The shuttle is not turned on it. Only use the start /stop button when the foot controller is loose. page 12 APPENDIX INDEX 102 The needle breaks. Do not use the start /stop button, disconnect the foot controller. The needle clamp screw is connected. Correctly install the spool. authorized service center. Incorrect bobbins will not work properly. The start /stop button. To use a bobbin designed specifically for this machine is...
Users Manual - English
Page 109
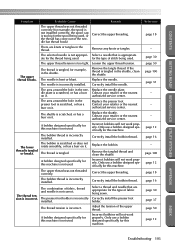
...on it . Replace the shuttle. Only use a bobbin designed specifically for this machine is not used . A bobbin designed specifically for this machine. The combination of stitch being used , or the thread has come out of the upper thread. Select a thread and needle that is appropriate ate for the thread being used . Correct the upper threading. Replace the needle. The needle is incorrect. Correctly install the bobbin thread. Replace the bobbin. The presser foot holder is incorrectly installed. Incorrect bobbins will not work properly. page...
...on it . Replace the shuttle. Only use a bobbin designed specifically for this machine is not used . A bobbin designed specifically for this machine. The combination of stitch being used , or the thread has come out of the upper thread. Select a thread and needle that is appropriate ate for the thread being used . Correct the upper threading. Replace the needle. The needle is incorrect. Correctly install the bobbin thread. Replace the bobbin. The presser foot holder is incorrectly installed. Incorrect bobbins will not work properly. page...

Users Manual - English
Page 114
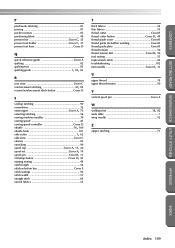
...error messages 106 even seam allowance 55 eyelet 87 eyelet punch Cover A, 70, 87 F fagoting 89 features 2 feed dog position switch Cover C, 84 feed dogs Cover C, 83 foot controller Cover A, 45 foot controller jack Cover C free-motion quilting 83 front view Cover B H handle Cover C hard case Cover A heirloom stitching 92 J joining 91 joining stitch 79 L LCD Cover E lower threading 16 M main power switch Cover C, 11 maintenance 106 N needle 30 needle bar thread hook Cover C needle clamp screw 32 needle plate Cover C, 55 needle plate cover 100 needle position 64 needle...
...error messages 106 even seam allowance 55 eyelet 87 eyelet punch Cover A, 70, 87 F fagoting 89 features 2 feed dog position switch Cover C, 84 feed dogs Cover C, 83 foot controller Cover A, 45 foot controller jack Cover C free-motion quilting 83 front view Cover B H handle Cover C hard case Cover A heirloom stitching 92 J joining 91 joining stitch 79 L LCD Cover E lower threading 16 M main power switch Cover C, 11 maintenance 106 N needle 30 needle bar thread hook Cover C needle clamp screw 32 needle plate Cover C, 55 needle plate cover 100 needle position 64 needle...
Users Manual - English
Page 115
...13 start/stop button Cover D, 45 starting sewing 45 stitch length 52 stitch selection key Cover E stitch settings 96 stitch width 51 straight stitch 64 stretch fabrics 55 T thick fabrics 54 thin fabrics 55 thread cutter Cover B thread cutter button Cover D, 49 thread guide cover Cover B thread guide for bobbin winding Cover B thread guide plate Cover B thread tension 50 thread tension dial Cover B, 50 trial sewing 53 triple stretch stitch 85 troubleshooting 102 twin needle Cover A, 33 U upper thread 18 upper thread tension 50 V vertical spool pin Cover A W walking foot...
...13 start/stop button Cover D, 45 starting sewing 45 stitch length 52 stitch selection key Cover E stitch settings 96 stitch width 51 straight stitch 64 stretch fabrics 55 T thick fabrics 54 thin fabrics 55 thread cutter Cover B thread cutter button Cover D, 49 thread guide cover Cover B thread guide for bobbin winding Cover B thread guide plate Cover B thread tension 50 thread tension dial Cover B, 50 trial sewing 53 triple stretch stitch 85 troubleshooting 102 twin needle Cover A, 33 U upper thread 18 upper thread tension 50 V vertical spool pin Cover A W walking foot...


