
Users Manual - English
Page 5
...speed controller (for models equipped with the start/stop button 10 Changing the needle stop position ...10 THREADING THE MACHINE 11 Winding the bobbin ...11 Lower threading ...14 Upper threading ...16 Drawing up the lower thread ...19 REPLACING THE NEEDLE 20 Needle precautions ...20 Needle...the presser foot holder ...25 2. SEWING BASICS 26 SEWING ...26 General sewing procedure ...26 Selecting stitching ...27 Starting to sew ...28 Thread tension ...29 USEFUL SEWING TIPS ...30 Trial sewing ...30 Changing the sewing direction ...30 Sewing curves ...30 Sewing thick fabrics ...30 Sewing thin ...
...speed controller (for models equipped with the start/stop button 10 Changing the needle stop position ...10 THREADING THE MACHINE 11 Winding the bobbin ...11 Lower threading ...14 Upper threading ...16 Drawing up the lower thread ...19 REPLACING THE NEEDLE 20 Needle precautions ...20 Needle...the presser foot holder ...25 2. SEWING BASICS 26 SEWING ...26 General sewing procedure ...26 Selecting stitching ...27 Starting to sew ...28 Thread tension ...29 USEFUL SEWING TIPS ...30 Trial sewing ...30 Changing the sewing direction ...30 Sewing curves ...30 Sewing thick fabrics ...30 Sewing thin ...
Users Manual - English
Page 7
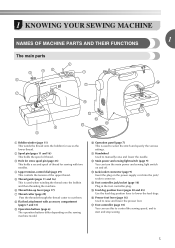
...lever (page 16) Used to lower the feed dogs. e Thread guide (pages 11 and 16) This is used when winding the thread onto the bobbin and then threading the machine. f Thread take-up lever (page 17) g Thread cutter (page 29) Pass the threads through the thread cutter to... (page 11) This winds the thread onto the bobbin for sewing with accessory compartment (pages 7 and 31) i Operation buttons (page 6) The operation buttons differ depending on the sewing machine model. d Upper tension-control dial (page 29) This controls the tension of thread. q Foot controller (page 10) You can turn ...
...lever (page 16) Used to lower the feed dogs. e Thread guide (pages 11 and 16) This is used when winding the thread onto the bobbin and then threading the machine. f Thread take-up lever (page 17) g Thread cutter (page 29) Pass the threads through the thread cutter to... (page 11) This winds the thread onto the bobbin for sewing with accessory compartment (pages 7 and 31) i Operation buttons (page 6) The operation buttons differ depending on the sewing machine model. d Upper tension-control dial (page 29) This controls the tension of thread. q Foot controller (page 10) You can turn ...
Users Manual - English
Page 13
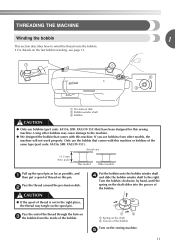
... shaft slides into the groove of the bobbin. 1 2 a Spring on the shaft b Groove of the bobbin. Using other models, the machine will not work properly. a Pre-tension disk b Bobbin winder shaft c Bobbin CAUTION ● Only use bobbins from the inside of the bobbin Turn on the spool pin. If you use bobbins (part code: SA156, SFB: XA5539-151...
... shaft slides into the groove of the bobbin. 1 2 a Spring on the shaft b Groove of the bobbin. Using other models, the machine will not work properly. a Pre-tension disk b Bobbin winder shaft c Bobbin CAUTION ● Only use bobbins from the inside of the bobbin Turn on the spool pin. If you use bobbins (part code: SA156, SFB: XA5539-151...
Users Manual - English
Page 14
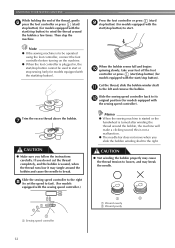
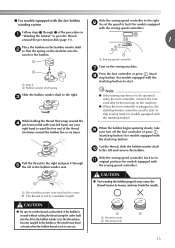
...or stop sewing (only for models equipped with the start/stop button). CAUTION ● Not winding the bobbin properly may cause the thread tension to loosen, and may tangle around the bobbin and cause the needle to break. Slide the sewing speed controller back to its l original position (...thread runs low it may break the needle. 1 2 a Wound evenly b Wound poorly a Sewing speed controller 12 Trim the excess thread above the bobbin. KNOWING YOUR SEWING MACHINE While holding the end of the thread, gently f press the foot controller or press (start/ stop button) (for models ...
...or stop sewing (only for models equipped with the start/stop button). CAUTION ● Not winding the bobbin properly may cause the thread tension to loosen, and may tangle around the bobbin and cause the needle to break. Slide the sewing speed controller back to its l original position (...thread runs low it may break the needle. 1 2 a Wound evenly b Wound poorly a Sewing speed controller 12 Trim the excess thread above the bobbin. KNOWING YOUR SEWING MACHINE While holding the end of the thread, gently f press the foot controller or press (start/ stop button) (for models ...
Users Manual - English
Page 15
...used to start or stop button). a Slit in bobbin winder seat (with built-in the bobbin or the needle may cause the thread tension to cut to a suitable length. CAUTION ● Not winding the bobbin properly may bend or break when the bobbin thread starts to run out. 1 2 a ...the free end of the procedure in a "Winding the bobbin" to pass the thread around the pre-tension disk (page 11). 1 Place the bobbin on the sewing machine. a Sewing speed controller a Notch b Bobbin winder shaft spring Slide the bobbin winder shaft to its k original position (for models ...
...used to start or stop button). a Slit in bobbin winder seat (with built-in the bobbin or the needle may cause the thread tension to cut to a suitable length. CAUTION ● Not winding the bobbin properly may bend or break when the bobbin thread starts to run out. 1 2 a ...the free end of the procedure in a "Winding the bobbin" to pass the thread around the pre-tension disk (page 11). 1 Place the bobbin on the sewing machine. a Sewing speed controller a Notch b Bobbin winder shaft spring Slide the bobbin winder shaft to its k original position (for models ...
Users Manual - English
Page 16
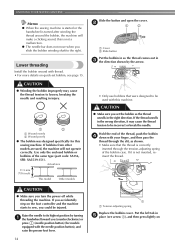
... the needle and resulting in injury. 1 2 a Wound evenly b Wound poorly ● The bobbin was designed specifically for models equipped with this machine. CAUTION ● Winding the bobbin improperly may cause the thread tension to sew, you could be incorrect or break the needle. Use only the enclosed...unrolls in e place (see page 15. If you accidentally step on Lower threading Install the bobbin wound with your finger, and then pass the thread through the tension-adjusting spring of the bobbin case. Hold the end of the same type (part code: SA156, SFB: XA5539-151). ...
... the needle and resulting in injury. 1 2 a Wound evenly b Wound poorly ● The bobbin was designed specifically for models equipped with this machine. CAUTION ● Winding the bobbin improperly may cause the thread tension to sew, you could be incorrect or break the needle. Use only the enclosed...unrolls in e place (see page 15. If you accidentally step on Lower threading Install the bobbin wound with your finger, and then pass the thread through the tension-adjusting spring of the bobbin case. Hold the end of the same type (part code: SA156, SFB: XA5539-151). ...
Users Manual - English
Page 17
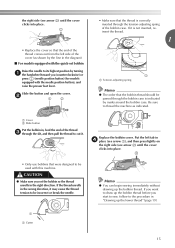
...that the thread is correctly inserted through the bobbin case is not inserted, reinsert the thread. 1 1 a Tension-adjusting spring Memo ● The order that the bobbin thread should be passed through the tension-adjusting spring of the bobbin case. Replace the bobbin cover. Put the left side of the ...needle. 1 a Cutter Memo ● You can begin sewing immediately without drawing up the bobbin thread. CAUTION ● Make sure you start to sew, follow to cut it may cause the thread tension to its highest position by turning a the handwheel toward you (counterclockwise) or press (...
...that the thread is correctly inserted through the bobbin case is not inserted, reinsert the thread. 1 1 a Tension-adjusting spring Memo ● The order that the bobbin thread should be passed through the tension-adjusting spring of the bobbin case. Replace the bobbin cover. Put the left side of the ...needle. 1 a Cutter Memo ● You can begin sewing immediately without drawing up the bobbin thread. CAUTION ● Make sure you start to sew, follow to cut it may cause the thread tension to its highest position by turning a the handwheel toward you (counterclockwise) or press (...

Users Manual - English
Page 52
.... e Stitch between the straight stitches. a a 1 cm (3/8 inch) • Do not sew reverse/reinforcement stitches or cut the thread. b Select stitch , and then increase the thread c tension. • For details, refer to fabric. Sew while making sure that look like shells are used to decorate trims, the front of blouses or cuffs... drops d slightly off the edge of thin fabrics. It is called "shell tucks". UTILITY STITCHES Smocking The decorative stitch created by ironing them. Pull the bobbin threads to "Selecting stitching" (page 27) and "Thread tension" (page 29).
.... e Stitch between the straight stitches. a a 1 cm (3/8 inch) • Do not sew reverse/reinforcement stitches or cut the thread. b Select stitch , and then increase the thread c tension. • For details, refer to fabric. Sew while making sure that look like shells are used to decorate trims, the front of blouses or cuffs... drops d slightly off the edge of thin fabrics. It is called "shell tucks". UTILITY STITCHES Smocking The decorative stitch created by ironing them. Pull the bobbin threads to "Selecting stitching" (page 27) and "Thread tension" (page 29).
Users Manual - English
Page 61
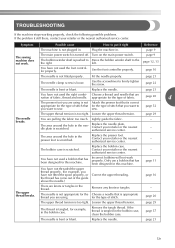
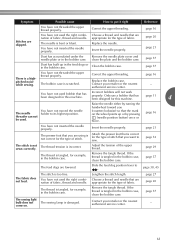
... been designed for this machine. Replace the needle. sew. Loosen the upper thread tension. breaks. The area around the hole in the bobbin case, clean the bobbin case. authorized service center. Only use a bobbin that you want to sew. Remove the tangle thread. Turn on the main power... are pulling the fabric too much. There are using . page 21 59 page 10 The needle is scratched. The bobbin case is not fitted properly. Loosen the upper thread tension. Replace the needle plate. page 22 The needle is too tight. page 20 The upper thread...
... been designed for this machine. Replace the needle. sew. Loosen the upper thread tension. breaks. The area around the hole in the bobbin case, clean the bobbin case. authorized service center. Only use a bobbin that you want to sew. Remove the tangle thread. Turn on the main power... are pulling the fabric too much. There are using . page 21 59 page 10 The needle is scratched. The bobbin case is not fitted properly. Loosen the upper thread tension. Replace the needle plate. page 22 The needle is too tight. page 20 The upper thread...
Users Manual - English
Page 62
... Contact your retailer or the nearest authorised service center. Only use a bobbin that are using. Adjust the tension of thread and needle for the fabric you are appropriate for this machine. Reset the bobbin thread correctly. Fit the spool properly. Choose a thread and needle that...been designed for this machine. Sew with stabiliser material under the fabric. Adjust the tension of fabric. Reference page 21 - - - page 11 page 11 - The bobbin case is scratched. The thread tension is tangled. You have not inserted the needle properly. You have not threaded ...
... Contact your retailer or the nearest authorised service center. Only use a bobbin that are using. Adjust the tension of thread and needle for the fabric you are appropriate for this machine. Reset the bobbin thread correctly. Fit the spool properly. Choose a thread and needle that...been designed for this machine. Sew with stabiliser material under the fabric. Adjust the tension of fabric. Reference page 21 - - - page 11 page 11 - The bobbin case is scratched. The thread tension is tangled. You have not inserted the needle properly. You have not threaded ...
Users Manual - English
Page 63
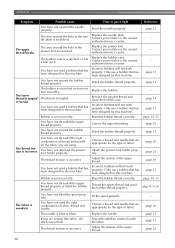
... the type of stitch that are appropriate for this machine. Attach the presser foot that are using is tangled in the bobbin case. page 52 The stitch is incorrect. Adjust the tension of fabric. If the thread is not correct for the type of fabric. page 38, 45 The fabric does not... feed. Lengthen the stitch length. Symptom Possible cause How to put it right Reference You have not used the right combination of fabric, thread and needle. Clean the bobbin case. The bobbin...
... the type of stitch that are appropriate for this machine. Attach the presser foot that are using is tangled in the bobbin case. page 52 The stitch is incorrect. Adjust the tension of fabric. If the thread is not correct for the type of fabric. page 38, 45 The fabric does not... feed. Lengthen the stitch length. Symptom Possible cause How to put it right Reference You have not used the right combination of fabric, thread and needle. Clean the bobbin case. The bobbin...
Users Manual - English
Page 65
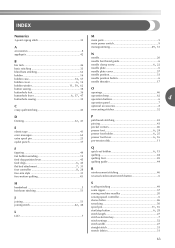
...monogramming 49 51 accessories 8 appliqués 42 N needle 20 B bar tack 46 basic stitching 33 blind hem stitching 34 bobbin 14 , bobbin case 14 57 , bobbin cover 6 14 bobbin , winder 11 59, 62 button sewing 38 needle bar thread guide 6 , needle clamp screw 6 22 needle plate ...43 piecing 43 pocket corners 46 , presser foot 6 24 , presser foot holder 6 25 , presser foot lever 6 16 pre-tension disk 11 Q , quick-set bobbin 6 15 quilting 44 quilting foot 45 quilting guide 44 R reinforcement stitching 46 reverse/reinforcement stitch button 6 H handwheel 5 heirloom ...
...monogramming 49 51 accessories 8 appliqués 42 N needle 20 B bar tack 46 basic stitching 33 blind hem stitching 34 bobbin 14 , bobbin case 14 57 , bobbin cover 6 14 bobbin , winder 11 59, 62 button sewing 38 needle bar thread guide 6 , needle clamp screw 6 22 needle plate ...43 piecing 43 pocket corners 46 , presser foot 6 24 , presser foot holder 6 25 , presser foot lever 6 16 pre-tension disk 11 Q , quick-set bobbin 6 15 quilting 44 quilting foot 45 quilting guide 44 R reinforcement stitching 46 reverse/reinforcement stitch button 6 H handwheel 5 heirloom ...


