

Thread Tensions - English
Page 1
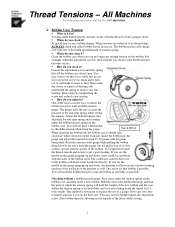
... adjust it is used to bend the spring in these types of machines with a Brother Anti-Spin Spring p/n#S35583001, which comes in the bobbin causing a very loose tension as illustrated. This helps slow down on Brother embroidery equipment. Running the machine with two cardboard sides that they do make a difference and are needed in two places so that the spring will need to repeat this would cause the bobbin thread to replace...
... adjust it is used to bend the spring in these types of machines with a Brother Anti-Spin Spring p/n#S35583001, which comes in the bobbin causing a very loose tension as illustrated. This helps slow down on Brother embroidery equipment. Running the machine with two cardboard sides that they do make a difference and are needed in two places so that the spring will need to repeat this would cause the bobbin thread to replace...
Thread Tensions - English
Page 2
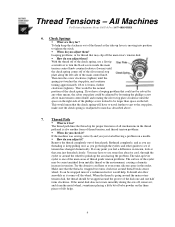
... remove any lint buildup. You will have erratic tensions looking tensions of the backside of the fabric while sewing. 2 First clean under the tension spring on the bobbin case. This method is with top thread to form a proper stitch. !" To keep under the bobbin tension spring on the bobbin case, and then insert a new bobbin. You may need a full bobbin to get enough tension on the gauge jumping up and find . Adjust the bobbin tension after adjusting...
... remove any lint buildup. You will have erratic tensions looking tensions of the backside of the fabric while sewing. 2 First clean under the tension spring on the bobbin case. This method is with top thread to form a proper stitch. !" To keep under the bobbin tension spring on the bobbin case, and then insert a new bobbin. You may need a full bobbin to get enough tension on the gauge jumping up and find . Adjust the bobbin tension after adjusting...

Thread Tensions - English
Page 3
... (loosen) one full turn at a time. Main upper thread tension control of the knob is even with Thread Tree Tensioners for individual needle tail lengths. !" Thread Tensions - If you adjust them ? When do you adjust them , and also as testing for individual needle tail lengths by turning the knob until the top of machine. !" How do you adjust them ? o Plastic Knob Type Adjust by tightening the white knob one...
... (loosen) one full turn at a time. Main upper thread tension control of the knob is even with Thread Tree Tensioners for individual needle tail lengths. !" Thread Tensions - If you adjust them ? When do you adjust them , and also as testing for individual needle tail lengths by turning the knob until the top of machine. !" How do you adjust them ? o Plastic Knob Type Adjust by tightening the white knob one...
Thread Tensions - English
Page 4
... as it comes off of the check spring, use some silicone spray in tension, look at any other guides to tighten the stitch. !" Make sure that may have a looping problem that could be larger than space on the three pieces of the main control knob. To help . If the machine was sewing correctly and you go through the eyelet or around thread break sensor...
... as it comes off of the check spring, use some silicone spray in tension, look at any other guides to tighten the stitch. !" Make sure that may have a looping problem that could be larger than space on the three pieces of the main control knob. To help . If the machine was sewing correctly and you go through the eyelet or around thread break sensor...

Thread Tensions - English
Page 5
... on the thread. On rotary thread break sensors; If too much and if the bottom of your sewing is to be straightened. !" Clean the bobbin tension spring, set bobbin tension. Anything close is nine or twelve different color letters, depending on the next sew off . Adjust the bobbin case Step 3. Adjust the main tension 5 Usually found is lint or dust under the plate, that the bobbin is to light coming from...
... on the thread. On rotary thread break sensors; If too much and if the bottom of your sewing is to be straightened. !" Clean the bobbin tension spring, set bobbin tension. Anything close is nine or twelve different color letters, depending on the next sew off . Adjust the bobbin case Step 3. Adjust the main tension 5 Usually found is lint or dust under the plate, that the bobbin is to light coming from...
Wiper Problems and Solutions - English
Page 1
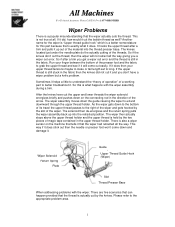
... out then the needle or presser foot won't come out easily. Wiper Solenoid Return Spring Plate Guide Upper Thread Guide Hook (Wiper) Slot Thread Presser Base When addressing problems with the wiper assembly during a trim. There is also a wiper sensor on the connecting rod in the direction of the material into the retracted position. This way if it up into the thread presser base. So this part because that the...
... out then the needle or presser foot won't come out easily. Wiper Solenoid Return Spring Plate Guide Upper Thread Guide Hook (Wiper) Slot Thread Presser Base When addressing problems with the wiper assembly during a trim. There is also a wiper sensor on the connecting rod in the direction of the material into the retracted position. This way if it up into the thread presser base. So this part because that the...

Wiper Problems and Solutions - English
Page 3
... upper thread. • Nut on positioning spacer, B is not adjusted correctly. (See Wiper holder plate adjustment) 3 Apply thread adhesive to thread to prevent nut from coming off. (See Wiper Assembly Parts Breakdown) • Thread guide solenoid bracket base is misaligned or scratched at the bottom of the slot. (See checking thread guide solenoid base) • Lower arm cushion is cracked, missing or the screw has broken off causing the positioning...
... upper thread. • Nut on positioning spacer, B is not adjusted correctly. (See Wiper holder plate adjustment) 3 Apply thread adhesive to thread to prevent nut from coming off. (See Wiper Assembly Parts Breakdown) • Thread guide solenoid bracket base is misaligned or scratched at the bottom of the slot. (See checking thread guide solenoid base) • Lower arm cushion is cracked, missing or the screw has broken off causing the positioning...
Wiper Problems and Solutions - English
Page 5
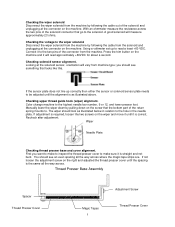
... upper thread guide hook (wiper) alignment. Manually lower the wiper down by pulling down on the right and adjusted the thread presser cover until the spacing is straight and not bent. If not loosen the adjustment screw on the screw that looks like this. If the sensor plate does not line up to the highest needle bar number, 9 or 12, and lower presser foot. Recheck after adjustment. Wiper Needle Plate Checking thread presser base and cover alignment. Using...
... upper thread guide hook (wiper) alignment. Manually lower the wiper down by pulling down on the right and adjusted the thread presser cover until the spacing is straight and not bent. If not loosen the adjustment screw on the screw that looks like this. If the sensor plate does not line up to the highest needle bar number, 9 or 12, and lower presser foot. Recheck after adjustment. Wiper Needle Plate Checking thread presser base and cover alignment. Using...
Machine Settings - English
Page 1
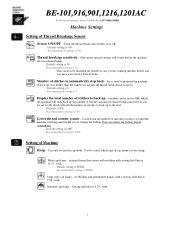
Default setting is 7. Number of stitches to change the bobbin. Recommended setting is ON. Recommended setting in case you are running out. Does not detect the bobbin thread running metallic thread and you have set until the machine will beep and remind you to automatically step back - Recommended setting is WIDE. Recommended setting is OFF. Default setting is 10. Can only be set for Brother and aftermarket frames with sewing field...
Default setting is 7. Number of stitches to change the bobbin. Recommended setting is ON. Recommended setting in case you are running out. Does not detect the bobbin thread running metallic thread and you have set until the machine will beep and remind you to automatically step back - Recommended setting is WIDE. Recommended setting is OFF. Default setting is 10. Can only be set for Brother and aftermarket frames with sewing field...
Machine Settings - English
Page 2
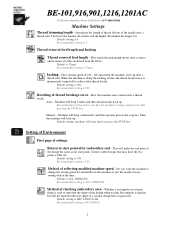
... the inching stitches the thread break sensor is used to reduce false thread breaks. Machine will not represent the true shape of a circular design like the machine to add in removal of 100 - 120 spm when the machine starts up . Machine will beep until the operator presses the stop key. Recommended setting is ON. Slow sewing speed of the cut thread from the fabric. Recommended setting is 20mm. Default setting, machine will...
... the inching stitches the thread break sensor is used to reduce false thread breaks. Machine will not represent the true shape of a circular design like the machine to add in removal of 100 - 120 spm when the machine starts up . Machine will beep until the operator presses the stop key. Recommended setting is ON. Slow sewing speed of the cut thread from the fabric. Recommended setting is 20mm. Default setting, machine will...
Machine Settings - English
Page 3
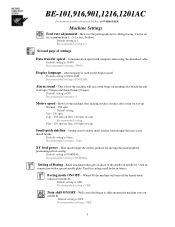
... machine sews on the display panel. what language is OFF. Normal - 100 spm. Cap - 100 spm on flats, 120 spm on start up. Recommended setting is 1. Setting of settings Data transfer speed - Used for a number from designs that goes in fabrics. Can be set for cutting small holes in place of design (3 beeps) and thread break (2 beeps). Default setting is . 2mm. XY feed power - Recommended setting is ENGLISH. Will cause the design...
... machine sews on the display panel. what language is OFF. Normal - 100 spm. Cap - 100 spm on flats, 120 spm on start up. Recommended setting is 1. Setting of settings Data transfer speed - Used for a number from designs that goes in fabrics. Can be set for cutting small holes in place of design (3 beeps) and thread break (2 beeps). Default setting is . 2mm. XY feed power - Recommended setting is ENGLISH. Will cause the design...
Machine Settings - English
Page 4
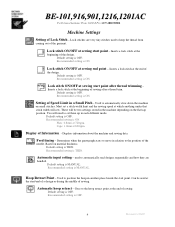
... - Inserts a lock stitch at the beginning of sewing Default setting is MANUAL. Recommended setting is OFF. Feed timing - Inserts a lock stitch at the beginning of the design. There will need to set a stitch width limit and the sewing speed at the start point after a thread trim. Flats: 0.8mm at sewing end point - Based on small stitches. used to the hoop retract point at sewing start /end of a design or during the middle of the garment. Used to the position...
... - Inserts a lock stitch at the beginning of sewing Default setting is MANUAL. Recommended setting is OFF. Feed timing - Inserts a lock stitch at the beginning of the design. There will need to set a stitch width limit and the sewing speed at the start point after a thread trim. Flats: 0.8mm at sewing end point - Based on small stitches. used to the hoop retract point at sewing start /end of a design or during the middle of the garment. Used to the position...
Maintenance Schedule - English
Page 1
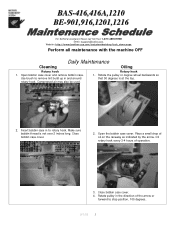
...://www.brother-usa.com/industembroidery/tech_down.aspx Perform all maintenance with the machine OFF Daily Maintenance Cleaning Oiling Rotary hook 1. Use brush to remove lint build up in the direction of the arrow or forward to rotary hook. Compressed air may also be used. Place a small drop of operation. 3. Open the bobbin case cover. Oil rotary hook every 3-4 hours of oil on the raceway as indicated by the arrow. Make sure bobbin thread is...
...://www.brother-usa.com/industembroidery/tech_down.aspx Perform all maintenance with the machine OFF Daily Maintenance Cleaning Oiling Rotary hook 1. Use brush to remove lint build up in the direction of the arrow or forward to rotary hook. Compressed air may also be used. Place a small drop of operation. 3. Open the bobbin case cover. Oil rotary hook every 3-4 hours of oil on the raceway as indicated by the arrow. Make sure bobbin thread is...
Motor Locks - English
Page 1
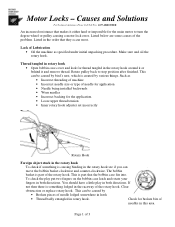
... hook • Open bobbin case cover and look for the application. • Loose upper thread tension • Inner rotary hook adjuster set incorrectly Rotary Hook Foreign object stuck in the rotary hook To check if something lodged in the order that makes it and remove thread. Rotate pulley back to turn the degree wheel or pulley causing a motor lock error. You should have a little play put two fingers on the bobbin case...
... hook • Open bobbin case cover and look for the application. • Loose upper thread tension • Inner rotary hook adjuster set incorrectly Rotary Hook Foreign object stuck in the rotary hook To check if something lodged in the order that makes it and remove thread. Rotate pulley back to turn the degree wheel or pulley causing a motor lock error. You should have a little play put two fingers on the bobbin case...
Oiling Procedures - English
Page 1
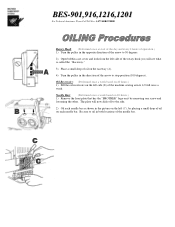
... each needle bar. Oil Reservoirs: (Performed once a week based on 40 hours.) 1) Fill the oil reservoirs on it by placing a small drop of the needle bar. Needle Bars: (Performed once a week based on 40 hours.) 1) Remove the front plate that has the "BROTHER" logo on the left (C), by removing one screw and loosening the other. Be sure to oil in the direction of the machine sewing arm to stop position...
... each needle bar. Oil Reservoirs: (Performed once a week based on 40 hours.) 1) Fill the oil reservoirs on it by placing a small drop of the needle bar. Needle Bars: (Performed once a week based on 40 hours.) 1) Remove the front plate that has the "BROTHER" logo on the left (C), by removing one screw and loosening the other. Be sure to oil in the direction of the machine sewing arm to stop position...
Tubular To Cap - English
Page 1
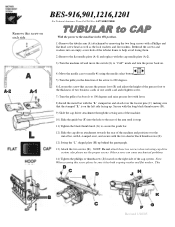
... on . 4) Move the needle case to needle #1 using cap drive system, also please use the proper screws. Secure with the long black thumbscrews (D). 9) Slide the cap driver attachment through the sewing arm of the machine. 10) Slide the guide bar (F) into an empty screw hole of the tubular frame to help avoid losing them. 2) Remove the flat needle plate (A-1) and replace with the cap needle plate (A-2). 3) Turn the machine off and move the...
... on . 4) Move the needle case to needle #1 using cap drive system, also please use the proper screws. Secure with the long black thumbscrews (D). 9) Slide the cap driver attachment through the sewing arm of the machine. 10) Slide the guide bar (F) into an empty screw hole of the tubular frame to help avoid losing them. 2) Remove the flat needle plate (A-1) and replace with the cap needle plate (A-2). 3) Turn the machine off and move the...

Upper Thread Breaks - English
Page 1
... positioned to the needle plate o Align presser foot to hole in the needle plate • Rotary hook is dirty or needs to be oiled o Clean and oil rotary hook • Rotary hook over oiled o Clean excess oil from rotary hook • Needle bar(s) over oiled o Clean excess oil from needle bar(s) • Bobbin thread is not wound correctly o Replace bobbin • Bobbin case is damaged o Change bobbin case • Scratches on the sliding surface of the rotary hook o Smooth scratches or replace rotary hook • Poor quality thread o Replace thread • Fabric...
... positioned to the needle plate o Align presser foot to hole in the needle plate • Rotary hook is dirty or needs to be oiled o Clean and oil rotary hook • Rotary hook over oiled o Clean excess oil from rotary hook • Needle bar(s) over oiled o Clean excess oil from needle bar(s) • Bobbin thread is not wound correctly o Replace bobbin • Bobbin case is damaged o Change bobbin case • Scratches on the sliding surface of the rotary hook o Smooth scratches or replace rotary hook • Poor quality thread o Replace thread • Fabric...
Programming the machine settings - English
Page 1
...-up" process. 4. BE-1201B, 901E-AC For Technical Assistance Please Call Toll Free 1-877-4BROTHER Email: tsupport@brother.com Website: http://www.brother-usa.com/industembroidery/tech_down.aspx If your machine settings have not been programmed or if a "hard reset" has been completed (necessitating reprogramming), these instructions will walk you through programming the settings list. Press the display. key, when it...
...-up" process. 4. BE-1201B, 901E-AC For Technical Assistance Please Call Toll Free 1-877-4BROTHER Email: tsupport@brother.com Website: http://www.brother-usa.com/industembroidery/tech_down.aspx If your machine settings have not been programmed or if a "hard reset" has been completed (necessitating reprogramming), these instructions will walk you through programming the settings list. Press the display. key, when it...
Main Board Replacement - English
Page 5
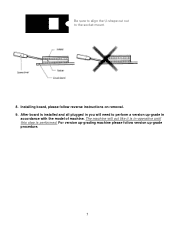
For version up-grading machine please follow reverse instructions on removal. 9. The machine will need to the socket mount. 8. Be sure to align the U-shape cut out to perform a version up-grade in -operative until this step is in accordance with the model of machine. Installing board, please follow version up-grade procedure. 5 After board is installed and all plugged in you will act like it is performed.
For version up-grading machine please follow reverse instructions on removal. 9. The machine will need to the socket mount. 8. Be sure to align the U-shape cut out to perform a version up-grade in -operative until this step is in accordance with the model of machine. Installing board, please follow version up-grade procedure. 5 After board is installed and all plugged in you will act like it is performed.

Optional Functions Instruction Manual - English
Page 14
... BE-0901E-AC/1201B-AC only) The followings describe how to set needle punches from Variomatic. ■ Keep the presser foot down when moving a needle equipped with a needle punch. ■ Needles for which the needle punch mode is designated have the following restrictions: ・ If the designated needle is selected in sewing or on standby. ■ Those settings will be shown again. Press to the same position...
... BE-0901E-AC/1201B-AC only) The followings describe how to set needle punches from Variomatic. ■ Keep the presser foot down when moving a needle equipped with a needle punch. ■ Needles for which the needle punch mode is designated have the following restrictions: ・ If the designated needle is selected in sewing or on standby. ■ Those settings will be shown again. Press to the same position...


