
Users Manual - English
Page 9
... belts, fixing units, print heads, paper feed rollers, transfer rolls, cleaning rollers, waste toner packs, oil bottles) or damage caused by the ...Laser Printer/MFC/Fax machine free of charge if defective in excess of the specifications or with an equivalent or better one through a courier service. Improper packaging may also have other than a Brother...-Brother. BROTHER LASER PRINTER / MULTIFUNCTION CENTER®/ FAX ON-SITE WARRANTY (Canada only) For a limited on-site warranty of 1 year labour and parts from the date of purchase, Brother International Corporation (Canada) Ltd. ("Brother"),...
... belts, fixing units, print heads, paper feed rollers, transfer rolls, cleaning rollers, waste toner packs, oil bottles) or damage caused by the ...Laser Printer/MFC/Fax machine free of charge if defective in excess of the specifications or with an equivalent or better one through a courier service. Improper packaging may also have other than a Brother...-Brother. BROTHER LASER PRINTER / MULTIFUNCTION CENTER®/ FAX ON-SITE WARRANTY (Canada only) For a limited on-site warranty of 1 year labour and parts from the date of purchase, Brother International Corporation (Canada) Ltd. ("Brother"),...
Users Manual - English
Page 15
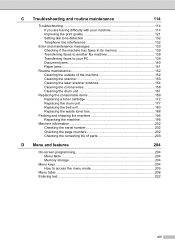
... machine 139 Transferring faxes to your PC 139 Document jams 140 Paper jams 141 Routine maintenance 152 Cleaning the outside of the machine 152 Cleaning the scanner 153 Cleaning the laser scanner windows 154 Cleaning the corona wires 158 Cleaning the drum unit 161 Replacing the consumable items 169 Replacing a toner cartridge 172 Replacing the drum...
... machine 139 Transferring faxes to your PC 139 Document jams 140 Paper jams 141 Routine maintenance 152 Cleaning the outside of the machine 152 Cleaning the scanner 153 Cleaning the laser scanner windows 154 Cleaning the corona wires 158 Cleaning the drum unit 161 Replacing the consumable items 169 Replacing a toner cartridge 172 Replacing the drum...
Users Manual - English
Page 94
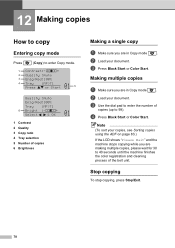
...LCD shows "Please Wait" and the machine stops copying while you are making multiple copies, please wait for 30 to 99). d Press Black Start or Color Start. b Load your document. Stop copying 12 To stop copying, press Stop/Exit. 78 Making multiple copies 12 a Make sure you are in ...Copy mode . c Use the dial pad to enter the number of copies (up to 40 seconds until the machine finishes the color registration and cleaning process of copies 6 Brightness Making a single copy 12 a Make sure you are in Copy mode . b Load your document. c Press Black Start or...
...LCD shows "Please Wait" and the machine stops copying while you are making multiple copies, please wait for 30 to 99). d Press Black Start or Color Start. b Load your document. Stop copying 12 To stop copying, press Stop/Exit. 78 Making multiple copies 12 a Make sure you are in ...Copy mode . c Use the dial pad to enter the number of copies (up to 40 seconds until the machine finishes the color registration and cleaning process of copies 6 Brightness Making a single copy 12 a Make sure you are in Copy mode . b Load your document. c Press Black Start or...
Users Manual - English
Page 115
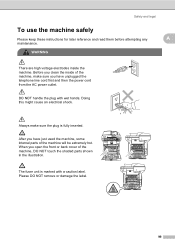
... you open the front or back cover of the machine will be extremely hot. Please DO NOT remove or damage the label. 99 Before you clean the inside the machine. Safety and legal To use the machine safely Please keep these instructions for later reference and read them before attempting any..., make sure the plug is marked with wet hands. DO NOT handle the plug with a caution label. When you have just used the machine, some internal parts of the machine, DO NOT touch the shaded parts shown in the illustration. Doing this might cause an electrical shock. The fuser unit is...
... you open the front or back cover of the machine will be extremely hot. Please DO NOT remove or damage the label. 99 Before you clean the inside the machine. Safety and legal To use the machine safely Please keep these instructions for later reference and read them before attempting any..., make sure the plug is marked with wet hands. DO NOT handle the plug with a caution label. When you have just used the machine, some internal parts of the machine, DO NOT touch the shaded parts shown in the illustration. Doing this might cause an electrical shock. The fuser unit is...

Users Manual - English
Page 116
... starting a fire. DO NOT carry the machine by holding scanner unit. To prevent injuries when moving or lifting this might cause the toner dust to clean up scattered toner. DO NOT use at the wall jack. To prevent injuries, be careful not to put your hands on the edge of the... under the document cover. To prevent injuries, be installed near an AC power outlet that are located at the bottom of the machine. Please carefully clean the toner dust with a dry, lint-free cloth and dispose of an emergency, you move the machine, grasp the side hand holds that are not...
... starting a fire. DO NOT carry the machine by holding scanner unit. To prevent injuries when moving or lifting this might cause the toner dust to clean up scattered toner. DO NOT use at the wall jack. To prevent injuries, be careful not to put your hands on the edge of the... under the document cover. To prevent injuries, be installed near an AC power outlet that are located at the bottom of the machine. Please carefully clean the toner dust with a dry, lint-free cloth and dispose of an emergency, you move the machine, grasp the side hand holds that are not...

Users Manual - English
Page 117
... and on page 152 for example, near a bath tub, wash bowl, kitchen sink, washing machine, or in a wet basement or near water, for how to clean the machine. Check with the machine. 5 DO NOT dispose of batteries in the vicinity of the leak. 4 Use only the power cord provided with local... cords during an electrical storm. Safety and legal To reduce the risk of shock or fire, use flammable substances or any type of spray to clean the inside or outside of the machine. CAUTION Lightning and power surges can damage this may explode. DO NOT use only a No. 26 AWG or...
... and on page 152 for example, near a bath tub, wash bowl, kitchen sink, washing machine, or in a wet basement or near water, for how to clean the machine. Check with the machine. 5 DO NOT dispose of batteries in the vicinity of the leak. 4 Use only the power cord provided with local... cords during an electrical storm. Safety and legal To reduce the risk of shock or fire, use flammable substances or any type of spray to clean the inside or outside of the machine. CAUTION Lightning and power surges can damage this may explode. DO NOT use only a No. 26 AWG or...
Users Manual - English
Page 122
Manufactured: BROTHER TECHNOLOGY (SHENZHEN) LTD. Radiation Power: 30 mW Wave Length: 780 - 800 nm Laser Class: Class 3B Important safety instructions A 1 Read all of these openings must be connected to an AC power source within the range indicated on the...product should be attached to a DC power source. DO NOT connect it from the wall outlet before cleaning inside of the product and to protect it to laser products marketed in hazardous invisible radiation exposure. Internal laser radiation Max. The openings should never be placed near or over a radiator or heater. If you are...
Manufactured: BROTHER TECHNOLOGY (SHENZHEN) LTD. Radiation Power: 30 mW Wave Length: 780 - 800 nm Laser Class: Class 3B Important safety instructions A 1 Read all of these openings must be connected to an AC power source within the range indicated on the...product should be attached to a DC power source. DO NOT connect it from the wall outlet before cleaning inside of the product and to protect it to laser products marketed in hazardous invisible radiation exposure. Internal laser radiation Max. The openings should never be placed near or over a radiator or heater. If you are...
Users Manual - English
Page 130
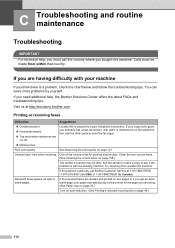
...to see if the problem is caused by yourself. One of the corona wires for the paper you think there is a problem, check the chart below and follow the troubleshooting tips. Clean the four corona wires. (See Cleaning the corona wires on two pages or if you ...auto reduction. (See Printing a reduced incoming fax on page 121. C Troubleshooting and routine maintenance C Troubleshooting C IMPORTANT For technical help , the Brother Solutions Center offers the latest FAQs and troubleshooting tips. If the problem continues, call the country where you must be correct for printing may be...
...to see if the problem is caused by yourself. One of the corona wires for the paper you think there is a problem, check the chart below and follow the troubleshooting tips. Clean the four corona wires. (See Cleaning the corona wires on two pages or if you ...auto reduction. (See Printing a reduced incoming fax on page 121. C Troubleshooting and routine maintenance C Troubleshooting C IMPORTANT For technical help , the Brother Solutions Center offers the latest FAQs and troubleshooting tips. If the problem continues, call the country where you must be correct for printing may be...

Users Manual - English
Page 131
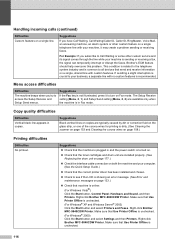
...answer, check the telephone line cord connection. Try sending the fax again. Deactivate the machine by dirt or correction fluid on the glass strip. (See Cleaning the scanner on page 47.) Sending a Fax Call to Basic(for a dial tone. Try avoiding this problem by lifting the handset of memory. To...is probably temporary noise or static on the line as a CNG Tone. Make a copy to hear fax receiving tones before pressing Black Start or Color Start. If you can turn off remote fax options on page 68), print fax messages in and switched on. If you answered on the ...
...answer, check the telephone line cord connection. Try sending the fax again. Deactivate the machine by dirt or correction fluid on the glass strip. (See Cleaning the scanner on page 47.) Sending a Fax Call to Basic(for a dial tone. Try avoiding this problem by lifting the handset of memory. To...is probably temporary noise or static on the line as a CNG Tone. Make a copy to hear fax receiving tones before pressing Black Start or Color Start. If you can turn off remote fax options on page 68), print fax messages in and switched on. If you answered on the ...
Users Manual - English
Page 132
...in and the power switch is turned on. „ Check that machine is dirty. (See Cleaning the scanner on page 153 and Cleaning the corona wires on the glass strip, or one of the corona wires for printing is online: (For Windows Vista®) Click the Start button...Offline is sending or receiving a fax, the signal can temporarily interrupt or disrupt the faxes. Brother's ECM feature should help overcome this problem. Right-click Brother MFC-9840CDW Printer. Right-click Brother MFC-9840CDW Printer. Suggestions If the Fax key is showing an error message. (See Error and maintenance ...
...in and the power switch is turned on. „ Check that machine is dirty. (See Cleaning the scanner on page 153 and Cleaning the corona wires on the glass strip, or one of the corona wires for printing is online: (For Windows Vista®) Click the Start button...Offline is sending or receiving a fax, the signal can temporarily interrupt or disrupt the faxes. Brother's ECM feature should help overcome this problem. Right-click Brother MFC-9840CDW Printer. Right-click Brother MFC-9840CDW Printer. Suggestions If the Fax key is showing an error message. (See Error and maintenance ...
Users Manual - English
Page 137
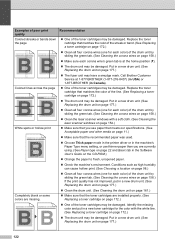
.... abcdefghijklmnopqrstuvwxyz. ABCDEFGHIJKLMNOPQRSTUVWXYZ. 0123456789. abcdefghijklmnopqrstuvwxyz. Identify the missing color and put in a new drum unit. (See Replacing...One of poor print quality White lines or bands or ribbing across the page ABCDEFGHIJKLMNOPQRSTUVWXYZ. 0123456789. ABCDEFGHIJKLMNOPQRSTUVWXYZ. 0123456789. abcdefghijklmnopqrstuvwxyz. abcdefghijklmnopqrstuvwxyz. ABCDEFGHIJKLMNOPQRSTUVWXYZ. 0123456789. A rough surfaced paper or thick print media can resolve a print quality problem by replacing a toner cartridge with a soft cloth. (See Cleaning the laser...
.... abcdefghijklmnopqrstuvwxyz. ABCDEFGHIJKLMNOPQRSTUVWXYZ. 0123456789. abcdefghijklmnopqrstuvwxyz. Identify the missing color and put in a new drum unit. (See Replacing...One of poor print quality White lines or bands or ribbing across the page ABCDEFGHIJKLMNOPQRSTUVWXYZ. 0123456789. ABCDEFGHIJKLMNOPQRSTUVWXYZ. 0123456789. abcdefghijklmnopqrstuvwxyz. abcdefghijklmnopqrstuvwxyz. ABCDEFGHIJKLMNOPQRSTUVWXYZ. 0123456789. A rough surfaced paper or thick print media can resolve a print quality problem by replacing a toner cartridge with a soft cloth. (See Cleaning the laser...
Users Manual - English
Page 138
...See Replacing the drum unit on page 177.) 122 Call Brother Customer Service at the home position (b). „ The drum unit may be damaged. ABCDEFGHIJKLMNOPQRSTUVWXYZ. 0123456789. abcdefghijklmnopqrstuvwxyz. abcdefghijklmnopqrstuvwxyz. Colored lines across the page ABCDEFGHIJKLMNOPQRSTUVWXYZ. 0123456789. abcdefghijklmnopqrstuvwxyz. ABCDEFGHIJKLMNOPQRSTUVWXYZ.... color) of the drum unit by sliding the green tab. (See Cleaning the corona wires on page 158.) „ Clean the laser scanner windows with the white line. (See Replacing a toner cartridge on page 172.) „ One of...
...See Replacing the drum unit on page 177.) 122 Call Brother Customer Service at the home position (b). „ The drum unit may be damaged. ABCDEFGHIJKLMNOPQRSTUVWXYZ. 0123456789. abcdefghijklmnopqrstuvwxyz. abcdefghijklmnopqrstuvwxyz. Colored lines across the page ABCDEFGHIJKLMNOPQRSTUVWXYZ. 0123456789. abcdefghijklmnopqrstuvwxyz. ABCDEFGHIJKLMNOPQRSTUVWXYZ.... color) of the drum unit by sliding the green tab. (See Cleaning the corona wires on page 158.) „ Clean the laser scanner windows with the white line. (See Replacing a toner cartridge on page 172.) „ One of...
Users Manual - English
Page 139
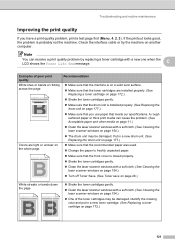
...media on page 11.) „ Install a new toner cartridge for the color causing the problem. (See Replacing a toner cartridge on page 172.) „ Clean the corona wires and the drum unit for the color causing the problem. (See Cleaning the corona wires on page 158.) If the print quality has not ....) „ Install a new toner cartridge for the color causing the problem. (See Replacing a toner cartridge on page 172.) „ Clean the corona wires of the drum unit for the color causing the problem. (See Cleaning the corona wires on page 158 and Cleaning the drum unit on page 161.) If the print...
...media on page 11.) „ Install a new toner cartridge for the color causing the problem. (See Replacing a toner cartridge on page 172.) „ Clean the corona wires and the drum unit for the color causing the problem. (See Cleaning the corona wires on page 158.) If the print quality has not ....) „ Install a new toner cartridge for the color causing the problem. (See Replacing a toner cartridge on page 172.) „ Clean the corona wires of the drum unit for the color causing the problem. (See Cleaning the corona wires on page 158 and Cleaning the drum unit on page 161.) If the print...

Users Manual - English
Page 140
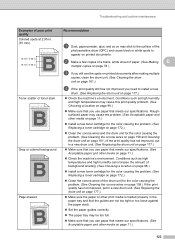
... the problem. (See Acceptable paper and other media on page 11 and Basic tab in the Software User's Guide on your printouts are different. All one color Recommendation „ Make sure that you use paper that the belt unit is installed properly. (See Replacing the belt unit on page 11.) „ Make... using the custom setting in the printer driver. Examples of poor print quality Ghost The color of the drum unit for the color causing the problem. (See Cleaning the corona wires on page 158.) If the print quality has not improved, put in a new drum unit. (See Replacing the drum unit on page...
... the problem. (See Acceptable paper and other media on page 11 and Basic tab in the Software User's Guide on your printouts are different. All one color Recommendation „ Make sure that you use paper that the belt unit is installed properly. (See Replacing the belt unit on page 11.) „ Make... using the custom setting in the printer driver. Examples of poor print quality Ghost The color of the drum unit for the color causing the problem. (See Cleaning the corona wires on page 158.) If the print quality has not improved, put in a new drum unit. (See Replacing the drum unit on page...
Users Manual - English
Page 147
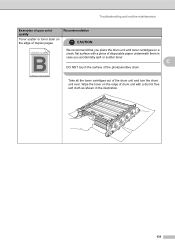
... the toner cartridges out of the photosensitive drum. abcdefghijklmnopqrstuvwxyz. Troubleshooting and routine maintenance Examples of poor print quality Recommendation Toner scatter or toner stain on a clean, flat surface with a dry lint free soft cloth as shown in case you place the drum unit and toner cartridges on the edge of duplex...
... the toner cartridges out of the photosensitive drum. abcdefghijklmnopqrstuvwxyz. Troubleshooting and routine maintenance Examples of poor print quality Recommendation Toner scatter or toner stain on a clean, flat surface with a dry lint free soft cloth as shown in case you place the drum unit and toner cartridges on the edge of duplex...
Users Manual - English
Page 151
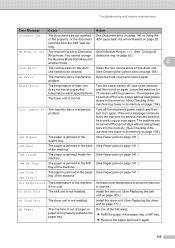
... is not installed. The fuser unit is jammed in the MP (See Paper jams on page 141.) of the machine Increase room temperature to be cleaned. The machine can be turned off for up to 4 days without losing faxes stored in the memory. (See Checking if the machine has faxes in... another mode. The machine can be turned off Ring mode. Fuser Error The temperature of the machine. to print, copy or scan again. problem. Do one of the following: „ Refill the paper in the back (See Paper jams on page 141.) tray of fuser unit does not rise at a specified...
... is not installed. The fuser unit is jammed in the MP (See Paper jams on page 141.) of the machine Increase room temperature to be cleaned. The machine can be turned off for up to 4 days without losing faxes stored in the memory. (See Checking if the machine has faxes in... another mode. The machine can be turned off Ring mode. Fuser Error The temperature of the machine. to print, copy or scan again. problem. Do one of the following: „ Refill the paper in the back (See Paper jams on page 141.) tray of fuser unit does not rise at a specified...
Users Manual - English
Page 161
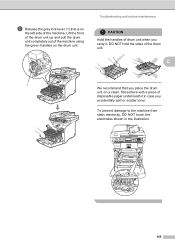
... unit up and pull the drum unit completely out of the drum unit. e Release the gray lock lever (1) that you place the drum unit on a clean, flat surface with a piece of disposable paper underneath it . Troubleshooting and routine maintenance CAUTION Hold the handles of the machine.
... unit up and pull the drum unit completely out of the drum unit. e Release the gray lock lever (1) that you place the drum unit on a clean, flat surface with a piece of disposable paper underneath it . Troubleshooting and routine maintenance CAUTION Hold the handles of the machine.
Users Manual - English
Page 168
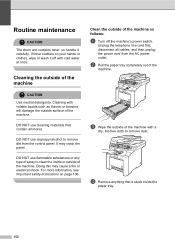
... water at once. Clean the outside of the machine as follows: C a Turn off with volatile liquids such as thinner or benzine will damage the outside of spray to clean the inside the paper tray. 152 DO NOT use flammable substances or any type of the machine. If toner ...scatters on page 106. DO NOT use cleaning materials that is stuck inside or outside surface of the machine C CAUTION Use neutral detergents. For more information, see Important safety instructions on ...
... water at once. Clean the outside of the machine as follows: C a Turn off with volatile liquids such as thinner or benzine will damage the outside of spray to clean the inside the paper tray. 152 DO NOT use flammable substances or any type of the machine. If toner ...scatters on page 106. DO NOT use cleaning materials that is stuck inside or outside surface of the machine C CAUTION Use neutral detergents. For more information, see Important safety instructions on ...

Users Manual - English
Page 169
You may need to remove dust. e Wipe the inside of the paper tray with a dry, lint-free cloth to repeat the cleaning process three or four times. f Re-load the paper and put the paper tray firmly back in the machine. g Plug the machine's power cord back ... cables and telephone line cord. Unplug the telephone line cord first, disconnect all cables and telephone line cord. If you can feel dirt or debris, clean the glass again concentrating on it with a soft lint-free cloth moistened with a non-flammable glass cleaner. 1 C 2 d Plug the machine's power cord back into the...
You may need to remove dust. e Wipe the inside of the paper tray with a dry, lint-free cloth to repeat the cleaning process three or four times. f Re-load the paper and put the paper tray firmly back in the machine. g Plug the machine's power cord back ... cables and telephone line cord. Unplug the telephone line cord first, disconnect all cables and telephone line cord. If you can feel dirt or debris, clean the glass again concentrating on it with a soft lint-free cloth moistened with a non-flammable glass cleaner. 1 C 2 d Plug the machine's power cord back into the...

Users Manual - English
Page 170
DO NOT touch the laser scanner windows with your fingers. Unplug the telephone line cord first, disconnect all cables, and then unplug the power cord from the AC power outlet. Cleaning the laser scanner windows C CAUTION DO NOT use isopropyl alcohol to clean the laser scanner windows. Lift the drum unit up and then pull it out until it stops. c Hold the green handle of the drum unit. a Turn off the machine's power switch. b Press the front cover release button and then open the front cover. 154
DO NOT touch the laser scanner windows with your fingers. Unplug the telephone line cord first, disconnect all cables, and then unplug the power cord from the AC power outlet. Cleaning the laser scanner windows C CAUTION DO NOT use isopropyl alcohol to clean the laser scanner windows. Lift the drum unit up and then pull it out until it stops. c Hold the green handle of the drum unit. a Turn off the machine's power switch. b Press the front cover release button and then open the front cover. 154


