Users Manual - English
Page 6
... USB ...6-11 Improving the print quality ...6-11 Solving print problems ...6-17 7 Appendix ...A-1 Printer specifications ...A-1 Important information for choosing your paper A-6 8 Appendix (For Europe and Other Countries B-1 Brother Numbers ...B-1 Important information: Regulations B-2 Radio interference (220 to 240 volt model only B-2 International ENERGY STAR® Compliance Statement B-2 IEC 60825 specification (220 to 240 volt model...
... USB ...6-11 Improving the print quality ...6-11 Solving print problems ...6-17 7 Appendix ...A-1 Printer specifications ...A-1 Important information for choosing your paper A-6 8 Appendix (For Europe and Other Countries B-1 Brother Numbers ...B-1 Important information: Regulations B-2 Radio interference (220 to 240 volt model only B-2 International ENERGY STAR® Compliance Statement B-2 IEC 60825 specification (220 to 240 volt model...
Users Manual - English
Page 8
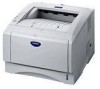
...a Hi-Speed USB 2.0 certified cable if your PC. ■ Please make sure that you connect it to see that is in . 1\ About this printer What is no longer than 6 feet (2 meters). ■ When you use a USB cable, make sure that you use . ■ Most parallel ...USB cable to a non-powered hub or a Mac® keyboard. 1 - 1 ABOUT THIS PRINTER Interface cable ■ An interface cable is not a standard accessory. ■ Some computers have all of the following parts. 1 1 Printer 2 Drum unit and toner cartridge assembly 3 Quick Setup Guide 4 CD-ROM 2 5 AC power cord Components may...
...a Hi-Speed USB 2.0 certified cable if your PC. ■ Please make sure that you connect it to see that is in . 1\ About this printer What is no longer than 6 feet (2 meters). ■ When you use a USB cable, make sure that you use . ■ Most parallel ...USB cable to a non-powered hub or a Mac® keyboard. 1 - 1 ABOUT THIS PRINTER Interface cable ■ An interface cable is not a standard accessory. ■ Some computers have all of the following parts. 1 1 Printer 2 Drum unit and toner cartridge assembly 3 Quick Setup Guide 4 CD-ROM 2 5 AC power cord Components may...

Users Manual - English
Page 79
...Drum Paper Status Figure 3-6 Toner Drum Paper Status Figure 3-7 Toner Drum Paper Status Figure 3-8 Toner Drum Paper Status Figure 3-9 Printer status Data remaining in memory Print data remains in the printer memory. We recommend that the toner cartridge is nearly empty. The Drum LED alternates turning on page 5-9. See Replacing the drum unit... is on for when Toner Empty is near the end of its life. Drum unit near end of life The drum unit is indicated. Toner low Indicates that you obtain a new drum unit to print the remaining data. Purchase a new toner cartridge and have it ...
...Drum Paper Status Figure 3-6 Toner Drum Paper Status Figure 3-7 Toner Drum Paper Status Figure 3-8 Toner Drum Paper Status Figure 3-9 Printer status Data remaining in memory Print data remains in the printer memory. We recommend that the toner cartridge is nearly empty. The Drum LED alternates turning on page 5-9. See Replacing the drum unit... is on for when Toner Empty is near the end of its life. Drum unit near end of life The drum unit is indicated. Toner low Indicates that you obtain a new drum unit to print the remaining data. Purchase a new toner cartridge and have it ...
Users Manual - English
Page 93
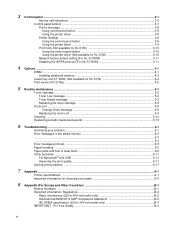
... the maintenance video in the Maintenance Tutorial section of the CD-ROM we have provided with the printer. 1 2 3 4 5 6 7 1 You can see how to replace the toner cartridge. 2 You can see how to replace the drum unit. 3 You can see how to clean the scanner window. 4 You can see how to clean the corona... wire in the drum unit. 5 You can see how to clean the surface of the OPC in the drum unit. 6 You can see how to replace certain parts and clean the printer regularly.
... the maintenance video in the Maintenance Tutorial section of the CD-ROM we have provided with the printer. 1 2 3 4 5 6 7 1 You can see how to replace the toner cartridge. 2 You can see how to replace the drum unit. 3 You can see how to clean the scanner window. 4 You can see how to clean the corona... wire in the drum unit. 5 You can see how to clean the surface of the OPC in the drum unit. 6 You can see how to replace certain parts and clean the printer regularly.
Users Manual - English
Page 96
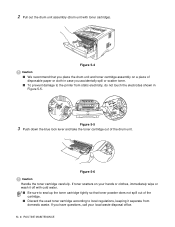
Figure 5-4 Caution ■ We recommend that toner powder does not spill out of the drum unit. If you accidentally spill or scatter toner. ■ To prevent damage to the printer from domestic waste. Figure 5-5 3 Push down the blue lock lever and take the toner cartridge out of the cartridge. ...■ Discard the used toner cartridge according to seal up the toner cartridge tightly so that you place the drum unit and toner cartridge assembly ...
Figure 5-4 Caution ■ We recommend that toner powder does not spill out of the drum unit. If you accidentally spill or scatter toner. ■ To prevent damage to the printer from domestic waste. Figure 5-5 3 Push down the blue lock lever and take the toner cartridge out of the cartridge. ...■ Discard the used toner cartridge according to seal up the toner cartridge tightly so that you place the drum unit and toner cartridge assembly ...

Users Manual - English
Page 97
... guarantee your printer. Using or attempting to use of a drum unit. Figure 5-8 ROUTINE MAINTENANCE 5 - 5 Warranty coverage does not apply to use of the printer itself and/or it in your printer may cause damage to replace consumed toner cartridges with only Genuine Brother Branded Supplies....your print quality please continue to the printer itself . We also strongly recommend that you continue to problems caused by the use only Genuine Brother Brand replacement toner cartridges. It may be shortened. ■ If an unpacked drum unit is put in unsatisfactory print quality....
... guarantee your printer. Using or attempting to use of a drum unit. Figure 5-8 ROUTINE MAINTENANCE 5 - 5 Warranty coverage does not apply to use of the printer itself and/or it in your printer may cause damage to replace consumed toner cartridges with only Genuine Brother Branded Supplies....your print quality please continue to the printer itself . We also strongly recommend that you continue to problems caused by the use only Genuine Brother Brand replacement toner cartridges. It may be shortened. ■ If an unpacked drum unit is put in unsatisfactory print quality....

Users Manual - English
Page 98
Caution Put the toner cartridge in the drum unit immediately after you put it in Figure 5-9 and Figure 5-10 to prevent any degradation to the print quality. Figure 5-9 Figure 5-10 6 Put the new toner cartridge firmly into the drum unit you insert the toner cartridge properly or it lock into place. Figure 5-11 Caution Make sure you hear it may separate from the drum unit. 5 - 6 ROUTINE MAINTENANCE Do not touch the shaded parts shown in properly, the lock lever will lift automatically. If you have removed the protective cover.
Caution Put the toner cartridge in the drum unit immediately after you put it in Figure 5-9 and Figure 5-10 to prevent any degradation to the print quality. Figure 5-9 Figure 5-10 6 Put the new toner cartridge firmly into the drum unit you insert the toner cartridge properly or it lock into place. Figure 5-11 Caution Make sure you hear it may separate from the drum unit. 5 - 6 ROUTINE MAINTENANCE Do not touch the shaded parts shown in properly, the lock lever will lift automatically. If you have removed the protective cover.
Users Manual - English
Page 99
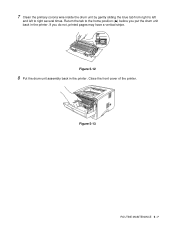
Return the tab to right several times. 7 Clean the primary corona wire inside the drum unit by gently sliding the blue tab from right to left and left to the home position (▲) before you do not, printed pages may have a vertical stripe. Figure 5-12 8 Put the drum unit assembly back in the printer. Close the front cover of the printer. Figure 5-13 ROUTINE MAINTENANCE 5 - 7 If you put the drum unit back in the printer.
Return the tab to right several times. 7 Clean the primary corona wire inside the drum unit by gently sliding the blue tab from right to left and left to the home position (▲) before you do not, printed pages may have a vertical stripe. Figure 5-12 8 Put the drum unit assembly back in the printer. Close the front cover of the printer. Figure 5-13 ROUTINE MAINTENANCE 5 - 7 If you put the drum unit back in the printer.
Users Manual - English
Page 100
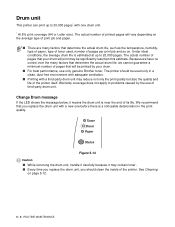
...Brother toner. The printer should be significantly less than this estimate. Change Drum message If the LED shows the message below, it may reduce not only the print quality but also the quality and life of the printer. Toner Drum Paper Status Figure 5-14 Caution ■ While removing the drum unit..., handle it carefully because it means the drum unit is a noticeable deterioration in a clean, dust-free environment with adequate ...
...Brother toner. The printer should be significantly less than this estimate. Change Drum message If the LED shows the message below, it may reduce not only the print quality but also the quality and life of the printer. Toner Drum Paper Status Figure 5-14 Caution ■ While removing the drum unit..., handle it carefully because it means the drum unit is a noticeable deterioration in a clean, dust-free environment with adequate ...
Users Manual - English
Page 101
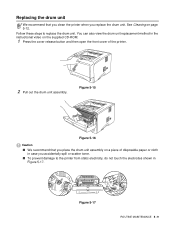
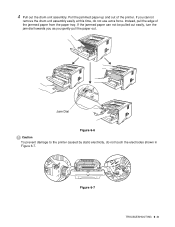
... of disposable paper or cloth in Figure 5-17. Replacing the drum unit We recommend that you place the drum unit assembly on a piece of the printer. 2 Pull out the drum unit assembly. Figure 5-15 Figure 5-16 Caution ■ We recommend that you clean the printer when you replace the drum unit. See Cleaning on page 5-12. Follow these steps to...
... of disposable paper or cloth in Figure 5-17. Replacing the drum unit We recommend that you place the drum unit assembly on a piece of the printer. 2 Pull out the drum unit assembly. Figure 5-15 Figure 5-16 Caution ■ We recommend that you clean the printer when you replace the drum unit. See Cleaning on page 5-12. Follow these steps to...

Users Manual - English
Page 102
... your hands or clothes, immediately wipe or wash it off with cold water. ■ Discard the used drum unit according to unpack a drum unit until you put the cartridge in the printer. Caution Wait to local regulations, keeping it in properly, the blue lock lever will lift automatically. If you... insert the toner cartridge properly, or it lock into the new drum unit until immediately before you hear it may damage the drum unit. 5 Put the ...
... your hands or clothes, immediately wipe or wash it off with cold water. ■ Discard the used drum unit according to unpack a drum unit until you put the cartridge in the printer. Caution Wait to local regulations, keeping it in properly, the blue lock lever will lift automatically. If you... insert the toner cartridge properly, or it lock into the new drum unit until immediately before you hear it may damage the drum unit. 5 Put the ...
Users Manual - English
Page 103
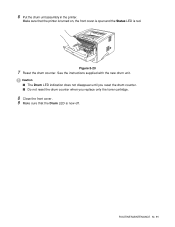
See the instructions supplied with the new drum unit. Caution ■ The Drum LED indication does not disappear until you reset the drum counter. ■ Do not reset the drum counter when you replace only the toner cartridge. 8 Close the front cover. 9 Make sure that the printer is turned on, the front cover is open and the Status LED is now off. Make sure that the Drum LED is red. 6 Put the drum unit assembly in the printer. Figure 5-20 7 Reset the drum counter. ROUTINE MAINTENANCE 5 - 11
See the instructions supplied with the new drum unit. Caution ■ The Drum LED indication does not disappear until you reset the drum counter. ■ Do not reset the drum counter when you replace only the toner cartridge. 8 Close the front cover. 9 Make sure that the printer is turned on, the front cover is open and the Status LED is now off. Make sure that the Drum LED is red. 6 Put the drum unit assembly in the printer. Figure 5-20 7 Reset the drum counter. ROUTINE MAINTENANCE 5 - 11
Users Manual - English
Page 104
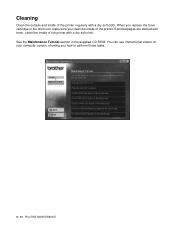
If printed pages are stained with toner, clean the inside of the printer with a dry soft cloth. See the Maintenance Tutorial section in the supplied CD-ROM. You can see instructional videos on your computer screen, showing you clean the inside of the printer. Cleaning Clean the outside and inside of the printer regularly with a dry soft cloth. When you replace the toner cartridge or the drum unit, make sure you how to perform these tasks. 5 - 12 ROUTINE MAINTENANCE
If printed pages are stained with toner, clean the inside of the printer with a dry soft cloth. See the Maintenance Tutorial section in the supplied CD-ROM. You can see instructional videos on your computer screen, showing you clean the inside of the printer. Cleaning Clean the outside and inside of the printer regularly with a dry soft cloth. When you replace the toner cartridge or the drum unit, make sure you how to perform these tasks. 5 - 12 ROUTINE MAINTENANCE

Users Manual - English
Page 106
... Paper handling on page 6-5 and Paper jams and how to the section listed: Printer LED is blinking See LED is blinking on page 3-1. Other problems See Other problems on page 6-17. 6 - 1 TROUBLESHOOTING Printer does not print: If you did not solve your problem and then go to clear... problem First, check the following: ■ The power plug is connected properly and the printer is turned on. ■ All of the protective parts have been removed. ■ The toner cartridge and drum unit are problems with the above checks, please find your problem with : Print quality See Improving...
... Paper handling on page 6-5 and Paper jams and how to the section listed: Printer LED is blinking See LED is blinking on page 3-1. Other problems See Other problems on page 6-17. 6 - 1 TROUBLESHOOTING Printer does not print: If you did not solve your problem and then go to clear... problem First, check the following: ■ The power plug is connected properly and the printer is turned on. ■ All of the protective parts have been removed. ■ The toner cartridge and drum unit are problems with the above checks, please find your problem with : Print quality See Improving...
Users Manual - English
Page 113
Jam Dial Figure 6-6 Caution To prevent damage to the printer caused by static electricity, do not use extra force. Instead, pull the edge of the printer. If the jammed paper can not be pulled out easily, turn the jam dial towards you as you cannot remove the drum unit assembly easily at this time, do not touch the electrodes shown in Figure 6-7. Figure 6-7 TROUBLESHOOTING 6 - 8 If you gently pull the paper out. Pull the jammed paper up and out of the jammed paper from the paper tray. 4 Pull out the drum unit assembly.
Jam Dial Figure 6-6 Caution To prevent damage to the printer caused by static electricity, do not use extra force. Instead, pull the edge of the printer. If the jammed paper can not be pulled out easily, turn the jam dial towards you as you cannot remove the drum unit assembly easily at this time, do not touch the electrodes shown in Figure 6-7. Figure 6-7 TROUBLESHOOTING 6 - 8 If you gently pull the paper out. Pull the jammed paper up and out of the jammed paper from the paper tray. 4 Pull out the drum unit assembly.
Users Manual - English
Page 115
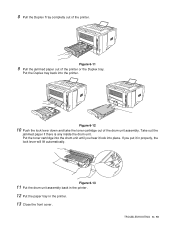
... the toner cartridge out of the printer. If you hear it in the printer. 13 Close the front cover. TROUBLESHOOTING 6 - 10 Take out the jammed paper if there is any inside the drum unit. Figure 6-13 11 Put the drum unit assembly back in the printer. 12 Put the paper tray in... properly, the lock lever will lift automatically. 8 Pull the Duplex Tray completly out of the drum unit assembly. Put the toner cartridge into the printer. Figure 6-11 9 Pull...
... the toner cartridge out of the printer. If you hear it in the printer. 13 Close the front cover. TROUBLESHOOTING 6 - 10 Take out the jammed paper if there is any inside the drum unit. Figure 6-13 11 Put the drum unit assembly back in the printer. 12 Put the paper tray in... properly, the lock lever will lift automatically. 8 Pull the Duplex Tray completly out of the drum unit assembly. Put the toner cartridge into the printer. Figure 6-11 9 Pull...
Users Manual - English
Page 116
...Toner Save mode in the Hard Disk and that the printer cable is selected. Other problems Problem The printer cannot print. Recommendation ■ Check that it is selected with USB Problem HL-5130 (or HL-5140, HL-5150D and HL-5170DN) does not appear in Chooser (Mac OS®...may cause this print fault. Recommendation ■ Check that the printer is turned on . See Replacing the toner cartridge on page 5-9. 6 - 11 TROUBLESHOOTING See Replacing the drum unit on page 5-3. ■ Try installing a new drum unit. Conditions such as humidity, high temperatures, and so on may ...
...Toner Save mode in the Hard Disk and that the printer cable is selected. Other problems Problem The printer cannot print. Recommendation ■ Check that it is selected with USB Problem HL-5130 (or HL-5140, HL-5150D and HL-5170DN) does not appear in Chooser (Mac OS®...may cause this print fault. Recommendation ■ Check that the printer is turned on . See Replacing the toner cartridge on page 5-9. 6 - 11 TROUBLESHOOTING See Replacing the drum unit on page 5-3. ■ Try installing a new drum unit. Conditions such as humidity, high temperatures, and so on may ...
Users Manual - English
Page 117
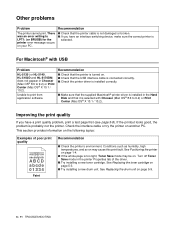
...sure that you choose the appropriate media type in the printer driver, or use ? Rough-surfaced paper may be damaged. Put in Chapter 5. ■ Use a new drum unit. in a new drum unit. in Chapter 1. ■ Choose Thick paper mode in the printer driver. See What kind of paper can I use ...thinner paper than you return the blue tab to the home position (▲). See Replacing the drum unit on page 1-4. ■ Use a new toner cartridge. See Positioning the printer on page 5-9. on page 5-9. ■ Make sure you use ? See What kind of paper can I ...
...sure that you choose the appropriate media type in the printer driver, or use ? Rough-surfaced paper may be damaged. Put in Chapter 5. ■ Use a new drum unit. in a new drum unit. in Chapter 1. ■ Choose Thick paper mode in the printer driver. See What kind of paper can I use ...thinner paper than you return the blue tab to the home position (▲). See Replacing the drum unit on page 1-4. ■ Use a new toner cartridge. See Positioning the printer on page 5-9. on page 5-9. ■ Make sure you use ? See What kind of paper can I ...
Users Manual - English
Page 118
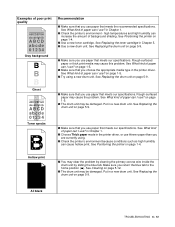
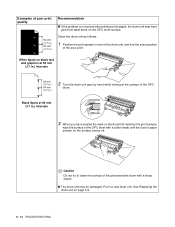
... page 5-9. 6 - 13 TROUBLESHOOTING Black Spots at the surface of the OPC drum. Put in a new drum unit. White Spots on black text and graphics at 94 mm (3.7 in.) intervals 94 mm (3.7 in.) 94 mm (3.7 in.) 2 Turn the drum unit gear by hand while looking at 94 mm (3.7 in.) intervals 3 When you...If the problem is not solved after printing a few pages, the drum unit may be damaged. Caution Do not try to clean the surface of the photosensitive drum with a sharp object. ■ The drum unit may have located the mark on the drum that matches the print sample, wipe the surface of the poor ...
... page 5-9. 6 - 13 TROUBLESHOOTING Black Spots at the surface of the OPC drum. Put in a new drum unit. White Spots on black text and graphics at 94 mm (3.7 in.) intervals 94 mm (3.7 in.) 94 mm (3.7 in.) 2 Turn the drum unit gear by hand while looking at 94 mm (3.7 in.) intervals 3 When you...If the problem is not solved after printing a few pages, the drum unit may be damaged. Caution Do not try to clean the surface of the photosensitive drum with a sharp object. ■ The drum unit may have located the mark on the drum that matches the print sample, wipe the surface of the poor ...
Users Manual - English
Page 119
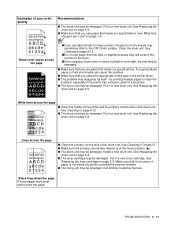
... the primary corona wire in a new drum unit. Lines across the page ABCDEFGH abcdefghijk ABCD abcde 01234 ■ Clean the inside the printer covering the scanner window. ■ The fixing unit may sometimes stick to clear this problem, especially if the printer has not been used for laser printers, the glue from the sheets may be damaged...
... the primary corona wire in a new drum unit. Lines across the page ABCDEFGH abcdefghijk ABCD abcde 01234 ■ Clean the inside the printer covering the scanner window. ■ The fixing unit may sometimes stick to clear this problem, especially if the printer has not been used for laser printers, the glue from the sheets may be damaged...


