
Quick Setup Guide - English
Page 6
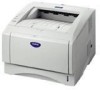
... cable for the interface you use a Hi-Speed USB 2.0 certified cable if your computer uses a Hi-Speed USB 2.0 interface. 4 ■ Getting Started Carton Components Printer 1 2 7 3 4 5 6 1 Face-down Output Tray Support Flap (Support Flap) 2 Control Panel 3 Front Cover Release Button 4 Multi-purpose Tray (MP Tray...Cover 7 Face-down Output Tray (Top Output Tray) CD-ROM (including User's Guide) Quick Setup Guide Drum Unit Assembly (including Toner Cartridge) AC Power Cord Carton components may differ from one country to use a Parallel interface cable or USB interface cable that is not...
... cable for the interface you use a Hi-Speed USB 2.0 certified cable if your computer uses a Hi-Speed USB 2.0 interface. 4 ■ Getting Started Carton Components Printer 1 2 7 3 4 5 6 1 Face-down Output Tray Support Flap (Support Flap) 2 Control Panel 3 Front Cover Release Button 4 Multi-purpose Tray (MP Tray...Cover 7 Face-down Output Tray (Top Output Tray) CD-ROM (including User's Guide) Quick Setup Guide Drum Unit Assembly (including Toner Cartridge) AC Power Cord Carton components may differ from one country to use a Parallel interface cable or USB interface cable that is not...

Quick Setup Guide - English
Page 7
...LED will flash and change color depending on the printer status. 5 Job Cancel Button Will stop and cancel the print operation in progress. 6 Go Button Pause / Continue printing. 6 Printer LED Indications Printer LED Sleep / OFF Toner Warming Up Drum Paper Status Green : Blinking ...: ON : OFF Ready Receiving Data Data Remaining Green Yellow Yellow Printer LED Toner Drum Paper Status Toner Low Yellow *1 Green Toner Empty No Paper/ Drum End...
...LED will flash and change color depending on the printer status. 5 Job Cancel Button Will stop and cancel the print operation in progress. 6 Go Button Pause / Continue printing. 6 Printer LED Indications Printer LED Sleep / OFF Toner Warming Up Drum Paper Status Green : Blinking ...: ON : OFF Ready Receiving Data Data Remaining Green Yellow Yellow Printer LED Toner Drum Paper Status Toner Low Yellow *1 Green Toner Empty No Paper/ Drum End...
Quick Setup Guide - English
Page 10
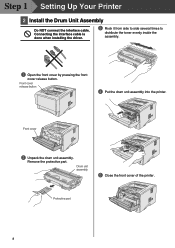
Remove the protective part. Drum unit assembly 5 Close the front cover of the printer. Protective part 8 Connecting the interface cable is done when installing the driver. 3 Rock it from side to side several times to distribute the toner evenly inside the assembly. 1 Open the front cover by pressing the front cover release button. Front cover 2 Unpack the drum unit assembly. Front cover release button 4 Put the drum unit assembly into the printer. Step 1 Setting Up Your Printer 2 Install the Drum Unit Assembly Do NOT connect the interface cable.
Remove the protective part. Drum unit assembly 5 Close the front cover of the printer. Protective part 8 Connecting the interface cable is done when installing the driver. 3 Rock it from side to side several times to distribute the toner evenly inside the assembly. 1 Open the front cover by pressing the front cover release button. Front cover 2 Unpack the drum unit assembly. Front cover release button 4 Put the drum unit assembly into the printer. Step 1 Setting Up Your Printer 2 Install the Drum Unit Assembly Do NOT connect the interface cable.

Quick Setup Guide - English
Page 36
... and Publication Under the supervision of Brother Industries Ltd., this product are subject to change without notice in a Professional Environment. 34 The Printer should also be adequately insured with the carrier. When shipping the Printer, the DRUM UNIT assembly and TONER CARTRIDGE must ship your Printer, carefully package the Printer in the foil bag. ■ Other...
... and Publication Under the supervision of Brother Industries Ltd., this product are subject to change without notice in a Professional Environment. 34 The Printer should also be adequately insured with the carrier. When shipping the Printer, the DRUM UNIT assembly and TONER CARTRIDGE must ship your Printer, carefully package the Printer in the foil bag. ■ Other...


