Users Manual - English
Page 15
... The Alarm Indicator is On or Flashing 6-22 6.8.1 The Alarm Lamp is On ...6-22 6.8.2 The Alarm Lamp is Flashing ...6-22 6.9 Forcing the Printer to Print Remaining Data (When Printing is Halted 6-23 6.10 Cleaning the Density Sensor 6-24 CHAPTER 7 PAPER JAMS ...7-1 7.1 Clearing Paper Jams ...-purpose Tray 7-3 7.3 Paper Jams in the Paper Tray 7-4 7.4 Paper Jams Between the Print Head Cartridge and the Fuser Cartridge 7-6 Paper jams around the print head cartridge 7-6 Paper jams around the fuser cartridge 7-8 Paper longer than 355.6 mm (14 in.) jams 7-9 7.5 Paper Jams in the Paper Rotator...
... The Alarm Indicator is On or Flashing 6-22 6.8.1 The Alarm Lamp is On ...6-22 6.8.2 The Alarm Lamp is Flashing ...6-22 6.9 Forcing the Printer to Print Remaining Data (When Printing is Halted 6-23 6.10 Cleaning the Density Sensor 6-24 CHAPTER 7 PAPER JAMS ...7-1 7.1 Clearing Paper Jams ...-purpose Tray 7-3 7.3 Paper Jams in the Paper Tray 7-4 7.4 Paper Jams Between the Print Head Cartridge and the Fuser Cartridge 7-6 Paper jams around the print head cartridge 7-6 Paper jams around the fuser cartridge 7-8 Paper longer than 355.6 mm (14 in.) jams 7-9 7.5 Paper Jams in the Paper Rotator...

Users Manual - English
Page 16
... A.1 Introduction to the Optional and Consumable Items A-1 A.1.1 Options ...A-1 Hard Disk ...A-1 2 Tray Module...A-1 Memory Expansion Card ...A-1 A.1.2 Consumable Items ...A-2 Toner Cartridges ...A-2 Print Head Cartridge ...A-2 Transfer Roll Cartridge ...A-2 A.2 Getting Product Support Information A-3 A.3 General Specifications ...A-4 A.3.1 Printer Specifications...A-4 A.3.2 Network Specifications...A-7 Common Specifications ...A-7 TCP/IP Specifications ...A-7 NetBIOS Specifications ...A-7 NetWare Specifications...A-7 AppleTalk Specifications ...A-7 A.3.3 Printable Area ...A-8 A.4 Life Span...
... A.1 Introduction to the Optional and Consumable Items A-1 A.1.1 Options ...A-1 Hard Disk ...A-1 2 Tray Module...A-1 Memory Expansion Card ...A-1 A.1.2 Consumable Items ...A-2 Toner Cartridges ...A-2 Print Head Cartridge ...A-2 Transfer Roll Cartridge ...A-2 A.2 Getting Product Support Information A-3 A.3 General Specifications ...A-4 A.3.1 Printer Specifications...A-4 A.3.2 Network Specifications...A-7 Common Specifications ...A-7 TCP/IP Specifications ...A-7 NetBIOS Specifications ...A-7 NetWare Specifications...A-7 AppleTalk Specifications ...A-7 A.3.3 Printable Area ...A-8 A.4 Life Span...

Users Manual - English
Page 21
...%, the ambient temperature should not exceed 65%. When moving the printer, remove the toner cartridges. Do not reuse toner cartridges once you do, condensation may occur inside the printer and can spill inside the printer and deteriorate print quality. • Do not place the printer directly next to an air conditioner or heater, as this affects...
...%, the ambient temperature should not exceed 65%. When moving the printer, remove the toner cartridges. Do not reuse toner cartridges once you do, condensation may occur inside the printer and can spill inside the printer and deteriorate print quality. • Do not place the printer directly next to an air conditioner or heater, as this affects...

Users Manual - English
Page 27
xxvii Loose toner can spill inside the printer and deteriorate print quality. Loose toner can spill inside the printer and deteriorate print quality. • Do not tilt or shake the print head cartridges or transfer roll cartridges when removing them temporarily. • When you remove the transfer roll cartridge from the printer because the waste toner collection box is full, do not attempt to empty the waste toner box and reuse the cartridge, as toner may spill inside the printer and cause damage.
xxvii Loose toner can spill inside the printer and deteriorate print quality. Loose toner can spill inside the printer and deteriorate print quality. • Do not tilt or shake the print head cartridges or transfer roll cartridges when removing them temporarily. • When you remove the transfer roll cartridge from the printer because the waste toner collection box is full, do not attempt to empty the waste toner box and reuse the cartridge, as toner may spill inside the printer and cause damage.

Users Manual - English
Page 43
... prevent paper from overheating. Open to load items such as a guide to control the printer. Use this tray to clear paper jams, replace the print head cartridge, or transfer roll cartridge. Use the buttons and display to refill the paper tray. 3-1 Lift to prevent it from falling when ... 10 Button B 11 Button A 12 Paper Meter Description Load paper here. Make sure that the exhaust grilles are never obstructed. The printer's power switch. Allows internal heat to open the upper part of the illustration above. Use button B to turn it is printed. CHAPTER 3 BASIC...
... prevent paper from overheating. Open to load items such as a guide to control the printer. Use this tray to clear paper jams, replace the print head cartridge, or transfer roll cartridge. Use the buttons and display to refill the paper tray. 3-1 Lift to prevent it from falling when ... 10 Button B 11 Button A 12 Paper Meter Description Load paper here. Make sure that the exhaust grilles are never obstructed. The printer's power switch. Allows internal heat to open the upper part of the illustration above. Use button B to turn it is printed. CHAPTER 3 BASIC...
Users Manual - English
Page 44
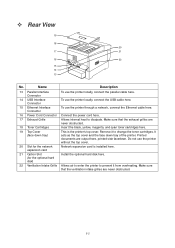
... the exhaust grilles are output here, printed side facedown. Do not use the printer through a network, connect the Ethernet cable here. 16 Power Cord Connector Connect the power cord here. 17 Exhaust Grille Allows internal heat to change the toner cartridges. It acts as the top cover and the face down tray) This...
... the exhaust grilles are output here, printed side facedown. Do not use the printer through a network, connect the Ethernet cable here. 16 Power Cord Connector Connect the power cord here. 17 Exhaust Grille Allows internal heat to change the toner cartridges. It acts as the top cover and the face down tray) This...
Users Manual - English
Page 116
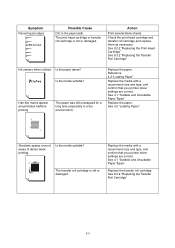
... 8.2.2 "Replacing the Print Head Cartridge" See 8.3.2 "Replacing the Transfer Roll Cartridge" 6-8 See 8.2.2 "Replacing the Print Head Cartridge" The print head cartridge or transfer roll cartridge is old or damaged. Action Replace the media with a recommend size and type, and confirm that your dealer or Brother authorized service representative. See "Help" Contact your printer driver settings are printed...
... 8.2.2 "Replacing the Print Head Cartridge" See 8.3.2 "Replacing the Transfer Roll Cartridge" 6-8 See 8.2.2 "Replacing the Print Head Cartridge" The print head cartridge or transfer roll cartridge is old or damaged. Action Replace the media with a recommend size and type, and confirm that your dealer or Brother authorized service representative. See "Help" Contact your printer driver settings are printed...
Users Manual - English
Page 117
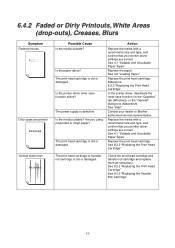
... a dry environment). Replace the media with a recommend size and type, and confirm that your printer driver settings are correct. The print head cartridge or transfer roll cartridge is old or damaged. Reference 4.2 "Loading Paper" Replace the media with a recommend size and type, and confirm that your printer driver settings are correct. The transfer roll...
... a dry environment). Replace the media with a recommend size and type, and confirm that your printer driver settings are correct. The print head cartridge or transfer roll cartridge is old or damaged. Reference 4.2 "Loading Paper" Replace the media with a recommend size and type, and confirm that your printer driver settings are correct. The transfer roll...
Users Manual - English
Page 118
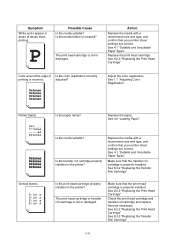
adjusted? See 8.2.2 "Replacing the Print Head Cartridge" See 8.3.2 "Replacing the Transfer Roll Cartridge" 6-10 See 4.1 "Suitable and Unsuitable Paper Types" Replace the print head cartridge. Adjust the color registration. See 8.3.2 "Replacing the Transfer Roll Cartridge" Is the print head cartridge properly installed in the printer? Possible Cause Is the media suitable? Replace the media with a recommend size and...
adjusted? See 8.2.2 "Replacing the Print Head Cartridge" See 8.3.2 "Replacing the Transfer Roll Cartridge" 6-10 See 4.1 "Suitable and Unsuitable Paper Types" Replace the print head cartridge. Adjust the color registration. See 8.3.2 "Replacing the Transfer Roll Cartridge" Is the print head cartridge properly installed in the printer? Possible Cause Is the media suitable? Replace the media with a recommend size and...

Users Manual - English
Page 119
...foreign object jammed in the printer? Is the transfer roll cartridge properly installed in the printer? Is the paper guide in the multi-purpose tray set at the correct mark. See 4.1 "Suitable and Unsuitable Paper Types" Push the paper tray completely back into the printer? See 4.2.1 "Load ... your dealer or Brother authorized service representative. Did you using warped paper? See 4.2.2 "Load A5 Paper in the paper tray. If you cannot remove the obstruction, turn off and remove the jammed paper or foreign object. See 8.3.2 "Replacing the Transfer Roll Cartridge" In the paper...
...foreign object jammed in the printer? Is the transfer roll cartridge properly installed in the printer? Is the paper guide in the multi-purpose tray set at the correct mark. See 4.1 "Suitable and Unsuitable Paper Types" Push the paper tray completely back into the printer? See 4.2.1 "Load ... your dealer or Brother authorized service representative. Did you using warped paper? See 4.2.2 "Load A5 Paper in the paper tray. If you cannot remove the obstruction, turn off and remove the jammed paper or foreign object. See 8.3.2 "Replacing the Transfer Roll Cartridge" In the paper...

Users Manual - English
Page 126
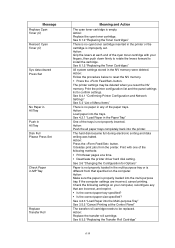
... Density Sensor" The density sensor is empty. See 6.10 "Cleaning the Density Sensor" There is paper jammed in the printer or the cartridge is no yellow toner cartridge inserted in the printer. See Chapter 7 "Paper Jams" There is no paper jammed in the paper rotator used for duplex printing. Action: Press... media. Make sure there is paper jammed in the paper trays. See 7.4 "Paper Jams Between the Print Head Cartridge and Fuser Cartridge" There is no paper jammed in the printer. Action: Grip the levers at each end of the density sensor. Make sure that there is paper jammed in ...
... Density Sensor" The density sensor is empty. See 6.10 "Cleaning the Density Sensor" There is paper jammed in the printer or the cartridge is no yellow toner cartridge inserted in the printer. See Chapter 7 "Paper Jams" There is no paper jammed in the paper rotator used for duplex printing. Action: Press... media. Make sure there is paper jammed in the paper trays. See 7.4 "Paper Jams Between the Print Head Cartridge and Fuser Cartridge" There is no paper jammed in the printer. Action: Grip the levers at each end of the density sensor. Make sure that there is paper jammed in ...
Users Manual - English
Page 127
... See 3.6 "Changing the Configuration for Options" Paper is not properly loaded in the multi-purpose tray or is no cyan toner cartridge inserted in the printer or the cartridge is empty. See 4.2.3 "Load Paper into the multi-purpose tray. Message Replace Cyan Toner (C) Reinsert Cyan Toner (C) Sys data...reset the NV memory. Action: Grip the levers at the Control Panel" The transfer roll cartridge needs to install the cartridge. Action: Push the all paper trays completely back into the trays. The printer settings may be replaced. See 4.2.1 "Load Paper in the NV memory were deleted. ...
... See 3.6 "Changing the Configuration for Options" Paper is not properly loaded in the multi-purpose tray or is no cyan toner cartridge inserted in the printer or the cartridge is empty. See 4.2.3 "Load Paper into the multi-purpose tray. Message Replace Cyan Toner (C) Reinsert Cyan Toner (C) Sys data...reset the NV memory. Action: Grip the levers at the Control Panel" The transfer roll cartridge needs to install the cartridge. Action: Push the all paper trays completely back into the trays. The printer settings may be replaced. See 4.2.1 "Load Paper in the NV memory were deleted. ...
Users Manual - English
Page 128
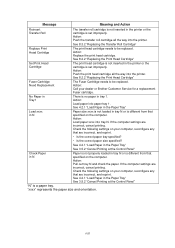
... the printer. Check the following settings on your computer, reconfigure any that are incorrect, and reprint. • Is the correct paper tray specified? • Is the correct paper size specified? If the computer settings are incorrect, cancel printing. Check the following settings on your dealer or Brother Customer Service for a replacement Fuser cartridge...
... the printer. Check the following settings on your computer, reconfigure any that are incorrect, and reprint. • Is the correct paper tray specified? • Is the correct paper size specified? If the computer settings are incorrect, cancel printing. Check the following settings on your dealer or Brother Customer Service for a replacement Fuser cartridge...
Users Manual - English
Page 129
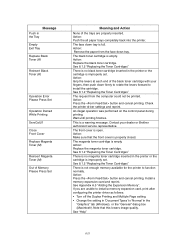
..."Replacing the Toner Cartridges" There is no magenta toner cartridge inserted in the printer or the cartridge is improperly set . Action: Press the button and cancel printing. See 8.1.2 "Replacing the Toner Cartridges" There is no black toner cartridge inserted in the printer or the cartridge is improperly set ... Reinsert Magenta Toner (M) Out of Memory Please Press Set Meaning and Action None of the black toner cartridge with your dealer or Brother authorized service representative. An illegal operation was performed on the control panel during printing. The front cover ...
..."Replacing the Toner Cartridges" There is no magenta toner cartridge inserted in the printer or the cartridge is improperly set . Action: Press the button and cancel printing. See 8.1.2 "Replacing the Toner Cartridges" There is no black toner cartridge inserted in the printer or the cartridge is improperly set ... Reinsert Magenta Toner (M) Out of Memory Please Press Set Meaning and Action None of the black toner cartridge with your dealer or Brother authorized service representative. An illegal operation was performed on the control panel during printing. The front cover ...
Users Manual - English
Page 133
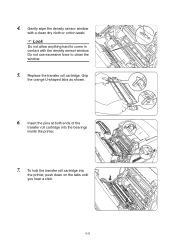
4. Gently wipe the density sensor window with the density sensor window. Grip the orange U-shaped tabs as shown. 6. Insert the pins at both ends of the transfer roll cartridge into the printer, push down on the tabs until you hear a click. 6-25 Look Do not allow anything hard to clean the window. 5. To lock the transfer roll cartridge into the bearings inside the printer. 7. Replace the transfer roll cartridge. Do not use excessive force to come in 1 contact with a clean dry cloth or cotton swab.
4. Gently wipe the density sensor window with the density sensor window. Grip the orange U-shaped tabs as shown. 6. Insert the pins at both ends of the transfer roll cartridge into the printer, push down on the tabs until you hear a click. 6-25 Look Do not allow anything hard to clean the window. 5. To lock the transfer roll cartridge into the bearings inside the printer. 7. Replace the transfer roll cartridge. Do not use excessive force to come in 1 contact with a clean dry cloth or cotton swab.
Users Manual - English
Page 135
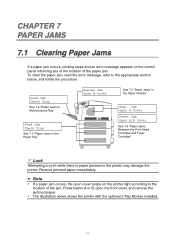
Jam Open A-Cover Fuser Jam Open A/B Cover See 7.4 "Paper Jams Between the Print Head Cartridge and Fuser Cartridge" Look Attempting to the appropriate section below, and follow the procedure. The illustration above shows the printer with the optional 2 Tray Module installed. 7-1 CHAPTER 7 PAPER JAMS 7.1 Clearing Paper Jams If a paper jam occurs, printing stops and...
Jam Open A-Cover Fuser Jam Open A/B Cover See 7.4 "Paper Jams Between the Print Head Cartridge and Fuser Cartridge" Look Attempting to the appropriate section below, and follow the procedure. The illustration above shows the printer with the optional 2 Tray Module installed. 7-1 CHAPTER 7 PAPER JAMS 7.1 Clearing Paper Jams If a paper jam occurs, printing stops and...
Users Manual - English
Page 141
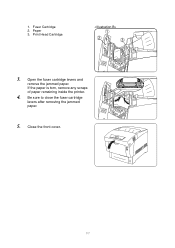
Open the fuser cartridge levers and remove the jammed paper. Be sure to close the fuser cartridge levers after removing the jammed paper. 5. Print Head Cartridge 3. Close the front cover. 7-7 Fuser Cartridge 2. Paper 3. If the paper is torn, remove any scraps of paper remaining inside the printer. 4. 1.
Open the fuser cartridge levers and remove the jammed paper. Be sure to close the fuser cartridge levers after removing the jammed paper. 5. Print Head Cartridge 3. Close the front cover. 7-7 Fuser Cartridge 2. Paper 3. If the paper is torn, remove any scraps of paper remaining inside the printer. 4. 1.

Users Manual - English
Page 142
Push up button 'B' (1) and fully open the front cover (2). 2. Be sure to remove the jammed paper. 1. Paper jams around the fuser cartridge: Follow the procedure below to close the levers at the ends of the fuser cartridge and remove the jammed paper. If the paper is torn, remove any scraps of the fuser cartridge after removing the jammed paper. 4. To prevent burns, do not touch it with your bare hands. 3. Close the front cover. 7-8 Look During operation, the fuser unit 2 (heater) becomes very hot. Open the levers at the ends of paper remaining inside the printer.
Push up button 'B' (1) and fully open the front cover (2). 2. Be sure to remove the jammed paper. 1. Paper jams around the fuser cartridge: Follow the procedure below to close the levers at the ends of the fuser cartridge and remove the jammed paper. If the paper is torn, remove any scraps of the fuser cartridge after removing the jammed paper. 4. To prevent burns, do not touch it with your bare hands. 3. Close the front cover. 7-8 Look During operation, the fuser unit 2 (heater) becomes very hot. Open the levers at the ends of paper remaining inside the printer.

Users Manual - English
Page 147
... to Appendix D "Life Span of Consumables". 8.1.1 Toner Cartridge Handling Precautions Never throw a used toner cartridges. • After moving a toner cartridge from the printer. For more information about when to change consumables, refer...cartridge color). For details about consumables, refer to Appendix A "Introduction to do not replace the toner cartridge when required. Handling Precautions • Never use toner cartridges recommended by Brother. CHAPTER 8 ROUTINE MAINTENANCE AND CONSUMABLE REPLACEMENT 8.1 Replacing the Toner Cartridges The printer uses four toner cartridges...
... to Appendix D "Life Span of Consumables". 8.1.1 Toner Cartridge Handling Precautions Never throw a used toner cartridges. • After moving a toner cartridge from the printer. For more information about when to change consumables, refer...cartridge color). For details about consumables, refer to Appendix A "Introduction to do not replace the toner cartridge when required. Handling Precautions • Never use toner cartridges recommended by Brother. CHAPTER 8 ROUTINE MAINTENANCE AND CONSUMABLE REPLACEMENT 8.1 Replacing the Toner Cartridges The printer uses four toner cartridges...

Users Manual - English
Page 150
Pull the toner seal straight up . Pulling 0 the toner seal diagonally may tear the seal. 9. 6. Grip the levers at each end of the toner cartridge with the corresponding insertion point in the printer and insert it . Replace the top cover. 8-4 Look Pull the toner seal straight up to the ( ) position. 8. Align the toner cartridge with your fingers, then push down firmly to rotate the levers forward to remove it as illustrated. 1. Toner seal 7.
Pull the toner seal straight up . Pulling 0 the toner seal diagonally may tear the seal. 9. 6. Grip the levers at each end of the toner cartridge with the corresponding insertion point in the printer and insert it . Replace the top cover. 8-4 Look Pull the toner seal straight up to the ( ) position. 8. Align the toner cartridge with your fingers, then push down firmly to rotate the levers forward to remove it as illustrated. 1. Toner seal 7.


