Users Manual - English
Page 4
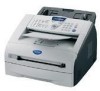
... for Canada) ii You can use only genuine Brother accessories, which are available for purchase.) In USA: 1-877-552-MALL (6255) 1-800-947-1445 (fax) http://www.brothermall.com In Canada: 1-877-BROTHER Description Toner Cartridge Drum Unit Telephone Line Cord Telephone Handset Handset Curled Cord... for USA and Canada) LS0087002 (French for Canada) FAX-2820/FAX-2910/FAX-2920 LS0096001 (English for USA and Canada) LS0096002 (French for Canada) MFC-7220/MFC-7225N LS0097001 (English for USA and Canada) LS0097002 (French for all Brother products. In USA only: 1-800-521-2846 Ordering ...
... for Canada) ii You can use only genuine Brother accessories, which are available for purchase.) In USA: 1-877-552-MALL (6255) 1-800-947-1445 (fax) http://www.brothermall.com In Canada: 1-877-BROTHER Description Toner Cartridge Drum Unit Telephone Line Cord Telephone Handset Handset Curled Cord... for USA and Canada) LS0087002 (French for Canada) FAX-2820/FAX-2910/FAX-2920 LS0096001 (English for USA and Canada) LS0096002 (French for Canada) MFC-7220/MFC-7225N LS0097001 (English for USA and Canada) LS0097002 (French for all Brother products. In USA only: 1-800-521-2846 Ordering ...
Users Manual - English
Page 6
...-284-4329 for Fax, MFC and DCP and 1-800-276-7746 for the cost of local Brother Authorized Service Center(s), call 1-800-521-2846. Supply Brother or the Brother Authorized Service Center...Accessory Items is covered by this warranty. The decision as Paper Feeding Kit, Fuser and Laser Units. What is covered: • This Product includes a Machine and Consumable and ...for parts or labor. and, (5)Problems arising from Brother and/or alteration/removal of consumable, whichever comes first. What to print heads, toner, drums, ink cartridges, print cartridges, refill ribbons, thermal ...
...-284-4329 for Fax, MFC and DCP and 1-800-276-7746 for the cost of local Brother Authorized Service Center(s), call 1-800-521-2846. Supply Brother or the Brother Authorized Service Center...Accessory Items is covered by this warranty. The decision as Paper Feeding Kit, Fuser and Laser Units. What is covered: • This Product includes a Machine and Consumable and ...for parts or labor. and, (5)Problems arising from Brother and/or alteration/removal of consumable, whichever comes first. What to print heads, toner, drums, ink cartridges, print cartridges, refill ribbons, thermal ...
Users Manual - English
Page 8
For laser products: Failure to remove the Toner Cartridge (and Toner Drum Unit on applicable models) during shipping. Damage to your User's Guide for proper packaging.) BROTHER DISCLAIMS ALL OTHER WARRANTIES EXPRESSED OR IMPLIED INCLUDING, WITHOUT LIMITATION, ANY IMPLIED WARRANTIES OF ...Canada only) Pursuant to this limited warranty of 1 year from the date of purchase for labour and parts, Brother International Corporation (Canada) Ltd. ("Brother"), or its Authorized Service Centers, Distributors, Dealers, Agents or employees, shall create another warranty or modify this warranty...
For laser products: Failure to remove the Toner Cartridge (and Toner Drum Unit on applicable models) during shipping. Damage to your User's Guide for proper packaging.) BROTHER DISCLAIMS ALL OTHER WARRANTIES EXPRESSED OR IMPLIED INCLUDING, WITHOUT LIMITATION, ANY IMPLIED WARRANTIES OF ...Canada only) Pursuant to this limited warranty of 1 year from the date of purchase for labour and parts, Brother International Corporation (Canada) Ltd. ("Brother"), or its Authorized Service Centers, Distributors, Dealers, Agents or employees, shall create another warranty or modify this warranty...

Users Manual - English
Page 16
...device 10-3 LAN connection (MFC-7225N only 10-3 Laser safety 10-3 FDA regulations 10-3 Important safety instructions 10-4 Trademarks 10-5 Troubleshooting and routine maintenance Troubleshooting 11-1 Error messages 11-1 Checking if the machine has faxes in the United States only 10-1 Federal Communications ...Commission (FCC) Declaration of the machine 11-9 Paper is jammed inside the machine 11-7 Paper is jammed inside the drum unit and toner cartridge assembly....11-10 xiv...
...device 10-3 LAN connection (MFC-7225N only 10-3 Laser safety 10-3 FDA regulations 10-3 Important safety instructions 10-4 Trademarks 10-5 Troubleshooting and routine maintenance Troubleshooting 11-1 Error messages 11-1 Checking if the machine has faxes in the United States only 10-1 Federal Communications ...Commission (FCC) Declaration of the machine 11-9 Paper is jammed inside the machine 11-7 Paper is jammed inside the drum unit and toner cartridge assembly....11-10 xiv...
Users Manual - English
Page 17
... 11-22 Cleaning the laser scanner window 11-22 Cleaning...Drum Life 11-29 A Appendix A Setting up telephone services A-1 Distinctive Ring A-1 What does your telephone company's 'Distinctive Ring' do A-1 What does Brother...'s 'Distinctive Ring' do A-1 Do you have Voice Mail A-1 Before you choose the ring pattern to register A-2 Registering the Distinctive Ring pattern A-2 Turning off the Distinctive Ring A-2 Caller ID...A-3 Viewing Caller ID List A-3 Printing Caller ID List A-3 Call Waiting A-4 Advanced receiving operations A-4 Operation from extension telephones A-4 For Fax...
... 11-22 Cleaning the laser scanner window 11-22 Cleaning...Drum Life 11-29 A Appendix A Setting up telephone services A-1 Distinctive Ring A-1 What does your telephone company's 'Distinctive Ring' do A-1 What does Brother...'s 'Distinctive Ring' do A-1 Do you have Voice Mail A-1 Before you choose the ring pattern to register A-2 Registering the Distinctive Ring pattern A-2 Turning off the Distinctive Ring A-2 Caller ID...A-3 Viewing Caller ID List A-3 Printing Caller ID List A-3 Call Waiting A-4 Advanced receiving operations A-4 Operation from extension telephones A-4 For Fax...
Users Manual - English
Page 89
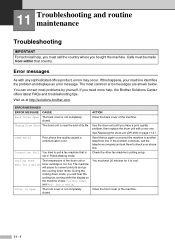
... until you bought the machine. See Replacing the drum unit (DR-350) on the machine shows Cooling Down, and Wait for a while. 11 Troubleshooting and routine maintenance Troubleshooting IMPORTANT For technical help , the Brother Solutions Center offers latest FAQs and troubleshooting tips. The most ...down mode. then replace the drum unit with any sophisticated office product, errors may occur. If the problem continues, call the country where you have a print quality problem; Check the other fax machine's polling setup. Visit us at http://solutions.brother.com. Calls must call the ...
... until you bought the machine. See Replacing the drum unit (DR-350) on the machine shows Cooling Down, and Wait for a while. 11 Troubleshooting and routine maintenance Troubleshooting IMPORTANT For technical help , the Brother Solutions Center offers latest FAQs and troubleshooting tips. The most ...down mode. then replace the drum unit with any sophisticated office product, errors may occur. If the problem continues, call the country where you have a print quality problem; Check the other fax machine's polling setup. Visit us at http://solutions.brother.com. Calls must call the ...
Users Manual - English
Page 90
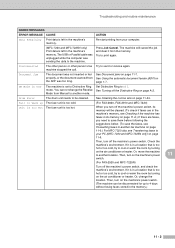
.... Or, move the machine to cool or warm the room by turning on page 11-6. Disconnected The other person or other person's fax Try to print again. Drum Error The drum unit needs to be disconnected for up The fuser unit is too hot or too cold, try to cool or warm the...-7. Press Job Cancel. Unit is too Hot The fuser unit is too hot. (For FAX-2820, FAX-2910 and MFC-7220) When you need to save them before following the suggestions below. (To save the faxes, see Forwarding faxes to another fax machine on page 11-6.) For MFC-7220 also see Checking if the machine has...
.... Or, move the machine to cool or warm the room by turning on page 11-6. Disconnected The other person or other person's fax Try to print again. Drum Error The drum unit needs to be disconnected for up The fuser unit is too hot or too cold, try to cool or warm the...-7. Press Job Cancel. Unit is too Hot The fuser unit is too hot. (For FAX-2820, FAX-2910 and MFC-7220) When you need to save them before following the suggestions below. (To save the faxes, see Forwarding faxes to another fax machine on page 11-6.) For MFC-7220 also see Checking if the machine has...
Users Manual - English
Page 92
...is not installed or it is full. Toner Life End The toner cartridge and drum unit Re-install the toner cartridge and drum unit assembly. Replace the toner cartridge with a new one. (See -OR- Clear the faxes from the memory. (See Out of Memory message on page 8-7.) (Printing operation... in the paper tray (See Paper jams on the CD-ROM.) (FAX-2820 and FAX-2920 only) For details regarding print resolution and printer memory, please see the Printer Manual which can be downloaded from the solutions.brother.com Web site. -OR- Troubleshooting and routine maintenance ERROR MESSAGES ERROR...
...is not installed or it is full. Toner Life End The toner cartridge and drum unit Re-install the toner cartridge and drum unit assembly. Replace the toner cartridge with a new one. (See -OR- Clear the faxes from the memory. (See Out of Memory message on page 8-7.) (Printing operation... in the paper tray (See Paper jams on the CD-ROM.) (FAX-2820 and FAX-2920 only) For details regarding print resolution and printer memory, please see the Printer Manual which can be downloaded from the solutions.brother.com Web site. -OR- Troubleshooting and routine maintenance ERROR MESSAGES ERROR...
Users Manual - English
Page 96
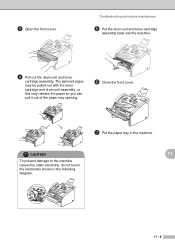
Troubleshooting and routine maintenance 5 Put the drum unit and toner cartridge assembly back into the machine. 4 Pull out the drum unit and toner cartridge assembly. The jammed paper may be pulled out with the toner cartridge and drum unit assembly, or this may release the paper so you can pull it out of the paper tray opening. 6 Close the front cover. 7 Put the paper tray in the following diagram. 11 - 8 3 Open the front cover. CAUTION 11 To prevent damage to the machine caused by static electricity, do not touch the electrodes shown in the machine.
Troubleshooting and routine maintenance 5 Put the drum unit and toner cartridge assembly back into the machine. 4 Pull out the drum unit and toner cartridge assembly. The jammed paper may be pulled out with the toner cartridge and drum unit assembly, or this may release the paper so you can pull it out of the paper tray opening. 6 Close the front cover. 7 Put the paper tray in the following diagram. 11 - 8 3 Open the front cover. CAUTION 11 To prevent damage to the machine caused by static electricity, do not touch the electrodes shown in the machine.
Users Manual - English
Page 97
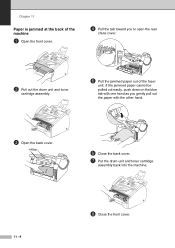
If the jammed paper cannot be pulled out easily, push down on the blue tab with one hand as you to open the rear chute cover. 2 Pull out the drum unit and toner cartridge assembly. 5 Pull the jammed paper out of the machine 1 Open the front cover. 4 Pull the tab toward you gently pull out the paper with the other hand. 3 Open the back cover. 6 Close the back cover. 7 Put the drum unit and toner cartridge assembly back into the machine. 11 - 9 8 Close the front cover. Chapter 11 Paper is jammed at the back of the fuser unit.
If the jammed paper cannot be pulled out easily, push down on the blue tab with one hand as you to open the rear chute cover. 2 Pull out the drum unit and toner cartridge assembly. 5 Pull the jammed paper out of the machine 1 Open the front cover. 4 Pull the tab toward you gently pull out the paper with the other hand. 3 Open the back cover. 6 Close the back cover. 7 Put the drum unit and toner cartridge assembly back into the machine. 11 - 9 8 Close the front cover. Chapter 11 Paper is jammed at the back of the fuser unit.
Users Manual - English
Page 98
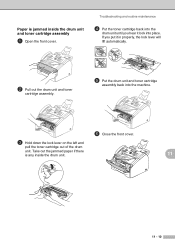
...properly, the lock lever will lift automatically. 2 Pull out the drum unit and toner cartridge assembly. 5 Put the drum unit and toner cartridge assembly back into place. Troubleshooting and routine maintenance 4 Put the toner cartridge back into the drum unit until you put it lock into the machine. 6 Close ...front cover. 3 Hold down the lock lever on the left and pull the toner cartridge out of the drum unit. Take out the jammed paper if there is jammed inside the drum unit. 11 11 - 10 Paper is any inside the drum unit and toner cartridge assembly 1 Open the front cover.
...properly, the lock lever will lift automatically. 2 Pull out the drum unit and toner cartridge assembly. 5 Put the drum unit and toner cartridge assembly back into place. Troubleshooting and routine maintenance 4 Put the toner cartridge back into the drum unit until you put it lock into the machine. 6 Close ...front cover. 3 Hold down the lock lever on the left and pull the toner cartridge out of the drum unit. Take out the jammed paper if there is jammed inside the drum unit. 11 11 - 10 Paper is any inside the drum unit and toner cartridge assembly 1 Open the front cover.
Users Manual - English
Page 100
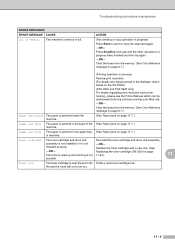
...Fax Storage (See Turning off Remote Fax Options on page 6-4), print fax messages in memory (See Printing a fax...Fax key is crucial to your machine, it to sounds. Brother... the faxes. To gain extra memory, you send a PC FAX message ...Fax or Polling Job (See Canceling a fax in Fax mode. Try sending the fax again. Custom features on a single, shared line with fax receiving tones. If you may create a problem sending or receiving faxes...sending or receiving a fax, the signal can ...Hears' Voice as a calling fax machine and respond with custom ... Brother machine handles the Caller ID ...
...Fax Storage (See Turning off Remote Fax Options on page 6-4), print fax messages in memory (See Printing a fax...Fax key is crucial to your machine, it to sounds. Brother... the faxes. To gain extra memory, you send a PC FAX message ...Fax or Polling Job (See Canceling a fax in Fax mode. Try sending the fax again. Custom features on a single, shared line with fax receiving tones. If you may create a problem sending or receiving faxes...sending or receiving a fax, the signal can ...Hears' Voice as a calling fax machine and respond with custom ... Brother machine handles the Caller ID ...
Users Manual - English
Page 101
... is plugged in its memory will not accept print. The machine prints unexpectedly or it prints garbage. (For FAX-2820, FAX-2910 and MFC-7220) When you turn off the machine's power switch and then turn it is online. ...document and try it again. (The machine can print 62 lines per page. Right-click 'Brother MFC-XXXX,' (where XXXX is set up to allow for several minutes and then try it again. ...turned On. (See the Quick Setup Guide.) -OR- • The toner cartridge and drum unit are faxes you connect the machine's cable correctly. (See the Quick Setup Guide.) The machine cannot...
... is plugged in its memory will not accept print. The machine prints unexpectedly or it prints garbage. (For FAX-2820, FAX-2910 and MFC-7220) When you turn off the machine's power switch and then turn it is online. ...document and try it again. (The machine can print 62 lines per page. Right-click 'Brother MFC-XXXX,' (where XXXX is set up to allow for several minutes and then try it again. ...turned On. (See the Quick Setup Guide.) -OR- • The toner cartridge and drum unit are faxes you connect the machine's cable correctly. (See the Quick Setup Guide.) The machine cannot...
Users Manual - English
Page 104
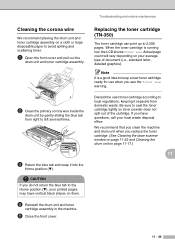
... may cause this problem occurs when making copies or printing received faxes, turn off Toner Save mode in the machine itself. (See Toner Save on page 2-7.) Clean the scanner window and the primary corona wire on the drum unit. (See Cleaning the laser scanner window on page 11-22 and Cleaning the corona... wire on page 11-24.) If the print quality has not improved, install a new drum unit. (See Replacing the drum unit (DR-350) on page 11-27.) Install a new...
... may cause this problem occurs when making copies or printing received faxes, turn off Toner Save mode in the machine itself. (See Toner Save on page 2-7.) Clean the scanner window and the primary corona wire on the drum unit. (See Cleaning the laser scanner window on page 11-22 and Cleaning the corona... wire on page 11-24.) If the print quality has not improved, install a new drum unit. (See Replacing the drum unit (DR-350) on page 11-27.) Install a new...
Users Manual - English
Page 105
...improved you will know the exact position on page 8-2.) If you check the surface of the OPC drum. Make a few copies of a blank, white sheet of paper. (See Making multiple copies on the drum that is photosensitive so do not touch it with a cotton swab that is causing the poor ...use a scrubbing or wiping motion because this might damage the drum. 11 - 17 Do not try to clean the surface of the OPC drum with isopropyl alcohol. The OPC drum is lightly dampened with a sharp object, such as follows: 1 Remove the drum unit and toner cartridge assembly, and then remove the toner ...
...improved you will know the exact position on page 8-2.) If you check the surface of the OPC drum. Make a few copies of a blank, white sheet of paper. (See Making multiple copies on the drum that is photosensitive so do not touch it with a cotton swab that is causing the poor ...use a scrubbing or wiping motion because this might damage the drum. 11 - 17 Do not try to clean the surface of the OPC drum with isopropyl alcohol. The OPC drum is lightly dampened with a sharp object, such as follows: 1 Remove the drum unit and toner cartridge assembly, and then remove the toner ...
Users Manual - English
Page 106
...-22.) The toner cartridge may sometimes stick to clear this problem, especially if the machine has not been used for laser printers, the glue from the sheets may be damaged. Call Brother Customer Service at the home position (▲). If you don't use paper that the guides are using the manual feed... and then rotate the paper 180° in the paper tray too long. Make sure that you use paper that a torn piece of the drum unit. The drum unit may be damaged. Make sure the primary corona wire blue tab is loaded properly in the Software User's Guide on page 11-27...
...-22.) The toner cartridge may sometimes stick to clear this problem, especially if the machine has not been used for laser printers, the glue from the sheets may be damaged. Call Brother Customer Service at the home position (▲). If you don't use paper that the guides are using the manual feed... and then rotate the paper 180° in the paper tray too long. Make sure that you use paper that a torn piece of the drum unit. The drum unit may be damaged. Make sure the primary corona wire blue tab is loaded properly in the Software User's Guide on page 11-27...

Users Manual - English
Page 108
.... 3 Unplug the machine from the AC power outlet. 4 Unplug all the cables from the machine. 5 Open the front cover. 6 Remove the drum unit and toner cartridge assembly. Unless interference is a recurring problem on the phone line, we recommend that came with your machine. Leave the toner cartridge... on your phone line, you may prefer to use the packing materials that you change the Compatibility to Basic, the ECM feature is available for fax operations. 1 Press Menu/Set, 2, 0, 1. 1.Compatibility 2 Press ▲ or ▼ to select Basic or Normal (or High*). The machine should be ...
.... 3 Unplug the machine from the AC power outlet. 4 Unplug all the cables from the machine. 5 Open the front cover. 6 Remove the drum unit and toner cartridge assembly. Unless interference is a recurring problem on the phone line, we recommend that came with your machine. Leave the toner cartridge... on your phone line, you may prefer to use the packing materials that you change the Compatibility to Basic, the ECM feature is available for fax operations. 1 Press Menu/Set, 2, 0, 1. 1.Compatibility 2 Press ▲ or ▼ to select Basic or Normal (or High*). The machine should be ...
Users Manual - English
Page 109
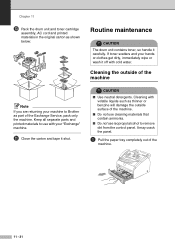
... the machine. 11 - 21 Keep all separate parts and printed materials to use isopropyl alcohol to Brother as shown below: Routine maintenance CAUTION The drum unit contains toner, so handle it carefully. Chapter 11 0 Pack the drum unit and toner cartridge assembly, AC cord and printed materials in the original carton as part...
... the machine. 11 - 21 Keep all separate parts and printed materials to use isopropyl alcohol to Brother as shown below: Routine maintenance CAUTION The drum unit contains toner, so handle it carefully. Chapter 11 0 Pack the drum unit and toner cartridge assembly, AC cord and printed materials in the original carton as part...

Users Manual - English
Page 111
Laser Scanner Window 4 Put the drum unit and toner cartridge assembly back into the AC power outlet first, and then plug in the diagram below . 5 Close the front cover. 6 Plug the machine's power cord back into the machine. When you have used the machine, some internal parts of the machine, ...below . Turn on the machine's power switch. 11 - 23 Chapter 11 2 Open the front cover and pull out the drum unit and toner cartridge assembly. 3 Gently clean the laser scanner window by wiping it with a clean soft, dry cloth. Do not use isopropyl alcohol. WARNING Just after you open...
Laser Scanner Window 4 Put the drum unit and toner cartridge assembly back into the AC power outlet first, and then plug in the diagram below . 5 Close the front cover. 6 Plug the machine's power cord back into the machine. When you have used the machine, some internal parts of the machine, ...below . Turn on the machine's power switch. 11 - 23 Chapter 11 2 Open the front cover and pull out the drum unit and toner cartridge assembly. 3 Gently clean the laser scanner window by wiping it with a clean soft, dry cloth. Do not use isopropyl alcohol. WARNING Just after you open...
Users Manual - English
Page 112
... low, the LCD shows Toner Low. Troubleshooting and routine maintenance Cleaning the corona wire We recommend placing the drum unit and toner cartridge assembly on them. 4 Reinstall the drum unit and toner cartridge assembly in the machine. 5 Close the front cover. CAUTION If you replace the ...toner cartridge. (See Cleaning the laser scanner window on page 11-22 and Cleaning the drum unit on your local waste disposal office. ...
... low, the LCD shows Toner Low. Troubleshooting and routine maintenance Cleaning the corona wire We recommend placing the drum unit and toner cartridge assembly on them. 4 Reinstall the drum unit and toner cartridge assembly in the machine. 5 Close the front cover. CAUTION If you replace the ...toner cartridge. (See Cleaning the laser scanner window on page 11-22 and Cleaning the drum unit on your local waste disposal office. ...


