Users Manual - English
Page 3
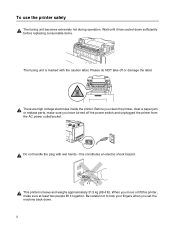
... The fusing unit becomes extremely hot during operation. Wait until it together. ii There are high voltage electrodes inside the printer. Before you clean the printer, clear a paper jam or replace parts, make sure you move or lift this constitutes an electric shock hazard. When you have turned off ...or damage the label. Do not handle the plug with the caution label. This printer is marked with wet hands - Please do ...
... The fusing unit becomes extremely hot during operation. Wait until it together. ii There are high voltage electrodes inside the printer. Before you clean the printer, clear a paper jam or replace parts, make sure you move or lift this constitutes an electric shock hazard. When you have turned off ...or damage the label. Do not handle the plug with the caution label. This printer is marked with wet hands - Please do ...
Users Manual - English
Page 18
... messages ...6-3 Call service messages ...6-4 Paper jams and how to clear them 6-7 JAM A1 / JAM A2 (paper jam in the paper tray 6-8 JAM B (paper jam at the entrance to the fusing roller 6-9 JAM C (paper jam where the paper comes out of the printer 6-11 JAM D (paper jam in the lower part of the duplex unit 6-13 JAM E (paper jam in the upper part of...
... messages ...6-3 Call service messages ...6-4 Paper jams and how to clear them 6-7 JAM A1 / JAM A2 (paper jam in the paper tray 6-8 JAM B (paper jam at the entrance to the fusing roller 6-9 JAM C (paper jam where the paper comes out of the printer 6-11 JAM D (paper jam in the lower part of the duplex unit 6-13 JAM E (paper jam in the upper part of...
Users Manual - English
Page 27
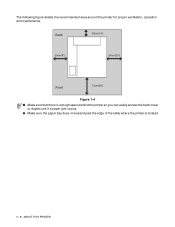
The following figure details the recommended area around the printer for proper ventilation, operation and maintenance. Back 35cm(14") 20cm(8") 50cm(20") Front 70cm(28") Figure 1-4 ■ Make sure that there is enough space behind the printer so you can easily access the back cover or duplex unit if a paper jam occurs. ■ Make sure the paper tray does not extend past the edge of the table where the printer is located. 1 - 9 ABOUT THIS PRINTER
The following figure details the recommended area around the printer for proper ventilation, operation and maintenance. Back 35cm(14") 20cm(8") 50cm(20") Front 70cm(28") Figure 1-4 ■ Make sure that there is enough space behind the printer so you can easily access the back cover or duplex unit if a paper jam occurs. ■ Make sure the paper tray does not extend past the edge of the table where the printer is located. 1 - 9 ABOUT THIS PRINTER
Users Manual - English
Page 30
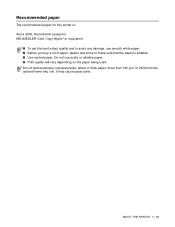
... alkaline paper. ■ Print quality will vary depending on the paper being used. It may cause paper jams. ABOUT THIS PRINTER 1 - 12 Recommended paper The recommended paper for this printer is: Xerox 4200, Hammermill Laserprint NEUSIEDLER Color Copy 90g/m2 or equivalent ■ To get the best output quality and to make sure that...
... alkaline paper. ■ Print quality will vary depending on the paper being used. It may cause paper jams. ABOUT THIS PRINTER 1 - 12 Recommended paper The recommended paper for this printer is: Xerox 4200, Hammermill Laserprint NEUSIEDLER Color Copy 90g/m2 or equivalent ■ To get the best output quality and to make sure that...
Users Manual - English
Page 33
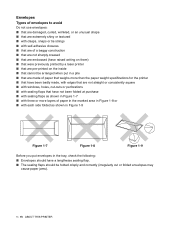
...are not sharply creased ■ that are embossed (have raised writing on them) ■ that were previously printed by a laser printer ■ that are pre-printed on the inside ■ that cannot be arranged when put in a pile ■ that... are made of paper that weighs more than the paper weight specifications for the printer ■ that have been badly made, with edges that are not straight or consistently square ■ with windows, ... should be folded crisply and correctly (irregularly cut or folded envelopes may cause paper jams). 1 - 15 ABOUT THIS PRINTER
...are not sharply creased ■ that are embossed (have raised writing on them) ■ that were previously printed by a laser printer ■ that are pre-printed on the inside ■ that cannot be arranged when put in a pile ■ that... are made of paper that weighs more than the paper weight specifications for the printer ■ that have been badly made, with edges that are not straight or consistently square ■ with windows, ... should be folded crisply and correctly (irregularly cut or folded envelopes may cause paper jams). 1 - 15 ABOUT THIS PRINTER

Users Manual - English
Page 34
... not put different types of paper in the paper tray at the same time because it may cause paper jams or misfeeds. ■ For proper printing, you use any Brother warranty or service agreement. ■ Before you print envelopes, you must choose the same paper size from the...been made. ABOUT THIS PRINTER 1 - 16 Brother will have feed and print-quality problems because of paper can I use . on page 1-10. ■ Envelopes should not be using the envelopes in a laser printer. Feeding direction Figure 1-10 If you must 'fan' the stack to avoid paper jams and misfeeds. ■...
... not put different types of paper in the paper tray at the same time because it may cause paper jams or misfeeds. ■ For proper printing, you use any Brother warranty or service agreement. ■ Before you print envelopes, you must choose the same paper size from the...been made. ABOUT THIS PRINTER 1 - 16 Brother will have feed and print-quality problems because of paper can I use . on page 1-10. ■ Envelopes should not be using the envelopes in a laser printer. Feeding direction Figure 1-10 If you must 'fan' the stack to avoid paper jams and misfeeds. ■...

Users Manual - English
Page 35
...shape. Using labels with a laser printer. Types of labels and transparencies to avoid Do not use labels or transparencies that they cover the entire length and width of the sheet. Brother will not recommend particular labels or...Brother Customer Service. Labels and transparencies exceeding this printer must 'fan' the stack to avoid paper jams and misfeeds. Labels and transparencies The printer will print on the specification of the proper transparencies to purchase, call your printer will be damaged. ■ When feeding transparencies, use the recommended type for laser printers...
...shape. Using labels with a laser printer. Types of labels and transparencies to avoid Do not use labels or transparencies that they cover the entire length and width of the sheet. Brother will not recommend particular labels or...Brother Customer Service. Labels and transparencies exceeding this printer must 'fan' the stack to avoid paper jams and misfeeds. Labels and transparencies The printer will print on the specification of the proper transparencies to purchase, call your printer will be damaged. ■ When feeding transparencies, use the recommended type for laser printers...
Users Manual - English
Page 92
... foot to move them up or down until they touch the work surface and the tray unit is level. This might cause paper jams. OPTIONS 4 - 4 Figure 4-6 8 To level the printer, adjust the feet of the optional lower tray unit. Turn the feet to secure it. Figure 4-7 Do not put transparencies, labels or...
... foot to move them up or down until they touch the work surface and the tray unit is level. This might cause paper jams. OPTIONS 4 - 4 Figure 4-6 8 To level the printer, adjust the feet of the optional lower tray unit. Turn the feet to secure it. Figure 4-7 Do not put transparencies, labels or...
Users Manual - English
Page 128
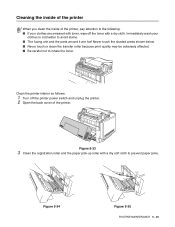
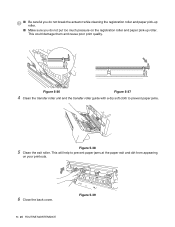
...avoid stains. ■ The fusing unit and the parts around it are smeared with toner, wipe off the printer power switch and unplug the printer. 2 Open the back cover of the printer, pay attention to inhale the toner. Figure 5-33 3 Clean the registration roller and the paper pick-up ...roller with a dry cloth. Clean the printer interior as follows: 1 Turn off the toner with a dry soft cloth to prevent paper jams. Figure 5-...
...avoid stains. ■ The fusing unit and the parts around it are smeared with toner, wipe off the printer power switch and unplug the printer. 2 Open the back cover of the printer, pay attention to inhale the toner. Figure 5-33 3 Clean the registration roller and the paper pick-up ...roller with a dry cloth. Clean the printer interior as follows: 1 Turn off the toner with a dry soft cloth to prevent paper jams. Figure 5-...
Users Manual - English
Page 129
This will help to prevent paper jams. Figure 5-38 5 Clean the exit roller. ■ Be careful you do not break the actuator while cleaning the registration roller and paper pick-up roller. &#... ROUTINE MAINTENANCE Figure 5-39 Figure 5-36 Figure 5-37 4 Clean the transfer roller unit and the transfer roller guide with a dry soft cloth to prevent paper jams at the paper exit and dirt from appearing on the registration roller and paper pick-up roller. This could damage them and cause poor print...
This will help to prevent paper jams. Figure 5-38 5 Clean the exit roller. ■ Be careful you do not break the actuator while cleaning the registration roller and paper pick-up roller. &#... ROUTINE MAINTENANCE Figure 5-39 Figure 5-36 Figure 5-37 4 Clean the transfer roller unit and the transfer roller guide with a dry soft cloth to prevent paper jams at the paper exit and dirt from appearing on the registration roller and paper pick-up roller. This could damage them and cause poor print...
Users Manual - English
Page 134
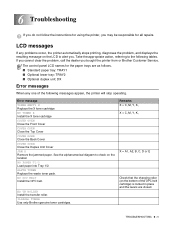
...jammed paper. See the alphanumerical diagram to check on the bottom of the following tables. Remarks X = C, M, Y, K, X = C, M, Y, K, X = A1, A2, B, C, D or E Check that the charging roller (on the location NO PAPER T1/2 Load paper into Tray 1/2. Take the appropriate action, referring to alert you bought the printer from or Brother...LCD to the following messages appear, the printer will stop operating. ILLEGAL TONER Use only Brother genuine toner cartridges. 6 Troubleshooting If you do not follow the instructions for using the printer, you may be responsible for the paper...
...jammed paper. See the alphanumerical diagram to check on the bottom of the following tables. Remarks X = C, M, Y, K, X = C, M, Y, K, X = A1, A2, B, C, D or E Check that the charging roller (on the location NO PAPER T1/2 Load paper into Tray 1/2. Take the appropriate action, referring to alert you bought the printer from or Brother...LCD to the following messages appear, the printer will stop operating. ILLEGAL TONER Use only Brother genuine toner cartridges. 6 Troubleshooting If you do not follow the instructions for using the printer, you may be responsible for the paper...
Users Manual - English
Page 140
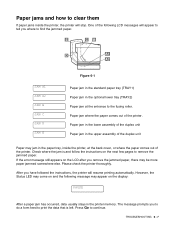
... continue. One of the printer. Please check the printer thoroughly. Press Go to remove the jammed paper. The message prompts you where to find the jammed paper. TROUBLESHOOTING 6 - 7 E CB D A1 A2 JAM A1 JAM A2 JAM B JAM C JAM D JAM E Figure 6-1 Paper jam in the standard paper tray (TRAY1) Paper jam in the paper tray, inside the printer, the printer will appear to tell you...
... continue. One of the printer. Please check the printer thoroughly. Press Go to remove the jammed paper. The message prompts you where to find the jammed paper. TROUBLESHOOTING 6 - 7 E CB D A1 A2 JAM A1 JAM A2 JAM B JAM C JAM D JAM E Figure 6-1 Paper jam in the standard paper tray (TRAY1) Paper jam in the paper tray, inside the printer, the printer will appear to tell you...

Users Manual - English
Page 141
... ■ Moist paper ■ Paper that does not meet specifications JAM A1 / JAM A2 (paper jam in the paper tray) JAM A1 JAM A2 If there is a paper jam in the printer. 4 Open the back cover. If there is creased at the edges, paper jams can occur. ■ Do not touch the toner surface of the... jammed paper. Wash toner stains immediately with toner, print several test ...
... ■ Moist paper ■ Paper that does not meet specifications JAM A1 / JAM A2 (paper jam in the paper tray) JAM A1 JAM A2 If there is a paper jam in the printer. 4 Open the back cover. If there is creased at the edges, paper jams can occur. ■ Do not touch the toner surface of the... jammed paper. Wash toner stains immediately with toner, print several test ...
Users Manual - English
Page 142
... and pulling it slowly toward you. If you . Otherwise, follow the same steps to remove the jammed paper as for JAM C (paper jam where the paper comes out of the printer. 1 Open the back cover. 2 Remove the jammed paper by holding it with both hands and pulling it slowly toward you have the duplex unit...
... and pulling it slowly toward you. If you . Otherwise, follow the same steps to remove the jammed paper as for JAM C (paper jam where the paper comes out of the printer. 1 Open the back cover. 2 Remove the jammed paper by holding it with both hands and pulling it slowly toward you have the duplex unit...
Users Manual - English
Page 143
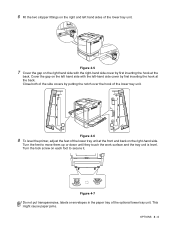
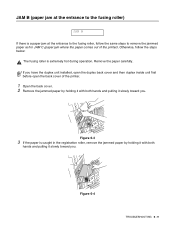
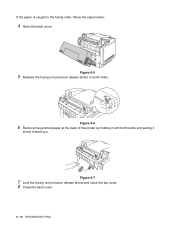
Figure 6-6 6 Remove the jammed paper at the back of the printer by holding it with both sides. Figure 6-5 5 Release the fusing unit pressure release levers on both hands and pulling it slowly toward you. If the paper is caught in the fusing roller, follow the steps below: 4 Open the back cover. Figure 6-7 7 Lock the fusing unit pressure release levers and close the top cover. 8 Close the back cover. 6 - 10 TROUBLESHOOTING
Figure 6-6 6 Remove the jammed paper at the back of the printer by holding it with both sides. Figure 6-5 5 Release the fusing unit pressure release levers on both hands and pulling it slowly toward you. If the paper is caught in the fusing roller, follow the steps below: 4 Open the back cover. Figure 6-7 7 Lock the fusing unit pressure release levers and close the top cover. 8 Close the back cover. 6 - 10 TROUBLESHOOTING
Users Manual - English
Page 144
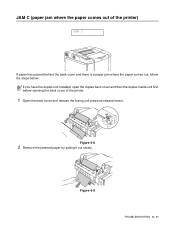
Figure 6-9 TROUBLESHOOTING 6 - 11 Figure 6-8 2 Remove the jammed paper by pulling it out slowly. JAM C (paper jam where the paper comes out of the printer) JAM C If paper has passed behind the back cover and there is a paper jam where the paper comes out, follow the steps below: If you have the duplex unit installed, open the duplex back cover and then the duplex inside unit first before opening the back cover of the printer. 1 Open the back cover and release the fusing unit pressure release levers.
Figure 6-9 TROUBLESHOOTING 6 - 11 Figure 6-8 2 Remove the jammed paper by pulling it out slowly. JAM C (paper jam where the paper comes out of the printer) JAM C If paper has passed behind the back cover and there is a paper jam where the paper comes out, follow the steps below: If you have the duplex unit installed, open the duplex back cover and then the duplex inside unit first before opening the back cover of the printer. 1 Open the back cover and release the fusing unit pressure release levers.
Users Manual - English
Page 146
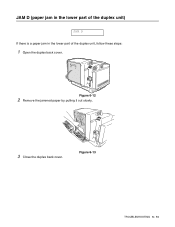
JAM D (paper jam in the lower part of the duplex unit) JAM D If there is a paper jam in the lower part of the duplex unit, follow these steps: 1 Open the duplex back cover. Figure 6-13 TROUBLESHOOTING 6 - 13 Figure 6-12 2 Remove the jammed paper by pulling it out slowly. 3 Close the duplex back cover.
JAM D (paper jam in the lower part of the duplex unit) JAM D If there is a paper jam in the lower part of the duplex unit, follow these steps: 1 Open the duplex back cover. Figure 6-13 TROUBLESHOOTING 6 - 13 Figure 6-12 2 Remove the jammed paper by pulling it out slowly. 3 Close the duplex back cover.

Users Manual - English
Page 147
Figure 6-14 Figure 6-15 6 - 14 TROUBLESHOOTING JAM E (paper jam in the upper part of the duplex unit) JAM E If there is a paper jam in the upper part of the duplex unit, follow these steps: 1 Open the duplex back cover. 2 Open the duplex inside unit.
Figure 6-14 Figure 6-15 6 - 14 TROUBLESHOOTING JAM E (paper jam in the upper part of the duplex unit) JAM E If there is a paper jam in the upper part of the duplex unit, follow these steps: 1 Open the duplex back cover. 2 Open the duplex inside unit.
Users Manual - English
Page 148
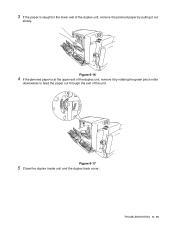
Figure 6-16 4 If the jammed paper is caught in the lower exit of the unit. 3 If the paper is at the upper exit of the duplex unit, remove it by rotating the green pinch roller downwards to feed the paper out through the exit of the duplex unit, remove the jammed paper by pulling it out slowly. TROUBLESHOOTING 6 - 15 Figure 6-17 5 Close the duplex inside unit and the duplex back cover.
Figure 6-16 4 If the jammed paper is caught in the lower exit of the unit. 3 If the paper is at the upper exit of the duplex unit, remove it by rotating the green pinch roller downwards to feed the paper out through the exit of the duplex unit, remove the jammed paper by pulling it out slowly. TROUBLESHOOTING 6 - 15 Figure 6-17 5 Close the duplex inside unit and the duplex back cover.

Users Manual - English
Page 153
...6-1. ■ The HL-2700CN printer is selected in the printer settings in your application. ■ The host is configured properly: check printer port, print manager, etc. (clear stored job or 'use print manager' is turned off) ■ There is no jammed paper inside the printer. ■ Paper ...not displayed on . You can correct most problems yourself. Setting up the printer hardware Question Recommendation The printer does not come on the LCD. Find your HL-2700CN printer. Check the following : ■ The printer is securely plugged into the AC power outlet/socket. ■ The power...
...6-1. ■ The HL-2700CN printer is selected in the printer settings in your application. ■ The host is configured properly: check printer port, print manager, etc. (clear stored job or 'use print manager' is turned off) ■ There is no jammed paper inside the printer. ■ Paper ...not displayed on . You can correct most problems yourself. Setting up the printer hardware Question Recommendation The printer does not come on the LCD. Find your HL-2700CN printer. Check the following : ■ The printer is securely plugged into the AC power outlet/socket. ■ The power...

